Originally Posted At: https://breakingmuscle.com/feed/rss
Few people understand what it truly takes to eat, train, and prepare like a dynastic bodybuilding champion. Lee Haney is one of them. With eight consecutive Mr. Olympia titles from 1984-1991, Haney spent nearly an entire decade at the top of the fitness world. To this day, his eight Olympia titles are tied with fellow legend Ronnie Coleman for the most ever. That’s why a recent interview might paint the picture of a man who doesn’t appreciate where modern bodybuilding stands.
On Feb. 6, 2022, Haney appeared in a podcast episode with Muscular Development. Amidst a discussion of various current events, like the rise of Derek Lunsford, Haney particularly centered on modern conditioning standards for the best of the best. In a few words, he isn’t a fan.
Similarly to Arnold Schwarzenegger, Haney thinks modern bodybuilding is too fixated on size rather than aiming for symmetry and balance. Per the legend, the top names might be larger than ever, but they’re missing vital details that used to be a primary focus during his era.
When one factors in potentially excessive dehydration to display even more muscular detail, Haney thinks this overall mentality comes at a significant cost to the athletes’ health.
“A lot of athletes end up sick or end up dying because of trying to achieve that level of dryness,” Haney explained. “I think we need to change the cultural mindset of what’s happening when it comes to judging these competitions.”
Ultimately, while he appreciates the dedication to competition and fitness, Haney expressed that what bodybuilders are asked of nowadays goes too far. For him, having a long and enjoyable life is more important than having a fruitful, rigid career that could potentially put that at risk.
“At the end of the day, you want to enjoy yourself as an athlete, but you want to walk away with your health,” Haney said. “You shouldn’t have to die to reach this level of conditioning. They’re asking too much of the athletes, period. You look at the former school of bodybuilding. People say ‘old school,’ that is the real school. It is the school. Forget that ‘old school.’ … We reached a level of conditioning that let us walk away after the competition and still be alive, and still be healthy.”
The 63-year-old Haney maintained that previous bodybuilding contest standards let the icons of his era go on to lead long lives. He explained that figures like the late and influential Bill Pearl, three-time Mr. Olympia Frank Zane (1977-1979), and even Schwarzenegger lived or have all reached their senior years, well into their 70s and 80s, for a good reason. Their bodybuilding preparations didn’t ask too much of them.
As such, it might be time to reassess and trace steps back to those past days before it’s too late. Haney suggests that the onus may be on the bodybuilding judges to only reward certain physiques in the context of earlier bodybuilders.
“They remember the fact that we were healthy. Nobody passed out on stage. Maybe we got a little dehydrated, got a little light-headed, but nobody had to call in paramedics to revive anybody. So, there’s a pattern that already exists. I’m saying, let’s get back to those patterns,” Haney said. “It doesn’t take a lot to do that. It just takes a joining of the minds. … I think we have to step back and rewrite, reassess, because the blood of these athletes that are dying, is on your hands. They’re on your hands.”
Haney’s thoughts are noble and worthy of being listened to, especially coming from a legend well-known for suggesting that bodybuilders “stimulate, don’t annihilate” in the gym. For bodybuilding to even consider scaling back to his preferred health ideal will likely take a Yeoman’s effort from everyone involved. That includes competition organizers, athletes, and their coaches seeing the forest for the trees together.
Because if an all-time great thinks the sport isn’t in a quality place, then it could be time to reconsider the dangerous path that lead to this point.
Originally Posted At: https://breakingmuscle.com/feed/rss
Although current social media pages might be filled with so-called “glute girls” who prioritize their posterior in the gym, targeting your glutes and hamstrings isn’t just for likes and shares. A muscular backside also happens to be a key component in performing big feats of strength, as well as driving athletic performance in nearly any sport.
While there are plenty of potential exercises to target your posterior chain — lower back, glutes, and hamstrings — one of the most popular exercises in recent years is the barbell hip thrust.
Credit: Vladimir Sukhachev / Shutterstock
This movement, supporting a weighted barbell across your hips while suspending your upper back on a platform, can be highly effective but it can also be awkward, physically uncomfortable, and difficult to master. To achieve the same end result (and the same result on your end), there are a few equally effective hip thrust alternatives that provide backside size and strength with fewer obstacles.
The conventional deadlift, with its hip-width stance and significant back involvement, is a staple for many lifters focused on muscle-building and strength gains. The sumo deadlift, however, uses a much wider stance to alter leverage and shift muscle recruitment.
The wide-set foot position increases leg drive, allowing the inner thighs (adductors), hamstrings, and glutes to be worked through a long range of motion, which can contribute to muscle growth. (1) The sumo deadlift also allows a more upright torso, which can reduce strain on the lower back, making the exercise ideal for anyone with recurring lower back pain or mobility issues.
When to Use It
As a “big ‘n basic” compound (multi-joint) movement, the sumo deadlift is a heavy hitter in the weight training world and should get top billing in a workout. Perform the exercise as early in the session as possible, as either the first or second exercise after a general warm-up.
Giving the exercise a high priority helps to reap the greatest strength and muscle gains, compared to performing it toward the end of the workout. (2)
How to Do It
Place a barbell on the floor and take a wider than shoulder-width stance. Angle your toes slightly outward and reach down with straight arms. Keep your upper body mostly vertical and bend your legs to grab the bar. Set your hands roughly hip-width apart. Take a breath and flex your abs to create tension.
Squeeze the bar tightly and pull your shoulder blades together. Drive your feet through the ground and apply constant tension to lift the weight — don’t try to abruptly yank the bar off the ground. Keep the bar close to your body as you lift up to full lockout. Reverse direction to replace the bar on the ground.
Split-Stance Romanian Deadlift
The Romanian deadlift is a commonly used deadlift variation to zero-in on the glutes and hamstrings. You can amp up that focus by adopting a split stance, or staggered stance, to emphasize each leg individually. Rather than a pure single-leg movement with your non-working leg entirely off the ground, you can maintain balance while also shifting the majority of muscular stress to the front leg.
Single-leg training, or using a single-leg emphasis, can be as beneficial as bilateral (two-legged) training when it comes to building muscle, strength, and power, while requiring relatively lower loads overall. (3) Getting comparable results with less weight can be especially beneficial for lifters dealing with joint pain.
When to Use It
Even though the split stance provides some balance support, it’s best not to perform the split-stance Romanian deadlift when extremely fatigued (at the end of a training session). Coordination, strength, and stability could be compromised which would make the exercise excessively challenging. Train the split-stance Romanian deadlift relatively earlier in the workout on a dedicated leg day, or as one of the only leg exercises performed in a full-body workout.
How to Do It
Stand upright, holding a barbell with an overhand grip. Take a small step back with your right leg, keeping the toes of your right foot generally in line with the heel of your left foot. Set your feet at least shoulder-width apart until you feel stable. Brace your core, keep your back neutral, and bend forward at your hips. Keep the bar close to your front leg.
Lower the weight until you feel a significant stretch in the hamstrings and glutes of your front leg. Raise the weight without moving your feet. Perform all reps on one side before switching your stance.
Walking Romanian Deadlift
The walking lunge has a well-earned reputation as an intense cardio exercise and a great leg-builder. Both of those benefits can be amplified by swapping the lunge for this deadlift variation. The walking Romanian deadlift cranks up the glute and hamstring activity without compromising any of the conditioning benefits.
When to Use It
The walking Romanian deadlift (or walking RDL) can be performed as an intense finisher at the very end of any workout, not just a leg session, or it can be performed on its own and programmed similar to a cardio/conditioning workout. Don’t feel like jumping on the treadmill? Grab a pair of dumbbells and do some walking RDLs. Rather than specific repetitions, the walking RDL can be performed for a duration (one or two minutes is a good start) or for a total distance (begin with 50 to 100 feet).
How to Do It
Stand with a dumbbell in each hand by your sides. Take a step forward with your left foot. When your foot is fully planted on the ground, slightly bend your left leg and hinge forward at your hips. Keep your back in neutral, not rounded.
Reach the weights toward your front foot as far as is comfortable. Pull your shoulders back to stand upright again. Take a step forward with your right foot. Repeat the hinge forward and reach down. Continue alternating feet with step forward.
Kettlebell Swing
Theswing might be the most frequently performed kettlebell exercise because it delivers a great bang for the training buck. It allows you to build explosive power, top-notch conditioning and endurance, and a muscular posterior chain. If you have access to a kettlebell in your gym or at home, swings should be on the short list of “must-learn exercises.”
When to Use It
The kettlebell swing relies on explosive power, so it’s ideally performed early in a training session or in a workout by itself. If you’ve fine-tuned the technique and can control the movement, you may be able to use it as a finisher toward the end of a workout as long as your grip and lower back (two critical safety elements) aren’t pre-fatigued.
How to Do It
Stand in front of a kettlebell in a relatively wide stance. Hinge forward at your hips, push your glutes back, and grab the top handle with both hands in a palms-down grip. Forcefully drive your hips forward to lift the weight in a fast, powerful snap. Keep your arms mostly straight. Squeeze the handle tightly without actively using your arms to move the weight. Your arms are just for control, the force of movement should come from the initial hip drive.
Flex your core when the weight is at the top position (roughly chest level) and allow the kettlebell to reverse direction as it “falls.” Repeat the hinge with your upper body. As the kettlebell passes just behind your knees, snap your hips forward to begin the next repetition smoothly.
Reverse Hyperextension
If one exercise is repeatedly touted by veteran powerlifters as a way to build the lower back, glute, and hamstring strength needed to squat hundreds upon hundreds of pounds, it’s probably worth considering even for those not interested in lifting a half-ton. The reverse hyperextension has long been advocated in the strength sports world as a way to “injury-proof” the posterior chain.
That’s a large claim that depends on the individual and plenty of factors, but the reverse hyperextension has been shown to work your lower back, glutes, and hamstrings without needing to throw around heavy weights. (4) This makes it an ideal way to work the target muscles without wearing down your body.
When to Use It
This movement is an efficient way to wrap up any leg workout after your lower body is fatigued and fully warmed up. However, performing the reverse hyperextension with light weight for moderate to higher repetition can also be a good addition to your general warm-up routine. The muscle activation and significant stretch can help to prepare your posterior chain for any heavier work to follow.
How to Do It
Some commercial gyms have dedicated reverse hyperextension machines, but the exercise can be performed on a “standard” back hyperextension machine (while facing backwards, holding the leg pads with your hands) or using a exercise ball placed on top of a flat bench, but the ball will be unstable and will require much more core control.
Get into position with your hips and abdominals supported on the pad. Lean forward at your waist and allow your feet to hang freely in the air. Your upper and lower body should form a general L-shape. Contract your glutes to raise your straight legs until they’re roughly parallel to the ground. Pause at the top for one or two seconds. Lower your legs under control. Pause in the stretched position for one or two seconds before repeating.
SHELC
The supine hip extension leg curl, or SHELC, requires an exercise ball and some space to lie on the floor. It’s an efficient way to perform a hip thrust alternative at home with limited equipment. This bodyweight-only exercise is one of the few movements to significantly recruit your hamstrings nearly in isolation, without the help of your larger quadriceps muscles and without adding weight.
When to Use It
The SHELC is versatile enough to be performed at any point in a training routine. Because it’s a bodyweight movement, you may want to pre-fatigue your target muscles with exercises and use the SHELC to finish them or, if the exercise is sufficiently challenging for your legs, perform it earlier in the workout.
How to Do It
Lie on the floor with your legs extended and both heels on top of an exercise ball. Brace your upper body by keeping your arms on the ground. Dig your heels into the ball to raise your hips off the ground — your body should be in a straight line from your feet to your chest.
Curl your feet toward your glutes, pressing down to keep both feet in contact with the ball. Straighten your legs to return to the starting position. Don’t drop your hips until the entire set is completed — perform the leg curl while maintaining the bridged position. If your feet are close to falling off the ball when your legs are curled in, move your heels closer to the top/center of the ball in the starting position.
Single-Leg Glute Bridge
The glute bridge is very similar to the basic hip thrust, minus a bench to elevate your shoulders, so you can get the benefits of a hip thrust without equipment. The single-leg glute bridge can be an efficient exercise choice, especially because the basic (two-legged) glute bridge is often not challenging enough for many lifters.
When to Use It
The single-leg glute bridge only requires some space on the ground, so it can be very easily superset with nearly any exercise to sneak in extra glute and hamstring training at any time. Try pairing them with push-ups for a quick and simple, ground-based, bodyweight-only workout. Or perform a set of single-leg glute bridges before each set of deadlifts to boost glute activation.
How to Do It
Lie flat on the ground with your legs straight. Bend your left leg and place your foot on the ground near your right knee. Keep your right leg straight and raise it until your knees are next to each other. Hold this straight leg position for the duration of the set.
Keep your foot flat on the ground and drive through the floor while raising your hips. You should feel a strong contraction through the back of your left leg. Pause for one to two seconds before lowering your glutes to the floor. Perform all reps with one leg before switching sides.
Single-Leg Landmine Hip Thrust
One highly effective hip thrust alternative is actually a simple hip thrust variation. The landmine allows you to shift the load to a single hip, instead of bearing a long barbell across your entire hip area. This modified hip thrust can be more comfortable for the lifter, while the landmine’s pivoting base offers a unique training angle.
When to Use It
The single-leg landmine hip thrust can be programmed like any hip thrust movement, simply adjust the load as needed. Single-leg training is often overlooked in many training programs, so if your current leg workout doesn’t involve any unilateral movements, consider making the single-leg landmine hip thrust a key player.
How to Do It
Sit on the floor perpendicular to a flat bench with your legs extended straight. Position the end of a landmine above your left hip. Place your left foot flat on the ground near your right knee. Rest your upper back and arms across the bench.
Raise your hips by driving through the floor with your left foot. Brace your core and pivot your upper body around the bench. Pause briefly in the top position — when you’ve reached a straight line from your knees to your shoulders. Lower to the ground under control, being careful not to bounce the weight off the floor. Perform all reps with one leg before switching sides.
Benefits of Hip Thrust Alternatives
You’re not sacrificing results if you’ve opted out of the classic barbell hip thrust. In fact, there are a few specific reasons why a barbell hip thrust alternative could be the preferred choice as a barbell hip thrust replacement.
Avoids Hip Discomfort
Many lifters find the bar’s position during hip thrusts to be too uncomfortable and not worth the trouble. Because the hip thrust requires a barbell to be laid across your hip region, it’s not uncommon for your hip bones to come into contact with the weight, especially if the bar shifts or slides during repetitions. Even on specially designed hip thrust machines, the load is supported directly across your hips via a belt or pad, which can still cause extreme discomfort as the weight pulls down through your pelvis.
Credit: Maridav / Shutterstock
The majority of hip thrust alternatives don’t require weight to be loaded on your hips at all. The single-leg landmine hip thrust, in particular, supports the weight on a single side and the angle of the landmine helps to offset the stress.
Increased Muscle Recruitment
The barbell hip thrust can require some technique, between setting your upper body on the bench, positioning your feet correctly, and maintaining a neutral body position as your hips rise. Any errors in those steps can drastically reduce activation on the target muscles, making the exercise less effective.
These barbell hip thrust alternatives are relatively more simple to master, while targeting the glutes and hamstrings more directly either by using a single-leg emphasis or by reducing contributing muscles and working the target muscles in isolation.
Decreased Lower Back Stress
Some lifters feel lower back strain during the barbell hip thrust, as there can be some mobility requirements to safely and effectively perform the movement. Many of the alternative hip thrust exercises reduce compressive strain on the lower back and don’t require as much hip mobility to perform, which can make the exercises more joint-friendly.
More Ways to Work the Posterior
The hip thrust is a relatively popular exercise, but despite the hashtags, it’s not a mandatory movement for building a powerful, muscular set of glutes and hams. The effective alternatives laid out above can be plugged into any training plan whether your goal is lower body strength, total-body muscle, or the kind of glute and hamstring development that gets trending.
References
Schoenfeld, B. J., & Grgic, J. (2020). Effects of range of motion on muscle development during resistance training interventions: A systematic review. SAGE open medicine, 8, 2050312120901559. https://doi.org/10.1177/2050312120901559
Nunes, J. P., Grgic, J., Cunha, P. M., Ribeiro, A. S., Schoenfeld, B. J., de Salles, B. F., & Cyrino, E. S. (2021). What influence does resistance exercise order have on muscular strength gains and muscle hypertrophy? A systematic review and meta-analysis. European journal of sport science, 21(2), 149–157. https://doi.org/10.1080/17461391.2020.1733672
Speirs, Derrick E.1,2; Bennett, Mark A.3; Finn, Charlotte V.4; Turner, Anthony P.2. Unilateral vs. Bilateral Squat Training for Strength, Sprints, and Agility in Academy Rugby Players. Journal of Strength and Conditioning Research 30(2):p 386-392, February 2016. | DOI: 10.1519/JSC.0000000000001096
Lawrence, M. A., Somma, M. J., & Swanson, B. T. (2022). Effect of Load on Muscle Activity, Kinematics, and Force Production During the Reverse Hyperextension Exercise. Journal of applied biomechanics, 38(5), 336–345. https://doi.org/10.1123/jab.2022-0046
The importance of wrist mobility and strength are almost impossible to overstate. Without a strong, mobile wrist that can fluidly operate across multiple planes, our ability to grab and manipulate things with our hands would be nearly useless. Without the mobile wrist, our manual dexterity doesn’t really exist—our arms become those pincers people use to pick up trash.
You need adequate wrist mobility, whether you work a keyboard for a living (carpal tunnel syndrome), catch barbells in the rack position, throw projectiles, cradle infants, work on cars, cook, drink coffee out of mugs, wave goodbye, play Ultimate Frisbee, or shoot hoops (with good follow through). If you plan on giving awesome high fives or becoming a dominant arm wrestler or engaging at all with the physical world, you absolutely need mobile, strong, durable wrists.
Seriously, though, adequate wrist mobility is important for everyday life and intense exercise alike.
And yet the wrist is a common weak link. Who’s actively training the wrist? There’s no “wrist day” at the gym. Today that changes. Today you learn the proper way to improve mobility and strength at the wrist.
1. Wrist Rolls
Wrist rolls are simple. Lace your fingers together and, using plenty of push-pull oppositional strength, put your wrists through every possible range of motion. Rotation, flexion, extension, adduction, abduction—just make sure you’re fullyextending and fully flexing and fully rotating. Roll them through all ranges of motion.
If you work in front of a computer, I’d recommend doing a few sets of these before and after the work day.
2. Prayer Stretches
Wrist prayer stretches are static stretches that increase in intensity. Put your hands in the prayer position in front of your face: palms and fingers flat against each other, fingers pointing up the ceiling (or sun, or heavens).
Then, while keeping your hands together and fingers still pointing up, bring your hands down toward your navel. Continue descending until you can’t keep your palms touching any longer, then hold it there for 3-5 seconds. Repeat, trying to go lower each time. 12 reps.
3. Palm Lifts
Get on your hand and knees, hands flat on the floor and positioned directly underneath your shoulders (so your arms are a straight line perpendicular to the floor). Slowly lift your palms off the floor while keeping your fingers flat on the ground. At the top, your wrist should be stacked directly over your hand. Try to keep your arm perpendicular to the floor. Hold for 2-3 seconds, then slowly lower your palm to the floor. 2-3 sets of 8-10 reps.
4. Rear Facing Palms Up Wrist Stretch
Get on your hands and knees, back of your hands flat on the floor with the palms facing up and your fingers pointing toward you. This places your wrist in flexion, and by shifting your bodyweight backwards by sitting back on your calves, you go deeper into wrist flexion. Do this carefully and slowly. 2-3 sets of 8-12 reps. Avoid pain, but discomfort is fine.
5. Rear Facing Palms Down Wrist Stretch
Get on your hands and knees, palms of your hands flat on the floor and your fingers point back toward you. This places your wrist in extension, and by shifting your bodyweight backward onto your calves, you go farther into extension. Like the last stretch, be careful, move slowly, and avoid pain. 2-3 sets of 8-12 reps.
6. Weighted Wrist Extension/Flexion
Weighted wrist extensions and flexions strengthen the primary movements our wrists perform. However, many people are biased toward either flexion or extension, and training both patterns with weight can help balance out our strength and mobility.
For extensions:
Hold a dumbbell and place your forearm on a surface with your wrist and hand extending beyond the edge.
Your palm should be facing the floor.
Your wrist should hang down, bent in passive flexion.
Bring your wrist into full extension against the weight’s resistance.
Hold for a half second, then slowly lower it back. Repeat.
For flexions:
Hold a dumbbell and place your forearm on a surface with your wrist and hand extending beyond the edge.
Your palm should face the ceiling.
Your wrist should be hanging in extension.
Curl your wrist up into full flexion against the weight’s resistance.
Hold for a half second, then slower slower it back. Repeat.
For both movements, use a light dumbbell. This isn’t a movement for massive weight. You’re training small but essential movement patterns. 3 sets of 12-15 reps, each wrist.
7. Weighted Pronation/Supination
Beyond just extension and flexion, the wrist can also perform pronation and supination. These are rotational movements at the wrist, used to do things like handle a screwdriver, turn a door handle, or throw an object. They’re important to get strong, because doing so can give you the kind of “farmer strength” that so many people are missing these days.
Supination is moving your wrist in clockwise rotation—external rotation. Palms down to palms up. Pronation is moving your wrist counterclockwise—internal rotation. Palms up to palms down. You need to train both movements, and the best way I’ve found is to do it while holding a heavy mace, club, or sledgehammer in your hands. It’s simple.
Hold the shaft out in front of you with your elbow bent at 90 degrees.
Slowly alternate between supinating and pronating your wrist. Rotate the object counterclockwise, then back up clockwise.
Control the motion. Don’t rush through the movement.
Don’t go too heavy. If the object is too heavy, you can always slide your grip up toward the head to shorten the lever. As you get stronger and progress in the movement, you can slide your grip farther down the shaft to lengthen the lever.
2 sets of 6 reps (3 in each direction) with each arm.
8. Weighted Radial/Ulnar Deviation
Radial and ulnar deviation refers to moving the wrist from side to side. Flexing and extending along the “edges” of the wrist joint, like when you unscrew or screw on a pickle jar lid. Here’s how to train it:
Hold the same object you used for the supination/pronation exercise down at your side. Your arm should be straight and perpendicular with the ground.
For radial deviation, the head of the mace will be out in front of you. Raise the head of the mace by bending at the edge of the wrist, as if you’re raising a flag up to the sky. For ulnar deviation, the head of the mace is behind you. Raise the head of the mace behind you by bending at the other edge of the wrist. Again, you can adjust your grip to shorten or lengthen the lever and change the resistance.
2 sets of 6 reps (3 in each direction) with each arm.
9. Static Hold
The wrist is also a stabilizer. A wrist that can hold its position even as gravity and exterior forces try to destabilize is a strong wrist. If you throw a punch, hold a wrist lock, or carry anything heavy, you want a stable wrist.
The best way to train wrist stability is to do static holds with the very same object you used for the last two exercises. You will hold the mace/sledgehammer/club out in front of you with your elbow bent 90°, and that’s all you’ll do. Just hold that position.
That’s it! You don’t have to do all these exercises all the time. They are assistance exercises, not primary ones. But keep them in your back pocket for whenever you have a few minutes to train, be consistent, and in no time at all you’ll notice your wrist mobility and strength have improved and that your performance in other areas has as well.
Cold? Flu? Tummy troubles? I know that I don’t have time to be sick, and I’m sure you don’t either. Luckily I don’t get sick very often anymore, but back in my competitive athlete days, it felt like I was constantly battling one cold, cough, or sinus infection after another.
Not to toot my own horn, but I chalk up my current good health to my Primal lifestyle. I know for sure that there is a marked before and after—before Primal, when I had a medicine cabinet full of OTC remedies, and after, when I rarely take a sick day. On those occasions when I do detect a tickle in my throat or the first signs of sour stomach, my first course of action is to double down on those aspects of my lifestyle that support a robust immune system, particularly nutrient-dense foods, sleep, and time in the sun.
The food piece is what we’re going to talk about today. Everybody has an opinion about what to eat, or not, when you’re under the weather. I’m not claiming that certain foods can cure the flu or prevent you from coming down with that cold even after your sick kid coughs in your face. But once you’re sick, the name of the game is supporting your immune system by providing it with beneficial nutrients and compounds that could aid it in fighting off the viruses or bacteria that are making you sick in the first place. Some foods will also provide welcome comfort, which is nothing to sneeze at, pun intended.
(I should note that I’m talking today about recovering from short-term issues—common cold, flu, a bout of food poisoning, that sort of thing. Chronic illnesses are a whole other ballgame.)
But maybe you shouldn’t eat anything at all? You’re probably familiar with the old adage, “Feed a cold, starve a fever.” Are you unintentionally doing more harm than good by eating even supposedly “healing” foods?
Let’s dive into it.
Feed a Cold, Starve a Fever? Yes or No?
As usual, it’s complicated.
I’ve covered the issue of fasting with a cold or other illness in depth before, but the short answer is that fasting may be beneficial in the case of a bacterial infection like a sinus infection but probably isn’t beneficial when battling viral illnesses like the common cold or coronaviruses.
Here’s where it gets complicated: bacterial and viral illnesses often go hand-in-hand. You get sick with a virus, your immune defenses become compromised, and a bacterial illness takes root. Thus, it’s not always clear what, exactly, ails you.
Furthermore, both can cause fever as part of a desirable immune response. The idea behind starving a fever is that eating increases body temperature (true). If you’re already “too hot,” you don’t want to pile on. That makes sense on face value. However, fever (or rather, the underlying immune response it represents) is a calorie-intensive process. For every 1 degree Celsius increase in body temperature (1.8 degrees Fahrenheit), metabolic rate ramps up by an estimated 10 percent.1Fasting when you have a fever, regardless of its origin, may make it harder for your body to continue to launch a robust immune response. That’s why the more common recommendation now is to feed a fever—to meet the increased need for energy and nutrients.
What if you have no appetite when you’re sick?
Ah, another wrinkle to consider. Appetite loss is a common feature of many types of illness, and not just in humans. Animals across the species spectrum display the same anorexic (literally “without appetite”) response to being sick.
Scientists speculate that this is adaptive for a number of reasons.2 When a sick animal isn’t driven to go out and find food, it conserves the energy normally spent hunting or foraging. Instead, it can hunker down in its shelter, where it is also safe from predators it may not be able to evade in its current weakened state.
Fasting has other benefits as well. Yes, you aren’t taking in nutrients and calories that your immune system could use to fight foreign invaders, but you’re also depriving those same invaders of nutrients that they could use to reproduce and make you sicker.3 Fasting can also put you in a state of ketosis. Ketones, particularly beta-hydroxybutyrate, have anti-inflammatory and anti-oxidative effects that can protect against acute illness via a variety of complex metabolic pathways.4
All things considered, I believe that listening to your body is usually the best course of action. If you don’t have any appetite when you’re sick, there’s probably no problem with—and potentially some benefit to—fasting or just eating small meals. Staying hydrated is very important, though. Make sure you stay on top of fluid intake and consider adding electrolytes (especially if you’re feverish or have diarrhea). If appetite loss lasts longer than a couple days, or if you feel yourself becoming weaker or truly unable to eat, contact your doctor.
4 Foods to Eat When You’re Sick
Ok, but what if you do have an appetite? What if you want to support your immune system with foods that could potentially help it knock out the illness faster? What then?
Here’s where I’d start.
1. Bone broth and soups
Bone broth is a rockstar when it comes to helping you feel better. Besides the comfort factor of eating a bowl of steaming chicken soup when you’re not feeling well, research affirms that bone broth can help the body recover from upper respiratory infections.5 Hot liquids also keep mucus flowing which, while gross, allows the body to purge infectious agents. Chicken soup seems to be even more effective in this regard than plain hot water.6 (I expect any type of bone broth would have the same effect.)
The glycine in bone broth is also a natural sleep aid, and we all know that good sleep is key to recuperating from illness or injury.
How to get it:
I’m partial to homemade bone broth (here are recipes for chicken broth and turkey broth in the Instant Pot, for example), but store-bought is fine too. Sip it straight or make a bone broth latte.
Soups that contain meat and vegetables are great ways to get extra nutrients in. I’m especially partial to garlicky soup. There is some evidence, though not always from very high-quality studies, that antibacterial and antiviral compounds in garlic can be useful in combatting everything from the common cold and flu to dengue virus.78 (I hope it goes without saying that you shouldn’t just chomp down on a few cloves of garlic if you have dengue fever. Get to an emergency room!)
Long-time readers may recall me mentioning that when I feel a cold coming on, my immediate response is to simmer a whole head of crushed garlic in a pot of broth with cayenne pepper. This Garlic Soup with Mushrooms recipe will have the same effect but with even tastier results.
Or if you’re feeling hardcore, go ahead and eat a clove or two raw. Some people swear by raw garlic for relieving a sore throat.
2. Turmeric tea, or golden milk
Golden milk is the perfect mix of ingredients, each of which is immune-supporting in its own right:
Turmeric, which contains the anti-inflammatory and anti-oxidative compound curcumin9
Ginger, which may be especially beneficial if you’re experiencing nausea or upset stomach
Honey, which research has proven effective for relieving sore throat10 and cough11 (the latter even better than pharmaceuticals in some cases)
Recipe:
A warm mug is just the ticket when you’re not feeling so hot. This golden milk recipe calls for coconut or almond milk, but if you can do cow milk, they whey and lactoferrin may provide an extra boost, helping you feel better if you’re suffering from a cold.12
If you’re feeling more savory than sweet and want to harness the power of bone broth while you’re at it, try my Ginger Turmeric Chicken Soup instead. There’s a reason it’s one of the most popular recipes on the blog.
3. Fermented foods
You already know that fermented foods are important sources of probiotics that help nurture a healthy gut microbiome. I recommend increasing your intake of fermented foods any time you have GI issues or immediately if you must take an antibiotic.
But fermented foods aren’t just for gut health. In one study, researchers asked college students to supplement with probiotics or a placebo for 12 weeks and tracked the incidence of upper respiratory infections during that time.13 Although both groups were equally likely to get sick, the probiotics group had less severe symptoms, missed fewer days of school, and recovered two days faster on average. A meta-analysis of 20 randomized controlled trials found similar results in children and adults with respiratory illnesses.14
How to get them:
Any fermented foods will do, but a bowl of sauerkraut or a giant deli pickle might not sound great when you’re sick. Some spicy kimchi or sambal oelek would do wonders for clearing stuffed sinuses, though!
Yogurt or kefir are probably your best bets. The studies mentioned above used various probiotic strains, but Lactobacillus rhamnosus was a common one that you can probably find in yogurt from your grocery store.
4. Smoothies
I’m not much of a smoothie guy generally, but I mention them here for a few reasons. They may be more tolerable than a full meal if you have a stomach ache or sore throat. You can incorporate many of the beneficial items above (yogurt, whey, turmeric, etc.) into a smoothie. And smoothies usually contain other ingredients that support the immune system in their own right, such as berries for polyphenols or greens for magnesium and other vitamins.
Recipes:
Now I’m sure some of you are wondering if smoothies are a good idea since sugar suppresses the immune system. That’s true, but I’m less worried about whole fruit in a smoothie than the boluses of sugar often administered in studies, especially if you aren’t eating all that much period because you’re sick. And smoothies don’t have to be loaded with sugar. Check out these smoothie bowls that feature a variety of healthful ingredients. Or try a keto-friendly avocado smoothie.
What Should You Eat with an Upset Stomach?
I bring this up because it’s a question I get fairly regularly. The standard advice in this situation is to adhere to a BRAT diet. That’s bananas, rice, applesauce, and toast. Not very Primal sounding.
But let’s stop and examine this for a second. The idea behind the BRAT diet is that these foods are fairly well tolerated when you have nausea, vomiting, or other GI issues. They’re bland and easily digested.
And on the scope of food options, they’re not all that bad, Primally speaking. Of all the grains, rice is arguably the most innocuous. I don’t encourage people to eat rice, but it’s in that gray area of “not the worst, especially if you’re insulin sensitive and want to add some carbs to your diet.” Bananas are the same. I even declared bananas an underrated superfood once, especially when they are on the greener side. Applesauce is just apples with some of the mastication done for you. You could even do toast in a Primal-friendlier way by choosing one of the many gluten-free (even grain-free) options now widely available.
Am I going to promote the BRAT diet? Not exactly. If you can tolerate some scrambled eggs or a blended soup, go for that. But if you’re sick and hungry, and a banana or some applesauce is all you can tolerate, I don’t want you wondering if the specter of Sisson is looking over your shoulder and tut-tutting.
And don’t forget that ginger and peppermint are both great for upset stomach. Try some ginger or peppermint tea, or take a few whiffs of peppermint essential oil before trying to eat something.
Prevention Is the Best Medicine
In terms of dietary components (vitamins, minerals, polyphenols) that support the immune system, it’s better to keep yourself adequately supplied all the time than to try to load up via foods or supplements while you’re already sick. High-dose vitamin C or zinc might help knock out a cold, for example, but a better strategy is to play offense instead of defense by eating nutrient-dense Primal foods consistently.
I’m sure some of you have foods you swear by when you’re sick. Maybe it’s a special concoction a parent or grandparent used to whip up—your family’s secret, fail-proof recipe. Share your best illness-combatting tactics in the comments.
Originally Posted At: https://breakingmuscle.com/feed/rss
Whenever one checks in on Phillip Herndon, the mammoth powerlifter is likely pulling off some incredible feat of strength. As a usual 110-kilogram competitor, Herndon has amassed a reputation for seemingly impossible displays of power the moment he gets a barbell within his grasp. Herndon’s latest in-gym achievements, as one of his first notable benchmarks of 2023, is undoubtedly one of the athlete’s best to date.
On Feb. 4, 2023, Herndon posted a video to his Instagram page of himself capturing a 412.7-kilogram (910-pound) back squat raw during a recent training session. According to the caption of Herndon’s post, the demonstration of leg poweris an all-time personal record (PR). Herndon had wrist wraps, a lifting belt, and knee sleeves adorned during the squat — which is considered a raw lift by sanctioned powerlifting standards.
In the same post, the athlete revealed he weighs 265 pounds, meaning, after gaining more muscle, he may compete in the 125-kilogram (275-pound) weight class moving forward. The athlete’s next competitive appearance would officially be his first time competing in the division after beginning his competitive career in the 82-kilogram (181-pound) class in 2013 and spending the past four years at 110 kilograms (242 pounds).
While unofficial, Herndon’s squat is 2.7 kilograms (6.1 pounds) more than the all-time raw World Record in the 125-kilogram weight class, according to Open Powerlifting. That record mark belongs to Dennis Cornelius, who squatted 410 kilograms (903.9 pounds) at the 2017 United States Powerlifting Association (USPA) Freedom Fitness Classic. Herdon currently holds the all-time raw world record in the 110-kilogram class, with a 395-kilogram (870.8-pound) squat, as well as the 110-kilogram class all-time world record squat with wraps at 435 kilograms (959 pounds).
“Best numbers of prep and lifetime PRs. Just getting started.”
Herndon’s squat PR is likely connected to his ongoing preparation for the 2023 World Raw Powerlifting Federation (WRPF) Ghost Clash 2. The contest is scheduled to take place on Feb. 18-19, 2023, in Miami, FL, and will feature other notable powerlifting stars.
Independent of weight class, here’s an overview of Herndon’s all-time raw competition bests:
Phillip Herndon All-Time Raw Competition Bests
Squat — 395 kilograms (870.8 pounds) | 110-kilogram All-Time World Record
Herndon has been alluding to his place in the WRPF Ghost Clash 2 competition for several weeks now, as most of his Instagram posts have included some reference to it. In that respect, he appears to be a lifter on a mission.
It’s barely been a month into 2023, and Herndon already looks locked and loaded for impressive achievements in the gym and on official lifting platforms. Should he transfer his newest strength accomplishment to Southern Florida later this month, it’ll likely only be one of many significant appearances from the record-setting powerlifter.
Originally Posted At: https://breakingmuscle.com/feed/rss
In the history of the CrossFit Games, Justin Medeiros has already entered rare air. As the two-time reigning Fittest Man on Earth®, the 23-year-old has joined the legendary Rich Froning Jr. (2011-2014) and Mat Fraser (2016-2020) as only the third Men’s CrossFit athlete to win the title on at least two occasions. Now, as the start of the 2023 CrossFit Open nears on Feb. 16, 2023 — while Medeiros prepares for his next hopeful title defense — he gave a recent intimate look at his training process.
On Feb. 4, 2023, Medeiros posted a video on his YouTube channel where he gives a full tour of his custom home gym. The facility appears to be appropriately adorned with the requisite equipment Medeiros needs to excel as an elite CrossFitter at the top of his game.
After a short, lighthearted back-and-forth, with girlfriend CrossFit athlete Ellie Turner, about what constitutes a pull-up bar in Medeiros’ home gym, the athlete jumps right into the tour.
Steel Rig
The steel rig in Medeiros’s gym would likely be impossible to miss. After all, the multi-faceted implement comprises an entire wall. Per Medeiros, the athlete seems to utilize it as a storage device, like for his resistance bands. Most often, though, it lets Medeiros factor in various kinds of bars for different movements, such as pull-ups and muscle-ups.
“We have all the pull-up bars set to the height like they have at the CrossFit Games …,” Medeiros said. “We have the boards just to do, like, different types of grips, to do hangs, pull-ups …”
Squat Rack, Storage
Just below Medeiros’s steel rig is a squat rack that has a full set of bumper plates and dumbbells adjacent to one another, including a range of dumbbells from five pounds to 125 pounds. If that weren’t enough, there’s a shelf of kettlebells, up to 70 pounds, and even more bumper plates right next to this additional storage.
Steel Arch
According to Medeiros, where he has his steel arch is the “coolest part of the gym.” The arch connects both ends of his steel rig and lets him hang tools like Olympic rings and ropes over it.
“I’ve never been on a rig that is this sturdy,” Medeiros explained. “It is crazy. It’s not bolted onto any of the walls and it doesn’t shake.”
Belt Squat
Per Medeiros, he has a belt squat machine in his gym — fashioned underneath a pull-up bar — that assists in body maintenance and injury prevention. The athlete maintains he can use it for pull-up and squat movements interchangeably.
In another corner of his gym, Medeiros has set aside space for various barbells like the EZ-curl bar, Axle Bar, and cambered bar. There are also some heavier-weighted dumbbells, a Log Lift tool, and a multipurpose lat pulldown machine.
Cardio
In a fundamental section of Medeiros’s gym, he has all of his cardio work in one place. Most everything from row machines and Assault bikes is represented in this star CrossFitter’s cardio space.
Steel Rig, Continued
On the other side of Medeiros’s steel rig is a reverse hyper attachment, a pad that helps stretch the back and hamstrings, building strength and easing pain. Alongside it are more bumper plates, some medicine balls and sandbags (including a 150-pound medicine ball and 300-pound sandbag), as well as various jump ropes. If that weren’t enough, there is yet another squat rack in this portion of Medeiros’s gym.
Peg Board
In the final main portion of Medeiros’s gym sits a peg board, fashioned with a plexiglass backing to mimic the set-up during many CrossFit competitions. A plyometrics section, along with jerk blocks, also sits next to this last wall.
“My dad came out and installed the plexiglass. We got our pegboard in here. We wanted to make sure we had plexiglass because that’s what we use in competition … The spot where your feet go is different in every gym, I’ve done it on brick, I’ve done it on wood, I’ve done it on plexiglass …” Medeiros said. “So we really tried to replicate everything we do at competition, the best we can, when we train.”
Should Medeiros once again repeat as the Fittest Man on Earth®, he would still have to work to do to catch respective legends like Fraser (five titles) and Froning (four titles). Though, at Medeiros’s rapid pace, with this sort of sport-specific equipment elevating him, it might only be a matter of time before he sits at the top of the Men’s side of CrossFit all-time legends.
Originally Posted At: https://breakingmuscle.com/feed/rss
When it comes to some of the most powerful lifts in recorded history, powerlifter Jimmy Kolb now stands alone. On Feb. 4, 2023, during the 2023 International Powerlifting Association (IPA) Hillbilly Havoc in Hurricane, WV, Kolb captured a 612.5-kilogram (1,350.3-pound) equipped bench press. The mark is an all-time World Record and is officially the heaviest lift ever achieved in a sanctioned competition. According to Open Powerlifting, Kolb surpassed his own previous World Record of 598.7 kilograms (1,320 pounds) from the 2022 IPA State Championships. The equipped press is also the first lift over 600 kilograms in any powerlifting division or category ever.
In addition to being adorned with appropriate wrist wraps and a lifting belt during his monumental feat, Kolb utilized a bench press shirt. The specialized equipment gives an athlete an assist in getting their weight off their chest while also “resisting” as the weight lowers toward the athlete. Kolb competed in the 140-plus-kilogram weight class, which he has maintained since January 2021, weighing in at an official 147.8 kilograms (326 pounds) for the most recent record-setting contest.
The video of Kolb’s massive lift features several spotters on hand, giving him requisite support. The athlete lowered his loaded barbell to his chest and struggled into position, fighting against the durable bench press shirt, before receiving the judge’s command to lift up. There appeared to be a measure of a strain for Kolb, but he successfully locked out the rep eventually. Once in lockout position, the athlete held the weight securely before the official on hand finally allowed him to re-rack it.
In the same video post, Kolb’s pride in logging his record achievement was evident in displaying his official scorecard with a smile.
“Today was a good day.”
Before Kolb’s new bench press accomplishment, Nathan Baptist was the closest athlete to the 600-kilogram barrier on any single lift, per Open Powerlifting. Baptist successfully squatted 594.7 kilograms (1,311.7 pounds) for a 140-kilogram-plus World Record at the 2021 United Powerlifting Association’s (UPA) Utah Kickoff.
Notably, Kolb mainly participates in bench-press-only meets. Kolb has won his last nine contests dating back to February 2020, only one of which was a full-power meet in the 2022 IPA 814 Strength Spectacular. Ultimately, in a relatively prolific career that began in April 2009, Kolb has only fallen short of a first-place result on eight occasions.
Now, as he notches another legendary mark, Kolb can know all his hard work led to him making history once again.
Originally Posted At: https://breakingmuscle.com/feed/rss
Pairing your back and biceps in one workout has been a classic muscle-building session for decades. It’s a time-tested approach that’s reliable, effective, and it simply makes sense — the majority of rowing and pulling-type movements that target your back also recruit your biceps.
Credit: MDV Edwards / Shutterstock
Even when your biceps aren’t getting a major stimulus from some back exercises, they’re getting warmed up and slightly pre-fatigued for the latter part of the workout, when you can finish them off with some direct biceps training.
It’s a match made in heaven and many body part split programs would be incomplete without a solid back and biceps day. Here are some of the best back and biceps workouts to add size and strength whether you’re new to the gym or think you’ve tried it all.
The goal with beginner-level training is to get strong and do so with a low barrier of entry, using exercises that can be relatively easily mastered. Many lifters who are new to the gym gravitate toward training their back using barbell rows. While the barbell can be a great tool for back training, it’s often skill-intensive and highly fatiguing, especially for beginners.
Base-Building Back and Biceps
This back and biceps workout routine uses exercises that are relatively simple to learn and more appropriate for establishing a base of strength and muscle. When you focus on the target muscles and apply strict technique, you’ll also give your pulling muscles a gnarly pump by the end of the session. Technically, if you had to label your workout in detail, it could be considered a “back, biceps, and shoulders workout” because you’re also giving some direct attention to the rear head of the shoulder muscle.
Bent-Over Dumbbell Row
The bent-over dumbbell row delivers a strong back-building stimulus without taxing your spinal erectors (lower back) like a barbell row often can. Avoid swinging your torso to move the weight.
How to Do it: Stand with a dumbbell in each hand, with your arms straight down by your sides. Bend your legs slightly and hinge forward at your hips while keeping your back neutral, not rounded. Let the weights reach toward your toes with your hands facing each other. Drive your elbow back past your ribs and try to feel a contraction in your back muscles. Return the weights to the stretched position before repeating. Maintain the same hip angle throughout the exercise.
Sets and Reps: 3 x 8-12
Rest Time: 60 to 90 seconds between sets
Close-Grip Lat Pulldown
The close-grip lat pulldown will help stretch your lats and hit them in a way the row didn’t. Mixing vertical pulling (like the lat pulldown) with horizontal pulling (like rows) is a very effective way to target the multiple muscles of your back.
How to Do it: Attach a neutral-grip (palms facing each other) to the pulldown cable. Grab the handles and sit, allowing your arms to straighten and stretch overhead. Plant your feet flat and secure your knees under any available pad. Keep your upper body nearly vertical, with a slight backward lean. Drive your elbows down until the bar is generally near your face or chin. Control the stretch as you return to the arms-overhead position.
Sets and Reps: 3 x 8-12
Rest Time: 60 to 90 seconds between sets
Machine Reverse Flye
The machine reverse flye will torch your rear deltoids. Although the rear delts are technically part of your shoulder muscle, the rear muscle head is involved in many back exercises. Training them directly as part of a back and biceps routine makes sense because your rear delts, like your biceps, are pre-fatigued after training your back.
How to Do it: Sit with your chest braced against the pad in a reverse flye (or “reverse pec-deck”) machine. Grab the handles with a thumbs-up grip with your hands at shoulder-level in front of you. Keep a slight bend in your elbows. Pull your hands back until they’re in line with your shoulders to the side. Don’t “overpull” to reach your hands behind your body. Return your hands to the forward position without letting the weights slam onto the stack.
Sets and Reps: 3 x 8-12
Rest Time: One minute between sets
Alternating Dumbbell Curl
The alternating dumbbell curl lets you focus on each arm individually, so you get some serious bang for your biceps training buck. The slight supination (turning of the wrist) helps to recruit more overall biceps muscle, including your brachioradialis, making the exercise a top notch biceps-builder.
How to Do it: Stand with a dumbbell in each hand with your arms hanging down at your sides. Bring your left hand up in a thumbs-up position. As your hand passes your hips, turn your hand palm up and continue curling until the weight is near shoulder-level. Reverse the motion to return the weight to your side. Repeat the movement with your right hand. Alternate arms with each repetition.
Sets and Reps: 3 x 10-20 per arm
Rest Time: 45 to 60 seconds between sets
How to Progress
As a beginner, your goal is to learn proper form with simple movements while getting stronger. As long as your compound (multi-joint) exercises get stronger while using good technique, you should be building muscle in all the right places.
Keep pushing each set until you eventually reach the end of the rep range. Once you reach that ceiling, increase the load and repeat the process, but only do so if your form remains strict. Don’t develop a habit of cheating just to move the weight. Once your loads have increased significantly, roughly 30% or more, you can jump into the next program.
Intermediate Back and Biceps Workout
Once you’ve reached the intermediate stage — you’re feeling more skilled in the gym and your shirts have filled out with a bit of muscle — it can be tempting to start “ego lifting,” especially if you start to notice the bigger lifters in the gym swinging around weights when they row. Don’t do that. It can get you injured and, actually, doesn’t stimulate your back well as using crisp, strict technique.
Keep your form dialed in and you should feel your back working deeply across the targeted muscle fibers, allowing you to trigger growth. The same principle applies to your biceps — no swinging. Let your biceps do the work, not your ego. Elbow flexion, not momentum, will grow arms.
Back and Biceps Workout with New Angles
As you transition to an intermediate lifter, you can likely handle some more volume as long as you’re eating enough nutrients to recover and grow. It’s also a good time to introduce some variety to prevent overuse injuries while also stimulating muscle regions in different ways. (1) This back and biceps gym workout uses a few different movements to target your muscles.
The chest-supported row is a great first exercise of the day. It’s stable and doesn’t require as much warming up as a free-standing row. The stability helps you focus on your back. The single-arm rows allow you to take advantage of unilateral (single-arm) strength-building, because you can lift more with one arm than trying to lift two dumbbells together. This unilateral focus also helps to correct any imbalances you may have.
The incline dumbbell curl stretches your biceps more than the standing movement, which elicits a large growth response. (2) The stretched movement may also impose more soreness due to the increased range of motion, but you should be able to handle that now that you’ve got more experience under your belt.
Chest-Supported Row
This movement fully supports your upper body and essentially removes your lower back from the equation, making it a strict back-building exercise with few limitations. The chest-supported row is an excellent way to begin a back-focused training day because your lats and larger back muscles are doing the work without fatiguing your low back.
How to Do it: Lay chest-down on a supported bench and grab the handles with a palm-down grip. Unrack the weight before pulling the bar up as high as possible. Pause briefly in the contracted position before lowering the weight to a full stretch.
Sets and Reps: 3 x 8-12
Rest Time: 60 to 90 seconds between sets
Wide-Grip Pulldown
This movement is one of the most fundamental pulldown variations. The emphasis on a long overhead stretch with a strong contraction makes the wide-grip pulldown an essential player is many back workouts.
How to Do it: Attach a long bar to a pulldown station. Take a grip slightly wider than shoulder-width and sit down. Secure your knees under any pads and allow your arms to extend straight overhead. Keep your torso mostly upright and drive your elbows down, pulling the bar to nearly chin level. Pause briefly before returning to an overhead position.
Sets and Reps: 3 x 8-12
Rest Time: 60 to 90 seconds between sets
Single-Arm Dumbbell Row
The single-arm dumbbell row is a classic back-training exercise. Mastering this movement is an essential for long-term back development. It allows you to target your back muscles, one side at at time, while drastically reducing lower back stress.
How to Do it: Grab a dumbbell in one hand, with your palm facing in toward your body. Brace your non-working hand on a flat bench or on the same side knee. Drive your arm up and back until the dumbbell is near your ribs. Pause briefly for a maximum contraction before lowering to a full stretch. Perform all reps with one arm before switching sides.
Sets and Reps: 3 x 8-12
Rest Time: No rest between arms, one minute between sets
Cable Rear Delt Flye
Targeting your rear delts with cables instead of a machine increases the time under tension, which can improve the muscle-building stimulus. (3) This unique movement lets you get more benefit from relatively less weight.
How to Do it: Stand in the middle of a double cable station with a high pulley with each hand grabbing the cable from the opposite side. Flex your abs and bend your knees slightly. Keep a slight bend in your arms as you draw your elbows down and back. In the full contraction, your arms should be slightly behind your torso. Return to the stretched position, with your arms crossed in front of your body.
Sets and Reps: 3 x 10-15
Rest Time: 45 to 60 seconds between sets
Incline Dumbbell Curl
The incline dumbbell curl is a powerful choice for a biceps exercise. The intense stretch and focused contraction creates a major trigger for muscle growth. Be sure to prioritize technique over heavy loads — if done properly, relatively light weights can feel extremely heavy. Resist the urge to cheat.
How to Do it: Set an adjustable bench to roughly 45-degrees. Lay back while holding a dumbbell in each hand. Rest your head, shoulders, and back on the bench pad. Allow your arms to hang straight with your palms facing forward. Curl the weight up while moving only your hand and the dumbbell — don’t let your elbow, upper arm, or head move. When you’ve reach the highest position possible without moving your elbow or upper arm, slower lower the weight to a full stretch.
Sets and Reps: 3 x 10-15
Rest Time: 45 to 60 seconds between sets
How to Progress
Once you are able to hit the end of the rep range for an exercise, increase the load in the next workout. It’s basic, bread and butter progression. There’s no need to overcomplicate things. You keep form strict and, as long as you eat enough while getting stronger, your arms will expand and your back will eventually get its own zip code.
Advanced Back and Biceps Workout
Now that you are even stronger, you need to periodize to new variations along with adding lifting straps. What often happens with advanced lifters is that their grip and forearms can become a limiting factor during back exercises, leaving progress-building reps untapped in each set.
At this stage of development, your back should be significantly stronger than your smaller forearm muscles. Strategically using lifting straps can prevent your forearms from fatiguing while allowing you to impose more stimulating reps to your back and biceps.
Back and Bi’s for Experienced Lifters
As an advanced lifter, you need to be more specific about hitting all regions of your back. The barbell row is extremely comprehensive and skill-intensive, so it becomes the first exercise in the workout. Vertical pulling is next to more thoroughly target your lats. At this point, you should be strong enough to do at least five strict pull-ups. If not, stick to lat pulldowns and figure out whether it’s a lack of strength or an excess of body weight hindering your pull-up progress.
The Jefferson curl is a unique movement added to train your spinal erectors from top to bottom. This unconventional exercise sometimes gets a bad rap because it requires a rounded back, which is usually warned against, but your spine was designed to move and these types of controlled, dynamic contractions grow your muscles best.
If you want a thick, back-dominant look in both your upper and lower back, Jefferson curls can be a secret weapon. It should go without saying, do them with control and don’t load your ego. The workout wraps up with the addition of the barbell wrist curl. Since you’ll be using straps, which supplements your gripping strength, your forearms will benefit from some isolation to keep them growing.
Barbell Row
Sometimes considered the definitive back exercise, the bent-over barbell row can be a key player in building size and strength. Don’t let the ability to move heavy weight tempt you into cheating the technique. Keep your form strict and don’t bounce or swing weight.
How to Do it: Stand in front of a loaded barbell with a stable shoulder-width stance. Hinge at your hips and grab the bar with an overhand grip, slightly wider than shoulder-width. Brace your core and explode the weight up toward your lower ab region, below your belly button. Try to pause very briefly before lowering the weight with control.
Sets and Reps: 3 x 8-12
Rest Time: Two minutes between sets
Pull-Up
The pull-up is a classic bodyweight exercise. In many training circles, your pull-up performance is second only to your bench press ability as a measure of your true experience and aptitude in the gym.
How to Do it: Grab an overhead pull-up bar using a shoulder-width grip, with your palms facing away from your body. Flex your abs and keep your body in a generally straight line — resist the urge to “kick” your legs up as you lift. Pull your chest toward the bar and lean slightly back. When your mouth or chin is near bar-level, lower yourself to full extension (a straight-arm stretched position) with control. Don’t free fall into the bottom.
Sets and Reps: 3 x 5-10
Rest Time: Two minutes between sets
Jefferson Curl
The Jeferson curl is performed contrary to one overriding weight training rule — here, you’re supposed to allow your back to round during the exercise. During most other movements like squats, deadlifts, and rows, proper technique usually involves keeping a stiff and neutral spine. During the Jefferson curl, the goal is to deliberately round your spine (under full control, of course).
How to Do it: Stand with a light barbell in your hands, with straight arms resting in front of your body. Lean forward at the waist and imagine curling each individual vertebrae down as you reach toward your feet. Keep your arms straight and keep the bar close to your legs. When you’ve reached the end of your flexibility, “uncurl” slowly to return to a standing position.
Sets and Reps: 3 x 5-10
Rest Time: One minute between sets
Cable Rear Delt Flye
The cable rear delt flye remains a reliable, high-intensity way to finish off your rear deltoids at the end of your workout for back and biceps. Keep your form strict and focus on feeling your delts doing the work.
How to Do it: Stand in the middle of a double cable station with a high pulley with each hand grabbing the cable from the opposite side. Flex your abs and bend your knees slightly. Keep a slight bend in your arms as you draw your elbows down and back. In the full contraction, your arms should be slightly behind your torso. Return to the stretched position, with your arms crossed in front of your body.
Sets and Reps: 3 x 8-12
Rest Time: One minute between sets
Incline Dumbbell Curl
Blast your biceps with the incline dumbbell curl. The intense stretch and hard contraction make it an excellent choice for zeroing in on your arms.
How to Do it: Set an adjustable bench to roughly 45-degrees. Lay back while holding a dumbbell in each hand. Rest your head, shoulders, and back on the bench pad. Allow your arms to hang straight with your palms facing forward. Curl the weight up while moving only your hand and the dumbbell — don’t let your elbow, upper arm, or head move. When you’ve reach the highest position possible without moving your elbow or upper arm, slower lower the weight to a full stretch.
Sets and Reps: 3 x 8-12
Rest Time: One minute between sets
Barbell Wrist Curl
Work your forearms (specifically, your wrist flexors) with the barbell wrist curl. The targeted movement will give some attention to your forearm muscles, which could potentially be understimulated when using lifting straps during heavier back exercises.
How to Do it: Set up on a flat bench with an underhand (palm-up) grip on a barbell. Support your forearms across the bench. Extend your wrists down to lower the weight, allowing the bar to roll toward your fingertips. Curl your hand closed and bring your wrists up without lifting your forearms from the bench. It’s a relatively short range of motion, so focus on applying tension without swinging.
Sets and Reps: 3 x 10-15
Rest Time: 45 to 60 seconds between sets
How to Progress
Progression is the same as before — Train hard, don’t swing any weights, and add reps or load each week.
If you can match or beat your rep performance, that’s great. Once you get to the highest end of the rep range, add load the following week. If you’re lifting heavy, but find yourself getting fatigued and losing performance, you may need to deload at some point.
But for the most part, continual growth comes down to continual strength increase with constant nutrient intake. Just be cautious when it comes to progressing pull-ups. It’s tempting to justify reps that swing around, which can end up adding load hastily.
Focus on your form most weeks and only count reps that are performed under controlled. Once you get to 10 strict pull-up reps, add five to 10 pounds, reduce the reps back to five, and keep going.
Benefits of a Back and Biceps Workout
While each type of body part split or potential workout setup can have its own benefits, there are a few distinct reasons to consider planning a back and biceps day in your weekly training split.
Happier Joints and Better Posture
People with strong backs who do more pulling exercises have happier, healthier joints. When you bench or overhead press excessively and don’t balance your musculature with rows, pulldowns, or pull-ups, your shoulders can get cranky. (4)
Credit: Natalie magic / Shutterstock
Your joints and connective tissues begin to beg for more rowing and a stronger back. This can create a healthier spine, improve joint function, and promote better posture.
You Get Good at Moving Stuff
Sure, nobody wants to be “that friend” everyone in the group hits up when they need help moving, but the alternative is worse — being the friend nobody contacts to help them move because they’re scared you’ll snap in half.
That’s where a consistent back and biceps day comes in. You’ll simply be more capable through everyday life, and moving furniture will feel like child’s play. Beyond the practical benefits, building strength in your back, biceps, and grip can carry over to boost performance in the gym — everything from more obvious exercises like farmer’s walks and deadlifts to overhead pressing, where a stronger back helps to provide upper body stability.
Build Some Eye-Catching Muscle
Many people rightly associate biceps training as being essential for a more aesthetic physique. While the chest, abs, and even shoulders are often considered other contenders for attention-grabbing body parts, a well-muscled back can take your muscularity to the next level and create an undeniably athletic and powerful look.
By training your back and arms, you fill out any T-shirt better, as opposed to looking like a malnourished college freshman swimming in baggy clothes. A big back can also make your waist look relatively smaller in comparison, in case you’re still working to shed a bit of extra fluff.
Back and Biceps Basic Anatomy
Here’s a brief rundown of all the muscles you’ll be hitting with each back and biceps workout. Yes, you’re training “the back” and “the biceps,” but there’s a bit more detail to consider.
Trapezius
The traps are a diamond-shaped muscle that takes up a large part of your upper back. It spans from your mid-neck to just below your shoulder blades. The trapezius has many muscle fibers and several “sections” — the upper traps, mid-traps and lower traps — but a variety of horizontal and vertical pulling will hit the muscle in its entirety. The main function is scapular retraction (pulling your shoulder blades together), so rowing exercises will be particularly useful.
Lats
The latissimus dorsi, or lats, are another big muscle group. It takes up the outer parts of your mid-back, spanning up to your armpits and down toward the start of your lower back. The lats are often notorious for giving you that wide look.
Credit: martvisionlk / Shutterstock
Some lifters regard the lats as the wingspan muscle because people can see your back gains from the front thanks to your lats. Not to mention, it makes your waist look smaller as well. Any vertical pulling exercises, like all pulldown exercises, hit the lats with a strong contraction and long stretch.
Spinal Erectors
These are two long, thick beams that run from the top of your back to the bottom, including what’s typically referred to as your “lower back”. Similar to the traps, your spinal erectors get stimulated with nearly every back exercise because they’re involved in controlling posture near the hips. They’re trained directly as the primary focus during Jefferson curls or any pulling or hip hinging exercise where you are actively arching your back.
Rhomboids
Your rhomboids are relatively smaller back muscles that attach at your mid-spine and sit partially under your scapula, creating part of your upper back musculature. The rhomboids aid in scapular retraction, in a similar role to the traps, and they help your posture look better. All horizontal rowing will hit the rhomboids well, especially if you focus on pulling your elbows back to allow your scapulae to squeeze together.
Rear Deltoids
The rear deltoids are the back head of your shoulders. Developing this relatively smaller muscle can makes your overall back look more complete, along with “rounding out” the appearance of your shoulders.
People who often ignore or underappreciate back training usually have lagging shoulders, as well. All pulling exercises where your elbow travels behind your body, like many types of rows, will hit the rear delts.
Some lifters argue that the rear delts don’t really need direct training as long as you have enough back volume each week, but well-planned isolation work never hurts, especially if you want to focus on building a specific body part.
Biceps
Your “biceps” actually consists of three related muscles: the biceps brachii, brachialis, and brachioradialis.
The biceps brachii is the spotlight “biceps” muscle consisting of two heads, a long head and short head. Both are visible and create what most people consider the biceps on their upper arm. You can’t see any distinct separation between the two heads unless you’re incredibly lean or incredibly muscled.
The brachialis is a smaller muscle that sits between your biceps and triceps. It’s rarely ever visible due to its anatomical location, but it creates arm size by “lifting” your biceps. Unless you’re very heavily muscles or as lean as a competitive bodybuilder, you’re not likely to see the muscle itself.
The last big player in the biceps game is the brachioradialis. It sits at the top of your upper forearms and rotates your wrists to a neutral (thumbs up) position, along with helping to flex your elbows. It’s more visible than the brachialis and, when developed, can help to fill out your sleeves, especially near the forearm area.
All of the aforementioned biceps muscles primarily work at elbow flexion (bending your arms), so these muscles get trained with every row and pulldown, as well as with any type of curl. This is why, if you’re getting stronger on a variety of back exercises and adding some hard curls, you don’t need many sets of biceps training to see big results.
Time For Some Back and Biceps
Time to start applying these workouts for back and biceps. Take an honest assessment of your experience level and get working on your rows, pulldowns, and curls. You’ve seen the most efficient ways to plan these back and biceps exercises, so get into the gym and get growing. Your back will widen and your arms will expand. Your upper body will look more impressive, and you might even notice that your physique is getting a few you extra admirers as a side effect.
References
Kassiano, Witalo1; Nunes, João Pedro1; Costa, Bruna1; Ribeiro, Alex S.1,2; Schoenfeld, Brad J.3; Cyrino, Edilson S.1. Does Varying Resistance Exercises Promote Superior Muscle Hypertrophy and Strength Gains? A Systematic Review. Journal of Strength and Conditioning Research 36(6):p 1753-1762, June 2022. | DOI: 10.1519/JSC.0000000000004258
Oranchuk, D. J., Storey, A. G., Nelson, A. R., & Cronin, J. B. (2019). Isometric training and long-term adaptations: Effects of muscle length, intensity, and intent: A systematic review. Scandinavian journal of medicine & science in sports, 29(4), 484–503. https://doi.org/10.1111/sms.13375
Burd, N. A., Andrews, R. J., West, D. W., Little, J. P., Cochran, A. J., Hector, A. J., Cashaback, J. G., Gibala, M. J., Potvin, J. R., Baker, S. K., & Phillips, S. M. (2012). Muscle time under tension during resistance exercise stimulates differential muscle protein sub-fractional synthetic responses in men. The Journal of physiology, 590(2), 351–362. https://doi.org/10.1113/jphysiol.2011.221200
Cools, A. M., Witvrouw, E. E., Mahieu, N. N., & Danneels, L. A. (2005). Isokinetic Scapular Muscle Performance in Overhead Athletes With and Without Impingement Symptoms. Journal of athletic training, 40(2), 104–110.
Originally Posted At: https://breakingmuscle.com/feed/rss
Hafthor Björnsson is best known in the strength sports world for his stellar work with Atlas Stones, log lifts, and deadlifts. Such a steadfast commitment to the former 2018 World’s Strongest Man champion’s strength work has earned him a deserved spot among some of the greatest athletes in history.
On Jan. 31, 2023, it was revealed that Björnsson would be a part of the International Sports Hall of Fame (ISHOF) Class of 2023. Björnsson will enter the ISHOF alongside fellow luminaries like two-time judo Olympic gold medalist (2012, 2016) Kayla Harrison and four-time Super Bowl champion (1981, 1984, 1988-1989) and Pro Football Hall of Famer Ronnie Lott. Dr. Robert Goldman initially created the ISHOF in 2012.
Björnsson is the third professional strongman to be recognized by the ISHOF.
Mark Henry, the inaugural 2002 Arnold Strongman Classic (ASC) winner and a former WWE World Heavyweight champion, was inducted into the ISHOF as a part of the first class in 2012. Three-time WSM champion (1980-1982) Bill Kazmaier would join Henry in 2017. Now Björnsson can count himself among their exclusive company.
Jackie Joyner-Kersee: Six-time Olympic track and field medalist (spread between 1984 and 1996, including three gold medals)
Richard Sorin: Founder of Sorinex Exercise Equipment, grip strength icon
In addition to Björnsson’s sterling competitive record — which also includes noteworthy achievements such as five Europe’s Strongest Man titles (2014-2015, 2017-2019) and three WSM runner-up finishes (2014, 2016-2017) — he possesses an assortment of strength records.
The most recognizable might be Björnsson’s 501-kilogram (1,104.5 pounds) World Record deadlift from the 2020 World’s Ultimate Strongman “Feats of Strength” series. Another is the Weight Over Bar World Record from the 2022 Strongman Rogue Invitational. The athlete threw a 25.4-kilogram (56-pound) weight over a 20-foot, three-inch high bar to extend his own previous record mark.
In terms of recent athletic exploits outside of a strongman context, Björnsson defeated former strongman rival and 2017 WSM winner Eddie Hall in a March 2022 boxing match. In a December 2022 return to professional powerlifting at the 2022 Thor’s Christmas Powerlifting Meet, the athlete attained a 970-kilogram (2,138.5-pound) total in the 140-kilogram-plus weight class.
Björnsson’s ISHOF honor might be even more noteworthy, considering he likely isn’t done as a strongman or powerlifting competitor. In October 2022, the Icelander alluded to a potential future where he’s moonlighting as both an elite strongman and powerlifter while continuing to pursue new World Records. In this case, the 34-year-old’s Hall of Fame honor and resume could only shine brighter in the coming years.
Originally Posted At: https://breakingmuscle.com/feed/rss
From the end of 2022 to the start of 2023, various notable figures in and around bodybuilding have had frank thoughts about the state of the sport. There was the iconic Arnold Schwarzenegger expressing his fandom of reigning four-time Classic Physique Olympia champion Chris Bumstead while noting the division should be the Olympia weekend’s main event. There was 1983 Mr. Olympia Samir Bannout lamenting that the Olympia qualification isn’t rigid enough and allows too many competitors. Now, Iain Valliere, an active bodybuilder, shared some recent strong thoughts on a prominent modern competitive category.
On Feb. 2, 2023, Valliere appeared in a podcast episode with Fouad Abiad Media, discussing some of the latest pertinent bodybuilding topics like the 2023 Arnold Classic. Among the more notable revelations was that the 2022 Vancouver Pro championbelieves the 212 division should no longer be a viable professional division.
As standards for training and quality nutrition continue to grow, Valliere professed that he doesn’t see a place for 212 bodybuilders in the long run. He maintained that recent successful examples of 212 competitors like Derek Lunsford and Shaun Clarida, who have transitioned to and competed well in the Men’s Open, demonstrate that there isn’t much of a need for the 212 anymore.
As such, the athlete said the division’s existence is redundant and that it should be absorbed into the Men’s Open.
“If a 175 or 180-pound Shaun [Clarida] comes in and is beating 290-pound, 6-feet guys, you really have no [expletive] case for keeping the 212 [division], to be honest.” Valliere said. “Because I still think the guys that are really [expletive] driven to be the best, would stick out a few years of getting [expletive] on if they believed in their heart. Like the Derek’s (Lunsford] of the world, would have stuck that [expletive] out and been in the Men’s Open and would have ended up where they are.”
After receiving pushback and counterarguments from his fellow podcasters, including retired 212 bodybuilder Guy Cisternio and retired Men’s Open competitor Fouad Abiad, Valliere made a reasonable analogy between basketball and bodybuilding, pointing out how the cream usually rises to the top without accommodations.
“That’s the same thing as saying guys that are, like, 5-foot-10 shouldn’t pursue basketball and that we should make a shorter net for the guys that are shorter. It’s stupid.” Valliere explained. “With 212, I just think a lot of those guys could end up in the [Men’s] Open just like it used to be, and be fine.”
Ultimately, to Valliere, nixing the 212 division is about the more talented athletes winning out and allowing them to compete in the most elite circumstances.
“No matter how much I train, I’m not going to be as big as Ramy [Mamdouh “Big Ramy” Elssbiay] or as fast as Usain Bolt,” Valliere said. “Some guys won’t be as good as Derek [Lunsford], some guys won’t be as tall as Yao Ming, it’s just the [expletive] reality. People are not all created equally and just because they aren’t, it doesn’t mean we should fill the gap.”
Valliere might have a right to possess his strong opinion on the future of the 212, but, at the time of this writing, competitive organizers don’t appear to have any meaningful plans toward falling in lockstep with his idea.
As for Valliere’s individual exploits, the Men’s Open bodybuilder is coming off an 11th-place finish at the 2022 Mr. Olympia. According to NPC News Online, the result was the second-lowest of his career, with a 14th-place finish at the 2018 iteration standing as his worst. To this day, Valliere’s best Mr. Olympia output was back-to-back placings in seventh in 2020 and 2021.
With the 2023 competitive season still in its early stages, if he qualifies for the contest, he’ll undoubtedly be seeking a rebound during the 2023 edition, November 3-5 in Orlando, FL.
For now classes are 6pm and 640pm at 2840 Wildwood st in the Boise Cloggers studio.
Book your class NOW!
click this ==>
Warrior Fit Testimonials
First, I want to say thank you for convincing me to do Tabata! I was struggling to lose weight and Finally I found something that helped! I really appreciate your coaching! - Craig T.
Ever since I was convinced to do Tabata I have seen huge results, I lost 6 pounds and gained energy in the first 3 weeks. I have been working out for 3 months before I decided to do Tabata and I struggled to lose weight.
At first I thought "How am I losing weight by bringing my heart rate up then cooling down then bringing it up again?" I don’t know how it works but it does!
Thank you!! - Theresa F.
The first day of Tabata, I wondered WHAT AM I DOING - I AM 56 !! Five weeks later I knew that it was what I needed. I learned that I could push myself well beyond my comfort zone and feel good later. I have a marked improvement in physical as well as emotional endurance. - Lyn C.
When I was first told about Tabata I was very excited from the word go, however that excitement stemmed from the fact that I had no clue what it meant. I missed the first week of class b/c I was traveling for work so when I came in during the 2nd week I had some making it up to do.
It was hard at first b/c my body wasn't used to working out at such a fast pace, but once I got into a rhythm I started to feel very good. These classes are no joke. If you stick with it you will leave there feeling stronger, healthier and overall better about yourself and what you've accomplished.
I would recommend these classes to anyone. Darrin is a great trainer and he'll keep you going with his energy.
- Jami L.
Warriors Fit Audio
Warrior Fit uses High Intensity Music to get ya Moooovin' So we can all "Get Our Sweat On"
The link below will give ya a freeee shot at Audible plus a couple audio books just to try it out and if you haven't used audio books on your commutes you are missing out. Get pumped up before you get to where you are going and exercise your mind. I use it Everyday. Go get yours now!

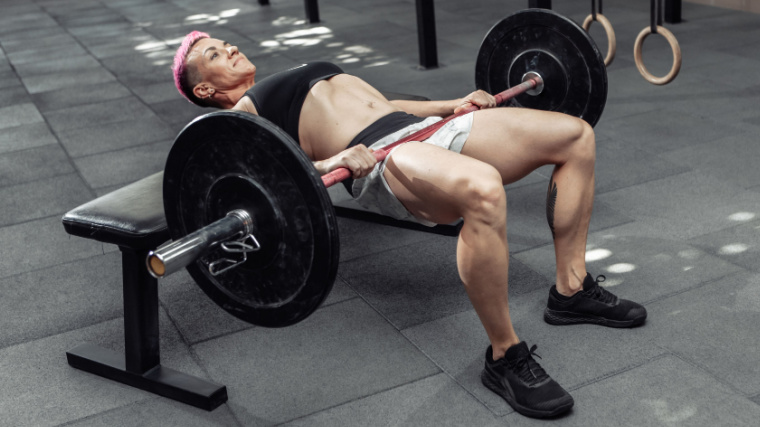
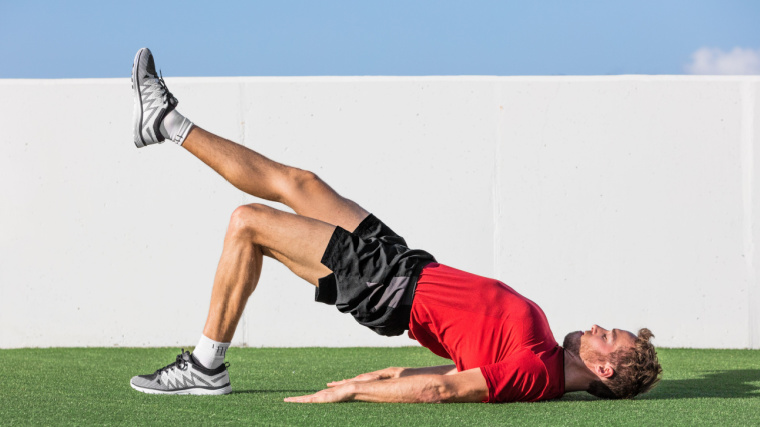
 The importance of wrist mobility and strength are almost impossible to overstate. Without a strong, mobile wrist that can fluidly operate across multiple planes, our ability to grab and manipulate things with our hands would be nearly useless. Without the mobile wrist, our manual dexterity doesn’t really exist—our arms become those pincers people use to pick up trash.
 Wrist prayer stretches are static stretches that increase in intensity. Put your hands in the prayer position in front of your face: palms and fingers flat against each other, fingers pointing up the ceiling (or sun, or heavens).


 Cold? Flu? Tummy troubles? I know that I don’t have time to be sick, and I’m sure you don’t either. Luckily I don’t get sick very often anymore, but back in my competitive athlete days, it felt like I was constantly battling one cold, cough, or sinus infection after another.
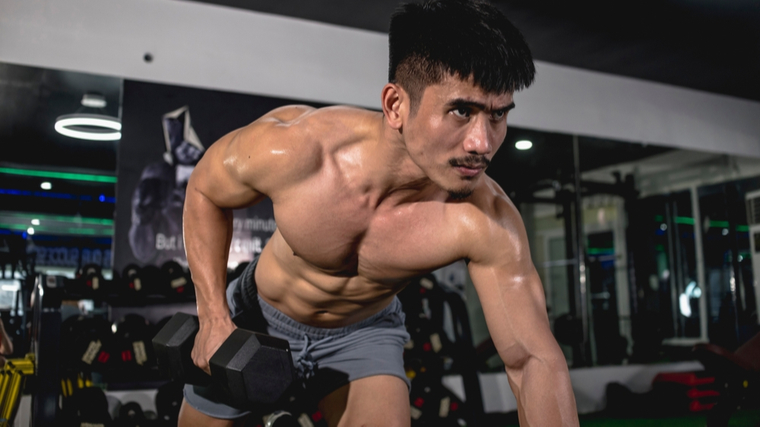
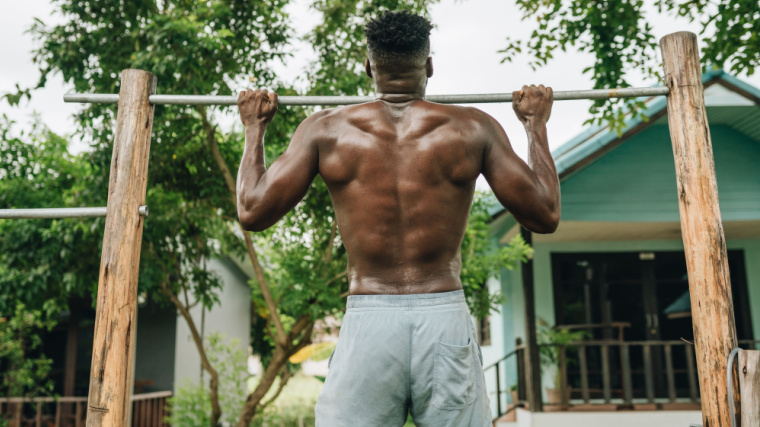
 For now classes are 6pm and 640pm at 2840 Wildwood st in the Boise Cloggers studio.
Book your class NOW!
click this ==>
For now classes are 6pm and 640pm at 2840 Wildwood st in the Boise Cloggers studio.
Book your class NOW!
click this ==>


