This post was originally published on this site

Originally posted at: http://www.nerdfitness.com/

This is not the only time we'll see Batman in our article on functional fitness.

So you want to learn about functional fitness?

Great!

We create strength, balance, and flexibility workouts as part of our 1-on-1 Online Coaching Program, so you’ve come to the right place to learn about functional fitness.


Here’s what we’ll cover to answer the question: “What is Functional Fitness?

Let’s do this!

What Is Functional Fitness and Why Is It Important?

Hiking would for sure be a part of functional fitness.

Functional fitness means training your body for everyday activities, and to make daily motion easier and safer.

When we practice functional fitness, it’s for activities like:

  • Carrying groceries 
  • Picking up small children
  • Walking in nature
  • Being mobile on the floor 
  • Fighting off sharks

Functional fitness in action

Functional fitness seeks to build strength, flexibility, and balance for navigating the physical world and the objects in it.

We do this by replicating and practicing movements necessary in the real world: squatting, pulling, pushing, bending, climbing, walking, and running.

Personally, I like to think of it as becoming “antifragile,” or being able to physically handle the chaos of life. 

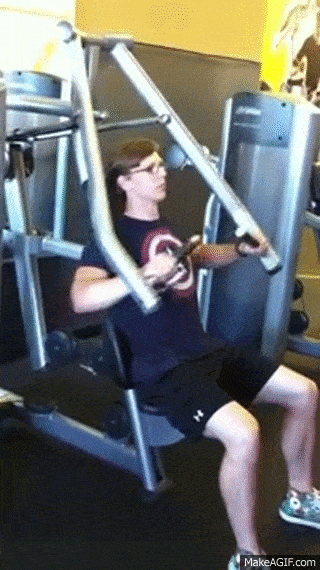
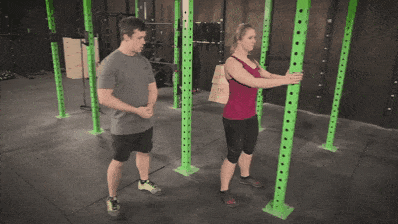
So for functional fitness, we prioritize natural movements (squats, pull-ups) over exercises that are done on a machine (leg presses, lat pulldown).

Here’s the rationale: in your everyday life, you probably won’t find yourself in a situation where you have to push weights along a guided track…while seated:

A typical machine exercise found here.

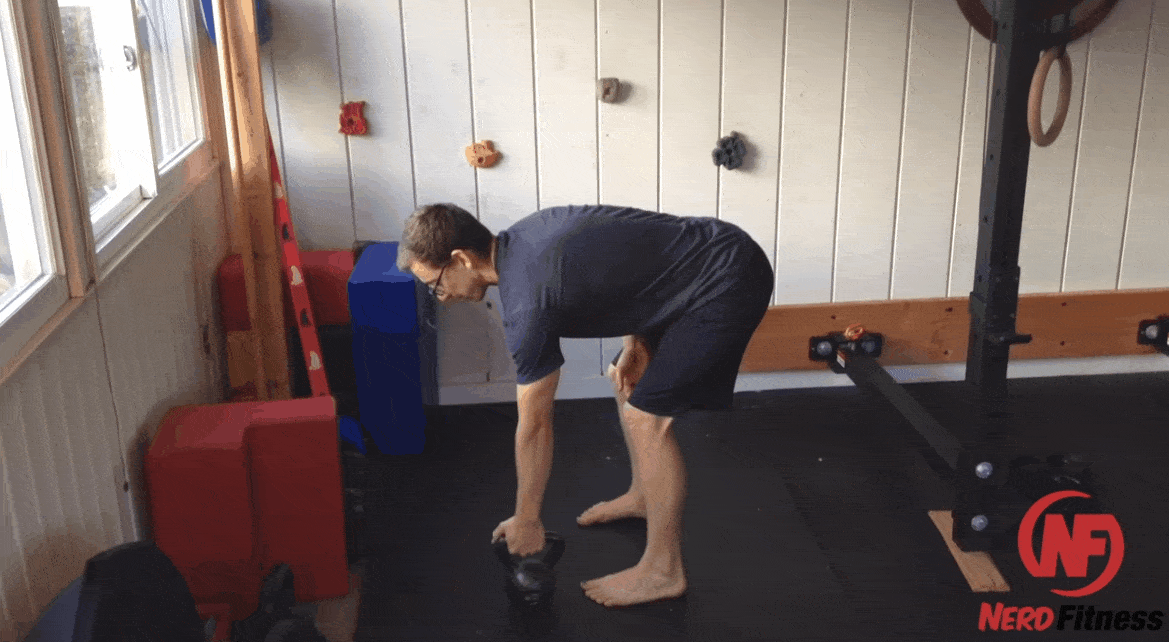
But you’ll probably find yourself in a situation where you have to lift an object from the floor, then raise it above your head, like loading your luggage into the overhead bin on a plane.

So it makes sense to practice:

And here is the kettlebell row!

And this too:

Coach Matt showing you how to do the kettlebell press.

Here, the kettlebell is substituting for an object you may have to pick up and lift during your everyday life: a book, a pet rabbit, a cursed golden idol, etc.

To continue on this thought, running from a giant boulder would also count as functional fitness.

It’s why we encourage free weights instead of machine use, because free weights force you to balance and control objects just like you have to in day-to-day life. 

Another thing to consider for functional fitness: “compound exercises.” 

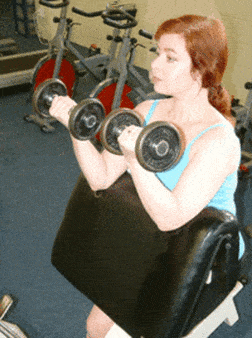
Compound exercises require more than one muscle group working together for the exercise (squats, pull-ups), so they replicate the way your body actually moves. This would be different from isolation exercises like biceps curls, which more or less train JUST your biceps muscles to move one particular way.

This would be an example of an isolation exercise.

Since functional fitness seeks to improve your body’s ability to work as one unit, compound exercises are encouraged!

As they say, variety is the spice of life.

Let’s give you one last example of functional fitness.

Compare running on an elliptical vs going on a short hike:

  • Both will get your heart rate up.
  • But a hike will challenge your stability and balance as you move over uneven terrain. The elliptical, on the other hand, provides a repetitive motion over and over.

There is a time and a place for both, but it’s important to introduce variety and instability if your goal is to develop all-around functional fitness.

What’s that? You want exact exercises to try? 

You got it!

The 10 Best Functional Fitness Exercises

Do you think he supplements with creatine?

A functional fitness workout prioritizes natural movements that help us conquer the obstacles and tasks faced in our everyday life.

Here are the best Functional Fitness Exercises:
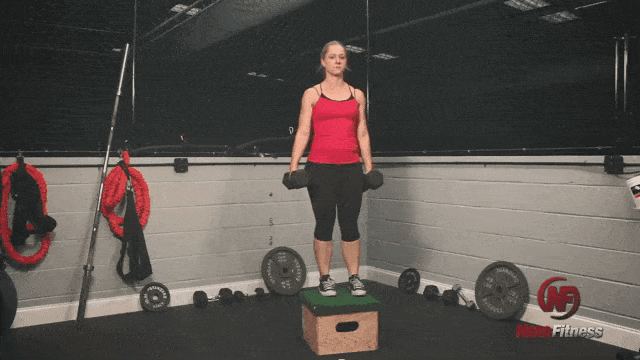
#1) Squats

Do a proper bodyweight squat to work out your legs

Squats are one of the most fundamental functional movements in our lives.

Getting off the ground, moving in and out of chairs, and shoveling snow will all be easier after a regular squatting practice. 

Simple bodyweight squats are a great way to get started, but if this is too tough at first, start with assisted bodyweight squats:

Coach Staci showing you the an assisted bodyweight squat

Once you get comfortable with a regular bodyweight squat, you can start incorporating weights, like with a goblet squat:

The goblet squat is a great way to build muscle for women.

If you build up to a 30-pound dumbbell, this move can replicate picking up a small child off the ground. Practical and functional if you’re a new parent. 
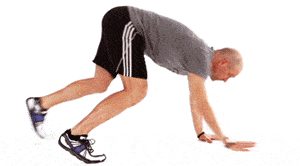
2) Deadlifts

I promise you, learning how to deadlift will change your life.

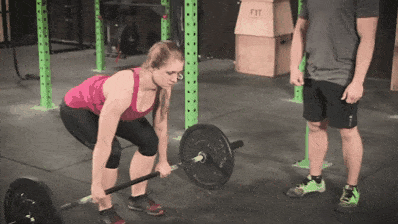
Speaking of picking up stuff off the ground, let’s talk about the deadlift as a part of functional fitness.

Moving furniture, grabbing bags of dog food, and taking a sleeping child to bed are all forms of the deadlift. When you start to incorporate the deadlift into your life, you make all these movements easier (and safer). 

If you’ve never deadlifted before, it can be a little intimidating. A good place to start might be the Romanian Deadlift with very light dumbbells:

Coach Staci showing you how to perform dumbbell Romanian deadlift

If you’re looking for other deadlift variations, or you want to make sure you have proper form, read our full guide with step-by-step instructions on how to deadlift safely.
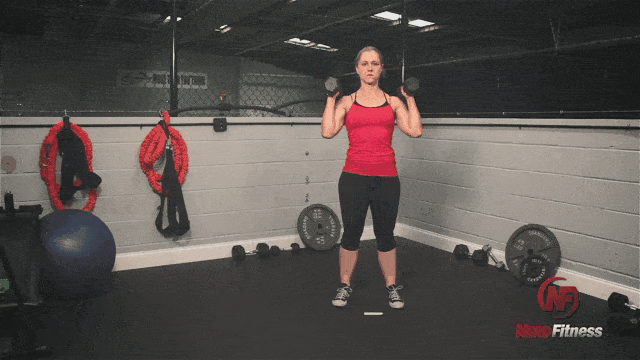
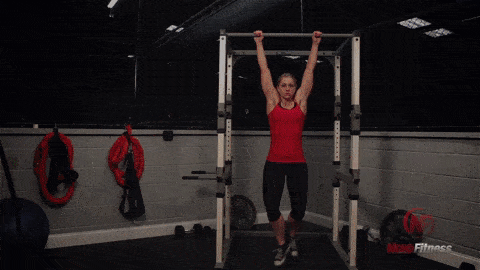
#3) Overhead Press

Staci performing the overhead press.

The overhead press is another exercise that will provide benefits in daily life:

  • Placing a cast iron skillet into a top kitchen cabinet
  • Hoisting luggage into the top bin when flying
  • Showing off the piece of the Triforce you just scored

Link using functional fitness to hold up the Triforce.

Performing the overhead press will not only increase your upper-body strength, but it will also strengthen your core, since you balance and stabilize yourself while standing and lifting. Compare this to the bench press, where the bench itself offers support during the movement.

Again, some lightweight dumbbells are a great starting point if you’re just getting started:

In the neutral grip press, shown here, you have your hands together during the movement.

Make sure you read our full guide on how to perform the overhead press for more variations and tips for progression.
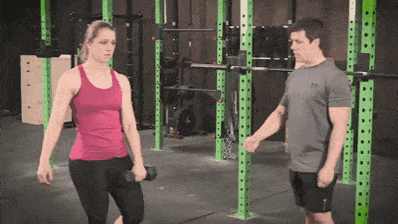
#4) Farmer’s Walk

The farmer's walk is for sure functional fitness.

The farmer’s walk is really simple: pick up a couple of weights and walk.

To up the difficulty, pick up more weight. Or walk further. 

Very basic, yet very functional, because most of us carry objects from one place to another all the time. 

When performing the farmer’s walk:

  • Pick the weight up with a good form
  • Keep a tight posture with your shoulders back
  • Take small, manageable steps

That’s it.

The farmer’s walk will challenge your arms, back, shoulders, core, and grip.

Being able to lift and carry heavy objects is about as functional as you can get.

#5) Bear Crawl

Is it a "bear crawl" because you look like a bear, or because your hands and feet "bear" all your weight?

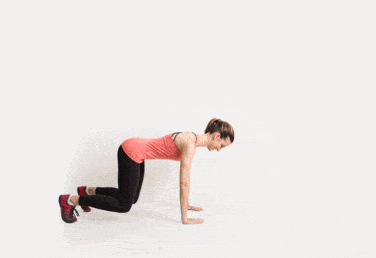
When we’re young, it’s a given that we’ll be mobile on the floor.

As adults, eh, not so much. The only interaction with the floor comes from us standing on it. We won’t even sit on it without a chair helping us. 

Not very functional. 

Enter the bear crawl…

To perform the bear crawl:

  • Begin in a tabletop position.
  • Bring your knees up, so they hover.
  • Using opposing arms and legs (ex: right arm, left leg), take a small step forward with each limb. You want to use small steps so your torso is stable, instead of rocking side to side.
  • Repeat on the opposite side. 

It’ll look like this:

The bear crawl is a great way to work on floor mobility.

#6) Walking Lunge

This gif shows the walking lunge, a great way to do bodyweight exercises in your own home!

The walking lunge is going to provide lower body strength, as well as balance, for when you come in and out of the movement.

To perform a walking lunge:

  • Stand with a shoulder-width stance.
  • Step out with your right leg.
  • Lower your hips until your back leg’s knee almost touches the ground.
  • If you stepped out far enough, your front knee won’t extend past your toes.
  • Explode forward and up by pushing off with your back leg and up with your front leg.
  • Bring both feet together, and then step forward with your other foot and repeat.

#7) Pull-Ups

The classic pull-up

When discussing the best functional fitness exercises, we can’t neglect your “pull” muscles.

Being able to lift yourself up is very functional, and may save your life if you’re being chased by velociraptors.

Clever girl...using functional fitness.

If you can’t quite get your first pull-up yet, an inverted bodyweight row will help you build strength until you can.
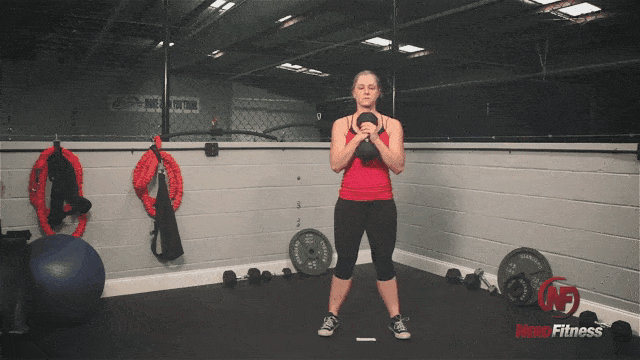
A bodyweight row like this is a great "pull" exercise you can while building up strength for pull-ups.

#8) Kettlebell Swing

Coach Staci showing you the kettlebell swing

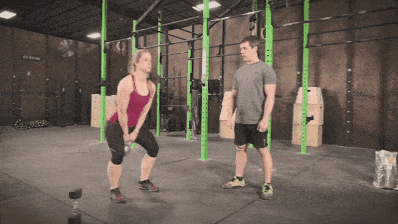
The kettlebell swing is an explosive full-body movement that focuses on building strength with your hip hinge.

How to perform the kettlebell swing:

  • Get down into a bent-over, flat-back position and grab the kettlebell with both hands from the handle.
  • Swing the kettlebell behind you, then get ready to jump up.
  • Jump up (without leaving the ground) and swing the kettlebell up. You should be standing tall at the peak of the movement.
  • Reverse the movement and bring the kettlebell back down and behind you.
  • Repeat.

If you want more tips for training with a kettlebell (a great tool for functional fitness), then check out “The 20 Minute Beginner Kettlebell Workout.”
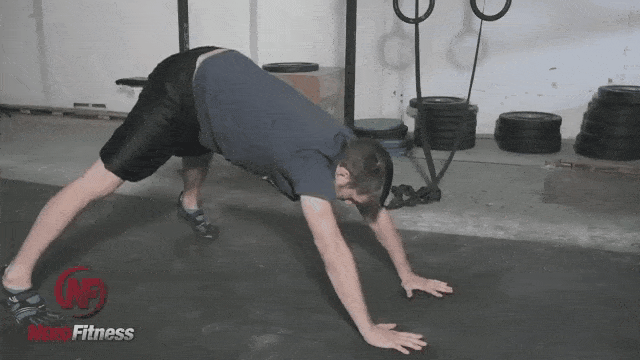
#9) Push-Ups

Here Rebel Leader Steve shows you the classic push-up.

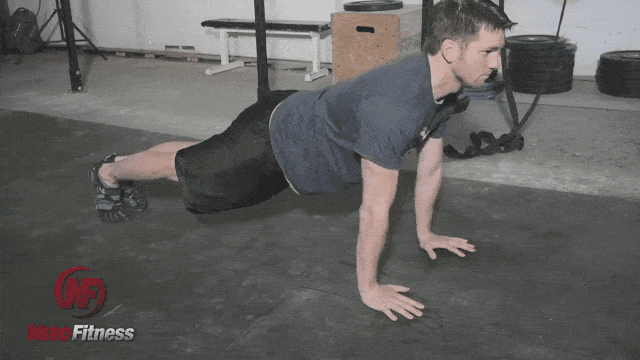
Push-ups, the ole fitness staple. But being able to hold yourself firm in a straight line (don’t sink), while pushing yourself up will create a lot of core strength. And a great functional exercise. 

Plus, you can add some variation to level them up, creating a more dynamic exercise. 

For example, you can do dive bomber push-ups:

Rebel Leader Steve showing you the divebomber push-up

#10) Step Up

This exercise really is as simple as stepping up and down a box or small secure stool.

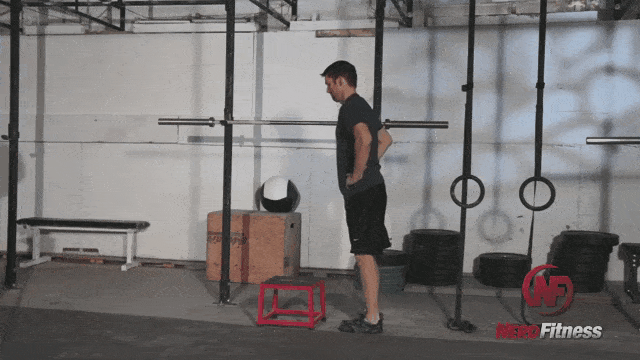
It doesn’t get much more functional than going up steps. Life doesn’t always provide us with elevators.

If this seems too easy, start mixing weights into the practice:

A couple of weights is an easy way to up the difficulty here.

BONUS: #11) Handstands

When you have both legs off the wall, you are doing a handstand! Woot!

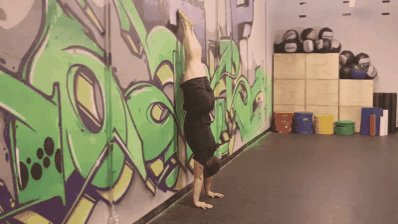
On the one hand, handstands are really tough. On the other hand, the amount of strength and balance required to perform a handstand are central to functional fitness.

And…ah…you need both hands to do it…unless you’re Luke Skywalker:

Luke rocks one arm handstand, but he also has the force. And yoda.

We have a full guide that will walk you through getting your first handstand, from simple wrist stretches:

Start by barely lifting your feet off the ground for crow pose.

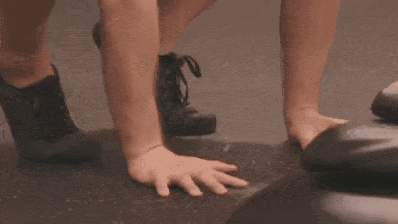
All the way to handstand push-ups:

If you can do push-ups like this, you are hardcore.

Are you doing these moves correctly? A good way to check would be to record a video of yourself and match it against the gifs and videos here. If they look close, you’re doing great!

The other option would be to have a trained professional review your form, which we can do in our 1-on-1 Online Coaching Program!

Our spiffy mobile app lets you send a video of your training directly to your coach, who will provide feedback so you can perfect your technique.

They’ll also build a workout program that’s custom to your situation, which can improve your functional strength!


What Is a Functional Fitness Training Workout?

This LEGO always does his warm up before he trains at home...or on the street.

Now that we’ve gone over specific functional fitness exercises, let’s pull them together to build a workout routine!

For most beginners, I recommend creating a full-body practice at first, which includes:

  • Quads (front of your legs).
  • Butt and hamstrings (back of your legs).
  • Chest, shoulders, and triceps: (“push” muscles).
  • Back, biceps, and grip ( “pull” muscles).
  • Core (abdominals and lower back).

Since we prioritized compound exercises in today’s post (because they are more aligned with functional fitness), our muscle groups will overlap when we build our routine.

That’s a good thing.

Using the exercises covered earlier, our Functional Fitness Workout could be:

That’s it! If you start doing this once a week you’ll be well on your way to building functional fitness.

If you want to do this twice a week, maybe switch out some exercises:

  • Instead of push-ups, try the overhead press
  • Instead of squats, try lunges
  • Instead of pull-ups, try bodyweight rows

One important point: no matter what routine you pick, always warm-up first!

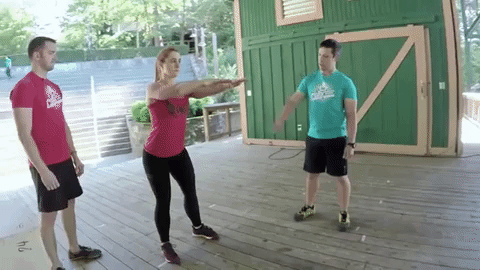
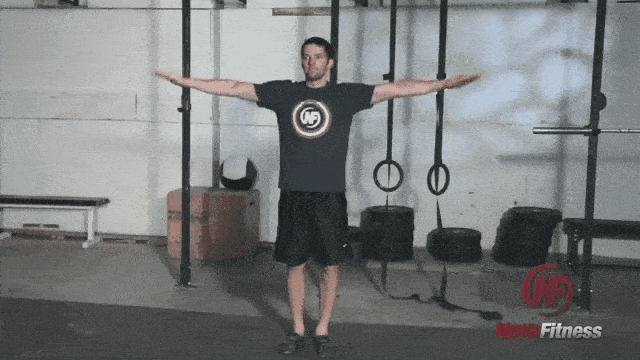
It can be simple arm circles:

Arm circles like so are a great way to get your heart rate up before doing HIIT.

Or some jumping jacks:

Jumping jacks are a great way to warm up for your at-home workout.

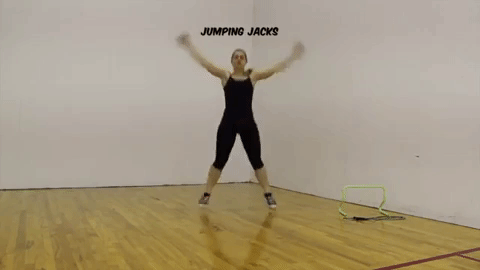
Warming up is important because we want your muscles engaged and loose before we jump right into our training. So warm-up for about 5 minutes before jumping into your workout.

As long as you include your warm-up, you now have what you need to start your training.

If you want more help building a functional fitness practice, I have a couple resources for you:

  1. How to Build Your Own Workout Routine: our guide will walk you through building your own training practice. We’ll teach you what exercises you should do, how many sets and reps you should perform, and how often you should work out. It’ll help you start performing functional fitness exercises today.
  2. Our 1-on-1 Online Coaching Program: if you want a more customized approach for your exact situation (kids, an old injury, you turn into a werewolf once a month), then check out NF Coaching. We’ll build you an exact plan of attack on how to become a functional fitness master.


Is CrossFit Functional Fitness?

Today we teach you everything you want to know about CrossFit.

CrossFit claims to support “functional movements” by using “safe, effective and efficient movements similar to those you use every day in life.”

So yeah, that does sound like what we’ve been talking about this whole time.

The difference with CrossFit is the intensity. It’s something we highlight in our Beginner’s Guide to CrossFit.

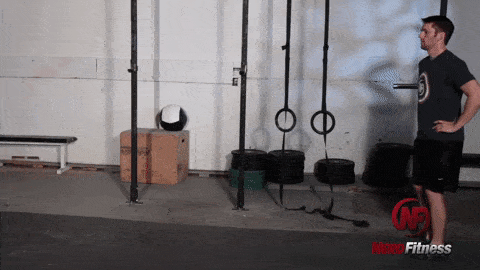
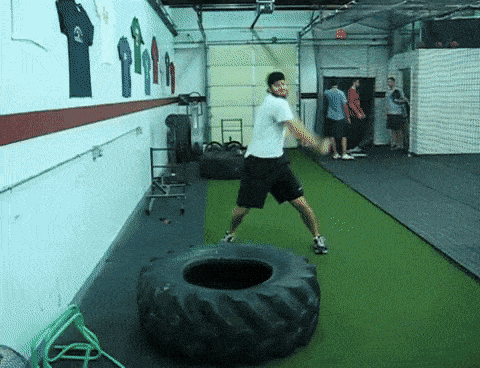
CrossFit does promote functional fitness. It’s why you’ll see people carrying sandbags, flipping tires, and wielding sledgehammers at CrossFit gyms:

Depending on what you do for work, this could be very functional.

But the intensity is another noteworthy aspect of CrossFit. Workouts are done in a group setting, with people cheering you on.

While this can be great for motivation, it can be less great when trying to move at your own pace and train with proper form.

Now, this is a generalization, and all CrossFit gyms will have their own characteristics and culture.

If you’re curious, it doesn’t hurt to walk through the door of your local CrossFit gym – just make sure you read our Crossfit Beginner Guide first. I’m sure they’d love to see you and show you around.

How to Build Functional Fitness (Next Steps)

Jogger silhouette running on the beach at sunset with the horizon in the background

We’ve covered a lot of different ways to increase and build functional fitness.

But our article barely scratched the surface:

  • Gymnastic rings would be a great way to promote functional fitness.
  • Working your way towards your first handstand is fun strength practice.
  • A yoga routine could also be considered as “functional.”
  • A hike would be a great way to prepare for traveling through natural landscapes.

Also, let’s not get close-minded here. Being strong will help you navigate the world in front of you, so in that sense, any form of strength training could be considered “functional fitness.”

So would parkour, which has you traveling through urban landscapes:

With the Assassin's Creedoutfit, this gif is perfect for our site.

Just find something you like and get started!

The more you do, and the more variation you include (barbell training, yoga, and hiking), the more functional fit you’ll be.

This is how you become “antifragile.”

Now, all that’s left to do is start:

If you wanna win a race, you need to start it!

Want a little help getting going? The perfect next step on how to begin your functional fitness journey?

No problemo!

Here are 3 options on how to continue with Nerd Fitness:

Option #1) If you want step-by-step guidance on how to get strong, lose weight, and level up your life, check out our killer 1-on-1 coaching program:


Option #2) If you want a daily prompt for functional fitness workouts, check out NF Journey. Our fun habit-building app helps you exercise more frequently, eat healthier, and level up your life (literally).

Try your free trial right here:

Option #3) Join the Rebellion! We need good people like you in our community, the Nerd Fitness Rebellion.

Sign-up below and receive our free guide Strength Training 101: Everything You Need to Know. It includes step-by-step instructions for the Best Functional Fitness Exercises covered in today’s guide. 

Alright, enough from me. Your turn:

Do you practice functional fitness?

Do you have any specific exercises you cover?

Any tips or tricks for someone just getting started?

Let me know in the comments!

-Steve

PS: Strength training would be a great way to promote functional fitness. If you’re not sure where to start with your strength training journey, start here.

###

GIF Source: Bear Crawl, Batman vs Shark, Triforce, Indiana Jones, CrossFit, Chest Press, Parkour

Photo Source: “I’m Batman,” Wandering, Strongman, Scenes from an empty lot in Brooklyn, vol 1., Antonio Guillem © 123RF.com

The post The Ultimate Guide for Functional Fitness: Exercises and Workout Plans first appeared on Nerd Fitness.

Be Nice and Share!
This post was originally published on this site

https://www.girlsgonestrong.com/

Few exercises simultaneously challenge your mobility, balance, strength, and coordination quite like the single-leg Romanian deadlift. But if this move doesn’t challenge you the way it used to, it’s time to mix things up with progressions!

Getting out of your comfort zone and improving your skills have a ton of benefits, particularly when it comes to your fitness.

When you perform the same exercise the same way over and over again, your body adapts and no longer needs to grow to meet the challenge. But throw in a variation or progression, whether by changing the weight, tempo, rep range, or by combining it with another movement, and your body is suddenly forced to improve to adapt — and that’s when you see results.

Another benefit of progressions? Variety! Keeping things fun and fresh in your routine will help you stay motivated, consistent, and moving in the direction of your health and fitness goals.

Working on more advanced variations of the single-leg Romanian deadlift is your opportunity to take its benefits to the next level.

That includes:

  • Building muscle and strength, particularly in the glutes and hamstrings.
  • Reduced risk of injury in sports, exercise, and regular daily activities thanks to improved stability, mobility, and flexibility.
  • Evening out muscle imbalances and improving symmetry.
  • Honing proprioception (the awareness of where your limbs and body are through space, even in darkness). Bonus: This also helps prevent future injuries!
  • Strengthening the mind-muscle connection, which enhances muscle activation and engagement (essentially making exercises more effective).

In this article, you’ll learn six fun and challenging single-leg Romanian deadlift (single-leg RDL) progressions, complete with step-by-step guides and video demonstrations to help ensure you’re performing them with correct form. Then, you’ll learn how to incorporate these variations into your current training routine so you can get started right away!

New to Single-leg Romanian Deadlifts? Learn how to master balance and form with our step-by-step guide for beginners. When you’re ready to move on, circle back to this article for some great ways to spice things up!

One quick tip before we dive in: If you’re practicing a variation that requires you to hold a weight, band, or cable in one hand, many folks find it helpful to extend their opposite arm out to the side and to make a fist. This not only helps you maintain tension in your arm and upper body, which is important for balance and form, but also keeps your shoulders square and ensures your upper body moves as one unit.

Ready? Then let’s get into the progressions!

Progression #1: Single-Leg Romanian Deadlift with One-Arm Vertical Band Row

In addition to working the lats and delts, incorporating this upper body pulling movement increases the demand on your core for stability. This variation can also be performed with a cable using a D-handle, which can be nice if you want to increase the load more than a band will allow.

How to Perform a Single-Leg Romanian Deadlift with One-Arm Vertical Band Row

  • Place a band or cable at chest height.
  • Hold the band in your right hand and step back with your arm extended until there is no slack left in the band.
  • Stand tall, root your left foot to the floor, and create a slight bend in your left knee.
  • Perform the first half of your single-leg RDL movement by hinging at the hips, letting your right leg rise behind you as high as you comfortably can, and lowering your torso forward and down.
  • Once you feel stable with your torso and arm extended parallel to the floor, row your right arm back alongside your body until your elbow is in line with your torso.
  • Extend your arm back to the starting position parallel to the floor.
  • Exhale with a tension breath and press the left foot into the floor as you extend your hips to return to standing.
  • Perform your reps, then switch sides.

Note: You may find you need to do a couple of test reps first in order to get the right tension on the band. If it feels too hard, step closer to where the band is anchored. If it feels too easy, step back a bit further from the anchor point.

Progression #2: Single-Leg Romanian Deadlift with Offset Row

This exercise is a great way to work all of the muscles of a traditional single-leg RDL, but with the added benefits of upper body horizontal pulling and anti-rotational core work! The offset row makes it extra challenging to keep your shoulders and hips square, which means your core has to work incredibly hard to stay in the proper position. This exercise can be performed with a dumbbell or a kettlebell.

How to Perform a Single-Leg Romanian Deadlift with Offset Row

  • Hold a dumbbell or kettlebell in your right hand.
  • Stand tall, root your left foot to the floor, and create a slight bend in your left knee.
  • Perform the first half of your single-leg RDL movement by hinging at the hips, letting your right leg rise behind you as high as you comfortably can, and lowering your torso forward and down.
  • Once you feel stable with your torso about parallel to the floor, row your right arm up and back until your elbow is in line with your torso.
  • Extend your arm back to the starting position.
  • Exhale with a tension breath and press the working foot into the floor as you extend your hips to return to standing.
  • Repeat for reps on the left leg, and then switch sides.

Progression #3: Single-Leg Romanian Deadlift with Alternating Row

Like the previous two variations, the single-leg RDL with alternating row incorporates upper body pulling movements. But the addition of a weight in both hands held perpendicularly from your body shifts your center of gravity, forcing your core to work harder to adjust for the change. It also works your entire posterior chain, from the back of your neck to your calves.

How to Perform a Single-Leg Romanian Deadlift with Alternating Row

  • Hold a dumbbell or kettlebell in each hand.
  • Stand tall, root your left foot to the floor, and create a slight bend in your left knee.
  • Perform the first half of your single-leg RDL movement by hinging at the hips, letting your right leg rise behind you as high as you comfortably can, and lowering your torso forward and down.
  • Once you feel stable with your torso about parallel to the floor, row your right arm up and back until your elbow is in line with your torso.
  • Extend your arm back to the starting position.
  • Row your left arm up and back until your elbow is in line with your torso.
  • Return your left arm back to the starting position.
  • Exhale with a tension breath and press the left foot into the floor as you extend your hips to return to standing.
  • Repeat for reps on the left side, then repeat the whole series on the right side.

Progression #4: Single-Leg Romanian Deadlift from Dead Stop

Adding a dead stop to any exercise makes it instantly more challenging. In the case of the single-leg RDL, having the kettlebells on the floor instead of constantly in your hands removes the stretch reflex (the rubberband-like ability of muscle and connective tissue that typically helps you power through continuous reps). Now, you’re using more raw strength to lift the weight while still having to balance on one leg.

How to Perform a Single-Leg Romanian Deadlift from Dead Stop

  • Place two kettlebells on the ground just in front of and outside of your left foot.
  • Stand tall, root your left foot to the floor, and create a slight bend in your left knee.
  • Perform the first half of your single-leg RDL movement by hinging at the hips, letting your right leg rise behind you as high as you comfortably can, and lowering your torso forward and down.
  • Once you feel stable with your torso about parallel to the floor, grab the handle of each kettlebell.
  • Exhale with a tension breath and press the left foot into the floor as you extend your hips to return to standing.
  • Slowly reverse the movement, returning the kettlebells to their starting position.
  • Repeat for reps on the left side, letting the kettlebells come to a complete stop on the floor between each rep.
  • Change sides and repeat while standing on your right leg.

Feeling unsure about kettlebells? Check out our beginner’s guide on how to use a kettlebell and become a pro in no time.

Progression #5: Single-Leg Romanian Deadlift to Skater Squat

The skater squat is a great way to add an extra balance challenge using just your bodyweight. Plus, while the single-leg RDL mainly works hamstrings and glutes, the skater squat puts more emphasis on the quads, so you’re getting a total lower body strengthening exercise as well.

Note: This movement is best done with bodyweight only, or holding a very light (5–10 pound) weight plate in front of you to act as a counterweight. A counterweight will help you with balance during the skater squat portion of the movement.

How to Perform a Single-Leg Romanian Deadlift to Skater Squat

  • Stand tall, root your left foot to the floor, and create a slight bend in your left knee.
  • Perform the first half of your single-leg RDL movement by hinging at the hips, letting your right leg rise behind you as high as you comfortably can, and lowering your torso forward and down.
  • Continue to balance on the left leg as you come back up to the starting position.
  • Reach the right leg about a foot behind you, keeping both knees bent.
  • Reach your arms out in front as a counterbalance, abs engaged.
  • Tap a raised pad, step, or the ground lightly with your right knee.
  • Exhale as you use the front leg to come back to standing.
  • Return to the standing position.
  • Repeat for reps, and then switch sides.

Progression #6: Single-Leg Romanian Deadlift to Pistol Squat

This variation combines the single-leg RDL with one of the most advanced unilateral exercises around: the pistol squat. Like the skater squat, the pistol squat is both a strength and balance skill. It works the quads, glutes, hamstring, calves, and core while requiring exceptional stabilization and mobilization from the ankles and feet. Mastering the pistol squat is a popular performance goal that takes consistency and practice, so make sure you’re comfortable with it before adding it to your single-leg RDL.

Like the single-leg Romanian deadlift to skater squat exercise, this movement is best done with bodyweight only or holding a very light (5–10 pound) weight plate in front of you to act as a counterweight during the pistol squat portion of the movement.

Working on your pistol squat? Master this performance goal with our step-by-step guide.

How to Perform a Single-Leg Romanian Deadlift to Pistol Squat

  • Stand tall, root your left foot to the floor, and create a slight bend in your left knee.
  • Perform the first half of your single-leg RDL movement by hinging at the hips, letting your right leg rise behind you as high as you comfortably can, and lowering your torso forward and down.
  • Continue to balance on the left leg as you come back up to the starting position.
  • Extend your right leg out in front of you, flexing your foot.
  • Extend your arms and squeeze your hands into fists, creating tension from your shoulders to your hands.
  • Descend into your pistol squat.
  • Once you reach the rock-bottom position (or as low as your body safely allows you to go), squeeze your fists a little tighter, engage through your core, and use the strength and balance of your left leg to stand back up.
  • Repeat for reps, and then change sides.

How to Add These Progressions to Your Routine

Now that you’ve learned some advanced variations of the single-leg RDL, let’s talk about how to incorporate these movements into your training:

  • I recommend incorporating only one variation of a single-leg RDL per workout, but you can incorporate a different (or the same!) variation 2–3 times per week.
  • Try starting with 2–3 sets of 8–10 reps per side. Since these movements require a lot of strength, balance, and coordination, perform them early in your workout so you’re able to use the best form possible before your muscles are too fatigued.
  • Alternate between lower body–dominant and upper body–dominant variations. For example, practice the single-leg RDL to skater squat on some days, and the single-leg RDL with alternating row on other days.

The post 6 Ways to Progress Your Single-Leg Romanian Deadlift appeared first on Girls Gone Strong.

Be Nice and Share!
This post was originally published on this site

http://www.marksdailyapple.com/

father son using diy natural cleanersWe talk a lot around here about taking care of your body, but what about your home? The cleanliness and safety of your environment play a big role in your overall health. You’re already doing the work to make sure the food and water that goes in your body are as clean as possible. The next step is to examine the substances you’re using to clean your home.

In honor of National Cleaning Week, today I’m offering all-natural, non-toxic solutions for cleaning your home from top to bottom. A host of companies now make greener cleaning products, but you don’t need to invest in a bunch of specialty supplies. You can attack almost any cleaning project if you have a short list of supplies on hand.

Here’s what you need:

  • Vinegar: Vinegar is acidic, containing somewhere around 5 percent acetic acid depending on the type. It has antibacterial properties, and you can use it in a wide variety of cleaning applications.1 Distilled white vinegar is more affordable than other types and is the one I recommend for cleaning.
  • Castile soap: Castile soap is gentle enough to be used on your body and effective enough to tackle any cleaning project. Dr. Bronner’s is a popular brand. Use any scent you like.
  • Baking soda
  • Microfiber and/or cotton cloths
  • Sponges
  • Empty spray bottles
  • Cleaning brushes, both stiff- and soft-bristled
  • Silicone spatula or scraper
  • Microfiber mop

Optional items:

  • Squeegee
  • Essential oils: Tea tree (melaleuca), lavender, thyme, oregano, and other oils have antimicrobial properties.2 If nothing else, they make your house smell good without artificial fragrances.
  • Lemons
  • Salt, which you probably already have in your kitchen
  • Hydrogen peroxide

Why Should You Use Non-toxic Cleaning Products?

Commercial cleaning products often contain harsh cleansing agents and fragrances. These substances can be absorbed through the skin, eyes, and lungs. Even mild exposures may cause irritation and inflammation, skin rashes, and other adverse reactions in sensitive individuals. They simply aren’t good for your health, not to mention your children’s and pets’ health. Even “green-certified” products can contain ingredients that you don’t necessarily want in your home. 

Besides the human health effects, many ingredients found in common cleaning products come with significant environmental concerns. These ingredients can harm plants and wildlife, contaminate drinking water, and adversely affect soil and even air quality. Check out the Environmental Protection Agency and the Environmental Working Group to learn more.

Health reasons aside, it’s more cost-effective to buy those staple ingredients in bulk and make your own products. It takes very little time, and the payoff is substantial.

Important Tips Before Getting Started

When you switch to a new cleaning product, homemade or otherwise, it’s always a good idea to test it on a small area of carpet, fabric, hardwood, or stone before you clean a large surface. For marble or granite, check manufacturer guidelines.

Using Vinegar as a Cleaning Agent

As I said, vinegar is acidic, so it can damage some delicate surfaces if you use it at full strength. It has more potent cleaning and antimicrobial properties undiluted, but you’ll want to dilute it for softer or more porous surfaces like natural stone tile.

Even though many recipes call for combining vinegar and baking soda, once the initial chemical reaction has taken place—that fizzing we’re all familiar with from elementary school science—you’re left with sodium acetate and water. Sodium acetate isn’t an effective cleaning agent, so you’re basically making more expensive water. The chemical reaction itself can help clean a clogged drain or a crusty pan, but for the most part, vinegar and baking soda are more effective when used separately.

A Quick Castile Soap Chemistry Lesson

Castile soap is a base. Mixing it with acids breaks it down and neutralizes its effectiveness. Don’t combine castile soap with vinegar, lemon juice, or hydrogen peroxide. Oxygen bleaches like OxyClean contain hydrogen peroxide, so don’t mix those with castile soap either. If you want to harness the different cleaning effects of castile soap and hydrogen peroxide, for example, use them separately with a rinse in between.

You can mix castile soap with water and baking soda. Baking soda adds a little grit to castile soap, which is useful for scrubbing and doesn’t undercut the soap’s effectiveness.

Essential Homemade Natural Cleaner Recipes

You can clean most things in your house with either a soft scrub or an all-purpose cleaner. There are lots of variations of these recipes online. These are the ones I like.

DIY Soft Scrub Recipe

  • ½ cup castile soap
  • 1½ cup baking soda
  • ¼ – ½ cup water (use distilled water if your tap water is very hard)
  • 2 tablespoons distilled white vinegar

Mix the castile soap and baking soda in a large bowl. In a separate bowl, mix ¼ cup water with the vinegar. Combine it with the baking soda mixture. Add more water to get the consistency you want. Store a thicker paste in a covered container. If you add enough water to make a pourable solution, use a funnel to put it in a squirt bottle.

* I know I just said not to mix vinegar and castile soap. In this case, the baking soda is also a base. It protects the soap from being neutralized by the baking soda.

DIY All-purpose Spray Recipe

Mix either of the following in a spray bottle.

Recipe 1 (my preferred):

  • 2 cups water (use distilled water if your tap water is very hard)
  • 2 tablespoons castile soap
  • 10-20 drops of your favorite essential oil (optional)

Recipe 2:

  • 1 cup filtered or distilled water (distilled if your water is very hard)
  • 1 cup distilled white vinegar
  • 10-20 drops of your favorite essential oil (optional)

Lemon Vinegar Recipe

This one is optional, but it’s one of my favorite homemade products, especially for cleaning kitchen counters.  Collect lemon peels, or peels from any citrus fruits, in a large jar. Keep them in the freezer if you won’t have a bunch at once, as you might if you’re making a batch of lemon curd or freezing lemon juice.

Once you have enough, pour distilled white vinegar over them until they are completely covered. Place a lid on the jar and let them sit on your counter for one to three weeks.

Strain the vinegar through a fine mesh strainer. Discard the peels, and keep the vinegar in a jar. Use this vinegar in place of the white vinegar in the all-purpose spray above. It leaves a pleasant lemon scent, plus you get the cleaning power of lemon!

Ok, let’s get cleaning!


How to Clean Your Cast Iron Skillet

Contrary to popular belief, it’s probably fine to use dish soap on cast iron, but many purists avoid it anyway. The one thing you never want to do is soak your cast iron pan in water, soapy or otherwise!

The easiest way to clean cast iron is with plain hot water, a stiff-bristled brush, and elbow grease.

For stuck-on food, pour about ¼ to ½ inch of water into the pan, put it on the stove, and crank up the heat. When it starts to simmer, use a silicone spatula to scrape up the stuck-on bits. Pour the water out carefully and attack any remaining stuck-on bits with a brush or silicone scraper. While the pan is still warm, you can also add some kosher salt and use a towel or your fingers (don’t burn yourself!) to scrub at the bottom.

Once clean, dry it thoroughly with a kitchen towel and rub a small amount of oil into the surface. There are countless opinions about which oils are best. The general consensus is: none of the ones Primal folks will want to use. I usually rotate between coconut, olive, avocado, and lard.

DIY Natural Oven Cleaner

Remove the racks. You’ll clean those separately.

Give the entire inside of the oven and the door a wipe down to remove crumbs and surface grease.

Make a paste of two parts baking soda to one part water. Smear it thickly on the inside of the oven door and inside the oven wherever there is baked-on gunk. (Hat tip to Bren of the Bren Did blog for researching the best method.) Let it sit for 20 minutes, then use a damp cloth or sponge to remove it. For really caked-on messes, repeat this step, but close the oven and let it sit overnight. The following day, remove the dried paste using a silicone scraper and warm water.

Now that the crust is gone, wash the entire inside of the oven with your DIY Soft Scrub or All-purpose Spray. Use damp cloths to thoroughly wipe down every surface.

Finally, clean the racks with DIY Soft Scrub. Use your bathtub if the kitchen sink is too small. If needed, let them soak overnight in hot water with a squirt of castile soap. You can also run them through your dishwasher if they fit.

How to Clean Your Stainless Steel, Porcelain, or Ceramic Sink

Rinse the entire sink with hot water and give it an initial wipe down with a cloth or sponge. Sprinkle baking soda all over the surface and start scrubbing. For stainless steel, make sure you’re working in the direction of the grain.

Next, spray the whole thing with vinegar or your DIY Lemon Vinegar All-purpose Spray. Let it do its fizzy thing, then rinse thoroughly.

Alternatively, your DIY Soft Scrub will work great on a grimy sink.

For stainless steel, finish by drying the sink. Then, put a few drops of olive or avocado oil on dry microfiber cloth and rub down the surface.

How to Clean Your Coffee Maker or Keurig with Vinegar

First off, always consult the user’s manual to see what internal parts and filters need regular cleaning or changing.

Most removable parts of a coffee maker—carafe, lid, filter baskets—are dishwasher safe. Again, double-check your manual. Run these through a dishwasher cycle weekly.

Once every couple months, clean and descale your coffee maker or Keurig. Unplug the unit and remove all the removable parts. Run them through the dishwasher, or wash them in a sinkful of hot water with a few drops of castile soap. Use a dry microfiber cloth to wipe down the inside and outside of the machine.

Put everything back together, then fill the reservoir with distilled white vinegar (don’t use any other kind for this purpose). Run a brew cycle. Dump it out, then run another cycle with plain water. Repeat if necessary to get rid of the vinegar taste or smell.

Cleaning a Wooden Cutting Board

To clean a wooden cutting board, especially after using it for raw poultry, rinse it and use a brush to scrub it under very hot running water. Then, spray it with undiluted vinegar and wipe it down with a clean, dry cloth.

You can also sprinkle it with salt and use a cut lemon to scrub the surface. The abrasiveness of the salt mixed with the acidity of the lemon will clean and freshen the surface.

How to Clean Your Toilet Naturally with a DIY Cleaning Solution

Start by pouring one cup of vinegar into the toilet bowl and four cups into the tank (yes, the tank needs cleaning, too). Spray the inside of the bowl with your DIY All-purpose Cleaner or squirt DIY Soft Scrub under the rim. Let it sit while you go clean the sink, mirror, and shower.

Next, scrub the inside with a toilet brush. For very dirty toilets, sprinkle some extra baking soda directly on the toilet brush and add a small squirt of castile soap. Flush the toilet and repeat if necessary. Flush again and rinse off the brush in clean water.

Finally, use your DIY All-purpose Cleaner and a sponge or microfiber cloth to clean the handle, outside of the toilet, and toilet seat. It probably goes without saying, but don’t use that same sponge or cloth to clean anything else until you wash it.

DIY Natural Grout Cleaner for Showers and Tile Floors

Start with a 50/50 mixture of vinegar and warm water like your DIY Lemon Vinegar All-purpose Spray. Spray it on the grout and let it sit for about five minutes. Then grab a stiff brush and get scrubbing.

If the grout still needs more love, use your DIY Soft Scrub. Sprinkle some extra baking soda over the grout for extra scrubby-ness.

For really tough stains, put a scoop of baking soda in a bowl and add enough hydrogen peroxide to make a paste. Smear it over the grout, wait 5 to 10 minutes, then get to work with your scrub brush.

DIY Shower Cleaner Spray

Once you’ve cleaned your shower grout, let’s keep clean, eh? For shower maintenance, fill a spray bottle with diluted vinegar, anywhere between a 2:1 and 4:1 ratio of water to vinegar. Optionally add a few drops of your favorite essential oil.

After each shower, give the walls and shower door a quick squeegee. A few times per week, spray the walls with the vinegar spray. (Do not use on marble or natural stone tiles.)

How to Clean Your Showerhead Naturally with Vinegar

Does your showerhead spray little needles of water in all directions? Are half the pinholes clogged? Easy fix.

Remove the showerhead if you can, then soak it in a small container of straight vinegar. For gold, brass, or nickel-coated showerheads, remove after 30 minutes. Otherwise, you can leave it to soak overnight. Optionally give it a quick scrub with a toothbrush, then reattach it and run hot water to clear it out.

If you can’t remove the showerhead, place a couple of cups of vinegar in a plastic bag. Place the bag over the showerhead and secure it with string or pipe cleaner. Then follow the instructions above.

DIY Natural Bathtub Cleanser

Follow the instructions above for cleaning a sink.

If your tub is mildewy, start by spraying the entire surface with undiluted vinegar. Let it sit for an hour, then sprinkle on baking soda and do an initial scrub of the whole surface. Rinse well, then give it a second cleaning with your DIY Soft Scrub.

DIY Non-toxic Carpet Cleaner Recipes

Carpet stains are tough because the best cleaning method depends on what caused them in the first place. Here are some good general recommendations for spot cleaning:

Try to clean spills right when they occur. Blot up wet messes with a clean towel; don’t rub the stain into the carpet.

Next, spray the spot with a cleaning solution. You can use the DIY All-purpose Cleaner made with castile soap, or make a solution of 1 cup water, ½ cup hydrogen peroxide, and 1 teaspoon of castile soap. Gently work at the stain with a clean cloth. Once the stain is up, spray the area with diluted vinegar and dab it with another clean cloth to remove any remaining soap.

For larger carpet cleaning machines, know that adding anything besides the manufacturer-approved cleaning solution probably voids your warranty. If you don’t care, try filling the tank with very hot water and adding just a couple drops (yes, really) of castile soap. Clean the carpet, then do a second round with just hot water and a cup or two of vinegar. Make sure you suck up as much water as possible with the machine.

The same cleaning solution should work for upholstery, but don’t forget to test it in an inconspicuous spot to make sure it won’t lift the color.

DIY Natural Glass Cleaner for Windows and Mirrors

Spray the window or mirror with 1:1 solution of vinegar and water (distilled if you have hard water). Squeegee and/or wipe the glass with a dry microfiber cloth.

For dirty outdoor windows, mix 1½ teaspoons of castile soap with 2 cups of water in a spray bottle. Use that solution to clean the windows first, then follow up with the diluted vinegar.

Non-toxic DIY Floor Cleaner for Wood, Tile, Laminate, or Linoleum

For hardwood and tile floors, good ol’ vinegar will do the trick. Mix ½ cup vinegar or Lemon Vinegar per gallon of warm water. Mop the floors with a microfiber mop.

For more delicate surfaces like natural stone, it’s better to skip acidic cleaners. In that case, you can mop with a solution of 3 tablespoons of castile soap in a gallon of water. You might want to do a second pass with just water to make sure all the soap is up.

How to Clean Your Mattress

Maybe you never thought about cleaning your mattress, but it accumulates dirt, dead skin, mites… actually, don’t think about it too hard or you won’t want to get into bed tonight.

First, strip all the bedding and wash it in hot water. Then, get your vacuum out and vacuum your mattress. For stains on the surface, you can use the carpet spot-treating solutions above, but make sure you don’t get the mattress too wet. Use a barely damp cloth to rub at the stain.

Next, stir ~10 drops of your favorite essential oil into a cup of baking soda. Place it in a mesh sieve and dust the baking soda evenly over the top of the mattress. (You can also use plain baking soda for this.) Let it sit for about an hour, then vacuum thoroughly again. If you want, lightly spritz the mattress with a homemade linen spray like this one, but make sure it’s completely dry before replacing the mattress cover and sheets.

DIY Natural Makeup Brush Cleaner

Castile soap works great on makeup brushes. First, clean the brush heads with plain water to get as much makeup off them as possible. Then, put a squirt of castile soap on a small dish and swirl the brush head around in it to clean the bristles. Rinse the bristles under running water, massaging them with your fingers to release the dirt and soap.

Repeat these steps until the water runs clean. Replace the soap in the dish as often as needed.

Optionally, you can put some diluted vinegar in a small jar and swirl the brushes in the vinegar as a final cleaning step. Either way, dry the handles with a towel and lay the brushes out to dry completely.

DIY Yoga Mat Cleaner Spray

You should wipe down your yoga mat regularly, especially if you’re bringing it to a yoga studio. Make your own spray by combining ¼ cup of vinegar or Lemon Vinegar with 1 cup of water and, optionally, a few drops of your favorite essential oil. Spray evenly over your mat and wipe with a clean towel.

To deep clean your mat, run some warm water in your bathtub and add a squirt of castile soap. Soak the mat for 10 minutes or so, then scrub both sides with a sponge. Rinse well (a detachable showerhead is great here). Hang to dry completely—ideally in the sun, the best natural disinfectant of all—before rolling it up again.

DIY Jewelry Cleaner

Jewels can be delicate, especially soft stones like opals, pearls, lapis lazuli, and turquoise. If you aren’t sure how to clean a specific piece of jewelry, please ask a jeweler.

For solid metal pieces, fill a bowl with warm water and add a couple drops of castile soap. Let your jewelry soak for a few minutes, then rinse. (For small jewelry, plug the sink drain first!) Use a cotton cloth or a toothbrush with very soft bristles to clean any remaining dirt off the pieces.

If you have tarnished sterling silver jewelry, line a bowl with aluminum foil. Add 1 cup of hot water, 1 tablespoon of baking soda, and 1 tablespoon of salt. Let the jewelry soak in this solution. After about 10 minutes, it should look much better. Remove it carefully and rinse it under clean water, then dry with a clean cloth. This works for silverware, too.

Primal Kitchen Pizza Sauce

The post How the Heck Do I Clean That? Natural and Non-toxic DIY Cleaning Solutions for Your Home appeared first on Mark’s Daily Apple.

Be Nice and Share!
This post was originally published on this site

Originally posted at: http://www.nerdfitness.com/

“HOW COW! He doesn’t even look like the SAME PERSON! ”

Meet Aksel, an economics student from Norway who is on a mission to turn into Wolverine.

I think you’ll agree with me in saying he’s more or less succeeded!

Aksel joined NF Coaching a year ago with the goal of losing some weight and building a lot of muscle.

So our very own Coach Taylor helped him do it.

However, pictures don’t tell the whole story.

Before joining Nerd Fitness, Aksel had hit a “rough patch” and knew something had to change in his life.

Here’s how Aksel’s journey went down.

The 4 Keys to Aksel’s Transformation

Aksel before and after

Aksel used to be an avid swimmer when he was a teenager, even competing in the national swimming championships in Norway.

Then, life happened.

Somewhere along the way, Aksel stopped swimming. Then he more or less stopped exercising. Soon alcohol and pizza began to provide him with most of his “nutrients.”

From all of this, Aksel became depressed.

This continued until one sad day, Aksel’s uncle passed away from cancer. This acted as a “reality check.” Aksel realized his lifestyle wasn’t making him a healthy person.

So he decided something had to change.

After going down a Google rabbit hole, Aksel found Nerd Fitness. He quickly decided that a coach might be exactly what he needed.

So he dived into the Rebellion.

Here are the 4 BIG changes that helped Aksel make progress:

Aksel before and after

#1) ALL CALORIES COUNT.

From Aksel, “I began getting in shape by tracking everything I ate.

I never knew how many calories were in the food I bought. Why are there so many calories in beer!?!

It was really eye-opening to analyze all the food and drinks in my life. Even ‘healthy’ food is often packed with calories.”

Once Aksel got his head around all this, he made a plan with his Coach.

Aksel still wanted to eat a diverse diet, plus he wanted to be able to have the occasional drink with his friends. However, he started to consider the amount that would help him reach his goals.

Takeaway: you don’t have to count calories, but all calories count. For the right clients, we’ll create a mission to have them track their food intake for a week. This helps to give a full picture of how they’re eating.

Many clients start to naturally behave differently after going through this exercise.

#2) STRENGTH TRAINING CHANGES EVERYTHING.

Aksel before and after

When Aksel first attempted to get in shape, he decided to start running.

But Aksel’s knees hurt from jogging. So he stopped.

When he joined NF Coaching, he mentioned to us that he wanted to build some muscle. So his coach had him start strength training immediately…since that’s how you build muscle.

It didn’t take long for Aksel to fall in love.

He started seeing results right away, losing body fat that he’d never been able to shed before.

The energy and confidence he gained from strength training propelled him to keep going.

Takeaway: strength training is one of the best things you can do for your body.

As we say around here, a strong nerd is a healthy nerd. No matter what your goals are, being strong will help them.

#3) DON’T UNDERESTIMATE THE POWER OF A GOOD NIGHT’S REST.

Aksel after

If you’re going to strength train, you need to recover.

That means you need to prioritize a good night’s sleep.

“I used to be a zombie before. But developing an actual sleep schedule has probably made the biggest difference in my life. Sleep helps my training. And my training helps me sleep.

I’m not sure I could do one without the other.”

Takeaway: don’t overlook your sleep habits. Proper shuteye really does make everything easier.

#4) HAVING A GUIDE WHO KNOWS THE WAY IS A GAME CHANGER.

Aksel before and after

As Aksel puts it, “Yes, you can just google most things.

But a coach adapts to you and your goals. It becomes SO MUCH easier when you have someone helping you out.

I was clueless when I started, and although I’m more knowledgeable now, I continue with my coach because I just want to be told what to do. This allows me to focus my brain power on my studies.”

Takeaway: you don’t have to figure this out alone. Yep, lots of people are able to search the interwebz for info and make a plan from that.

However, if you don’t want to go through all that trial and error, a coach can be a great way to progress at a quicker pace.

Through Hard Work, Amazing Things Are Possible

Aksel before and after

I’m gonna be real with you: what Aksel and his coach achieved is truly incredible.

If I didn’t know Aksel’s coach – and hadn’t seen the progress pictures – I might be a tad skeptical myself.

A fun gif of characters giving a suspicious eye.

But once you start to understand all the hard work Aksel put in, you begin to see what happened:

  • Aksel’s coach made a plan.
  • Then Aksel went and executed it to a T.

In other words, Aksel put in the work and the results followed.

Here’s the most important thing about Aksel’s journey: he started.

After spending a little bit of time on the internet, Aksel found a program that seemed doable and jumped in.

Yes, he’s been working very hard the last year. But all that hard work resulted from one decision: hiring a coach.

Around the Rebellion, we call this “20 Seconds of Courage.”

One moment – that often only takes seconds to do – that will help you gain momentum to move forward.

For some, it’s opening up a recipe book and turning on the stove.

For others, it’s walking through the front door of a gym.

For Aksel, it was hiring an expert and following their plan.

While it might only take 20 seconds, the first step is often the most important one.

You just have to take it when the moment arrives…like Samwise Gamgee.

A gif of Sam telling Frodo he's the farthest from home he's ever been.

If you want someone to help you start your journey to leave the “Shire,” we’re here to help.

We have a team of wizards who do this stuff all day, every day:

  • We have kick-ass Coaches that create custom programs for our clients. For Rebels willing to put in the effort (like Aksel), we get amazing results (also like Aksel).
  • We offer worldwide accountability and support. If you start traveling again in 2021, your NF Coach will come with you. They’ll assess your new surroundings and build you a custom plan for your new environment.
  • We check-in and adapt. Your coach won’t just establish a program and walk away. They’ll actually talk to you and make sure it’s working. If it’s not, no problem. We’ll record that information like a scientist and work with you to create a new path forward.

Sound good?

IF you are ready to jump into battle with your own Gandalf in your pocket (through the NF Coaching App, not literally)…

Let’s make a plan for you to be the next Nerd Fitness success story:


For the Rebellion!

-Steve

PS: Seriously, Aksel is awesome. Holy moly.

PPS: Shoutout to Coach Taylor for showing Aksel the way!

###

The post Behind the Scenes of Aksel’s “Unreal” Transformation first appeared on Nerd Fitness.

Be Nice and Share!
This post was originally published on this site

http://www.marksdailyapple.com/

The pantry can be a place for quality foods – canned wild-caught salmon, almond flour noodles, quality cooking oils and all of your favorite sauces and condiments made without sugar. The pantry can also house the usual carb suspects – chips, cookies, crackers, pasta, cereal and bread. If you’re not careful, this cool and dark space could derail your best efforts to eat foods that make you feel your best.

Follow these 8 easy steps and you’ll be well on your way to having a pantry that feeds your body in the way that your genes expect you to be fed.

1. Unload the Junk Food

The first step toward a Primal-minded pantry is purging it of the wrong foods.

Sure, the Primal lifestyle involves flexibility, but the pantry is a place to be a little more rigid so that you can leave your flexibility for situations where you may have less control (for example, traveling or engaging in a business dinner).

Toss out anything that:

  • You’ve decided isn’t part of your lifestyle right now
  • Is overly processed
  • Makes you feel tired, slow, or causes other physical changes
  • You consider your “weakness”

If you get rid of things that might cause you to stumble, it’s easier to stay on the right path in your day-to-day life. You remove the burden of foods calling out to you every time you pass the pantry. After those are out of your home, you only have to make sound decisions at the grocery store.

This doesn’t mean you have to be wasteful. Deliver your unopened items to a food bank or other charity that would appreciate a food donation.

2. Stock Up on Nuts and Seeds

After getting rid of the items that don’t work, load up on quick snacks that do work. Raw almonds, walnuts, macadamias are some fantastic options that will stay fresh for at least a couple months. Sunflower and pumpkin seeds are some other great options.

As with anything, just be sure to watch the flavored varieties. Certain natural flavorings are fine, but others introduce industrial seed oils and sugar to an otherwise quality snack. Keep an eye on ingredient labels.


3. Replace Industrial Seed Oils with Better Culinary Fats

Keep your pantry well-stocked with olive oil and avocado oil. You’ll be using on a daily basis. Fat does go rancid, though, so be sure to buy only as much oil as you’ll finish in a month.

Not sure which ones you’ll use the most? Check out The Definitive Guide to Fats.

4. Be Ready for Your Sweet Tooth

We all have a sweet tooth. Sweet stuff tastes good to us because it’s quick energy that can be stored (as body fat – evolutionarily a good thing, not so great for modern life).  So it’s normal for us to want some sweets in the pantry – just don’t go crazy with it and stick to acceptable sources. Honey is good to have on hand, as is semi-sweet dark chocolate (go for a good quality, mostly-cacao, low-sugar chocolate bar).

It’s also a good idea to stock your pantry with alternative flours and sweeteners that you can use to make healthier versions of your favorite bakery items. Some recipes to try:

Primal and Keto Brownies

Keto Chocolate Chip Cookies

Keto Blueberry Muffins

5. Fill Your Cup

Tea and coffee absolutely have a place in your pantry. In the Primal community, we love our coffee in the morning. Black, green, and herbal teas are a great mid-morning or afternoon pick-me-up, as long as you don’t sip so late that you mess with your sleep.

I also always have on hand chai collagen mix and matcha collagen mix to get a serving of collagen through a lightly sweet, frothy latte.

6. Flavor, Flavor, Flavor

Healthy, clean eating often gets the bad rap of being bland and tasteless. Herbs, spices, sauces, marinades, and dressings will keep you from getting tired of eating the same old thing, and will inspire you to create new dishes based off of ingredients that you already use frequently.

7. Jerky

Keep some jerky on hand for a quick protein snack – beef, buffalo, salmon, turkey, deer, moose. Even better, make your own jerky so that you get to choose what goes into your body. If you’ve never tried pemmican, take a crack at it. It’s a fan favorite recipe.

Keep in mind that most homemade jerky (or quality jerky purchased in a store) is less processed and will therefore go rancid much faster than the stuff you get at the truck stop. I somehow doubt, however, that eating your jerky on time will be a problem.

8. Canned Goods

You’ve ditched the canned beans and cherry pie filling, but don’t eschew the can altogether. It’s a good format for vegetables, and its convenience simply cannot be ignored. Canned tomatoes are just as good as most fresh tomatoes (sadly, it’s tough to find a good tomato nowadays). Pasta sauce made without sugar or industrial seed oils help along a quick dinner when you’re in a pinch. Artichoke hearts in the jar, canned pumpkin (not pumpkin pie mix), canned salmon or sardines, and canned coconut milk are also staples to have on hand.

Collagen_Quench_640x80

The post Spring Clean Your Pantry for a Healthy Year appeared first on Mark’s Daily Apple.

Be Nice and Share!
This post was originally published on this site

http://www.marksdailyapple.com/

plankThe plank feels like the simplest movement. Heck, it’s not even a movement, really: it’s holding a still position without movement. It expressly forbids movement. And yet it’s the simple exercises where things can really go wrong.

The plank is simple but not easy. When you’re in the plank position, every fiber of your being is resisting the pull of gravity. You must engage and tighten every inch of musculature in your body to resist collapse. To maintain coherence throughout the line your body forms. During a plank, you are quite literally holding the line against the most omnipresent force in the known universe.

At least in a push-up, you’re moving. You have something else to focus on. For a plank, a lot of the difficulty is mental. You’re just there in the same position, getting more and more tired with each passing moment. You have to sit with the pain.

Okay, so what’s the basic plank form?

Forearms or hands.

First choose whether you’ll be doing it on your forearms or on your hands. If you’re on your forearms, this places more emphasis on the core. If you’re on your hands (as if you’re at the top of a push-up), there’s more emphasis on the shoulder girdle. Try them both out and see which ones work best for you. I’d recommend doing both varieties on a regular basis just to cover your bases.

Line up your elbows or hands directly below your shoulders.

Imagine your arms are Greek columns holding up the temple that is your body. Those columns must be straight, they must be vertical to support the weight in the most advantageous position possible. If your elbows or hands aren’t lined up with your shoulders, the exercise will be harder and you might strain your shoulders.

More advanced versions of the plank have your hands/elbows drift ahead of your shoulders to increase the difficulty, but today’s post isn’t about those.


Form a plank – a straight line.

The technique is right there in the name of the exercise: plank. Form a plank, a single cohesive piece from head to toe. Tighten everything up. You should be a straight board.

Squeeze your glutes.

A good cue is imagining you’re pinching a quarter between your butt cheeks. Really engage those glutes because they support the entire posterior chain and keep your hips from dropping.

Look at the ground.

To keep your head in line with the rest of your body, loo at the ground. This promotes a neutral spine and head position.

Tuck your pelvis.

Instead of arching teh back, do a slight pelvic tuck to really engage your abs. The pelvic tuck also allows you to use your quads and push against the ground with your feet. The plank is supposed to activate/engage every muscle of the body, not just the posterior, and the pelvic tuck promotes this.

With the slight pelvic tuck, you may feel like your butt is up in the air but it’s really not. Just feels that way.

Push hard against the ground.

Push hard against the ground with your hands/forearms, like you’re trying to push the ground away from you, to protract your shoulder blades. This activates the serratus anterior, an often neglected muscle group.

Common Plank Mistakes

The plank is simple enough, but people make mistakes. Here are the most common.

Hands/elbows not aligned with your shoulders.

As you get more advanced you can slide your hands/elbows forward to increase difficulty, but if you’re just beginning your hands/elbows should be directly in-line with your shoulders.

Excessive arching of the back.

People do this because they’re worried about their hips rising, but this takes the abs out of the picture, impairs the ability of the quads to engage, and can actually stress your lower back. Tuck your pelvis.

All the weight on the arms.

Many people think of the plank as an upper body workout. You’re holding yourself up with the arms and contracting the abs, but the legs and feet are just kinda “there.” Don’t forget to actively press against the ground with feet and legs.

Not protracting the shoulder blades.

Many coaches teach shoulder blade retraction during the plank, but this is a mistake. It takes the serratus anterior completely out of the exercise and shortchanges a lot of tension (and thus strength) you can be applying.

Going to failure.

Stop short of form breakdown. It’s nice to test your max plank time every now and again, but don’t make it a habit. Training that way can instill poor motor patterns and increase your injury risk.

Primal_Essentials_640x80

The post Common Plank Mistakes to Watch Out For appeared first on Mark’s Daily Apple.

Be Nice and Share!
This post was originally published on this site

Originally Posted At: https://breakingmuscle.com/feed/rss

Fish oil supplements have many proven health benefits, so scientists are researching to ascertain if fish oil can aid in muscle soreness and recovery.

Fish oil supplementation has gained a lot of attention for its health benefits. Specifically, supplementation of omega 3 fatty acids has demonstrated positive effects on blood pressure, triglycerides, and heart rate.1


read more

Be Nice and Share!
This post was originally published on this site

Originally Posted At: https://breakingmuscle.com/feed/rss

If you focus on your training mindset, you will develop more than just physical strength.

The key to effective fitness and training is to know yourself. Introspection’s power will allow you to develop a deep sense of understanding for everything you will learn on your journey.


Danny Kavadlo, with his brother Al Kavadlo, is an authority in calisthenics and fitness.


read more

Be Nice and Share!
This post was originally published on this site

http://www.marksdailyapple.com/

Hey folks! You may have noticed something a little different this Friday. Weekly Link Love is now our New and Noteworthy series. We’re following the same format that a lot of you have been reading for over a decade now: it’s a collection of interesting reads I found around the Internet over the week. Enjoy!

Research of the Week

Exposure to SARS-CoV-2 without infection is enough to generate protective T-cell memory.

Dim light increases West Nile Virus exposure in chickens.

Some early Native Americans were coppersmiths.

Cows should eat a little seaweed every day.

The Southern European Atlantic diet traditional to North Western Spain and Northern Portugal is linked to reduced all-cause mortality. Who knew traditional diets were healthy?

New Primal Blueprint Podcasts

Episode 477: Wade Lightheart and Matt Gallant: Host Elle Russ chats with Wade and Matt about magnesium and digestion.

Episode 478: Mark Sisson: Host Brad Kearns chats with yours truly about some recent developments in my thinking on diet, fitness, and business.

Health Coach Radio: Parker Stevenson wants you to track the health of your business.

Media, Schmedia

Some “experts” think we should dye meat blue to curb our “insatiable” demand for animal protein.

uBiome founders charged with fraud.

Interesting Blog Posts

The cyclical nature of health and diet.

Don’t let negativity linger.

Social Notes

You love to see it.

Don’t forget to meander.

Everything Else

Adulteration of elderberry products is a big issue.

Dietary carbs and energy expenditure.

Can antibiotic-resistant microbes thrive on microplastics?

Things I’m Up to and Interested In

More unintended consequences: Average person gained 1.5 pounds per month during lockdown.

Important reminder: Why eating too much impairs thinking.

This will surprise some (but not me): Smaller farms have increased yields and more biodiversity than larger farms.

This is interesting: How musical training affects the adult brain.

Very cool: A map of Alexander the Great’s empire.

Question I’m Asking

How has your weight changed over the last year?

Recipe Corner

  • Sheet pan recipes are great and highly efficient, including this sheet pan chicken stir fry.
  • Skirt steaks are underrated. You have to cut them the right way or else they’re tough, but man is it rewarding.

Time Capsule

One year ago (Mar 20 – Mar 26)

Comment of the Week

“Mark, I think what you said was:

‘If one advances confidently in the direction of his dreams, and endeavors to live the life that he has imagined, he will meet with a success unexpected in common hours.’
Henry David Thoreau”

-Exactly, jeff!

Matcha_Collagen_Keto_Latte_640x80

The post New and Noteworthy: What I Read This Week — Edition 123 appeared first on Mark’s Daily Apple.

Be Nice and Share!
This post was originally published on this site

http://www.marksdailyapple.com/

Hi there, folks! In this week’s Ask a Health Coach, Erin is back to answer your questions about the pros and cons of consistent eating patterns, how to avoid chronically overdoing it in the gym, and staying motivated when everyone around you is addicted to a SAD lifestyle. Do you have questions for Erin? Post them in the comments section below or over in the Mark’s Daily Apple Facebook group.woman catching her breath and checking her heart rate when runningwoman catching her breath and checking her heart rate when running

Angie asked:
“I read somewhere that eating the same foods at the same time every day is best thing for fat loss. You know, for consistency. Can you tell me what times you recommend eating for the fastest results?”

Instead of telling you the best time to eat, I’m going to let you in on a little secret. The key to fat loss isn’t eating the same thing day after day after day — or eating it at the same time. Your body isn’t keeping score on what you ate and when you ate it. And it’s certainly not built for sticking to a rigid schedule that goes against everything our bodies and brains are designed to do.

Yes, Your Body Thrives on Inconsistency

Life, by nature, is totally inconsistent and training your body to adhere to a strict eating plan is the fastest way to fail because life will always get in the way. Always. There will always be curve balls: waking up too late to make a satiating protein-packed breakfast, forgetting to go grocery shopping, enjoying a much-needed vacation one day with free-flowing margaritas that in no way, shape, or form fit into your daily macros.

Hanging your hat on consistency in an inherently inconsistent world might yield results, but you deserve better than obsessing over food, sticking to a strict eating window, and constantly trying to force the situation.

Listen, the body is highly adaptive — it thrives on inconsistency. When the body gets used to a certain way of doing things, it starts to conserve its efforts (i.e. stall progress). You’ve likely seen this in the fitness world. Train your body the same way day after day, and after a while your strength will plateau. That’s why personal trainers recommend changing frequency, intensity, and type of activity every so often, so that you can increase your ability to adapt to new variables (and keep crushing it). Same thing goes for food.

Ever Heard of Metabolic Adaptation?

Sure, your body will adapt at the beginning of a hyper restrictive eating plan, but then it won’t change again until you change the variable. When it comes to cutting calories for fat loss, the body will adapt to that consistently-delivered lower number of calories. It gets used to what you give it! The problem, is, you’ll need to continue going lower and lower until you can’t possibly decrease your calories any further. You won’t win this one, trust me — your body will keep adapting.

That response is called metabolic adaptation.1 And it’s a good thing. While it works to conserve more energy when there’s a deficit, it also works to burn more energy when there’s a surplus. Got some high-calorie days and some low-calorie days? A few glasses of wine here, a few chocolate-chip cookies there? Your body can totally handle what you give it. The body isn’t wired for a steady, expected delivery of fuel. It is designed to roll with inherent, inevitable inconsistency. And I’d argue that you’d be much better off if you learn to love that about it.

Lance asked:

“Recently, I’ve been asking myself why I’m working so hard on my health when so many folks
around me have surrendered to a SAD diet and sedentary lifestyle. What can I do to stay
motivated when everyone else seems not to care?”

First of all, I applaud you for giving these thoughts the attention they deserve. I know from experience that it’s hard to be the only one who seems to care about their health. And the fact that you’re consciously chewing on these thoughts means you care about yourself and the outcome. While there’s tons of data out there about how eating Standard American Diet (SAD) foods and having a sedentary lifestyle can lead to cardiovascular disease and diabetes, there are just as many people plopped on their couches, downing their daily dose of refined grains, overly processed snack-foods, and sugar-laden drinks.2

The Only Person You Can Control is You

Here’s the deal though, you can’t control other people or their actions. You can, however, decide that your health and happiness are worth making the effort to continue working on yourself. You can decide that you’d prefer not to take a conscious role in adding to your chance of developing a chronic disease. You can decide that obesity doesn’t have to be in your future, regardless of what your inner circle does or doesn’t do.

What Motivates You?

Getting clear on your motivation for change is going to make the biggest difference here. Sure, avoiding medications and doctor visits down the road plays a big role, but really think about why your health is important to you. That why is the driving force behind your actions, and it’s likely influenced by a variety of intrinsic and extrinsic motivators, meaning you’re either motivated by something internal (eating fresh veggies makes you feel more energetic) or something external (you like the way your pants fit when you’ve been eating supportively).

Your own personal and important internal motivations are what you want to really anchor to; these will be your strongest why. It’s really important to discover your own deep-down reason for staying committed to the path you’re on — and letting the naysayers carve out their own.

Amanda asked:

“Now that my gym is back open, I like taking the hour-long spin classes they offer, but I notice that my heart rate gets very high. It’s definitely not slow and steady cardio like Mark recommends in the Primal Blueprint and it’s too long to qualify as sprints. When or how do I fit these workouts into a primal lifestyle?”

If we were sitting face-to-face on a Zoom call, I’d have so many follow-up questions for you. But since we’re having more of a one-sided conversation today, I’ll do my best to answer. In a nutshell, I’d say that the best way to fit these workouts in depends on your goal. If your goal is to have fun and your spin class is the most fun-filled hour of the whole day, I say go for it. That said, if your goal is to lose fat or improve your fitness, I’d take a closer look at why you’re committed to doing this chronic cardio, especially when you have a hunch it’s not in your best interest. For reference, some of the key fitness takeaways of the Primal Blueprint include:

  • Moving around at a slow pace
  • Lifting heavy things
  • Sprinting every once in a while

Clearly, sixty minutes of moderate-to-high heart rate doesn’t check off any of those boxes. Instead, it sort of puts you in this black hole of intensity that’s not easy enough to be easy or hard enough to be hard.

Exercise Isn’t a Form of Punishment

Diet culture tells us that we should use exercise as punishment or compensation, rather than joy.3 And unfortunately, a lot of money is spent on marketing to make you feel bad for not fitting into a certain mold. That’s why it’s so important to get clear on why you’re so committed to this class. Like I said above, if you love the social aspect, the music, getting out of the house, whatever, that’s a good thing. If you’re using it to cope with or avoid emotions, you’re obsessed with the calories burned feature, or you’re using it to ensure you’ve “worked off” last night’s dessert, I’d dig a little deeper.

What do you think? Agree? Disagree? Let’s go.

Oil_&_Vinegar_640x80

The post Ask a Health Coach: Consistency, Control, and Chronic Cardio appeared first on Mark’s Daily Apple.

Be Nice and Share!