This post was originally published on this site

https://www.girlsgonestrong.com/

If you’re a new mom, you’ve probably noticed your midsection looks different than it did before pregnancy. Maybe you have new stretch marks or lax skin, or perhaps people are still asking when your baby is due.

Some women also notice a feeling of weakness in their abdominal wall or ab muscles, or see bulging along the midline of their abdomen with certain movements (like when getting out of bed). While it’s not painful, it can be disconcerting.

Rest assured: This is all pretty common.

Remember, you just grew and birthed a baby, and your body went through huge changes to accommodate the development of new life. It’s really quite remarkable!

In this article, we talk about the postpartum abdominal wall and diastasis recti. You’ll learn:

Let’s get to it!

*If you have a significant diastasis or other concerns, we recommend consulting with a pelvic health physical therapist or your healthcare provider for an assessment and individualized physical therapy program.

What Is Diastasis Recti?

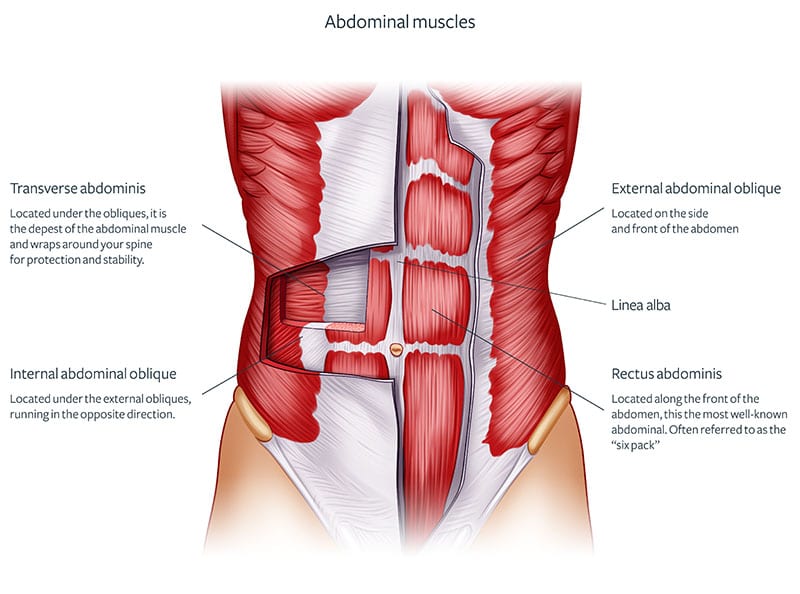
Diastasis recti is the natural separation of the abdominal muscles that occurs during pregnancy.

A diastasis is not a tear, a hole, a hernia, or a sign of inflammation. Rather, it’s a stretching and thinning of the linea alba (the connective tissue joining the two sides of the rectus abdominis muscles). Diastasis recti is commonly diagnosed based on the width of the gap between the muscles (a width of two fingerbreadths or more on a curl up is typically classified as a diastasis).

Figure of the abdominal muscles and their parts

As far as we know, prenatal diastasis recti can’t be avoided — the linea alba will stretch to accommodate the growing fetus safely. In other words, it’s a natural response to growing a baby. In fact, research has shown that up to 100 percent of pregnant women have a diastasis recti of more than 16 millimeters in their final trimester.1

But what happens in the postpartum period? Truthfully, it varies enormously from woman to woman.

A 2016 study found that at six weeks postpartum, 60 percent of women still had a diastasis recti of at least two fingerbreadths. By one year postpartum, that number dropped to 32.6 percent. The severity of their postnatal diastases ranged from widths of two fingerbreadths (mild) to more than four fingerbreadths (severe).2

Figures showing with and without diastasis recti

To put it simply: For many women, these changes resolve on their own over time. For others, the physical changes may be longer-lasting.

While some degree of abdominal separation is very common postnatally, it can be problematic for women with a wide or deep diastasis. These women may have aesthetic concerns (e.g., you may hear women mention their “pooch”) or may find it more challenging to do higher-level strength activities. For some women with severe diastasis recti, the tissue may become thin enough that it feels like there’s insufficient protection of the internal organs. When you check your diastasis, if the distance between the two sides of the rectus abdominis feels wider than two fingerbreadths, or it feels like you can sink your fingers into the abdomen along the midline with very little resistance (above or below your belly button), it’s a good idea to reach out to a physical therapist for guidance.

How do you know if you have diastasis recti? Learn how to assess your abdominal wall for diastasis recti.

Can I Heal My Diastasis Recti Postpartum?

New moms often ask physical therapists if they can heal diastasis recti postpartum. Depending on the woman asking, though, she may use language like…

  • “Can I close the gap?”
  • “Can I regain function in my abdominal wall?”
  • “Can I change how my stomach looks?”
  • “Can I make my ‘mummy tummy’ go away?”

… all of which are completely valid questions. So let’s talk about what healing means in the context of this article.

What Does “Healing” Diastasis Recti Mean?

Because diastasis recti is often diagnosed based on the distance between the two sides of the rectus abdominis muscles, clinicians used to define “healing” as closing the gap. However, our understanding of diastasis recti has evolved in recent years.

These days, our focus is more on the loss of connective tissue density and the inability to produce tension in the linea alba, which can compromise the function of the abdominal wall. In other words, there’s less concern with reducing the width of the gap and more emphasis on producing optimal ab muscle activation and restoring strength throughout the abdominal wall.3

So, clinically speaking, when we talk about healing diastasis recti, we’re referring to regaining optimal abdominal wall function.

But beyond this clinical definition, healing often means different things to different people. One postpartum woman may envision “healing diastasis recti” as meaning she can return to lifting heavy weights as part of her exercise routine, which might require that both sides of her abdominal wall function optimally. Another may see it as once again feeling comfortable and confident wearing certain clothes or looking in the mirror postpartum.

So with all that in mind, can diastasis recti be healed postpartum?

How much rehab and healing time your diastasis recti requires depends on a whole host of factors that vary from one person to another (e.g., genetics, age, number of pregnancies, width and depth of diastasis), as well as on your goals.

The good news? We do know that exercise can help improve the strength and function of your abdominal wall — so I’m going to teach you five exercises that are a good option to start with in the early postpartum period. 

But before we dive in, let’s run through four quick tips that may help optimize your recovery.

Are you a health or fitness pro? Learn more about training clients with diastasis recti.

4 Tips to Optimize Your Diastasis Recti Exercise Program

There are four important things you can do that may improve your outcomes while exercising with diastasis recti post-pregnancy.

Tip #1. Think About Stacking Your Body in a More Neutral Alignment

Your posture and the strength of your abdominal wall may affect each other in several ways. Here are some examples:

  • Many new moms adopt a more relaxed sway posture in which the pelvis shifts forward and the rib cage sits behind the pelvis. This posture requires minimal muscular effort and often depends on the more passive structures, such as joints and ligaments. The abdominal muscles don’t need to do much work and may be stretched for long periods throughout the day. (See figure on the left in the illustration below.)
  • To maintain your typical upright posture, the erector spinae muscles (which run along the length of your spine) may start working harder to compensate for your diastasis and the limited strength in your abdominal muscles.
  • Your spinal extensor muscles may work overtime to maintain posture and stability, which can result in upward rotation of the rib cage and further stretch of the abdominal wall. (See figure on the right in the illustration below.)

While there’s no such thing as “perfect” posture, and there’s no direct correlation between posture and something like lower back pain, you can practice a more neutral spine alignment by thinking about stacking your ribs over your pelvis and your diaphragm over your pelvic floor. (However, note again that there’s also no such thing as “perfect” neutral alignment! There is a range of positioning that qualifies as neutral.) See how it feels; for example, do you feel different muscles working? You should feel relatively relaxed, and this position shouldn’t be exhausting to hold. You can also play around with your alignment and see what works best for you as you go through different types of activities!

Figures showing different body alignment - sway back, optimal, rib thrust

Tip #2. Improve Your Core and Pelvic Floor Connection

When the tension and weight of the baby, fluid, and placenta has gone, actively contracting the muscles of the abdominal wall (including the deeper muscles, like the transverse abdominis) can feel challenging. This may leave some women feeling a sense of disconnect with their bodies. Some women have even described it to me as feeling like their abdominal wall is “a balloon that has popped.”

While regaining tension in the linea alba can take some time, working on the connection between your deep abdominal muscles and pelvic floor muscles could help you regain body awareness and improve muscle function.

Tip #3. Progressively Load the Abdominal Muscles

Many women with diastasis recti tend to underload their abdominal muscles, or in other words, they keep things too easy for too long. Other women may take things in the opposite direction and dive back into activities their bodies aren’t ready for quite yet. As with many things, it’s about finding a balance. In the first few months postpartum, you may want to be a little more conservative with abdominal exercises if you have a significant diastasis (your physical therapist can help guide you), but as the tissue recovery stabilizes, strength and function should take the focus.

Several research studies have shown that women with diastasis recti demonstrate weakness in the abdominal muscles on testing.4,5,6 As you return to exercise, focus on progressively loading your abdominal muscles (gradually increasing the difficulty, intensity, and loading of your ab exercises over time). Give yourself a challenge, but make sure to stop just before the linea alba begins to bulge (see tip #4).

Tip #4. Stop If You Experience Bulging at the Linea Alba or Pelvic Floor Symptoms

In the absence of individualized recommendations from your physical therapist, I recommend avoiding movements that cause doming, bulging, or sinking in the linea alba and that trigger symptoms of pelvic floor dysfunction (e.g., incontinence, heaviness in the vagina). These symptoms could indicate ineffective management of intra-abdominal pressure and an inability to coordinate the deeper muscle system appropriately for the work you’re doing.

While what can make diastasis recti worse is still unclear, it makes sense to avoid activities that could put unnecessary stress or pressure on the connective tissue or aggravate the pelvic floor.

5 Exercises for Postpartum Diastasis Recti

The following exercises are suitable for women who have a diastasis of up to three fingerbreadths wide and can still feel tension in the linea alba. If you have a more significant gap or a lack of tension (i.e., your linea alba feels soft and your fingertips sink into your abdomen), consult with a physical therapist before proceeding.

But are these the only postpartum diastasis recti exercises you can do? Absolutely not! 

There are literally hundreds of exercises that might be suitable for you. However, many women are worried about getting started, so here are some simple options. We recommend combining them with simple functional exercises such as a squat, deadlift, or row.

Complete 2–3 sets of 10–12 repetitions (alternating sides when relevant) for each of the following exercises. (Progressions and regressions for each of these exercises are available in the table in the next section.)

Also, huge thanks to Ellysia Noble, GGS Certified Pre- and Postnatal Coaching Specialist, Labor and Postpartum Doula, and Coach in our GGS Coaching program, for filming these demonstration videos!

Heel Slide with Alternate Arms

The heel slide is a fantastic way to connect your breathing with deep core muscle activation. A simple limb movement, it’s appropriate for the early postpartum weeks but still effectively works the deeper muscles of the abdomen and helps strengthen your core-pelvic floor connection.

How to do heel slides:

  • Start by lying on your back on the floor, with your knees bent, spine in a neutral position, and arms at your sides.
  • Take a deep breath in.
  • While exhaling, gently create tension and extend your right leg out straight, allowing your heel to maintain light contact with the floor (maintaining the closed chain). At the same time, extend your left arm up and over your head and back toward the floor.
  • Inhale to return to your starting position, then repeat on the opposite side.

As you’re doing this exercise, try to keep your hips stable (i.e., avoid rocking back and forth).

Glute Bridge

The glute bridge predominantly strengthens the glutes, hamstrings and quadriceps, but when you progress to more advanced versions, it can be a great exercise for challenging the trunk muscles.

Make sure you’re really comfortable with the basic version before progressing to the single-leg variations. In my practice, I’ve found that women with diastasis recti tend to struggle to control their pelvic alignment when performing single-leg glute bridges, so see if you can maintain your pelvis in a horizontal alignment when you move on to asymmetrical exercises.

How to do a glute bridge:

  • Begin by lying on your back with your knees bent and feet flat on the floor.
  • While exhaling, squeeze your glutes and lift your hips up toward the ceiling. Imagine peeling your spine up off the floor, one vertebra at a time. Stop when your body forms a straight line between your shoulders and your knees. (Note that even if you can’t perform the full range of motion, you’ll still benefit from this movement.)
  • Inhale and lower your body back down to the floor.

Standing Pallof Press

The Pallof press targets the whole abdominal wall, including the rectus abdominis and transverse abdominal muscles, and requires conscious, ongoing control of the position of the ribs over the pelvis. This is a great way to start rebuilding that mind-muscle connection and develop strength. Many women with diastasis recti also struggle with transverse plane strength (i.e., trunk rotation). This exercise will really target that.

How to do a standing Pallof press:

  • Position a cable or band at chest height and stand perpendicular to it.
  • Start with your feet hip-width apart, shoulders relaxed, and ribs stacked over your pelvis.
  • Take the attachment with your outer hand (farthest away from the cable machine), lightly resting the fingertips of your inside hand on top, and hold it just in front of your chest.
  • Breathe in to prepare. As you exhale, gently create tension and extend your arms straight in front of you, keeping your hands in line with your sternum.
  • Inhale to return to the starting position.
  • Relax between repetitions.
  • Repeat the set facing the opposite direction.

Bird Dog

It’s a common misconception that front-loaded exercises are inevitably problematic for diastasis recti. In fact, making your abs work against gravity can actually improve your abdominal wall function when performed correctly. In my practice, I’ve seen good results from adding bird dogs early on, and later progressing to more advanced exercises like planks and push-ups.

As you begin incorporating movements that load the superficial abdominal muscles, just be sure to monitor for symptoms like bulging at the linea alba.

How to do a bird dog:

  • Position yourself on your hands and knees. Make sure your hands are underneath your shoulders and your knees are underneath your hips. Your spine should be in a neutral position with a long neck and a gentle curve in your lower back.
  • Inhale to prepare. While exhaling, gently create tension and extend one arm and the opposite leg. Try not to rock your body from side to side and avoid sinking into your chest or lower back.
  • Inhale to return to the starting position.
  • Repeat with the other arm and leg.

Banded Pull-Down

This upper body exercise can be challenging for many women. Like the Pallof press, it requires conscious control of the position of the ribs over the pelvis throughout the movement. Many women with diastasis recti will notice bulging of the linea alba or upward rotation of the rib cage, so start with a light load and progress when you can do this exercise with good technique.

How to do a banded pull-down:

  • Anchor a band at head height or higher.
  • Stand facing the anchor with your feet hip-width apart and arms extended in front of you, holding the band.
  • As you exhale, gently create tension and keep your rib cage connected to your pelvis as you pull the band down to your sides. Make sure you keep your elbows straight from start to finish so that the movement comes from your shoulder joints.
  • Inhale as you slowly bring your arms back up to return to the starting position

Recovering from a C-section birth? Get the details on how to return to exercise after a C-section.

Progressions and Regressions

While those five exercises are often good options for the early postpartum period, if you’re just getting back into an exercise routine, you may want to start with the simplest version of each exercise and progress from there until you find a variation suitable for you. You can use the following table to determine how to regress and progress each movement.

An exercise is at the right level if it feels challenging, but you don’t see any of the symptoms we discussed. If you develop symptoms and they’re not immediately resolved by regressing or modifying the movement, it’s time to stop that exercise.

Table with progressions and regressions for diastasis recti exercises

Click here for a downloadable PDF of the table above.

The Bottom Line

Because there isn’t a whole lot of evidence-based research on what absolutely makes diastasis recti better or worse, many physical therapists and personal trainers tend to be more cautious when programming for women with a wide abdominal separation.

In many ways that’s a good thing, but in some cases, that level of caution can lead to blanket statements about avoiding certain ab exercises at all costs (e.g., “Don’t ever do sit-ups!”). Such statements may end up doing new moms a disservice.

I’m all about adapting instead by using regressions and modifications rather than avoiding altogether.

By staying aware of your body and listening to its cues, you can typically take advantage of a wide range of exercises that can help restore the function of your abdominal wall and potentially improve the appearance of your diastasis recti. (If you want some help with your exercise routine, you can check out our Moms Gone Strong program, which includes 90 days of done-for-you workouts tailored for every stage of pregnancy and postpartum!)

And remember: Recovery takes time. Your body just went through a huge transformation, and it will need some time to adjust. Be patient with yourself — you’re doing great!

The post Diastasis Recti Exercises: 5 Moves for New Moms appeared first on Girls Gone Strong.

Be Nice and Share!
This post was originally published on this site

http://www.marksdailyapple.com/

Kabobs typically have a warm-spiced Middle-eastern or a sweet Hawaiian flair. We’re changing it up and marinating our chicken kabobs in your favorite Italian flavors, like garlic, basil, lemon, and an herby marinade. You’re going to love this spin on the traditional meat-and-veggie-on-a-stick experience.

Getting together for backyard barbecues again? These Italian chicken and basil kabobs make a showstopping entreé that will wow the entire patio with its jewel-toned vegetables and its flavorful marinade.

We could talk about grilled chicken kabobs all day, but we’d rather make them (and eat them!). Here’s how to do it.

Italian Basil Meat and Vegetable Kabobs Recipe

Ingredients

  • 2 lbs. Boneless chicken breast, cut into 1” chunks
  • 1 large red bell pepper cut into chunks
  • 2 medium zucchini, cut into rounds
  • 1 large red onion, cut into chunks
  • 1/2 cup Primal Kitchen Italian Dressing and Marinade
  • 3/4 cup fresh basil leaves
  • 2 cloves garlic
  • 2 Tbsp. Primal Kitchen Avocado Oil
  • 1/2 an avocado
  • 1 Tbsp. lemon juice
  • Water
  • Salt and pepper

Directions

Combine the Primal Kitchen Italian dressing, basil and garlic in a blender until smooth.

Mix ? of the sauce with the chicken and place it in the fridge for about an hour to marinate (or longer if you like).

Toss the chopped bell pepper, zucchini and onion in the avocado oil and a pinch of salt and pepper.

Once the meat has marinated, thread the skewers with alternating meat and vegetables in whatever pattern you’d like.

Preheat your grill to medium-high heat. Once hot, place the skewers on the grill. Turn them over every few minutes, covering the grill when you’re not turning them. Continue grilling until the internal temperature of the chicken reaches 165 degrees Fahrenheit.


Take the remaining Italian basil sauce in the blender and add the lemon juice and avocado to it. Blend until smooth and season with salt and pepper.

Serve your skewers with some of the avocado sauce on top and the rest on the side. Enjoy!

Tips

  • If you are using wooden skewers, soak them for 30 minutes prior to placing the meat and veggies on them.
  • This recipe would also work well with beef – you can try sirloin or ribeye and cut them into 1” cubes prior to marinating.

Print

Italian Chicken and Basil Kabobs Recipe, Because Everything Tastes Best on Skewers


Description

Italian spiced grilled chicken kabobs with garlic, basil, and vegetables


Ingredients

2 lbs. Boneless chicken breast, cut into 1” chunks
1 large red bell pepper cut into chunks
2 medium zucchini, cut into rounds
1 large red onion, cut into chunks
½ cup Primal Kitchen Italian Dressing and Marinade
¾ cup fresh basil leaves
2 cloves garlic
2 tbsp. Primal Kitchen Avocado Oil
½ avocado
1 tbsp. lemon juice
water
Salt and pepper


Instructions

Combine the Primal Kitchen Italian dressing, basil and garlic in a blender until smooth. Mix ? of the sauce with the chicken and place it in the fridge for about an hour to marinate (or longer if you like).

Toss the chopped bell pepper, zucchini and onion in the avocado oil and a pinch of salt and pepper.

Once the meat has marinated, thread the skewers with alternating meat and vegetables in whatever pattern you’d like.

Preheat your grill to medium-high heat. Once hot, place the skewers on the grill. Turn them over every few minutes, covering the grill when you’re not turning them. Continue grilling until the internal temperature of the chicken reaches 165 degrees Fahrenheit.

Take the remaining Italian basil sauce in the blender and add the lemon juice and avocado to it. Blend until smooth and season with salt and pepper.

Serve your skewers with some of the avocado sauce on top and the rest on the side. Enjoy!

Notes

If you are using wooden skewers, soak them for 30 minutes prior to placing the meat and veggies on them. 

This recipe would also work well with beef – you can try sirloin or ribeye and cut them into 1” cubes prior to marinating.

Nutrition

  • Serving Size: 1 kabob
  • Calories: 324.9
  • Sugar: 11.2 g
  • Sodium: 378.7 mg
  • Fat: 20.4 g
  • Saturated Fat: 5.1 g
  • Unsaturated Fat: 13.7 g
  • Trans Fat: .1 g
  • Carbohydrates: 15.2 g
  • Fiber: 1.8 g
  • Protein: 21.3 g
  • Cholesterol: 55.6 g
  • Net Carbs: 13.34

Keywords: kabobs, chicken kabobs, how to make kabobs, how to grill kabobs,

Kabob and Skewer How-to

How Long to Cook Chicken Kabobs?

Your grilling time depends on how thick you cut your meat. For one-inch cubes of chicken, start with 3 minutes on each side. Remember, kabobs have four sides, not two! Test the internal temperature with a meat thermometer and continue grilling and turning in one-minute increments until the internal temperature reaches 165 degrees F.

How to Grill Kabobs

You can grill kabobs right on a clean grill grate. Preheat your grill, assemble your kabobs, and give them a quick spray of avocado oil spray so they are less likely to stick. Then, grill until the internal temperature reaches 165 degrees F for chicken, and 145 degrees F for medium-cooked steak.

How to Cook Chicken Kabobs in the Oven

Spray a baking sheet with avocado oil spray and roast your kabobs in a 450 degree oven for 20-30 minutes. Aim for an internal temperature of 165 degrees F for chicken, and 145 degrees F for medium-cooked steak.

How to Cook Kabobs on the Stove

For stovetop kabobs, a grill pan or a very wide cast-iron skillet would work best. You should be able to lay the kabobs down completely in the cast iron skillet. Cook time will be similar to time on the grill.

How Long To Soak Kabob Sticks

Soak wooden kabob sticks for 30 minutes. You do not need to soak metal skewers.

How to Cut Peppers and Onions for Kabobs

One-inch squares cut to be about the same size as your meat pieces work well. No need for perfection – any misshapen pieces that won’t stay on the skewer can be cooked alongside your kabobs. Just keep an eye on them so they don’t burn, as they will cook faster than the full skewers.

What to Serve With Kabobs

Traditional kabobs are served with rice, but Primal and Keto folks may want to look for better options. Kabobs are incredibly versatile and go well with cauliflower rice, broccoli salad, keto bread, watermelon salad, and more. Feel free to get creative!

BBQ_Sauces_640x80


The post Italian Chicken and Basil Kabobs Recipe, Because Everything Tastes Best on Skewers appeared first on Mark’s Daily Apple.

Be Nice and Share!
This post was originally published on this site

Originally posted at: http://www.nerdfitness.com/

There’s no gentle way to say this – training with injuries SUCKS!

The most important thing you can do now is to let yourself heal.

However, depending on your injury, there might be quite a few ways to stay active while also recovering.

We do this all the time in our Online Coaching Program. We’ll build workouts for clients who are dealing with pre-existing injuries, so they can make the most of their recovery time.

Today, we’ll share these same tips with you.


Here’s what we’ll cover:

REAL QUICK: If you’re worried about hurting yourself while lifting, I would encourage you to check out our guide, Strength Training 101: Everything You Need to Know. We cover all you need to begin a strength training practice, from equipment, starting weight recommendations, and proper form techniques to prevent injuries. You can grab it for free when you join the Rebellion below!

NOTE: I am not a doctor (in fact, I’m not even wearing pants right now). You should really seek medical attention for any injury you receive. 

Step 1: Preventing Injuries in the First Place (Warming-Up)

LEGO Rugby players in action.

Now, it should go without saying: the best way to handle an injury is to prevent it in the first place.

So always start your training with a dynamic warm-up.

Studies have shown that a brief warm-up before your workout can help prevent injuries.[1]

Here’s why:

You can think of your muscles like rubber bands:

Your muscles are kind of like this.

Should you start your workout by immediately lifting heavy weights or sprinting really fast, those cold, unstretched rubber bands can get pulled apart very quickly. They can then get snapped or pulled out of shape.

Ouch.

That’s why every workout should start with a warm-up.

We are such big believers of this, that when we program workouts through our Online Coaching Program, we ALWAYS kick it off with a warm-up. It’s one of the tools in our kit to help clients stay injury-free.


What’s that? You don’t know how to warm up?

No prob.

Here’s a beginner warm-up routine you can try:

If you want more, check out The 15 Best Warm-Up Exercises & Routines to Prevent Injury.

Step 2: When Should I See a Doctor After an Injury?

As Coach Jim mentions in the video above, the FIRST thing to do after an injury is to seek a professional.

All the internet advice in the world won’t take the place of a single session with a doctor or physical therapist.

After you get hurt, really the best thing you can do is have the injury examined by someone who knows what they’re doing.

I will say, that not all doctors are created equal…

The Doctor saying "Let's not get the law involved."

…but that’s not another article. 

Next, we need to get your headspace in proper order (even if you don’t have a head injury)

Step 3: How to Mentally Deal With Injuries

clown lego minifigures toy on white background .

The SECOND thing to do right after an injury: realize it’s going to affect you mentally…just as much, if not more than physically.

So be prepared!

There are numerous studies showing the different negative emotional reactions that people have when injured.[2]

But just from the School of the Obvious – if you’ve ever had an injury – you know how it puts you in a bad mood.

We've all felt like this..minus the pizza maybe.

What may help, is recognizing and reframing negative thoughts, like with some quiet meditation or journaling. Or even seeing a therapist or sports psychologist

Just make sure you don’t overlook the mental aspects of recovery.

Step 4: Testing Movement Around the Injury

After you’ve seen a doctor and prepared for the mental battle ahead, I want you to test all movements.

And by test, I mean work through as much of the range of motion of an exercise as possible with zero additional resistance and without feeling any pain.

Arm circles like so are a great way to get your heart rate up before doing HIIT.

That means if your shoulder bothers you, just see if you can extend your arms all the way above your head. Do this before you even consider doing a push press or shoulder press.

After that, make sure to test movements that you don’t suspect will be a problem.

A shoulder injury could very well make box jump sessions impossible, due to the arm swing involved in the movement.

Be careful on your box jump! But it is a bodyweight exercise.

Try out each movement cautiously!

Something to keep in mind: just because you have pain with a push movement, does not necessarily mean you will have pain with a pull movement.

I have had a shoulder injury where dips and push-ups were out of the question…but pull-ups were fine.

And that is why you should test all movements – you may have more training options than you expect. Then again, your injury may limit movement more than you realize.

Last time I’m going to say it – test.

Step 5: How to Make the Most Of Your Recovery (Sleep and Nutrition)

Next, rest.

And by rest, I mean completely stop doing movements that cause you pain until you are healed.

If you feel any pain during your test (especially joint pain), then you should abandon that movement until the injury heals.

You cannot “suck it up” and just grind through joint pain without hindering healing at best…

Peter holding his shin in pain

…and causing further damage at worst.

Along with rest, a recovery regimen to accelerate healing should be considered. Ideally, this would be done under the care of a physician. I have been to the doc for injuries in the past and have found that those that use “Sports” in the title of their practice (Sports Medicine, Sports Therapy) do their damnedest to keep you active.

Here are two often overlooked components of recovery:

  1. Sleep
  2. Nutrition

Sleep and nutrition are always important when it comes to fitness. But for the swiftest recovery from an injury, you need to get your food intake and sleep schedule dialed in extra tight.

If you want to do everything within your control to sway the healing forces in your favor, be extra diligent with your sleep and eats.

Step 6: Staying Active While Injured

This runner definitely has a strong core!

If your doctor has okayed it, stay active any way you can.

This is often the opposite of what many people will do – which is to completely stop using the injured area.

We want to move pain-free, of course, but any light movement is often going to be more beneficial than just stopping movement altogether – as it gets the blood flowing through the area and helps recovery.[3]

This might mean lowering the weights used, doing an assisted or even unweighted variation of an exercise.

Like by busting out a resistance band:

Staci using a band for an assisted pull-up, a great exercise for a bodyweight circuit.

But if you can still safely move the injured area without causing added pain or setbacks – then it’s often a good idea to do so.

If that’s not an option, consider different ways to move while injured:

  • If you can’t run, how about an elliptical or stationary bike?
  • If you can’t use one leg or the other, can you work out your upper body?
  • If you can’t use one arm/shoulder, can you still do lower body exercises like lunges/squats/step-ups?
  • If you can’t do any resistance training, can you still go for walks?

Let’s dive into this point a little more.

Step 7: Getting Creative While Working Out With an Injury

My dear friend, it’s time to get creative.

When you get injured, start thinking outside of the box to find the opportunity in the obstacle.

A shoulder injury may make back squats incredibly painful. But holding the bar for a front squat instead could feel fine…

Coach Staci performing the barbell front squat

…and perhaps it just so happens that you have neglected the front squat lately.

So instead, try to look at an injury as an opportunity for you to focus on a weakness. Strengthen your weaknesses, become more well-rounded, and better equipped to deal with rigorous activity.

That’s how you become “antifragile.”

But enough of the generalities.

You want some specific recommendations on how to train around your injuries…

Here are some tips for training around common injuries:

#1) Training with Lower Back Pain

A gif of someone with lower back pain.

If you have any lower back pain, forgo any spinal loading. Period.

That means no squats for sure.

But it also means no deadlifts.

It also means using no additional resistance in any movement where your shoulders should be higher than your hips.

That pretty much limits you to the bench press as far as free weights go, which you’re gonna want to make sure you do correctly.

You could also spend your recovery time exploring various bodyweight exercises.

#2) Training with an Injured Wrist

Wrist pain is most commonly complained about when doing the traditional push-up:

Here Rebel Leader Steve shows you the classic push-up.

You might be able to alleviate this pain by using push-up bars and even (believe it or not) knuckle push-ups.

This is because you might be dealing with a flexibility issue and not an actual injury.

Front squats and power cleans done with the Olympic rack position may also lead to complaints of wrist pain.

To eliminate wrist pain in the front squat, try the more common crossed-arm rack position:

The Genie Squat is a great way to start Front Squatting!

For the power clean, concentrate on getting the bar on top of the front of your front deltoids (shoulders) – if the bar is touching your throat, you are getting there.

Here are 15 wrist mobility exercises for more help here. 

#3) How to Train with a Knee Injury

Knee pain typically comes in a fitness setting as the result of one of three things:

  1. Deep bending such as with a squat or lunge
  2. Impact that corresponds with landing from jumping.
  3. Lateral (side to side) movement, especially for participants of sports like soccer, rugby, basketball, and other “man to man” athletics.

Knee issues can be especially frustrating for those trying to lose weight because exercises involving squatting, lunging, and jumping are ideal for accelerating fat loss.

In this situation, I typically recommend a kettlebell swing as my first alternative option.

Coach Staci showing you the kettlebell swing

A properly executed swing does not involve much bending of the knee. In my experience, most people who cannot squat can handle swings without screwing up any preexisting knee conditions.

If you’re trying to lose weight, another option you could try is boxing drills:

However, it is important to work slowly at first to be sure that the twisting necessary for generating punching power from the hips does not aggravate the knee condition.

#4) Can I Lift with a Hurt Elbow?

You’re out of luck on this one, unfortunately. Sorry.

Nearly any upper body exercise, push or pull, will hinder your recovery time.

Instead, focus on lower bodywork such as barbell squats, sprinting, and lunges.

This gif shows Staci doing a forward bodyweight lunge, the most basic lunge variation

#5) Can I Exercise with an Injured Ankle?

Avoid any high-impact movements with a hurt ankle.

And all that means is do not jump.

But other movements that involve more subtle ankle movement such as squats may also have to be put on the back burner as you heal. It is possible (likely?) that you may have to focus on upper body movements and use seated versions of movements such as rows and overhead presses instead of standing.

This will help let your ankle heal.

#6) What Should I Do With Shoulder and/or Hip Pain?

Sheldon with shoulder pain

Test, test, test.

These ball and socket joints can be the most unpredictable when it comes to training options.

Start slow, start light, and back off the second you feel any pain.

MOVING FORWARD WITH AN INJURY (Next Steps)

Injuries are always frustrating when they happen.

But I don’t know anyone with any significant amount of training time under their belt who hasn’t had to deal with one.

When injured:

  • Seek a medical opinion[4]
  • Be smart with your exercise selection
  • Dial-in your nutrition and sleep
  • Stay active
  • Be aware of training opportunities that you would not have considered without the injury

If you want any more help along your journey, you know we’re here for you.

Here are three ways that Nerd Fitness can help you level up.

#1) Our Online Coaching Program: a coaching program for busy people to help them make better food choices, stay accountable, and get healthier, permanently.

They can build you a custom program so you can grow strong, to hopefully prevent you from getting injured in the first place. Plus, they can do form checks to help make sure you’re doing all your training correctly. 

You can schedule a free call with our team so we can get to know you and see if our coaching program is right for you. Just click on the image below for more details:


#2) If you want a roadmap for getting in shape, check out NF Journey. Our fun habit-building app will help you exercise and eat better, all while you build your very own superhero.

Interested?

Try your free trial right here:

#3) Join the Rebellion! We need good people like you in our community, the Nerd Fitness Rebellion.

Sign up in the box below to enlist and get our Rebel Starter Kit, which includes all of our “work out at home” guides, our Strength Training 101 eBook, and much more!

Alright, I think that about does it for today’s articles.

Now, I want to hear from you!

Do you have an injury that is preventing you from training?

Do you have any tips and tricks to keep moving while still recovering?

Did you seek advice from a doctor who gave you good information?

Let us know in the comments!

-Steve

###

All photo sources can be found right here: January 27, 2009-22.05, Rugby Player, ©Rattanachai Singtrangarn/123RF.COM, Going to bed, Morning run with the FitbitBatman, Runners

Footnotes    ( returns to text)

  1. Read, “Effect of Neuromuscular Warm-up on Injuries in Female Soccer and Basketball Athletes in Urban Public High Schools.” Souce, JAMA
  2. The NCAA has a good look at this.
  3. Read, “Muscle blood flow and oxygen uptake in recovery from exercise.” Source, PubMed.
  4. Seriously, go talk to a doctor.

The post How to Train if You Have an Injury (7 Steps) first appeared on Nerd Fitness.

Be Nice and Share!
This post was originally published on this site

http://www.marksdailyapple.com/

Research of the Week

What accounts for the differences in alcohol consumption outcomes?

Dogs may detect COVID-19.

Autonomic imbalances in American football players.

Tsimane hunter-gatherers have brains that age more slowly.

Eat asparagus with your steak and red wine.

Doesn’t matter when or how: just get your steps in.

New Primal Blueprint Podcasts

Episode 495: Shawn Wells: Host Elle Russ chats with Shawn Wells, the world’s leading nutritional biochemist.

Episode 496: Kirsten Beverley-Waters: Host Brad Kearns chats with Kirsten Beverley-Waters about the power of finding utility in past traumas and struggles.

Health Coach Radio: Erin and Laura chat with Kate Lyman about doing the things that feel right.

Media, Schmedia

Does individualism promote selfishness?

Fractional dosing vaccine trials may be coming.

Interesting Blog Posts

The long history of working out on purpose.

Fermented bird-stuffed fermented seal: an Inuit delicacy.

Social Notes

Love this.

Play is for everyone.

Everything Else

Do we believe him?

Intro to Maillard reactions.


Things I’m Up to and Interested In

New program for budding writers: My colleague Elle Russ is running an 8-week writing workshop that starts July 12. Sign up now.

I’ll have to look into this one: Article claims you still need to wear sunscreen indoors because of windows and LED screens.

This is true for many organisms: Trees need wind.

Important: How the “experts” hope to remake our food.

What have I been saying for years?: This is why you don’t just slather sunscreen on mindlessly.

Question I’m Asking

Would you eat cicada tacos?

Recipe Corner

Time Capsule

One year ago (May 22 – May 28)

Comment of the Week

“Dr. Scholl’s makes an ultra thin gel insole with no extra heel padding, no arch support- takes up little room in my minimalist running shoe and provides just enough cushion for extended walking on concrete/pavement.”

-Good to know, Larry B.

Primal Kitchen Ketchup

The post New and Noteworthy: What I Read This Week — Edition 132 appeared first on Mark’s Daily Apple.

Be Nice and Share!
This post was originally published on this site

http://www.marksdailyapple.com/

Beautiful young woman working from home. African-american woman working from home using laptop and having a breakfast. Businesswoman using laptop while she is in home isolation during coronavirus/COVID-19 quarantine.Hey folks! This week, Erin Power is back to answer your questions about when you should be eating. If you’re wondering if you should be having breakfast, how to avoid being ravenous after a cross-country flight, or the best way to navigate summer BBQs, you won’t want to miss this post. Keep sharing your questions on our Mark’s Daily Apple Facebook page or in the comments below.


Rachel asked:

“I’m not typically a breakfast eater. Should I force myself to have breakfast even if I’m not hungry in the morning?”

I’m a front loader when it comes to eating. That means I put the most emphasis on my first meal of the day. And you should too if you want to avoid the grazing, eating-every-three hours mentality that, in my opinion, is totally contradictory to the way we were meant to feed ourselves.

Assuming you work a first shift job, it makes sense to fuel the day ahead of you. Plan on having your most nutrient-dense meal in the morning – or whenever your first meal of the day is. Remember, breakfast is when you BREAK YOUR FAST. It doesn’t have to be at 6am when you wake up. It could be at 8am or 11am or 2pm.

But What If You’re Not Hungry?

If you’re not hungry when you wake up, you’re not alone. Most people’s daily food intake looks something like this:

  • Eat as little as possible throughout the day, constantly thinking about what you’re going to eat and when you can eat it
  • Decide you can’t take it anymore and binge on a huge evening meal
  • Feel unsatiated, so you continue to snack until bedtime
  • Wake up still feeling full, likely with undigested food in your system


Breaking the Late-Night Eating Cycle

As a health coach, I help my clients break old habits that no longer serve them. When you eat a large dinner late at night, it not only prevents you from being hungry in the morning, it also interrupts your sleep cycle and prevents you from becoming metabolically flexible.1

I typically recommend that my clients do *force* a morning meal loaded with protein and fat. I’m not saying to eat past your satiation level, but if you usually start your day with a quick protein bar and coffee, or a yogurt and banana, honor your body by sitting down for a full meal of eggs, bacon, and veggies, and then taper from there.

How To Be Hungry at Breakfast Time

By the time you get to dinner, you’ll naturally want a smaller dinner (and feel like eating it earlier). And you won’t be tempted to snack all night to make up for the calories and nutrients you missed out on earlier in the day. You’ll also be more apt to get a great night of undisturbed sleep because you’re not working on digesting that late night bag of trail mix or waking up because your cortisol has spiked.

Research shows that habitual breakfast skippers are more likely to be chronic dieters, meaning their relationship with food is in the fussy rule-following camp.2 But there’s a difference between skipping breakfast and then grabbing a Frappuccino on the way to work, skipping breakfast because you’re still full from the previous night’s dinner, and skipping breakfast because your first meal falls a little later in the day.

Remember, your first meal is your breakfast — it’s the meal you break your fast with, so if it’s later in the day, no big deal. If you’re not hungry, start dialing back your dinner and evening intake, and if you’re typically opt for a sugar-laden coffee drink in lieu of a sit-down, protein-packed breakfast, start thinking about shifting your priorities there, or work with a certified health coach who can help you put new, healthier habits in place.

Thomas asked:

“I just started traveling for work again and will be making several flights around the country over the next few months. What are some paleo-friendly snacks I can bring onboard to prevent me from being ravenous when I land?”

Let me start by saying that you shouldn’t have to fuel yourself on a three- or four-hour flight. Or a three- or four-hour anything for that matter. Sitting on an airplane is a fairly sedentary activity. You’d never worry about fueling a multi-hour Netflix binge or a night of sleeping, would you?

Unless you’re diabetic or have been diagnosed with a disease that requires you to eat in shorter intervals, your body is designed to withstand hours without food.

Plan Ahead to Prevent Hunger

Sure, it might be your habit to be prepared — especially when you’re in an airport, with Standard American Diet fare like pretzels, biscuits, and sodas by the cartful, but your body can handle going without food. Trust me.

If you really can’t go for that long without experiencing urgent hunger, your metabolism might need a little TLC. Hunger that feels like an emergency after a few hours of sitting motionless isn’t normal. Well, it’s normal for most folks, unfortunately, but if you eat mostly paleo, and still feel ravenous from time to time, your diet might need a few tweaks:

  • Eat more. In general, just eat more food. Just because you don’t eat grains or legumes, you could be in a situation where you’re consistently depriving your muscles and cells from energy and nutrients. Even if you’re not on an airplane most of the day, practice eating more earlier in the day and see how you feel.
  • Eat more protein. I don’t have a specific gram count since I’m not a macro counter and really dislike anything that feels fussy, but Mark has a comprehensive post all about protein intake that you can check out for more info. My basic rule of thumb is that if you experience hunger or have low energy, adding more protein to your meals is a good place to start.
  • Eat more fat. Fat is a highly satiating macronutrient (that also lends excellent satisfaction and deliciousness to food), so make it a habit to tap into it regularly.3 Some of my favorite good-for-you fat sources are avocado and avocado oil, grass-fed meats, and nuts and nut butter.

When you take care of your metabolism, you’re free to tap into your body’s built-in system for extracting the fuel it needs to survive any food scarcity situation, including a cross-country flight.

Pam asked:

“My family is planning a reunion this summer, and no one eats like I do. I don’t want to seem rude and bring my own food and I guess I could eat beforehand, but what’s your take on the best way to handle this event without falling off the wagon? I’ve worked so hard to get to where I’m at.”

For some people, eating in isolation has been easy. Your choices don’t get judged, you’re not tempted by regular BBQs and happy hours. You’re in your own world and you’re feeling great about it. But now that we’re reaching the end of the pandemic — and long-awaited parties, vacations, and reunions are being planned, I feel like a pep talk is in order.

Often times, we assume that someone is going to challenge our food beliefs out in public. We tend to self-isolate (even in social situations) to avoid the risk of being seen as weird or one of those “healthy people” or worse, “on a health kick.”

Explaining Your Food Choices

First of all, you never have to explain how you’re eating or why you’re eating it. There’s something extremely powerful about the use of the words, “no thank you” as seen in the follow examples:

  • Someone offers you some pasta salad? “No thank you.”
  • Fresh baked chocolate chip cookies? “No thank you.”
  • A refill on your wine? “No thank you.”

Empower yourself by setting a firm boundary. The way you choose to eat is nobody’s business but your own. You don’t owe anyone an explanation and you certainly don’t need to justify or defend yourself, but food and celebrations go hand-in-hand and there’s zero need to deprive yourself just to stay on track either.

BYOS (Bringing Your Own Snacks)

When it comes to parties, I live by the acronym: BYOSSNDMSS.

In other words, Bring Your Own Satiating, Satisfying, Nutrient-Dense, Metabolically Supportive Snacks. It’s a mouthful, hence the acronym. If you see me at a party, I’ll be the one supplying the charcuterie plate for an app or the chocolate peanut butter fat bombs for dessert.

I don’t know about you, but foods like sausage, cheese, nuts, olives, and pickles, as well as dark chocolate and peanut butter are some of my favorites. And guess what, they’re typically crowd-pleasers for non-primal eaters too.

When you bring your own metabolically supportive snacks, you’re contributing to the party, not being rude for bringing your own food. You’re also not trying to convert anyone to a paleo way of eating, you’re simply sharing your love of delicious (nutrient-dense) food. Plus, it will help deter you and others from reaching for the less-than-healthy chips, dips, and cupcakes.

And if you’re looking for more tips, here are additional ways to navigate the judginess of partygoers you might encounter this summer.

Do you struggle with figuring out when to eat? Share your thoughts below.

Collagen_Quench_640x80

The post Ask a Health Coach: When Should I Be Eating? appeared first on Mark’s Daily Apple.

Be Nice and Share!
This post was originally published on this site

http://www.thealternativedaily.com/

Vaginas can be a touchy subject — even though all of us ladies have ‘em. When you suspect that something may be wrong, it can be challenging to seek advice. Of course, the Internet has been a saving grace in many ways, but it’s also a double-edged sword. The plethora of information available isn’t always […]

Be Nice and Share!
This post was originally published on this site

http://www.marksdailyapple.com/

preparing fish for the mediterranean dietYou’ve heard of the Mediterranean diet, no doubt. Perhaps your doctor has tried to turn you onto it. Maybe your parents or co-workers are using it to lose weight and normalize blood pressure. Read a popular treatise on the “Mediterranean Diet” and this is what it’ll have you eating:

  • Whole grain pasta
  • Whole wheat bread
  • Bushels of vegetables
  • Bunch of beans
  • Wild bitter greens (salad)
  • Fish a couple times a week
  • A cube or two of hard cheese
  • Drizzle of olive oil on everything
  • Glass of red wine
  • Few scraps of meat if they’re lucky

It’s low-fat and low-protein, especially animal protein. It’s high-carb. It’s rich in grains and legumes, low in meat and dairy. And it’s based on the dietary patterns researchers observed after visiting post-WW2 Italy and Greece. These were real patterns, actual observations.

But is it really the traditional Mediterranean diet?

World War 2 was a rough one. Greece was occupied by the Axis powers throughout the war, its agricultural output totally commandeered. Italy was decimated. Both countries were recovering from massive changes to their traditional diet wrought by war. What Ancel Keys (the Med diet researcher in question and the same man who convinced the world saturated fat caused heart disease) observed was not the traditional diet of the Mediterranean. Rather, it was the diet of a beleaguered, suffering, diminished people just trying to get by. That’s the “Mediterranean diet” of the 1950s, but does it represent what Meds have been eating for thousands of years?

According to the evidence I was able to procure, no. It’s not a complete representation.

Before I begin, I’m not trying to suggest that the traditional Mediterranean diet was low-carb, high-fat, grain-free, and near carnivore. They’ve been eating and growing grains and legumes for thousands of years. That region has a long history of farming. But—the region also has a long history of ranching, fishing, cheesemaking, meat-curing, and aquaculture. There’s much more to the Mediterranean diet than pasta and salads.

I’m not going to focus on Mediterranean hunter-gatherers, because those people are long gone and their genes made very little direct contribution to the genomes of people living in the Mediterranean countries today. Instead, I’m going to focus on the traditional Mediterranean diets of the Hellenistic Period, Classical Antiquity, and Medieval Period. The people living in the Mediterranean region 3000 years ago were similar to the ones living there today—what they ate then is directly relevant to people living or hailing from there now.

What are the lines of evidence and what do they say?


Isotope Studies

By studying the stable isotopes present in bone collagen, researchers can determine what proportion of dietary protein came from animals and plants and whether they were terrestrial or marine. The more plant protein a person eats, the lower the nitrogen-15 isotope content of their bone collagen. The more animal protein a person eats, the higher the nitrogen-15 content of their bones. So when researchers take a chunk of bone from a grave site and analyze the nitrogen isotope percentage, they get a good idea about the source of its owner’s dietary protein.

Nitrogen-15 levels act as “trophic tracers”— they track the position of the animal on the local food chain, identify whether they’re carnivores, omnivores, or herbivores.

Your average herbivore has an N-15 level of 4-6. Deer, cows, sheep, rabbits, and other herbivores

Your average omnivore has one of 7-10. Bears, boars.

Your average carnivore run 11+. Wolves, dogs, foxes.

There’s some variation, of course, but that’s the basic set-up. Now, where did traditional Mediterranean diet-eaters land?

In an ancient site on Syracuse (Sicily), N-15 readings of bones taken from a graveyard ranged between 8.9 and 11.8, with the majority exceeding 10. A similar study on much older mesolithic hunter-gatherers living in Sicily had similar N-15 levels, with most in the 11-12 range.1 If you assume that the hunter-gatherers were eating a typical hunter-gatherer diet rich in meat, seafood and bereft of grains and legumes, it’s quite remarkable that they had similar N-15 levels as the later farmers who are supposed to be eating nearly vegetarian Mediterranean diets. They weren’t, of course: Both mesolithic foragers and ancient Med farmers were eating large amounts of animal protein.

Romans living in York, England in the 3rd and 4th centuries AD had elevated N-15 levels (from 10 to as high as 14) indicating a diet high in animal protein. Judging from textual evidence and bone middens from that period, they had access to beef, sheep, pork, oysters, chickens (likely eggs), and dairy.2

Across 8 Byzantine Greek sites spanning 500 AD to 1400 AD, isotopic evidence reveals a diet rich in terrestrial animal protein and C3 grains like wheat and barley, with very little evidence of legumes.3 N-15 range running from 8.2 to 9.5. Strong omnivory.

In Helike, a site in southern Greece, researchers uncovered fossil remains that were continuous from the 4th century BC to the 15th century AD.4 The N-15 levels ran between 8 and 10.5, again pointing toward strong omnivory with the bulk of the protein coming from animal foods—dairy and meat. The researchers try to “adjust” this by suggesting the animals and grains they were eating were abnormally high in N-15 and thus threw off the “true” N-15 values, but I think a more parsimonious explanation is that they were simply eating a lot of animal foods in addition to their bread and plants.

In a Greek outpost in ancient Bulgaria, researchers analyzed the N-15 levels of a a large sample of children ranging from infancy to 11 years of age, plus adult women.5 These were some major meat-eaters. Well, the infants were nursing and only eating animal food (breastmilk), so of course they had high N-15 levels. The kids’ N-15 levels dropped a bit as they aged, but remained high enough to indicate a large amount of dietary animal protein. The women’s N-15 levels were also elevated, reaching as high as 12.

Italian aristocrats during the Renaissance look like full-on carnivores based on their N-15 values, which approach those of the Pleistocene big-game hunters.6 The big difference is in the source of the protein. The Pleistocene hunter-gatherers ate very little marine food while the Italian aristocrats got between 15-40% of their animal protein from seafood.

From nitrogen isotope studies, we know that most Greeks and Romans across different regions and eras got the majority of their protein from animal sources. Now, this doesn’t preclude the consumption of plants. Someone with a high nitrogen isotope reading can still eat a good number of plants, just not protein-rich plants because the plant protein will have dropped their trophic level. That rules out legumes as the main source of protein int the Mediterranean diet—supposedly one of the most prominent parts.

Nor does it mean that they were only eating slabs of meat. Animal protein can mean eggs, meat, organs, fowl, fish, shellfish, and dairy. And yes, even some legumes can squeeze in there, they just can’t be the dominant force.

Sewer Remains

Another way we can gauge ancient diets is by looking at the sewers. Or rather, sewer, because there’s only one available for study. We lucked out with the city of Herculaneum, an Italian city that was buried under volcanic ash after the eruption of Mt. Vesuvius. The eruption preserved the contents of a sewer running beneath the city that the town’s inhabitants—from all walks of life—used to dispose of their kitchen waste. Over the past decade, researchers have sifted through it, taking representative samples of the sewer and analyzing them for food remains.7 What did they find?

Hundreds of different foods, many of which only appeared here and there. The staple foods, the ones that appeared consistently and frequently, included:

  • Shellfish, especially limpets, clams, and sea urchins.
  • Fruits, especially figs, grapes, and apples.
  • Olives.
  • Eggs, including goose eggs.
  • Poppy seeds.
  • Various fish.

Except for some millet, they didn’t find evidence of any grains. This can be explained by the fact that the inhabitants consumed millet as porridge and other grains like wheat and barley as flour. Whole grains survive, flour doesn’t.

There were some legumes but they were infrequently found. This isn’t an indication of low legume consumption, as cooked legumes wouldn’t have survived anyway.

They found animal bones but for some reason didn’t analyze them. Maybe another time.

Animal Bone Remains

Another line of evidence can be found in animal bone burial sites.

Take the Roman legions. Popular legend has it that the Roman legionary only ate bread. That he conquered Gaul, Germany, and Britain eating a diet made up almost entirely of wheat and barley. They certainly did eat a lot of bread, but they also ate a lot of meat. Animal remains at historical Roman army camps show huge amounts of cattle and pig bones, while bone sites back in Italy reveal far more pig bones and a decent numer of cattle bones. 8 In fact, the large piles of cattle bones are a strong indicator to archaeologists that a Roman army passed through. They use the displacement of sheep and goat bones by cattle and pig bones as evidence of “Romanization” of a region.

Dental Health

We know from looking at hunter-gatherers and farmers that once agriculture is adopted, dental health falls off a cliff. Hunter-gatherers tend to have very good teeth; farmers have worse because they’re providing substrate for oral bacteria to consume. Even if they’re not eating sugar, they’re eating grains and other starchy foods that provide glucose.

And yet the ancient Romans have good dental health, at least compared to modern people. What’s going on?

My guess is that the lack of refined sugar is the reason why their teeth are in good condition.

They also had otherwise nutrient-dense diets—animal foods, particularly organ meats, dairy, and seafood (which the traditional Mediterranean diet definitely included) are rich sources of fat-soluble vitamins and minerals that are important for dental health.

The Romans and other traditional Mediterranean people definitely ate starch, but they ate enough animal foods to make up for it.

Put all this evidence together and you can “triangulate” a rough estimate of what the real Mediterranean diet consisted of:

Meat, especially beef, lamb, and pork.

Seafood, especially for those living on or near the coasts and rivers. And shellfish. Romans loved oysters. They loved them so much part of their motivation for conquering Britain was to get their hands on British oysters. Wealthier Romans would actually raise oysters at their estates and more modest Romans would even raise them in cities, suspending the oysters from ropes tied to bridges over bodies of water.

Dairy, especially cheese.

Eggs.

Traditionally-prepared grains, like fermented sourdough bread. Wheat and barley.

Some legumes. Hard to say exactly how much since their N-15 levels were so high.

Bitter greens.

Alliums like onions and garlic and leeks.

Fruits like figs, apples, stone fruits, and grapes.

Olives and olive oil.

Animal fats for cooking, especially lard.

Wine.

Fish sauce (the Romans made a fermented fish sauce called garum that they put on almost everything).

All in all, it’s a very healthy way of eating. You could make it keto, high-protein, or higher-carb. You can ditch the bread and legumes, or try them out. It’s a good template to play with—just don’t fall for the “scraps of lean meat and non-fat dairy” nonsense.

Obviously there is no one Mediterranean diet. It’s a big place that includes not just Italy and Greece but also Turkey, Spain, Portugal, parts of France, Israel, Jordan, Morocco, and other parts of North Africa. The sea goes on and on and there are real differences between the different regions, but also commonalities.

I’m not Med, but it speaks to me. I was in Turkey last year and a lot of the street food was the same kind of thing you could get 300, 600, even 900 years ago strolling along those same Med streets. In Istanbul, you can buy mussels plucked right out of the water and cooked to perfection. Lamb liver grilled on skewers right there over coals. You can find fishermen grilling smelt right there on the banks of the Bosporus. You can buy sacks of roasted chestnuts. It was magical. It felt right.

What do you think?

The post The Real Mediterranean Diet appeared first on Mark’s Daily Apple.

Be Nice and Share!
This post was originally published on this site

http://www.marksdailyapple.com/

Low angle view of young woman walking down the mountain barefoot. Female hiker walking barefoot on rock with waterfall in background.Honestly, when’s the last time you paid attention to your feet unless they were causing you pain?

Granted, I haven’t extensively polled my friends about their foot care regimens, but it’s easy to surmise that we largely neglect our poor feet. I’m not talking about getting the occasional pedicure or attacking your calluses with one of those terrifying implements that looks like a cheese grater. Cosmetic treatments are all well and good, but they don’t address the health and strength of your feet.

As a society, our feet are suffering. Just look at the market for custom insoles and corrective footwear. One of the most popular videos on the Mark’s Daily Apple YouTube channel is 2 Stretches to Heal Plantar Fasciitis. Last time I checked, it had well over 500,000 views. But it’s not just foot pain that’s a problem. Over a million people receive total hip or total knee replacement each year in the U.S. alone. By age 80, one in ten of us has a bionic knee.1 A recent survey estimated that 577 million worldwide were living with lower back pain, at great personal and economic cost.2

What does this have to do with your feet? Everything.

An agile, pain-free body starts from the ground up. Your feet are the foundation of the lower kinetic chain that comprises the feet, ankles, calves and shins, knees, thighs, hips, pelvis, and spine. Each link in the chain depends on the others to function as intended or the whole system can go awry. When you pronate (lean toward the inside edges of your feet) or supinate (lean toward the outside edges), you can end up with misalignment of the ankles, knees, and pelvis, and improper curvature of the spine. Walking with improper gait due to poor mechanics or pain forces other parts of the kinetic chain to compensate in order to maintain balance and generate motion.

Our ancestors certainly sported strong, highly utile feet by virtue of walking long distances barefoot or minimally shod over a variety of terrains. They probably also had great knees and hips and excellent posture. Like so many things in the modern world, though, we need to take intentional steps, no pun intended, to strengthen our feet and promote proper alignment and function.

Foot Anatomy: A Quick Primer

Human feet are unique in the animal kingdom, setting us apart from even our closest primate relatives. Although you might think your feet are pliable because you can point and flex them, relatively speaking, they’re actually quite stiff. That stiffness is a function of the internal anatomy, and it’s the reason that we can walk upright and run long distances over land on two feet.

Your foot contains two arches. The first is the one you’re familiar with, running longitudinally along the inner edge of your feet. The second is the transverse arch that runs across the top of your foot from side to side. The former gets considerably more attention, but recent analyses suggest that both were equally important in the evolution of anatomically modern human feet.3

Connective tissues support the arches and allow the foot to absorb and store mechanical energy when your foot hits the ground. The foot then acts like a spring, powered by that stored energy. In addition to bones, tendons, and ligaments, the feet also contain muscles called intrinsic foot muscles (IFM). The IFM, along with the fascia, help the foot maintain a proper shape, support the arch, absorb shock, and generate force during locomotion. Common foot problems can arise from issues related to the bones and joints (as with bunions), connective tissues (like plantar fasciitis), or the IFM. Many issues stem from weak arches that collapse.

If you go to a doctor complaining of foot pain, you’re most likely to be told that you need different shoes or “better insoles.” They may even suggest something more invasive, like surgery. In many cases, though, you probably need stronger feet, which you can achieve through simple exercises.


How to Know if Your Feet Are Healthy

Assuming you’re not suffering from something acute like bunions or Morton’s neuroma, the most obvious signs of poor foot health are fallen arches and pronation of the foot. For some folks, flat feet are genetic, but most people with fallen arches and pronation suffer from weakness in the foot.

Stand barefoot in a neutral position with feet hip-width apart. Have a friend get down on the floor and take a picture of your feet and legs from the back. You should be able to draw a straight line from the center of your heel through your ankle, knee, and up to your hip. If your ankle and knee trend inward toward the center of the body, that’s a sure sign that you need to work on strengthening that foot. Another way to check for pronation or its opposite, supination, is to look at the soles of your shoes. The wear pattern should be equally distributed across the center of the heel and ball of the foot area. You shouldn’t see excessive wear on either side.

Pain is another sign, but pain is tricky. Thanks to that kinetic chain, pain in the foot doesn’t definitively signal a foot problem. Often, it stems from a part of the body that isn’t bothering you at all. Just ask a runner who’s experienced back problems due to tight calves or ankle pain thanks to a tipped pelvis. A skilled bodyworker—physiotherapist, personal trainer, or sports massage therapist—can help you pinpoint the root cause.

Finally, you can perform a test:

  • Stand barefooted. Hold lightly onto a chair or countertop for support.
  • Lift one foot off the ground, then slowly rise onto the ball of your other foot and lower down.
  • See if you can perform 10 reps on each side without pain or severe wobbling.

If not, you’d benefit from a foot exercise program.

Exercises to Strengthen Your Feet

Even if you don’t have obvious signs of poor foot health now, it’s a good idea to add a few minutes of daily foot strengthening exercises to your routine. Always better to be proactive. This goes double if you wear high-heeled shoes (stop!). Foot exercises are mandatory if you’re pronating or having pain—once you talk to your doctor or PT, of course.

The good news is that you can do most of these exercises while you brush your teeth or sit through a Zoom meeting. There’s no real protocol here. Pick a few and do ten reps of each to start, working up to a few sets per day. Start sitting if necessary, then progress to standing on two feet, then one foot when possible. Do these exercises barefoot.

7 Foot Exercises You Can Do Anywhere

1. “Short Foot”

This exercise targets the IFM. Sit with feet flat on the ground. Without flexing the toes, work on pulling the big toe toward the heel. When done correctly, your longitudinal arch will “dome.” The movement is subtle. Hold for five seconds, then release.

Once you have mastered the movement and can do it without clawing at the floor with your toes, try it standing.

2. Toe Taps

These are self-explanatory. Just tap your toes, one foot at a time, like you’re impatiently waiting for something.

3. Heel Raises

Low heel raises: raise and hover your heels an inch or so off the ground. Hold for a few seconds before gently lowering.

High heel raises: lift all the way onto the balls of the feet. As you raise up, don’t let your feet collapse toward your big toe. Imagine you’re working in a line toward your pinky toe.

Both exercises can be done sitting or standing. Work up to standing on a single leg, holding on to something for balance if needed. For an even greater range of motion, stand on the edge of a step and let your heel dip below parallel. Concentrate on feeling the muscles in your feet, even though the calves will be doing much of the work.

4. Toe Spreads and Isolations

With your heel on the ground, lift your toes and work on spreading them apart as wide as possible. Try to return them to the floor still spread out.

Next, focus on lifting only your big toe without grabbing the earth with your other toes. Then, keep your big toe on the ground while you lift the others. Once you can do this proficiently, try lifting each toe individually. This is quite challenging for most people, so don’t feel bad if you can’t do it!

5. Single-leg Balance

This one’s also straightforward: stand on one foot. If your balance is poor, start by keeping your opposite big toe on the ground and hold on to something for support. For a more advanced option, stand on a softer surface like a wobble pad or sand.

6. Toe Grabs

Use the toes to pick up objects off the floor. A wadded-up tissue or soft ball about the size of a golf ball works well, but anything small and light will do. Keep your heel on the ground. Try picking up the object with your big toe and adjacent toe, then with only the three middle toes. Don’t worry if your foot cramps, that’s normal.

Another way to work your toes is to lay a hand towel on the floor in front of you. Use your toes to gather and inch the towel toward you one grab at a time. This works best on non-carpeted surfaces.

7. Side Wall Pushes

Stand with your shoulder against a wall. Bend the arm closest to the wall 90 degrees and make a fist like you’re about to start running. Lift the foot that’s farther from the wall so you’re balancing on the inside foot. Now push against the wall using the back of your hand and forearm. You should feel your arch lift and contract automatically.

Work from the Top Down

Just as foot problems can cause problems up the chain, pain in your feet might signal imbalances, misalignment, or weaknesses in other parts of the body. Exercises that target glutes, calves, and ankle stability can all significantly improve foot function. All the more reason to work squats into your regular routine!

Foot Massage DIY

If you’re lucky enough to have a partner who will massage your feet for you, take full advantage! You don’t need to get someone else involved, though. Just grab a lacrosse ball, tennis ball, or one of those foot massage balls they sell at running stores and go to town rolling your foot over it. It shouldn’t be excruciating—if it is, you’re applying too much pressure—but you definitely might find hotspots that need extra attention. Rolling sore feet over a frozen water bottle feels fantastic.

As another option, try wrapping a resistance band or a piece of fabric like a bathrobe belt or yoga strap around your big toe. Traction it gently away from the other toes, then use your fingers to massage along the line from your big toe to the arch of your foot, getting into the fascia.

Go Barefoot Already!

By far, the most commonly prescribed remedy for any kind of foot pain is shoe inserts or other custom orthotic devices. I think this advice is dead wrong for most people. Insoles or orthotic devices should be treated like sprints: use them to support weak structures in the case of acute pain or injury while working to address the underlying injury or weakness.

I’ve been beating this drum for years, so I’m not going to rehash all of my arguments against modern footwear and orthotics here. Suffice it to say that I strongly recommend you go barefoot as much as possible and don minimalist shoes when needed. Go barefoot at home and when walking on soft surfaces like sand, grass, and some dirt trails. Use barefoot-style shoes on hard surfaces like concrete or when traversing sharp rocky terrain or the urban jungle.

Going barefoot forces foot muscles and connective tissues to adapt to the stress of everyday movement. It allows your feet to provide important proprioceptive information to the rest of the body, and it cuts down on improper movement patterns like excessive heel striking that can cause upstream problems. I have a trove of articles in the Mark’s Daily Apple archives related to my love of a barefoot lifestyle. I’ll link some at the bottom of this post.

The last thing I’ll note is that if you’re used to wearing regular shoes or, gasp, high heels, you’ll want to transition slowly to barefoot styles. Start here: How to Prepare for Barefooting.

More related posts from MDA:

Even If the Shoe Fits… Forget It.

Healing Plantar Fasciitis: Best Shoe Choices

The Benefits of Barefoot Lifting: How and Why

How to Strengthen Your (Bare, Flat) Feet

The Barefoot Backlash: Are the Naysayers Right After All? (Hint: No.)

The Plight of the Modern Foot: Conditions that Plague Us—and How to Avoid Them

Primal_Essentials_640x80

The post Foot Health for Better Ankles, Knees, Hips, and Back (Plus 7 Foot-Strengthening Exercises You Can Do Anywhere) appeared first on Mark’s Daily Apple.

Be Nice and Share!
This post was originally published on this site

http://www.marksdailyapple.com/

Burgers are a Primal favorite, but plain old burgers with the same old toppings can get boring after a while. What better way to combat the boredom than to create a burger with a surprise ingredient inside? Introducing southwest burgers, stuffed with cheese and topped with with lime-spiked guacamole.

The combination of spicy seasonings, buttery cheese, and refreshing avocado is hard to beat. Yes, of course you could just serve guacamole on the side with sliced veggies for dipping, but it’s not the same. Sure, you could melt cheese on top, but the cheese melding with the juicy burger creates a brand new experience. It’s the synergy between the spiced meat, the melty cheese, and zingy, cool avocado that creates a delicious change of pace from a plain burger in a lettuce wrap.

Let’s level up your burger.

Southwest Stuffed Burgers with Guacamole Recipe

cheddar stuffed burger with avocado with a lettuce wrap recipeServes: 6

Time in the kitchen: 30 minutes

Ingredients

Guacamole

  • 2 avocados
  • juice from 1 lime
  • 1/3 cup chopped cilantro
  • 1/4 cup minced red onion
  • 2 Tbsp. finely chopped green pepper
  • 1/2 tsp. ground coriander
  • salt

Burgers

  • 2 lbs. ground beef
  • 1/4 cup chopped cilantro
  • 2 tsp. chili powder
  • 2 Tbsp. minced red onion
  • 2 Tbsp. finely chopped green pepper
  • 2 tsp. ground cumin
  • 1 tsp. salt
  • 1 tsp. garlic powder
  • 1/2 tsp. black pepper
  • 4 oz. shredded cheddar, pepper jack or colby cheese
  • green leaf or boston lettuce
  • unsweetened BBQ sauce or spicy ketchup (optional)ingredients for cheddar stuffed burger with avocado with a lettuce wrap recipe

Directions

Preheat your grill to medium-high heat.

In a bowl, combine the ground beef, spices, cilantro, red onion and green pepper.

meat and spice mix for cheddar stuffed burger with avocado with a lettuce wrap recipe

Form into 6 balls.

Take each of the balls and split them in half. Form one half into a flat patty with a slight indent in the middle and put a handful of shredded cheese in the center.

raw burger stuffed with cheddar for cheddar stuffed burger with avocado with a lettuce wrap recipeTake the other half of the patty and flatten it. Place the flattened patty on top of the stuffed patty and press the edges together to form one uniform stuffed patty. Repeat with the remaining meat and cheese. Make sure the edges are tightly pressed together to keep the cheese inside while grilling.

Place the burgers on the grill and cover. Allow to grill for 2 minutes, then turn them 90 degrees to form nice square grill marks.

stuffed burgers on the grill for the cheddar stuffed burger with avocado with a lettuce wrap recipeGrill for an additional couple of minutes, then flip the burgers over and repeat on the other side. Grill until the internal temperature reaches 160 degrees Fahrenheit. Remove the burgers from the grill and allow them to rest while you prepare the guacamole.

Scoop the flesh out from the avocados and mash with the lime juice until it reaches your desired texture. Stir in the onion, cilantro, pepper and coriander. Season with salt.

guacamole in a mixing bowl for cheddar stuffed burger with avocado with a lettuce wrap recipe

Place a dollop of guacamole on the burgers. Enjoy the burgers as-is or wrap them in lettuce.

cheddar stuffed burger with avocado with a lettuce wrap


cheddar stuffed burger with avocado with a lettuce wrap recipeTake it a step further with your favorite unsweetened BBQ sauce or spicy ketchup if you’d like! We like serving the burgers alongside our chopped broccoli salad.

cheddar stuffed burger with avocado with a lettuce wrap recipe

Primal Kitchen 7 Days, 7 Salads Challenge

Print

cheddar stuffed burger with avocado with a lettuce wrap recipe

Guacamole-Stuffed Southwest Burgers


  • Author:
    Mark’s Daily Apple

  • Prep Time:
    15

  • Cook Time:
    15

  • Total Time:
    30 minutes

  • Yield:
    6 servings

  • Diet:
    Gluten Free

Description

Cheddar-stuffed southwest spiced burger topped with cool guacamole and wrapped in lettuce.


Ingredients

Guacamole

2 avocados

juice from 1 lime

1/3 cup chopped cilantro

1/4 cup minced red onion

2 tbsp. finely chopped green pepper

1/2 tsp. ground coriander

salt

Burgers

2 lbs. ground beef

1/4 cup chopped cilantro

2 tsp. chili powder

2 tbsp. minced red onion

2 tbsp. finely chopped green pepper

2 tsp. ground cumin

1 tsp. salt

1 tsp. garlic powder

1/2 tsp. black pepper

4 oz. shredded cheddar, pepper jack or colby cheese

Green leaf or boston lettuce


Instructions

Preheat your grill to medium-high heat.

In a bowl, combine the ground beef, spices, cilantro, red onion and green pepper.

Form into 6 balls.

Take each of the balls and split them in half. Form one half into a flat patty with a slight indent in the middle and put a handful of shredded cheese in the center.

Take the other half of the patty and flatten it. Place the flattened patty on top of the stuffed patty and press the edges together to form one uniform stuffed patty. Repeat with the remaining meat and cheese. Make sure the edges are tightly pressed together to keep the cheese inside while grilling.

Place the burgers on the grill and cover. Allow to grill for 2 minutes, then turn them 90 degrees to form nice square grill marks.

Grill for an additional couple of minutes, then flip the burgers over and repeat on the other side. Grill until the internal temperature reaches 160 degrees Fahrenheit. Remove the burgers from the grill and allow them to rest while you prepare the guacamole.

Scoop the flesh out from the avocados and mash with the lime juice until it reaches your desired texture. Stir in the onion, cilantro, pepper and coriander. Season with salt.

Place a dollop of guacamole on the burgers. Enjoy the burgers as-is or wrap them in lettuce.

Take it a step further with your favorite unsweetened BBQ sauce or spicy ketchup if you’d like! We like serving the burgers alongside our chopped broccoli salad.

  • Category: Lunch, Dinner
  • Method: Grilling
  • Cuisine: American

Nutrition

  • Serving Size: 1 burger
  • Calories: 487.7
  • Sugar: .9 g
  • Sodium: 673.9 mg
  • Fat: 35.7 g
  • Saturated Fat: 14 g
  • Unsaturated Fat: 16 g
  • Trans Fat: 1.3 g
  • Carbohydrates: 7.8 g
  • Fiber: 3.8 g
  • Protein: 33.8 g
  • Cholesterol: 124.3 g
  • Net Carbs: 3.87 g

Keywords: stuffed burger recipe, cheese stuffed burger recipe, cheddar stuffed burger recipe, guacamole burger recipe, southwest burgers recipe

Nutrition Facts (1 burger, 1/6 of guacamole)

Calories: 487.7
Sugar: .9g
Sodium: 673.9mg
Fat: 35.7g
Saturated Fat: 14g
Monounsaturated Fat: 14.32
Polyunsaturated Fat: 1.58
Trans Fat: 1.3g
Carbs: 7.8g
Net Carbs: 3.87g
Fiber: 3.9g
Protein: 33.8g
Cholesterol: 124.3mg

No-Soy_Island_Teriyaki_and_Teriyaki_Sauces_640x80

The post Guacamole-Stuffed Southwest Burgers appeared first on Mark’s Daily Apple.

Be Nice and Share!
This post was originally published on this site

http://www.marksdailyapple.com/

Research of the Week

Another study confirming that selenium status is a strong factor in COVID severity.

Dietary saturated fats seem to be less harmful than the proposed alternatives.”

Can parents with differing views on veganism compromise when feeding their kids?

The pandemic running boom. Who’s running and why?

Where does the lead hypothesis stand?

New Primal Blueprint Podcasts

Episode 493: Vanessa Lambert: Host Elle Russ chats with Vanessa Lambert, co-founder of Bee the Wellness, curator of incredible wellness retreats, and powerful purveyor of inside-out full body and mind health.

Episode 494: Jake Steiner: Host Brad Kearns chats with Jake Steiner about curing your myopia naturally.

Health Coach Radio: Erin and Laura chat with Dr. Kim Foster about the power of building a referral-friendly business.

Media, Schmedia

Is there a sexual counter-revolution coming?

Civilization is way older than we think.

Interesting Blog Posts

Cats do well on low-carb too.

Catching natural selection in the act.


Social Notes

Next time you hear someone say “low-carb increases mortality…”

Intermittent euphoria.

Everything Else

People are already experimenting with this parasite. You know they are.

Good heuristic.

Things I’m Up to and Interested In

Terrible results: Overweight and obese COVID patients lose lean mass during their hospital stay and gain a bunch of visceral fat once they’re out.

More of this, please: Reintroducing the European bison into Spain to keep wildfire tinder down.

Important reminder: We’re still discovering new biomolecules.

Interesting article: Mushroom brain.

Want autophagy? Try keto: Nutritional ketosis upregulates hepatic autophagy.

Question I’m Asking

What does summer mean to you?

Recipe Corner

Time Capsule

One year ago (May 15 – May 21)

Comment of the Week

“pfffft privileged ancient pacific coast dwellers….”

-With that much wild Pacific salmon on their hands, they honestly were.

Primal Kitchen Pizza Sauce

The post New and Noteworthy: What I Read This Week — Edition 131 appeared first on Mark’s Daily Apple.

Be Nice and Share!