Originally Posted At: https://breakingmuscle.com/feed/rss
Nick “The Mutant” Walker wasn’t always a hulking phenom — one of modern bodybuilding’s top competitors. Then he won the 2021 Arnold Classic (AC) during his International Federation of Bodybuilding and Fitness (IFBB) Pro League rookie year, and he’s seemingly only become more high profile by the day ever since. A fifth-place result at the 2021 Mr. Olympia was a fitting cherry on top for an athlete who seemed like the next big thing in the sport. Now, after a podium performance at the 2022 Mr. Olympia, Walker will be wasting no time getting back on the mass warpath. He’ll return to some of his roots to do it.
On Jan. 12, 2023, the Arnold Sports Festival revealed that Walker would compete at the 2023 edition of the Arnold Classic. The contest is currently scheduled for Mar. 2-5, 2023, in Columbus, OH, where, unsurprisingly, several other established superstars already plan to gather. A stacked field likely won’t intimidate Walker, who seems to be on a determined mission to make it two vaunted AC titles in three years.
Walker’s AC return announcement came shortly after the Arnold Sports Festival announced that this year’s first-place prize money would be upped to $300,000 for the Men’s Open winner. That compensation is almost three times Walker’s victory winnings of $130,000 in 2021, partly signifying the tremendous rapid growth of the competition and its significance.
In a quick post on his Instagram, Walker tersely but efficiently elaborated on the news of his return to the AC. He shared a picture from his winning performance at the 2021 iteration with a caption of “run it back,” with obvious intentions of overcoming his elite peers on the Columbus, OH, stage again.
Walker will face no shortage of worthy challengers to etch his name as the Arnold Classic winner for the second time in three years.
For example, two-time winner William Bonac will seek his third career AC crown (2018, 2022), a feat only four other bodybuilders have accomplished in the contest’s 33-year history. At the same time, a newer ascending star like Samson Dauda will also be vying for the momentous championship. Other notable confirmed names so far include Kamal Elgargni and Akim Williams.
Notably, a group of relative newcomers in Derek Lunsford, Blessing Awodibu, and Michal “Križo” Križánek announced plans to skip the tentpole contest. Each of the three athletes made a distinction that they’d prefer to get some rest before focusing most of their efforts on an improved performance at the 2023 Olympia in November. Lunsford, in particular, as the 2022 runner-up in his Men’s Open debut, might have the most realistic chance of reaching those lofty goals.
At the time of this article’s publication, it is unclear if another two-time AC victor (2019, 2022) and the reigning champion, Brandon Curry, will come back to defend his title.
The 2023 Arnold Classic is already shaping up to be a battlefield if announcements like Walker’s expected appearance mean anything. With the new year up and rolling, March’s competition will likely be a memorable addition to bodybuilding lore.
Originally Posted At: https://breakingmuscle.com/feed/rss
Entering the 2022 Mr. Olympia, most expected Chris Bumstead to continue his largely unimpeded reign atop the Classic Physique division. Now a reigning four-time champion, Bumstead is one of the most prominent, influential names in bodybuilding, even drawing direct acclaim from the legendary Arnold Schwarzenegger. As it turns out, Bumstead had another roadblock to overcome as he completed his remarkable four-peat.
On Jan. 12, 2023, Bumstead posted a video on his Instagram revealing he tore his right biceps muscle roughly three days before the beginning of the 2022 Olympia contest. Despite such a potentially massive setback, Bumstead persevered to victory, but it wasn’t exactly how he had planned.
Per Bumstead’s testimonial, he didn’t even notice anything was wrong with his arm until the morning of Wednesday, Dec. 14, 2022, three days before he was expected to step on stage. The superstar athlete said he felt “a little bit of pain” before his own personal weigh-ins but wasn’t initially sure what the issue was. The ensuing day, the Thursday before the start of the 2022 Olympia, Bumstead’s pain apparently grew, especially while posing. By Friday evening, the pain in his arm was so intense Bumstead avoided posing as much as he could. After all, his callouts and the Classic Physique Finals were scheduled on that Saturday, and he had to conserve energy where possible.
For this young titan, it became both a physical and mental journey through adversity. Given the high expectations and pressure he placed on himself, this biceps injury at the near-last moment was understandably not a welcome obstacle.
” … So we went on stage for prejudging and I still felt really good and I still felt confident,” Bumstead said. “My physique was great but I kept just thinking that here is this great physique I’ve built, probably the greatest package I ever brought to the stage, but my arm. Everybody is going to be seeing me and go like, ‘Why does his arm not look right?’ I just couldn’t get that out of my head. It was something that was pulling me out of the moment.”
Despite his insecurity over an injury that ultimately didn’t preclude him from another Classic Physique Olympia title, Bumstead did his best to keep his eye on the prize. He had to take a step back and ensure his mind was in the right place before doing the seemingly impossible — winning a fitness posing competition with one body part that might not have looked or performed “right.”
The way the best of champions do.
“I had one of my ‘C-Bum’ moments in the bathroom, crying,” Bumstead revealed on the day of the Classic Physique Olympia. “I got on my knees in front of this mirror and I looked at myself. I was just like, ‘What’s going on, man? … All this work you’ve put in, all the effort you’ve put into this, all the love you have for this, the years and many times you’ve done this. And you’re stressing about it now? … All the fans and friends who’ve supported you, who are excited to be here. You should be excited for that. Not even ‘you should,’ but that you get the opportunity to be here and enjoy this. … This is a privilege and a blessing to be here. I’m going to choose to enjoy this.’”
From there, Bumstead’s promise to himself to enjoy the moment of standing under the Las Vegas, NV, stage spotlight paid off. By keeping a positive, competitive mindset, he clarified he could compartmentalize a torn muscle that might have otherwise dragged him down. Per Bumstead, if one looks closely at him after stepping off the stage during the Classic Physique Finals, the emotion of enduring the pain and stress from his injured biceps was evident, too, even if he tried his best to hide it.
“We went out there, had fun, crushed it, and it was just a proud moment of myself,” Bumstead said. “It’s also why you see that clip of me getting off stage and just bawling my eyes out. Because it was all the pressure, expectation, stress, getting on stage, being on my mind all day, battling it. All of the ups and downs all day, then I was able to pull it together, be there and enjoy it, and bring home the win.”
These days, roughly a month after the latest bright moment of his illustrious, growing career, Bumstead explained that his biceps tear wasn’t actually too severe. In fact, it doesn’t seem it’ll interrupt much of his training plans as he works toward a fifth consecutive championship in 2023.
He just has to be patient and take his time first.
“An update on my bicep now, it’s only mildly torn, it’s not off the insertion or the origin. It’s just in the muscle belly, so it’s really not that bad,” Bumstead said. “They [medical professionals] said six to eight weeks to recover. I’m stubborn, so I’m going to say five to six weeks on that one. But I haven’t trained back or biceps. I really haven’t trained at all in four weeks. I’m just letting it heal, letting it recover, keeping down inflammation.”
Originally Posted At: https://breakingmuscle.com/feed/rss
It’s not precisely on par with the Olympia contest, but the annual Arnold Classic (AC) arguably holds as much prestige and influence, being considered one of the major contests on the bodybuilding calendar. When some of the world’s best bodybuilders travel to Columbus, OH, to take the stage on Mar. 3-4, 2023 for the latest edition, they can take solace in knowing one thing. A victory will be rewarded more handsomely than ever.
On Jan. 12, 2023, the Arnold Sports Festival organizing body put out a press release on their website and posted to Instagram announcing the prize for winning the Men’s Open division at the 2023 AC will be $300,000. That is a $100,000 increase from the $200,000 reigning AC winner Brandon Curry took home in 2022. It builds on a significant increase from previous years when former champion Nick Walker won $130,000 after the 2021 iteration, and inches closer to the $400,000 top prize earned by Hadi Choopan after winning the 2022 Mr. Olympia.
In the press release, Arnold Schwarzenegger elaborated on the significance of the growth of the Arnold Classic.
“From the first time we hosted a bodybuilding championship in Columbus in 1976, my goal has been increasing the prize money to reward these fantastic athletes,” Schwarzenegger said. “I am excited to announce that this year’s winner of the Arnold Classic will win a record $300,000.”
As for who will travel to Ohio to vie for the newest AC title, a few past champions, big names, and up-and-comers highlight the Men’s Open. On Jan. 12, 2023, the organization revealed that Nick Walker would return to the 2023 AC and the contest that arguably first helped him build his sterling reputation in professional bodybuilding. Past winner (2018, 2020) William Bonac will also return to the Columbus stage. Meanwhile, two-time 212 Olympia winner Shaun Clarida (2020, 2022) will try to challenge both men. Other confirmed Men’s Open competitors include Samson Dauda, Kamal Elgargni, Justin Rodriguez, and Akim Williams.
Notably, a recent cadre of elite bodybuilders revealed they had either withdrawn or declined their invitations to the 2023 Arnold Classic. At the time of this writing, that group features the second-place finisher at the 2022 Mr. Olympia in Derek Lunsford, Blessing Awodibu, and Michal “Križo” Križánek.
As the 2023 competitive bodybuilding season develops, the 2023 Arnold Classic will undoubtedly be one of the first significant steps toward making it a year to remember. Eventually, one focused athlete with incredible mass and a ripped physique will have the great fortune of leaving Columbus, OH, $300,000 richer for their diligent efforts.
Originally Posted At: https://breakingmuscle.com/feed/rss
Among current elite strongman competitors, Mitchell Hooper might be the next big thing. After storming onto the scene in 2022 — notching a podium finish in six of seven contests and winning two of his last three, including the 2022 Arnold Strongman Classic UK — many understandably expect even more from Hooper in 2023. However, before he tries to build on a terrific debut year that saw him captivate the sport, the Canadian athlete is first dispensing some worthwhile training tips.
On Jan. 11, 2023, Hooper posted a video to his YouTube channel where he gave a group of athletes a walkthrough on how to lift Atlas stones properly. The session isn’t necessarily new for Hooper, who occasionally shares similar technique training videos in between moments of refining his own strength.
Hooper wastes no time diving into his de facto lecture on Atlas stones.
Set Your Stance Mid-Stone
He first diagrams how one starts from a quality lifting stance, noting that the balls of an athlete’s feet should be even with the center of the stone when setting up. Another critical factor is ensuring that the feet have wide enough positioning.
“You want to be in a spot where you can see your feet [on either side of the stone]. See your feet on the sides of the stone.”
If a person’s feet are too close to the Atlas stone, Hooper maintains that it could negatively change the hands’ positioning as they grip the stone. In addition, with the stone in hand, the knees might rub up against an athlete’s elbows, making for a non-ideal setup while lifting.
Cup the Stone with Hands and Forearms
In regards to specific notes about an athlete’s hands while trying to lift an Atlas Stone, Hooper clarifies that the hands should never be directly under because that will force the relatively weaker biceps muscles to support the load.
“The name of the game is creating friction by creating as much surface contact as possible. You want your hand and as much of your forearm to be on the stone as possible.”
Instead, the aim should be about having as much of one’s arms touching the stone as possible, almost “cupping” the large trademark strongman implement by placing your hands slightly forward of the weight’s center.
“Straight arm, hands forward, arms locked in. That way, we’re using our chest and our lat to squeeze the stone. We’re not using our biceps to pick up the stone.”
Deadlift High and Lap the Stone
Hooper maintains that once an athlete is in a proper position, their goal should be to lift the stone to their lap by putting it as far above their knees as possible. Then, once ready, the hips can sink back, and the stone can naturally be rolled into the lap.
“What you should aim to do is deadlift the stone as high as possible. You don’t want to just get to your knee and immediately sit it in.” Hooper said. ” … Think about how muscles oppose force and where that force is going.”
A common technique principle for strongmen and strongwomen, lapping the stone helps the athlete seamlessly re-grip for improved leverage before standing.
“The first goal is to get the stone from the ground to your lap … Once the stone passes your knee, you can sit and roll. You replace your hands, and you can bring it up [to a standing position].”
Get Hips Under the Stone to Stand Up
Per Hooper, once someone is prepared to change their grip for the hip movement, the stone should “sit on the sternum” with the body as tight as possible to the stone. The stone should then move straight up as the athlete stands up.
Hooper clarifies that some make the mistake of actually trying to lift the stone higher when it’s against their sternum. To combat this overcorrection, the strongman advises making a stringent effort to keep the stone tight to the chest and simply extending the hips underneath for improved leverage and full extension.
“When it comes to extending [into a standing position], you should not think about bringing the stone up … Your thought should be to shoot your hips under the stone, and then it will roll up.”
Special Technique for High Platforms
If a strongman or strongwoman competitor has the task of lifting the stone onto a taller podium, Hooper said they should strive to ensure their hands aren’t directly around the center of the stone when repositioning grip. This sort of “hugging” leaves limited flexibility for strength maneuverability with the stone at a higher position and has a higher chance of a failed lift.
Instead, when an athlete is working for their re-grip, the arms should be placed at a 45-degree angle over the top of the stone, leaving more room to work the stone onto a higher platform.
Ultimately, Hooper offered a reminder that the balls of the feet indicate where the center of the stone is. As such, the arms should still be in lockstep with the balls of the feet on initial positioning. While reviewing several video participants’ sample performances, Hooper offered one final correction to a common mistake being made in the early phase of the lift.
“The motion off the ground is not a squat, it’s a stiff-legged deadlift. Hips really high.”
Already an established superstar, Hooper, the teacher, will soon seamlessly shift to Hooper, the strongman. The athlete is set to compete at the 2023 Australia’s Strongest International (ASI) on Jan. 21, 2023, in Yapeen, Australia. If his exploits there go anywhere close to his success from 2022, Hooper just might start the new competitive year with a bang.
Originally Posted At: https://breakingmuscle.com/feed/rss
Everyone in the gym has their own ideas about ab training. And the majority of people seem to hate it. It’s the one thing most lifters leave to the end of their workout in favor of movements for other body parts, if they bother to train their core at all.
People often neglect core training because it can be grueling, boring, or just plain difficult. But it doesn’t have to be any of that. Simple and effective core training starts with the basics. When it comes to simple core training, it’s hard to beat what’s arguably the most ubiquitous of all core exercises in the gym, the classic plank. But when it comes to being both simple and effective, take the plank to the next level.
Credit: Human Form Fitness / YouTube
Enter, the bear plank. This upgraded plank position is both easier to learn than the classic and it hits your core harder. Here’s how to get a win-win for your core workout.
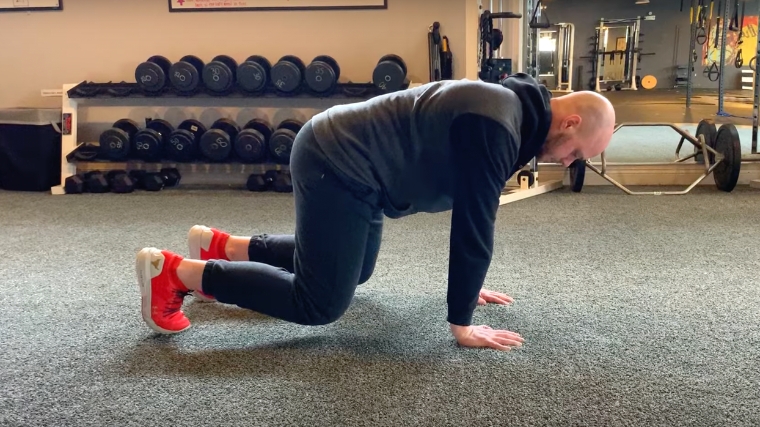
The bear plank, or bear-stance plank, refers to holding a ground-based position using straight arms and bent legs, rather than straight arms and straight legs (like a standard plank position). Your weight is supported on your hands and toes, with no other bases of support, but your legs are bent and your knees are very slightly above ground-level.
Step 1 — Hands, Knees, and Toes
Credit: Christian Fabrizio / YouTube
Get on the ground and support your body with your hands, knees, and feet. Set your hands directly under your shoulders, not in front or behind them. Place your feet hip-width apart.
Get an approximate 90-degree joint angle at your knees. If your legs are too bent, the movement won’t be challenging enough and you’ll risk resting your knees on the ground. If your legs are too straight with your knees behind your hips, you’ll end up looking like a poorly performed standard plank, which defeats the purpose of the exercise.
Form Tip: Your overall position should be comfortable, square, and balanced. Take the time to check the position of your hands, shoulders, knees, hips, and feet. Look directed down to the ground or slightly in front of your hands. Cranking your head to look forward will only stress your neck.
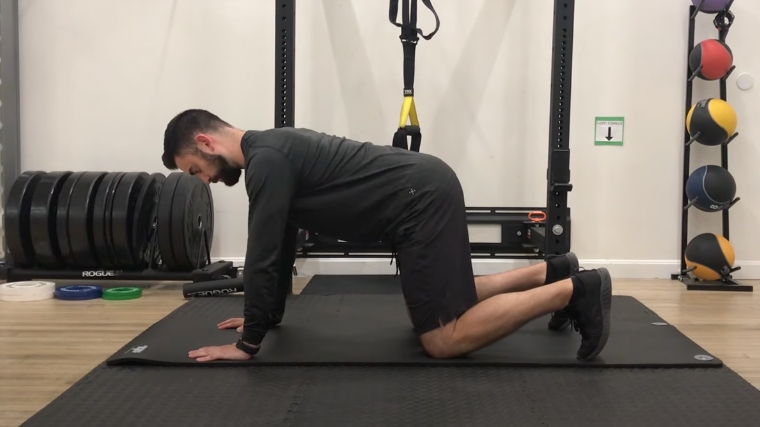
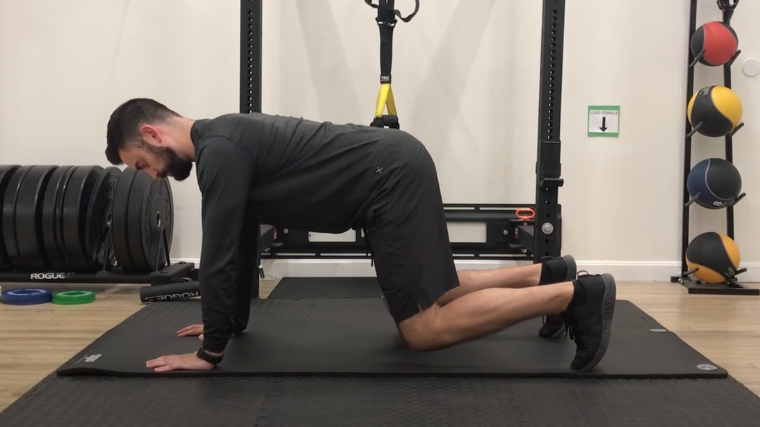
Step 2 — Lift Your Knees and Brace
Credit: Christian Fabrizio / YouTube
Bring your knees just a few inches off the ground and keep them in line with your feet. Don’t let your shins or knees wobble in or out of alignment. Flex every muscle from your toes to your wrists. Although this is a core-focused exercise, the more muscles surrounding the core you can also contract to promote stability, the better. (1)
Squeeze your quads, glutes, and hips. Think about driving your hands and feet into the floor as hard as possible without actually raising your body. Keep your knees off the ground and maintain complete tension for the duration of each set.
Form Tip: Don’t only focus on flexing your abs. Achieving full-body tension will contribute to a better quality bear stance which will make the movement harder and require more effort, which can yield better results.
Bear Plank Mistakes to Avoid
Even though the bear plank is a static exercise with no “moving parts,” there are still some common technique errors that will prevent maximum tension or limit progress.
Poor Knee Position
When your knees are touching the ground, your body has very little need to stabilize, so you’re not actually performing the exercise. Keeping your knees elevated also helps to maintain a strong hip position and prevent back rounding. This can also help maintain tension through your hamstrings, glutes, core, and trunk.
Credit: Benjavisa Ruangvaree Art / Shutterstock
Avoid it: Set your knees directly under your hips or tailbone, not far back in a nearly straight position. When you begin the exercise, imagine having a tray of wet paint appear under your knees. Stay tight, stay focused, and keep your legs clean. If your knees dip down into the “paint,” end the set, rest briefly, and try again.
Bending Your Arms
The fully supported bear plank position uses your fully straightened arms to support your upper body while your lower body is supported by bent legs. Bending your upper arms changes the overall angle of your torso and alters your center of gravity.
Credit: fizkes / Shutterstock
This makes the exercise less effective overall and emphasizes the relatively smaller muscles of your arms and shoulders to support the majority of your body’s weight, compared to dispersing the tension throughout your entire body.
Avoid it: Keep your arms locked straight during the exercise. If your shoulders or triceps fatigue excessively, end the set. Over time, your muscles will adapt by building strength and endurance to support the position.
How to Progress the Bear Plank
The bear plank is a relatively a simple movement, so the natural inclination of a lifter would be to seek ways to make it more difficult once they’ve “graduated” from the basic execution.
Add a Weight Vest
Adding a weight vest creates a heavier load to bear when in position, requiring even more from the trunk for stability and positioning. However, the typical weight distribution of a standard weight vest (with the weighted inserts often placed around the midsection) creates even greater temptation for the spine to slip into an arched or extended position. That means more reliance on your abs to negate this repositioning and keep your spine flat.
Credit: Depth Training and Physiotherapy Waterloo / Youtube
Keep in mind that using a weight vest usually goes hand-in-hand with reducing the amount of time spent in the plank position. Focus on high-quality performance rather than just achieving long durations.
Shoulder Taps
In the typical bear-stance plank, there are four points of contact with the floor — two hands and two feet. That means forces are distributed evenly among all those points. As soon as one of those points of contact leaves the floor, there are added demands on the body to resist changing position to compensate for reduced stability. In the bear plank, these are rotational forces and resisting them would be termed “anti-rotation.”
`
Since a massive function of your core is to brace and work against unwanted outside forces, the simple shoulder tap is a great way to train anti-rotation from a bear stance. Work hard to stay square and keep your back and trunk parallel to the floor without twisting or shifting. Try sets of 12-20 shoulder taps, alternating hands as you go along. Remember to move slowly with control.
Bear Dogs
Assuming a bear-stance starting position allows you to maintain a much more neutral spine when in starting position, as previously discussed. The basic bird dog exercise is a core stability movement that many lifters can master, but taking things to the next level involves some strategy. Bear dogs are a smart modification that provide all of the benefits in blasting contralateral stability (coordinating left and right limb movements).
Keep sets very low-rep, such as three or four reps per side. Instead of progressing with higher reps, opt for more total sets. This ensures you can focus on high-quality repetitions while avoiding too much fatigue which would prevent good performance.
Benefits of the Bear Plank
The bear plank, like all types of plank exercises, can be a top-level core strengthening drill. The total-body tension and abdominal activation can carry over to provide stability in other strength-focused exercises.
Better Ab Recruitment
The bear plank works well as a modification or alternative to basic planks, while being much more effective in targeting the abs due to simple changes in positioning. The abs are much more difficult to fully engage in a classic plank due to the long-legged position. Everyone naturally has a slight arch (lordotic curve) in their lower backs, and it’s especially present when standing up straight. The same issue applies when we get into a typical plank position.
However, when sitting down, it’s a lot harder to maintain the same degree of back arch. When you’re bending your knees to sit down, your pelvis tends to rotate “under” your body into more of a posterior tilt, making the spine exit extension and edge toward neutral or even a flexed position — that’s part of what makes you “slouch” when you sit.
Using that to our advantage can go a long way in its efficacy for core training. While it can be tough to keep a flat spine using a classic plank, opting for the bear plank almost ends up mimicking a seated position while kneeling. This change in knee angle also affects your pelvic position and brings your lumbar spine into a much more neutral state, which is great news for targeting and activating your abdominals. (2)
Simplified Technique
The bear plank is both a more challenging plank modification because it hits the abs harder than most other plank variations will. Fortunately, it’s also a less challenging modification because it’s relatively easier to perform for most lifters.
A lifter looking to take their core training game to the next level of quality and effectiveness can’t go wrong with the bear plank. Doubling down on the exercise by applying the advanced methods listed later in this article will be gold for keeping your training interesting while providing a continued challenge to trunk strength and stability.
Muscles Worked by the Bear Plank
Any exercise in the plank family will first and foremost target your core muscles. The bear plank, specifically, recruits these crucial stabilizing muscles better than many other exercises due to your overall body position.
Rectus Abdominis
When all four limbs are on the ground, the bear plank primarily focuses on the rectus abdominis muscles — the body part that most people reference when they say “six-pack”. The goal of the exercise is to keep the strength of the muscular contraction consistent and high-intensity.
Transverse Abdominis
The transverse abdominis is the “inner layer” of the abdominal wall. During the bear plank, or any high-effort core bracing, your transverse abs will be firing at maximum capacity to provide stability to your entire trunk, like beams of a house giving stability to the outer framework.
Obliques
Your obliques, on the sides of your abdominals, are responsible for rotating your trunk and thoracic spine, as well as resisting rotation. During the bear plank, your obliques are activated to help prevent tipping over sideways.
Credit: ThomsonD / Shutterstock
Anytime you lift a hand or foot during any anti-rotational bear plank variations, your obliques take on significantly more work. They will be asked to isometrically contract to keep the core from twisting out of position.
How to Program the Bear Plank
The bear plank can be plugged into any number of workout programs, either as a warm-up and activation drill, a focused core training exercise, or as part of a conditioning workout.
High Intensity for Time
The bear plank, and all plank variations, are somewhat unique to other exercises you can perform because they’re typically not done for multiple repetitions. Instead, focus on achieving maximum tension from head-to-toe and holding that tension for a specific time — using your phone’s timer feature comes in real handy for this. Aim for anywhere from five to 30 seconds of fully flexed tension for two to five sets.
Just like you “shouldn’t” use poor form to squeeze out a few extra reps of squats, you shouldn’t allow yourself to gradually apply less and less tension as a set goes on just to hit a pre-set time limit. When you feel the focused tension falling less than 100%, stop the set, rest, and do another.
Variations of the Bear Plank
Once you’ve mastered applying full-body tension with the bear plank, you can adapt that skill and conditioning to other exercises for a variety of results.
Classic Plank
As popular and common as the plank exercise is, the interesting truth is the fact that many people perform it poorly. Positioning the body on your elbows and toes has proven to be a slightly more demanding task than meets the eye, especially with form cues to ensure your abs are working their hardest. For starters, it’s important to remember that the abdominals posteriorly tilt the pelvis.
Credit: TORWAISTUDIO / Shutterstock
That means keeping your back flat with your butt squeezed and “tucked in” is far superior to keeping your back slightly (or generously) arched. Doing the latter will negate the purpose of the exercise.
Actively “pull inward” with your elbows in an attempt to move your ribcage down toward the hips. This keeps your core braced while contracting as hard as it can. This is an important cue, as it’s really easy to “hang out and chill” when performing a plank, enabling someone to stay in position for minutes on end. It’s much more effective to hold an intense contraction for 30 seconds or less, than to hold a poor quality position for three, five, or 45 minutes.
Bear-Stance Renegade Row
Doing renegade rows from a bear-stance position isn’t only harder and more intense for the abs, it’s also an easier way for you to assume the right lumbar (lower back) posture. Your pelvis enters anterior (forward) tilt and your body has to find a way to keep your glutes and lower abs engaged enough to overcome this. This isn’t easy in the presence of fatigue.
Making the switch to bent knees with tilt your pelvis posteriorly (backward) just enough to enforce a neutral spine, potentiating more lower ab involvement while leaving the glutes less involved. If the goal is core training, this is an ideal “gym hack.” The inclusion of the row pattern (which shouldn’t use a very weight) will also train your upper back to address posture, strength, and development.
FAQs
Should I begin with the bear plank or the classic plank?
Because the bear-stance plank puts your hips in a more efficient position, it can be a better starting point for many lifters. It’s also relatively harder to “cheat” during the bear plank, unless you rest your knees on the ground or stand up too high. With the standard plank, it’s common to see lifters dropping their hips and creating a U-shape with their body, losing tension throughout their core. Either movement can be effective when done properly, but it can be redundant and inefficient to perform them both in the same workout.
When should I add weight?
Apply the same principles as any bodyweight exercise — when your current programming (sets and duration) are no longer challenging, you can add a small load to increase the difficulty. With the bear plank, that could mean adding a very light weight vest when you can perform multiple sets of 20 to 30 seconds while maintaining high tension for the duration. Just like you might go from a set of 12 bodyweight pull-ups to a set of three weighted pull-ups, don’t be surprised if you drop from 30 seconds of unweighted bear planks to sets of five seconds with a weighted bear plank.
Get Down, Knees Up
There are hundreds of abdominal and oblique-focused exercises that might help a lifter get stronger and more conditioned, but it doesn’t have to get too fancy. Taking a basic plank and turning it into a bear-stance can be all that’s needed to step your training up a notch or two. Exercise doesn’t need to be complicated for good things to happen — quality is king. The bear plank is a great example of emphasize simple and effective training being the path to better results.
References
Gontijo, L. B., Pereira, P. D., Neves, C. D., Santos, A. P., Machado, D.deC., & Bastos, V. H. (2012). Evaluation of strength and irradiated movement pattern resulting from trunk motions of the proprioceptive neuromuscular facilitation. Rehabilitation research and practice, 2012, 281937. https://doi.org/10.1155/2012/281937
Workman, Chad & Docherty, David & Parfrey, Kevin & Behm, David. (2008). Influence of Pelvis Position on the Activation of Abdominal and Hip Flexor Muscles. Journal of strength and conditioning research / National Strength & Conditioning Association. 22. 1563-9. 10.1519/JSC.0b013e3181739981.
Featured Image: Susan Niebergall Fitness / Youtube
Originally Posted At: https://breakingmuscle.com/feed/rss
When Michal “Križo” Križánek became a member of the International Federation of Bodybuilding and Fitness (IFBB) Pro League in the Fall of 2022, he was still a relative unknown in the major bodybuilding scene. The pro competitor parlayed that ambiguity into ambitions of competing in the 2022 Mr. Olympia. The contest was his debut on an Olympia stage and acted as a means of showcasing his unique mass and physique. In the end, a 12th-place result was a solid debut, but the athlete doesn’t appear satisfied.
On Jan. 10, 2023, Križo posted a video to his YouTube channel where he dives into some of his plans for the 2023 calendar year. One of the more notable reveals is that the athlete will skip the 2023 Arnold Classic in Columbus, OH, this March in the interest of refining perceived gaps in his overall training.
As a competitor without an automatic berth in the 2023 Mr. Olympia this November, Križo will have to earn his keep by winning an IFBB Pro League show following the organization’s changes to its qualification system. Before that happens, though, he asserted his body needs proper rest if he’s to build upon his initial Olympia performance.
It’s a conditioning factor that apparently was an issue in a whirlwind 2022 for the competitor.
“I will have to pick [my next IFBB Pro League show] smart,” Križo said. “I wasn’t happy with my conditioning at the [2022] Olympia because I know I can come in more conditioned than that. I was already too tired.”
Križo didn’t offer too many specifics about when he’ll compete again after turning down his Arnold Classic invitation. He offered up a few options, perhaps most notably the Arnold Classic UK contest, to be held in September 2023 during the recently renamed Experience With Sports Festival UK (formerly the Arnold Sports Festival UK). He also speculated about what comes next in his bodybuilding journey.
“I don’t know yet,” said Križo of his plans. “I’d like to do the Arnold Classic UK. I’ll definitely do the [2023] EVLS Prague Pro, but this time it’s only after the Olympia, two weeks after. [The Arnold Classic UK] is usually in September. The [2023] Olympia will be in November, I think. That [Arnold Classic UK] should be at the end of September. I will have to choose at least two to three shows. There is no guarantee that I would win the very first one.”
With Hadi Choopan now the defending Mr. Olympia, any number of competitors will set their sights on toppling the first-time winner. Križo has picked his path toward such an ideal personal outcome, and only time will tell whether the strategy succeeds.
Featured image: @ifbb_pro_michalkrizokrizanek on Instagram
On Jan. 10, 2023, Awodibu used his Instagram to announce that he would be declining a formal invitation to the 2023 Arnold Classic in Columbus, OH.
Huge thanks to the [Arnold Sports Festival] for the invite, one of my all-time favourite shows, but, unfortunately, I will not be doing the Arnold [Classic] this year.
Awodibu’s main rationale for stepping down from the 2023 Arnold Classic is focusing on self-care before he can really try to achieve any ambitious goals in the coming months. In discussing why he’ll forgo one of bodybuilding’s top competitions, Awodibu didn’t overlook a detail. The winner of the 2022 International Federation of Bodybuilding and Fitness (IFBB) Indy and New York Pro contests, Awodibu noted that he felt his schedule last year was too jam-packed.
Ultimately, it seemed to have a negative effect on his eventual performance and presented physique at the 2022 Mr. Olympia.
“Going off completely for almost three months after the Indy and New York [Pro] shows and traveling really affected my Olympia prep negatively,” Awodibu wrote. “I definitely lost some muscle mass, and I didn’t have enough time to fill out my physique before the Olympia. So, right now, I’m just giving my body the much-needed time to bring my shape back before any prep. Expect a crazy comeback later this year.”
Awodibu is not the first notable name to reveal he would not be competing in the 2023 Arnold Classic. Rather than divert his energy on preparation for another contest, Derek Lunsford, the 2022 Mr. Olympia second-place finisher, revealed he would also skip the Arnold Classic. Instead, he’ll be spending his 2023 entirely on trying to finish the Olympia job at the start of this new year. That contest will take place sometime in November 2023 in Orlando, FL.
As an elite athlete, it can understandably be a lot to admit one needs time to recuperate rather than keeping the foot on the gas 99% of the time. Such a patient approach for Awodibu is theoretically unconventional, but it might pay off for him in spades in 2023.
Originally Posted At: https://breakingmuscle.com/feed/rss
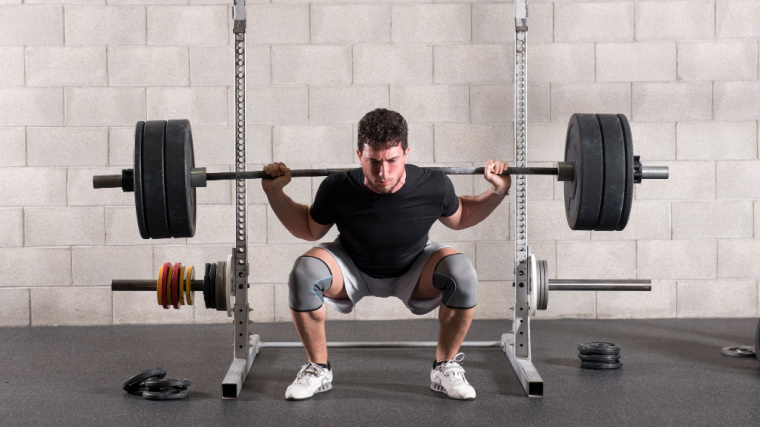
In each new year, with roughly 12 months as their proverbial ball of training clay, some athletes prefer to take their time and ease into potential lofty goals. Such a sentiment would not apply to the young Jacob Green, who hit the ground running in 2023 with a recent staggering strength feat.
On Jan. 8, 2023, Green posted a video to his Instagram profile where he captured a 254.9-kilogram (562-pound) back squat with knee wraps. Per the caption of his post, the successful lift is an all-time personal record (PR). In addition to his knee wraps, Green utilized a lifting belt to help him attain the PR. Green also performed the squat with a slow and deliberate three-second eccentric, or descending phase.
A USA Powerlifting (USAPL) Juniors powerlifter of late, Green crushing it in the squat rack and throughout the gym is nothing new for this youthful dynamo. In fact, it’s in line with stellar precedence for a growing phenom.
Only two days after logging this one-rep max squat PR, Green shared a clip of himself finishing a 234.9-kilogram (518-pound) squat for a five-rep PR. When it comes to leg endurance, Green doesn’t appear to be a slouch, either. He captured a 200-kilogram (441-pound) squat AMRAP (As Many Reps As Possible) for 12 reps in November 2022. He had notably entered that session with a goal of finishing nine reps, but the weight on his stacked barbell “felt too easy,” so he proceeded to push himself further.
Approximately two weeks before showing off the newfound torque in his piston legs on the one-rep max, Green capped a 176.4-kilogram (385-pound) bench press for a three-rep PR in late December 2022. That specific lift apparently came as a moment of small redemption. He wrote that previously failing on a similar third rep in August 2022 was “out of character.” Naturally, coming back to the same weight and same setup and successfully pushing through on this occasion was a quality way for the athlete to “redeem” himself.
Green’s competitive history is a little all over the place as an athlete who has shifted weight classes and divisions while he’s matured in recent years. Per Open Powerlifting, he doesn’t appear to be a competitor loading his calendar with a cadre of events on a yearly basis. That said, his most recent appearance was a win in the 2022 USAPL Virginia Open State Championships in the Teenage division and 100-kilogram (220-pound) weight class.
With almost an entire year’s worth of time ahead of him, Green is free to make 2023 a tentpole moment in his strength career at a comfortable pace. Based on his start to the new year, he should have plenty to celebrate by New Year’s Eve this coming December.
Originally Posted At: https://breakingmuscle.com/feed/rss
At the start of this century, Ronnie Coleman and Jay Cutler were arguably the two most prominent names in bodybuilding. En route to his legendary run of eight consecutive Mr. Olympia victories (1998-2005), Coleman relegated Cutler to second-place on four occasions (2001, 2003-2005). When push came to shove, and Cutler was ready for his long-awaited moment of glory, he would finally dethrone Coleman in 2006 and capture another title over his ripped peer in 2007.
Over a decade and a half later, Coleman and Cutler are two primary fixtures in the extended lore of bodybuilding history. The two former titans have a combined 12 Mr. Olympia titles (eight for Coleman, four for Cutler) and continue to be influential voices intimately concerned with the happenings of the modern sport. On Jan. 10, 2023, a video posted on Cutler’s YouTube channel features the two icons, joined by bodybuilding YouTube personality Jesse James West, plowing through a collaborative training session. Per the caption of Cutler’s video, the workout took place sometime during the 2022 Mr. Olympia weekend on Dec. 16-18, 2022.
The central focus of the three men’s joint workout was to chisel their respective back and biceps muscles. To commemorate the two legends he was training with, West had headbands and sleeveless flannels for everyone involved to adorn. A torn towel (reminiscent of these headbands) was a Cutler trademark look during the early parts of his career. Meanwhile, Coleman made wearing a sleeveless flannel his own staple during his dominant run as Mr. Olympia.
Once the workout got up and rolling, there was no stopping this whirlwind of strength and energy. The trio worked through respective sets of lat pulldowns, shifted to seated cable rows and single-arm machine rows, and implemented alternating traditional dumbbell curls throughout their routine. They did not specify the precise numbers and reps for each respective set.
In a treat for any spectating and diehard fans, Coleman and Cutler used the workout as an opportunity to swap unique anecdotes from Olympia legend to Olympia legend. It might have been an inside look at what it was like to be in the two men’s shoes while they were in their athletic primes.
Coleman and Cutler are certainly astute enough to know that what they have to offer bodybuilding now is more in line with their replete wisdom and experience. That’s what made their enthusiasm for watching Hadi Choopan finally climb the Olympia mountain post-workout palpable.
For a time, they were rivals. In the present, Coleman and Cutler can happily embrace their roles as stewards of bodybuilding’s past and future.
Originally Posted At: https://breakingmuscle.com/feed/rss
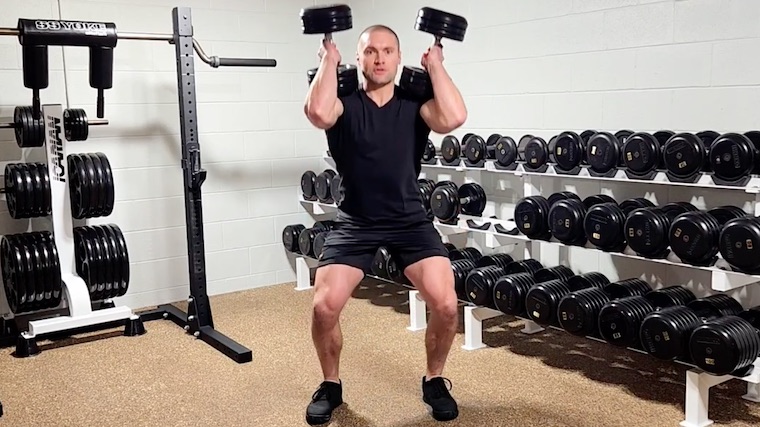
Imagine this: It’s peak hour at your gym and you’ve spent all day looking forward to attacking some front squats, but the wait for a squat rack is longer than the line at the smoothie bar on half-price day. Or maybe you’re trying to get a quality workout in a sparse hotel or still-growing home gym. Perhaps you just need a new squat variation for your program.
Credit: Fitness Fuelled / Shutterstock
Consider the dumbbell front squat. It requires only a pair of dumbbells and minimal floor space. More importantly, it builds killer quadriceps, a strong upper back, and a solid core. This article teaches you how and why to perform and program the dumbbell front squat.
See the detailed dumbbell front squat video instructions from Dr. Merrick Lincoln, then check out the step-by-step breakdown below.
How to Do the Dumbbell Front Squat Step By Step
The dumbbell front squat is a front squat alternative performed with a dumbbell racked on each shoulder. Follow these step-by-step instructions to ensure proper form.
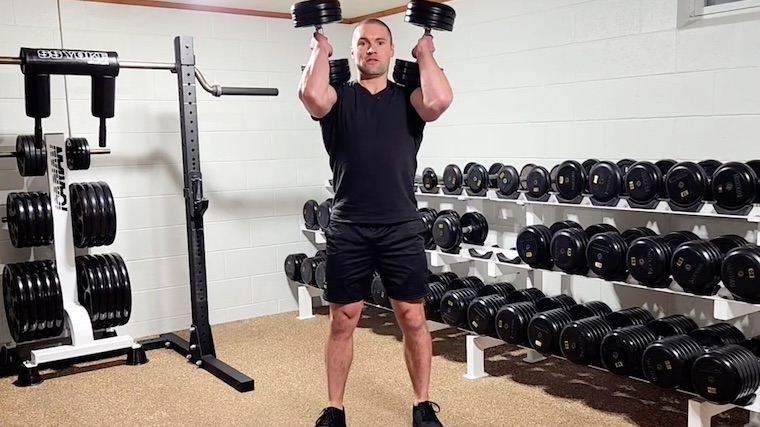
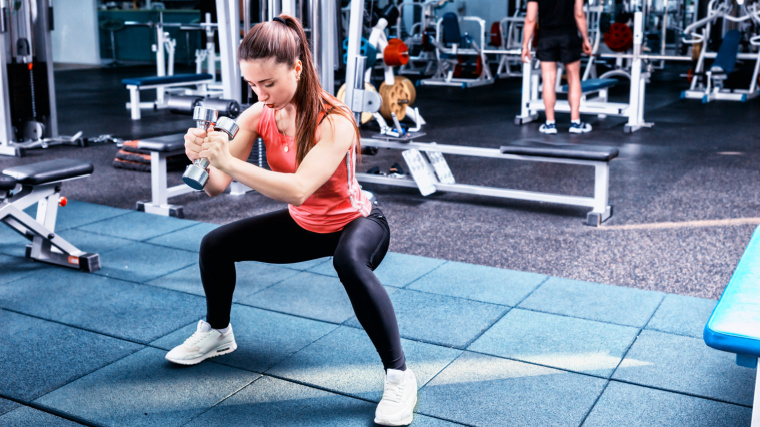
Step 1 — Clean the Dumbbells
Credit: Merrick Lincoln, DPT, CSCS / YouTube
Before you squat, you must “front rack” the dumbbells. In the front rack position, the ends of the dumbbells rest atop your shoulders and your elbows point straight ahead at shoulder-height.
To set up the front rack, perform a dumbbell clean — Start with the dumbbells at your sides. Drop into a mini-squat and rapidly extend your legs by driving your feet into the ground. Transfer the leg push into a powerful shrug. At the top of the shrug, draw your arms along your sides. Drop underneath the dumbbells by re-bending your legs and receive the weights atop your shoulders with your elbows high and bent. (1)
Form Tip: When cleaning heavy dumbbells, it may be helpful to think about “jumping” up with the dumbbells to propel them into the front rack. Although you should barely leave the ground, “jumping” the dumbbells into position can improve output and fluidity of the clean.
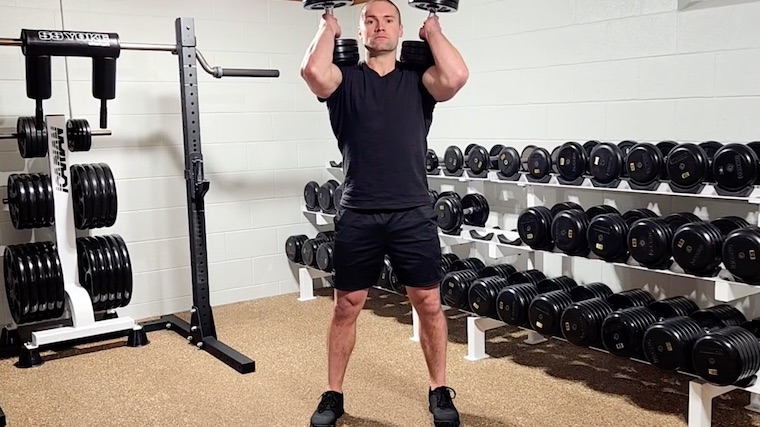
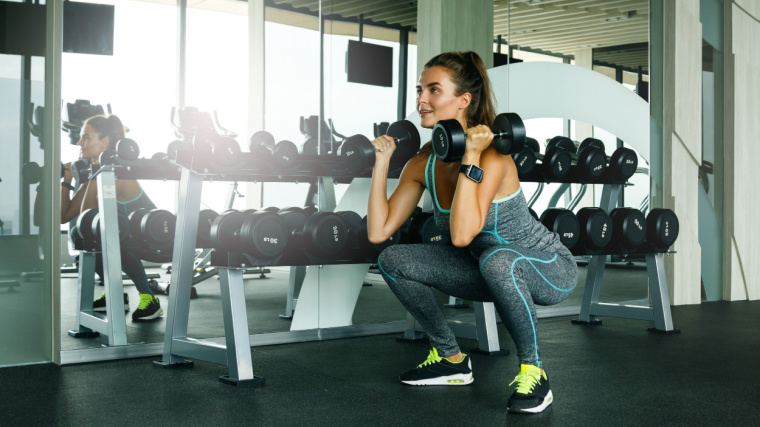
Step 2 — Set Your Stance and Brace
Credit: Merrick Lincoln, DPT, CSCS / YouTube
With dumbbells racked, place your feet at your preferred squat width and orientation. Typically, the front squat stance is shoulder-width or slightly wider. Your feet should point straight ahead or slightly outward. Brace your midsection by contracting your abdominals and back muscles at the same time.
Form Tip: Set up a strong foundation by achieving pressure through your heel, the ball of your foot, your big toe, and the base of your fifth toe. Basically, keep weight on your entire foot throughout the exercise without overemphasizing either your heels or the ball of your foot.
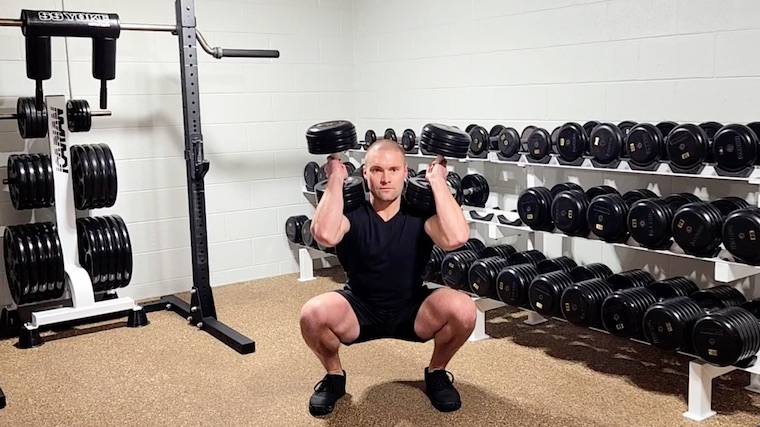
Step 3 — Lower to the Bottom Position
Credit: Merrick Lincoln, DPT, CSCS / YouTube
While keeping a straight or slightly arched back position, lower yourself toward the floor by allowing your knees, hips, and ankles to bend. Descend with control. Resist bouncing out of the bottom of the squat. Also, avoid “cutting depth” (i.e. ending the descent before you’ve reached maximum comfortable knee bend with good control).
Form Tip: Achieve proper dumbbell front squat form by squatting “down” not “back.” This is not a powerlifting-style back squat that calls for a forward lean to improve leverage and move heavy weights. Your upper body should remain more upright.
Step 4 — Stand Up to Lockout
Credit: Merrick Lincoln, DPT, CSCS / YouTube
Reverse the movement of your knees, hips, and ankles by standing tall. Keep the dumbbells balanced on your front delts throughout the movement. At the top, take a breath and re-brace your core before repeating another repetition. Don’t lower the weight from your shoulder until you’ve completed all reps.
Form Tip: As you push back to the standing position with forceful intent, think about driving the dumbbells toward the ceiling or sky but don’t actually lift them off your shoulders. This external cue can promote a strong front rack and improve power output. (2)
Dumbbell Front Squat Mistakes to Avoid
Steering clear of several common errors may help to maintain effectiveness and safety of the dumbbell front squat.
Allowing Your Elbows or Chest to Drop
The common barbell front squat cue applies just as well to the dumbbell front squat — “Chest up, elbows up.” Failure to maintain a high elbows position and a proud chest result in the dumbbells traveling forward. Too much forward movement of the dumbbells may result in compromised training stimulus for the quadriceps and even repetition failure with a loss of balance.
Credit: Viacheslav Nikolaenko / Shutterstock
Avoid it: Most of the dumbbells’ weight should rest on your shoulders, not your hands. Keep the weight in contact with your shoulders throughout the exercise. Don’t try to support the weight “freely” by holding your hands in the top of a biceps curl.
Low Back or Trunk Leaning Excessively Forward
Losing form at your hips or low back can cause all sorts of problems during the dumbbell front squat. These include, but are not limited to, loss of stability, your heels coming off the floor, and needlessly failed repetitions.
Credit: BLACKDAY / Shutterstock
Avoid it: To correct or prevent this, reminding yourself to brace and squat down rather than back is a good start, but it might not be enough. Among lifters without orthopedic limitations (i.e. lifters without stiff joints or obvious weaknesses), a coordination deficit can be to blame for excessive forward motion of the trunk or low back. (3) Check out the “overhead squat RNT” exercise in the FAQs section for a potent corrective exercise.
Insufficient Depth
Squats lacking depth? You can’t rely on your good looks and charm to fix this problem. If you are consistently cutting depth in the dumbbell front squat, your muscle development may suffer. Deep squatting has been shown to result in greater quadriceps muscle growth than shallow squatting. (4)
Credit: G-Stock Studio / Shutterstock
Furthermore, Kubo and colleagues reported full squat training resulted in more than twice the glute and adductor hypertrophy compared to half squatting. (5)
Avoid it: Many lifters without orthopedic limitations can improve their squat depth by repetitive practice focused on achieving “hamstrings touching calves.” If ankle flexibility is limiting your squat depth, consider the heels-elevated variation discussed below.
How to Progress the Dumbbell Front Squat
Lifters new the dumbbell front squat should begin with light weights to hone technique. Once this honeymoon phase is over, it’s time to go heavier and higher rep to promote strength and hypertrophy.
Increase the Weight
Once the exercise form is familiar and consistent, load progression to a “working weight” is in order. Establishing your working weight does not necessarily require repetition maximum testing.
A simple progression method is to determine a repetition range target based on your goals (explained in the Programming section). Then, work up to a weight that results in a challenging set that allows you to complete a number of repetitions near the bottom end of your target range. For example, if your repetition target for hypertrophy training is 8 to 12 repetitions, identify a weight that allows less than 10 repetitions.
Increase the Repetition Volume
As you get stronger with a particular pair of dumbbells, perform additional repetitions per set. Using the weight you identified above, you might be able to perform additional repetitions within a few weeks. Once you reach the upper end of your repetition target (e.g. 12 reps in the above example), it is time to increase weight again.
Benefits of the Dumbbell Front Squat
The dumbbell front squat is a unique squat variation that biases the thigh muscles while requiring only light to moderately heavy loads, which are comfortably supported atop the shoulders.
Quadriceps Muscular Growth
The placement of the load in front of the body during the dumbbell front squat promotes a “knee dominant” squat by facilitating greater forward knee travel and a more upright trunk position. (6) (7) “Knee dominant” means this variation loads the quadriceps to a relatively greater extent than variations where the load is held on the back, such as traditional back squats.
Consistently performing a squat variation that biases the quadriceps will build the “quad sweep” many aesthetic-focused lifters are seeking. The dumbbell front squat may be a particularly effective quadriceps-builder, because it trains the quadriceps through a large range of motion. (4)(8)
Spares the Low Back
The dumbbell front squat might be a friendly option for those dealing with low back pain or local muscle fatigue. The upright trunk angle diverts load from the low back and hips to the knees. (7) Reduced overall load used during the dumbbell front squat is also likely to reduce mechanical demand on the low back compared to other common squat variations that use heavier loads.
Credit: Photology1971 / Shutterstock
For example, compared to back squats, barbell front squats resulted in reduced spinal compression forces when performed at the same relative intensity. (9) The difference may be partly attributed to differences in overall load, since participants in this research squatted more than 25% more weight during back squats than front squats. (9) Naturally, the heavier squat imposed more overall stress.
Dumbbell front squats undoubtedly have a lower loading capacity than barbell front squats, so the demand on the low back is likely even lower. Give this squat variation a try when you low back feels “fried.”
A Forgiving Front Rack
Compared to the traditional front squat, the front rack position of the dumbbell front squat requires less shoulder, wrist, and elbow flexibility. Holding the barbell for the traditional front squat requires considerable shoulder external rotation, elbow flexion, and wrist extension.
Albeit barbell front squat variations such as gripless (i.e. “zombie”) front squats and cross-arm front squats avoid the challenging upper body positions of the barbell front squat. (10) But these gripless and cross-arm variations tend to place uncomfortable pressure on the deltoids or collarbones and may feel awkward.
Muscles Worked by Dumbbell Front Squat
Like any squat, the primary lower body actions resisted by the dumbbell front squat are knee extension, hip extension, and ankle plantar flexion. However, the unique setup and execution of the dumbbell front squat may make this variation more “knee dominant,” biasing the quadriceps. (6) Trunk muscles deserve an honorable mention for their involvement in the dumbbell front squat, as these muscles facilitate proper form.
Quadriceps
For aesthetics and function, the four muscles comprising the quadriceps are undoubtedly the most important muscles of the thigh. Although rectus femoris may experience little to no hypertrophy with squat training, squats promote substantial hypertrophy of the other three quad muscles: vastus medialis, vastus lateralis, and vastus intermedius. (5)(11) Fortunately, these muscles form the “quad sweep” many aesthetics-focused lifters desire.
Glutes and Other Hip Extensors
The “glutes” — gluteus maximus, gluteus medius, and gluteus minimus — are trained as hip extensors during the dumbbell front squat. The hamstrings are marginally active during the squat as hip extensors and also act to counteract shear forces at the knee. (8)(9) Research suggests the adductors, or inner thigh muscles, are also trained as hip extensors during the squat. (5)
Postural Muscles and Core
The dumbbell front squat hits postural muscles such as the spinal erectors, trapezius, and soleus (a deep calf muscle). To maintain a “braced” midsection during the squat, co-contraction of the abdominal muscles is necessary, which promotes a strong core.
How to Program the Dumbbell Front Squat
While it’s true the setup and execution of the dumbbell front squat limits maximum loading relative to barbell-based squats, appropriate programming of this exercise can deliver results. Specifically, lifters can program the dumbbell front squat for muscle gain (“hypertrophy”), strength, or as part of a deload from heavier squat variations.
Low to Moderate Weight, Moderate to High Repetitions
An exciting feature of training for muscular hypertrophy and muscular strength is that high effort sets, or those carried to- or close to- the point of muscular failure, are effective using practically any weight. (12)(13)(14) This is particularly relevant for an exercise like the dumbbell front squat.
Due to the constraints of setup (the initial dumbbell clean) and equipment (dumbbells), the dumbbell front squat cannot be loaded particularly heavy, at least not relative to the capacity of the leg muscles of experienced lifters. Whether you’re training for strength or size, select dumbbells that allow safe setup and proper form, and then take that set to within two or three repetitions of failure. Two to four sets of eight or more repetitions will promote strength and size, if each set is taken to close proximity to failure.
Moderate Weight, Moderate Repetitions
A deload refers to temporary reduction in training to promote recovery. The dumbbell front squat simply cannot be loaded as heavy as a barbell-based squats. This is due, in part, to the use of dumbbells which offer less stability and lower loading potential than a barbell. Note: the front-loaded nature of the exercise also limits loading potential relative to back squats. (9)
Therefore, even a somewhat challenging dumbbell front squat workout is likely to provide some degree of reprieve or recovery for intermediate and advanced lifters. Two or three sets of four to eight repetitions might serve as a nice deload week squat protocol.
Dumbbell Front Squat Variations
The dumbbell front squat isn’t the only way to perform an anteriorly loaded squat with dumbbells. Depending on your goals, preferences, and equipment, you might choose one of the following:
Heels-Elevated Dumbbell Front Squat
Performing squats on a wedge can be helpful to further bias the quadriceps or work around ankle dorsiflexion range of motion issues. (6)(7)(15) The wedge or heel lift projects your lower leg forward at the ankle’s resting position, reducing the need for additional dorsiflexion. (15)
When squatting with your heels elevated, your trunk tends to stay more upright and your knees travel further forward. Together, these features promote greater focus on the quadriceps (due to increased knee action). (6)(7)
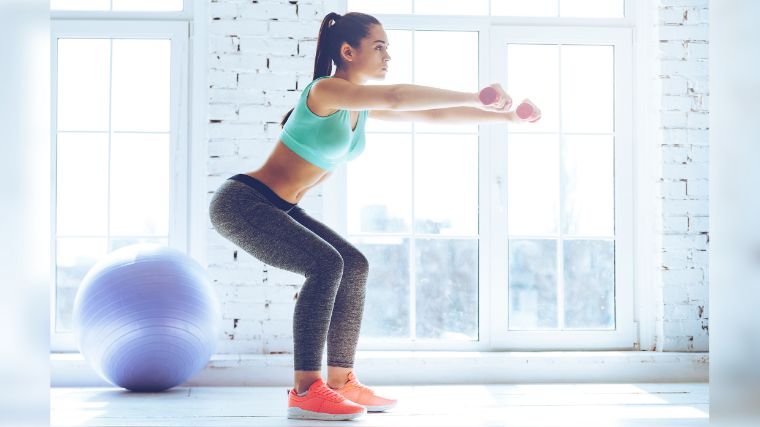
Dumbbell Goblet Squat
Goblet squat — not “goblin” (this isn’t Middle Earth). The traditional goblet squat uses a kettlebell to reinforce deep squatting mechanics with an upright torso. If you don’t train with kettlebells, a dumbbell works just as well.
Goblet squats are performed with the weight held under the chin, as if it were a large drinking glass (“Lord of the Rings” fans, think of a vessel Dwarves would drink from in the Mines of Moria). Keep your elbows tight to your ribcage and squat down between your legs.
Dumbbell Zercher Squat
This unique variation was popularized by strength coach Nick Nilsson. The term “Zercher” refers to the carriage position of the dumbbell. It rests on your arms at, or just in front of, your elbows.
Hold the dumbbell vertically with your arms in front of your body. If you are unable to squat deep enough to retrieve the dumbbell from the floor during setup, simply place the dumbbell on a stable bench or box and retrieve it from there. Your arms must remain close to your trunk with your elbows flexed. Like the dumbbell front squat, keep your trunk upright as you squat with your feet flat on the floor.
Dumbbell Squat
The dumbbell squat uses two dumbbells held with your arms hanging alongside your body. (8) While this variation avoids cleaning or muscling dumbbells to the rack position, it may not promote as upright of a trunk position as other front-loaded variations.
The dumbbell squat feels a little like a trap bar squat, albeit with a lower loading potential. Altogether, the dumbbell squat may be a great option for those looking for a user-friendly variation that promotes hip-, thigh-, and grip development.
FAQs
Why not just do barbell front squats instead?
That’s an option. Both exercises build leg size and strength while placing the load in front of your body. In fact, muscle activity levels for most of the primary muscles are similar between dumbbell front squat and barbell front squats when the same load is used. (16) But there are substantial differences between the barbell front squat and the dumbbell front squat: upper body position, placement of the load, equipment requirements, and loading capacity, just to name a few. Ultimately, the choice of whether to front squat with the barbell or dumbbells should take these differences into consideration.
How can I make setup easier when going heavy on dumbbell front squat?
The dumbbell clean to the front rack position before squatting is the most technically demanding portion of the entire exercise. It can impose a bottleneck on weight progression. But unless you’re using light enough dumbbells to curl or have a partner willing to lift the dumbbells to the front rack position for you, the clean is an intrinsic feature of the dumbbell front squat setup. The dumbbell Zercher squat and the dumbbell squat discussed in the Variations section allow you to avoid the clean.
I’ve seen the dumbbell front squat performed with a slightly different front rack position. What’s the deal?
Traditionally, your elbows are held high during the dumbbell front squat, as instructed. However, it is common to see the dumbbell front squat performed with lower elbows and the dumbbells parallel to the ground. While it may be effective with lighter weights, the lower carriage position may limit loading capacity, as the dumbbells are held slightly further in front of the body. The higher elbow position may also help to encourage an upright and extended upper back position, which helps to develop postural strength and upper back muscle.
My trunk bends forward during the dumbbell front squat — What should I do?
First, make sure the weight you are attempting to squat is appropriate for your current strength and ability. If you’ve tried reducing the weight and you’re still rounding forward and losing position, screen your ankle flexibility. Are you able to progress your knees over the front of your toes with your heels on the floor? If not, calf stretching, foam rolling, or ankle joint mobilizations may help. (3) After ruling out loading errors and orthopedic limitations, the likely culprit is a coordination issue, specially deficient trunk control. Reactive neuromuscular training (RNT) is a broad class of interventions aimed at restoring coordination and dynamic stability. (17) A common RNT technique to address excessive forward lean or trunk “rounding” is the “overhead squat RNT” technique, shown in the video below. Perhaps counterintuitively, a light challenge tending to pull the trunk forward can help improve position sense and coordination of the trunk during the squat. Although immediate improvements in squat form may occur, lasting benefits may result from performing this corrective exercise three or more days per week for two to four sets of 10 to 12 repetitions.
Just Another Anteriorly Loaded Thigh-Thickener?
Like its barbell-based brother, the dumbbell front squat places weight in front of the body. But unlike the barbell front squat, it doesn’t require extreme positions of the shoulders or wrists. And it doesn’t even require waiting for a squat rack. User-friendly and convenient, the dumbbell front squat is in a class of its own.
References
Hedrick, A. (2015). Dumbbell power clean, front squat, and power jerk. Strength & Conditioning Journal, 37(3), 84-88.
Nadzalan, A. M., et al. (2020). The effects of focus attention Instructions on the movement kinetics, muscle activation and performance during resistance exercise. In Journal of Physics: Conference Series (Vol. 1529(2), 022008.
Bishop, C., & Turner, A. (2017). Integrated approach to correcting the high-bar back squat from “excessive forward leaning”. Strength & Conditioning Journal, 39(6), 46-53.
Bloomquist, K., et al. (2013). Effect of range of motion in heavy load squatting on muscle and tendon adaptations. European journal of applied physiology, 113(8), 2133-2142.
Kubo, K., Ikebukuro, T., & Yata, H. (2019). Effects of squat training with different depths on lower limb muscle volumes. European Journal of Applied Physiology, 119(9), 1933-1942.
Barrack, A. J., et al. (2021). The relative orientation of the trunk and tibia can be used to estimate the demands on the hip and knee extensors during the barbell back squat. International Journal of Sports Science & Coaching, 16(4), 1004-1010.
Fry, A. C., Smith, J. C., & Schilling, B. K. (2003). Effect of knee position on hip and knee torques during the barbell squat. The Journal of Strength & Conditioning Research, 17(4), 629-633.
Graham, J. F. (2011). Exercise Technique: Dumbbell Squat, Dumbbell Split Squat, and Barbell Box Step-up. Strength & Conditioning Journal, 33(5), 76-78.
Gullett, J. C., et al. (2009). A biomechanical comparison of back and front squats in healthy trained individuals. The Journal of Strength & Conditioning Research, 23(1), 284-292.
Ronai, P. (2022). The Front Squat Exercise. ACSM’s Health & Fitness Journal, 26(2), 44-50.
Schoenfeld, B. J. (2010). Squatting kinematics and kinetics and their application to exercise performance. The Journal of Strength & Conditioning Research, 24(12), 3497-3506.
Schoenfeld, B., Fisher, J., Grgic, J., et al. (2021). Resistance training recommendations to maximize muscle hypertrophy in an athletic population: Position stand of the IUSCA. International Journal of Strength and Conditioning, 1(1), 1-30.
Lasevicius, T., et al. (2018). Effects of different intensities of resistance training with equated volume load on muscle strength and hypertrophy. European journal of sport science, 18(6), 772-780.
Spiering, B. A., et al. (2022). Maximizing Strength: The Stimuli and Mediators of Strength Gains and Their Application to Training and Rehabilitation. The Journal of Strength & Conditioning Research, 10-1519.
Charlton, J. M., et al. (2017). The effects of a heel wedge on hip, pelvis and trunk biomechanics during squatting in resistance trained individuals. The Journal of Strength & Conditioning Research, 31(6), 1678-1687.
Wu, H. W., et al. (2020). Effect of loading devices on muscle activation in squat and lunge. Journal of Sport Rehabilitation, 29(2), 200-205.
Guido Jr, J. A., & Stemm, J. (2007). Reactive neuromuscular training: a multi-level approach to rehabilitation of the unstable shoulder. North American Journal of Sports Physical Therapy: NAJSPT, 2(2), 97-103.
Featured Image: Merrick Lincoln, DPT, CSCS / YouTube
For now classes are 6pm and 640pm at 2840 Wildwood st in the Boise Cloggers studio.
Book your class NOW!
click this ==>
Warrior Fit Testimonials
First, I want to say thank you for convincing me to do Tabata! I was struggling to lose weight and Finally I found something that helped! I really appreciate your coaching! - Craig T.
Ever since I was convinced to do Tabata I have seen huge results, I lost 6 pounds and gained energy in the first 3 weeks. I have been working out for 3 months before I decided to do Tabata and I struggled to lose weight.
At first I thought "How am I losing weight by bringing my heart rate up then cooling down then bringing it up again?" I don’t know how it works but it does!
Thank you!! - Theresa F.
The first day of Tabata, I wondered WHAT AM I DOING - I AM 56 !! Five weeks later I knew that it was what I needed. I learned that I could push myself well beyond my comfort zone and feel good later. I have a marked improvement in physical as well as emotional endurance. - Lyn C.
When I was first told about Tabata I was very excited from the word go, however that excitement stemmed from the fact that I had no clue what it meant. I missed the first week of class b/c I was traveling for work so when I came in during the 2nd week I had some making it up to do.
It was hard at first b/c my body wasn't used to working out at such a fast pace, but once I got into a rhythm I started to feel very good. These classes are no joke. If you stick with it you will leave there feeling stronger, healthier and overall better about yourself and what you've accomplished.
I would recommend these classes to anyone. Darrin is a great trainer and he'll keep you going with his energy.
- Jami L.
Warriors Fit Audio
Warrior Fit uses High Intensity Music to get ya Moooovin' So we can all "Get Our Sweat On"
The link below will give ya a freeee shot at Audible plus a couple audio books just to try it out and if you haven't used audio books on your commutes you are missing out. Get pumped up before you get to where you are going and exercise your mind. I use it Everyday. Go get yours now!

 For now classes are 6pm and 640pm at 2840 Wildwood st in the Boise Cloggers studio.
Book your class NOW!
click this ==>
For now classes are 6pm and 640pm at 2840 Wildwood st in the Boise Cloggers studio.
Book your class NOW!
click this ==>


