This post was originally published on this site

http://www.marksdailyapple.com/

woman eating out with friends following the primal blueprintHere we are, closing in on 20 years of indulging this “fad” called the Primal/paleo movement. And the critics said we wouldn’t last. Ha! I find it extremely gratifying that new people are jumping on board, questioning conventional wisdom, configuring their own Primal practices, and, in doing so, remaking their health. It’s a testament to the fundamental soundness of the Primal Blueprint if I do say so myself.

Although I like to think that we are mainstream at this point, the reality is that I still get as many questions as ever highlighting the basic misunderstandings and confusion that continue to surround the Primal/paleo/ancestral health movement. That’s fine with me! I truly welcome all questions and comments. They mean that new people are finding us and are open to learning about how the Primal Blueprint might help them. Even when they challenge me—“What’s up with those weird toe shoes, Sisson?”—it’s an opportunity to plant a seed that might one day bloom into a new, healthier lifestyle.

In today’s post, I answer three common questions that refuse to die. If you’re new here, hopefully these clear up any lingering concerns you might have about diving into a Primal lifestyle. Primal vets, keep these responses in your back pocket. Whip them out next time you encounter a faux-concerned friend or family member who stubbornly insists on missing the point of what we’re all about here.

Why would I want to live like a caveman? What’s wrong with modern technology?

As much as I welcome questions, I do have to shake my head when people accuse me of trying to turn modern humans back into cavemen. Yes, that still happens, even after years and years of writing a blog on my laptop from my air-conditioned home. Clearly, I’m not trying to revert society back to Paleolithic times. I’m not advocating running through the streets in skins or hunting down dinner with spears (but more power to you if you’re sufficiently skilled).

Sure, Grok is our beloved icon here, but we all know that Grok would have loved to have had a refrigerator, comfortable bed, and Spotify subscription. My readers should know by now that the goal is to learn from Grok, gleaning clues about how to build superb lifelong health, not to emulate him completely.

As for what’s wrong with modern technology? Arguably plenty. But modern technology also allows us to live lives of unimaginable comfort compared to anything our ancestors enjoyed. Modern medicine, dentistry, transportation, communication—all of it is unquestionably a net positive for humanity despite the downsides. Grok’s life was hard stuff. It also shaped our genes into what they are today. We don’t need to make our lives artificially difficult (or more difficult than they are, anyway). We just need to respect the genetic blueprint we all inherited as humans.

Aren’t humans still evolving? Why should we even worry about what our long-gone ancestors did? Surely we’ve changed a lot since then.

The question of whether humans are still evolving is a complicated one. Even esteemed scientists disagree about it. (Maybe this shouldn’t be a surprise—scientists make their livings off disagreeing with one another.) Without getting too much in the weeds here, it’s clear that genetic selection is still taking place. Herding populations adapted to consume dairy.1 The English have become fairer in the past couple millenia, presumably to help with vitamin D production.2 The Dutch are getting taller, probably due to sexual selection pressure (female partners preferring tall men) rather than a particular survival advantage.3

You know what’s not happening? Humans aren’t getting better at living on French fries and German chocolate cake, unfortunately. We don’t flourish thanks to chronic stress or getting four hours of sleep per night. Our muscles haven’t figured out how to grow stronger from sitting on the couch. We’re surviving not thriving in our modern environment.

Long story short, our biology hasn’t changed all that much in the evolutionary blip of 10,000 years since the Agricultural Revolution. Sure, our societies have advanced, our cultures have blossomed, our technological innovation has exploded, our fashion sense has improved. But time and more recent environmental and cultural pressures haven’t revolutionized our basic biochemistry. Glucose, insulin, adrenaline, glycogen, amino acids, glutathione—all still present and accounted for.

I remain as convinced as ever that the fundamental building blocks of health are those I laid out in the 10 Primal Blueprint Laws:

  • Eat lots of plants and animals.
  • Don’t eat things that undermine health.
  • Move your body as much as possible. Lift heavy things. Sprint sometimes.
  • Get lots of sleep and plenty of sunlight.
  • Play and engage your brain.
  • Don’t do stupid things that are likely to kill you.

…as well as other habits of highly successful hunter-gatherers. I challenge even the most hardcore paleo skeptic to prove that we have evolved to not need these things. If anything, these edicts are even more critical in our modern world where it is all too easy to ignore them and ruin our health in the process.

Didn’t cavemen die young? That doesn’t sound very aspirational.

Grok probably didn’t even live to see his 30th birthday. That’s what you’ve heard, right? Something along those lines? Let’s set the record straight.

According to many scientific analyses, including Henry Oliver Lancaster’s seminal work Expectations of Life, we need to reexamine our modern assumptions about early humans’ supposedly brief lifespans.4 They are based on little hard evidence, relying instead on backward extrapolation from contemporary hunter-gatherer groups. These groups do not serve as accurate comparison models because population density, disease introduction, and other intrusions of modern life have significantly impacted their ways of life.

Furthermore, we have to ask how our ancestors died. Grok’s third or fourth decade didn’t constitute “old age” as we understand it today—a drawn-out period of physical and cognitive decline. He wasn’t dying at 30 because he succumbed to diabetes-related complications or heart disease. Although the average life expectancy of early humans was probably about 33 years, much of that was driven by high infant mortality rates. If they survived infancy, early humans generally died as a result of trauma (accident or warfare), predator attacks, natural disasters, starvation, or exposure to the elements, not because their inferior genes meant their bodies gave out.

We aren’t living longer because we are inherently healthier or “more evolved” than our ancestors. We live longer because modern advances protect us from the things that used to take people out in their prime. Given modern medical care, relative food security, and better protection from the elements, the average early human could have survived to a ripe old age, even by modern standards. In fact, despite the harshness of life back then, many did. Those who made it past childhood probably had a decent chance of thriving well into their 60s or 70s.5 6 And since we know that, logistically, sick or debilitated folks probably wouldn’t have lasted long, we can surmise that Grok and kin were largely healthy right up until the end. That sounds pretty aspirational to me.

Bottom line: The Primal Blueprint is a framework for health in the modern world

Here’s the take-home message. The Primal Blueprint is ultimately about reconciling our primeval genes with modern circumstances. You can optimize health by choosing biologically appropriate food and activities within a 21st-century context. By all means, avail yourself of the many, many ways modern life is vastly superior to Grok’s existence. But also, respect the wisdom of our ancestors. Avoid the temptation to eschew modern medicine and other advances on principle (avoid the naturalistic fallacy). On the other hand, don’t glorify technology and assume that newer is always better.

By the way, I occasionally hear from readers who feel overwhelmed by how very different the modern world is from what our genes are accustomed to. They wonder how they can ever be “Primal enough” to make a difference. Every step you take matters, be it dropping your chronic cardio workouts, trying to buy better quality food a few nights per week, or turning off electronic devices a half-hour earlier each night. Rather than judging yourself against Grok, look to Grok for inspiration. And then be thankful for indoor plumbing!

Still have questions? Heard other misconceptions about the Primal approach? Send ‘em on, and share your thoughts.

Keto Meal Plan

The post Common Misconceptions about the Primal Blueprint appeared first on Mark’s Daily Apple.

Be Nice and Share!
This post was originally published on this site

http://www.marksdailyapple.com/

finished cauliflower bacon mushroom risotto recipeThe rich flavors of salty bacon and earthy mushrooms dominate this low-carb risotto dish, turning riced cauliflower into a super-flavorful side. Cauliflower risotto is fantastic served with a main course of roasted chicken, salmon, or thick, juicy pork chops.

The recipe below is great without any additional ingredients, but if you’re really craving comfort food then fatten the risotto up a bit. Generous amounts of grated Parmigiano-Reggiano cheese or butter (or both) will do the trick. A garnish of fresh herbs like basil, parsley and chives add color and flavor.

Like traditional risotto, this dish shouldn’t be overcooked. Stop when the cauliflower is al dente. Otherwise, you’ll end up with a bowl of mush. Still flavorful, mind you, but lacking the crisp-tender texture that makes cauliflower risotto really good.

Mushroom and Bacon Cauliflower Rice Risotto Recipe

finished cauliflower bacon mushroom risotto recipe

Ingredients

2 lbs. Frozen cauliflower rice
4 slices bacon
3 tbsp. butter or avocado oil
1/2 cup chopped onion
3 stalks chopped celery
2 cloves minced garlic
8 oz. thinly sliced mushrooms
1/2 cup broth
fresh thyme
salt and pepper

ingredients for cauliflower rice mushroom bacon risotto recipe

Directions

Preheat your oven to 375 degrees Fahrenheit. Lay the cauliflower rice out on a large baking sheet and place it in the oven for about 30 minutes, or until the rice is defrosted and has browned slightly.

cauliflower in pan for cauliflower bacon mushroom risotto recipe

Cut your bacon slices in half and place them in a skillet on the stovetop over medium heat and brown until they are crispy. Add the onion and celery to the pan and saute for about 5 minutes, or until they’re soft. Add the garlic and stir until fragrant,

bacon and onion for cauliflower bacon mushroom risotto recipe

Add a tablespoon of butter to the pan. Once the butter is melted, add the mushrooms. Saute until soft.

mushrooms onions and bacon for cauliflower bacon mushroom risotto recipe

Add the remaining butter to the pan. Once it is melted, add the cauliflower rice and broth. Stir until the broth evaporates and the butter coats the rice. Add fresh thyme leaves and season with salt and pepper.

added cauliflower in pan for cauliflower bacon mushroom risotto recipe

Tips

  • If you’d like, you can make your own cauliflower rice by putting cauliflower florets into a food processor and pulsing them until crumbles form. I still recommend roasting them after this as it will help them be more tender and reduce the stovetop cooking time.
  • Use your favorite herbs here – rosemary, sage, parsley… any of them will work well!

Primal Kitchen Dijon Mustard

Print

finished cauliflower bacon mushroom risotto recipe

Mushroom and Bacon Cauliflower Rice Risotto Recipe


  • Author:
    Mark’s Daily Apple

  • Prep Time:
    5 min

  • Cook Time:
    10 min

  • Total Time:
    15 minutes

  • Yield:
    6 servings

  • Diet:
    Gluten Free

Description

Lower carb version of your favorite mushroom bacon risotto, made with riced cauliflower.


Ingredients

2 lbs. Frozen cauliflower rice

4 slices bacon

3 tbsp. butter

½ cup chopped onion

3 stalks chopped celery

2 cloves minced garlic

8 oz. thinly sliced mushrooms

½ cup broth

Fresh thyme

Salt and pepper


Instructions

Preheat your oven to 375 degrees Fahrenheit. Lay the cauliflower rice out on a large baking sheet and place it in the oven for about 30 minutes, or until the rice is defrosted and has browned slightly.


Cut your bacon slices in half and place them in a skillet on the stovetop over medium heat and brown until they are crispy. Add the onion and celery to the pan and saute for about 5 minutes, or until they’re soft. Add the garlic and stir until fragrant, 


Add a tablespoon of butter to the pan. Once the butter is melted, add the mushrooms. Saute until soft. 


Add the remaining butter to the pan. Once it is melted, add the cauliflower rice and broth. Stir until the broth evaporates and the butter coats the rice. Add fresh thyme leaves and season with salt and pepper.

Notes

If you’d like, you can make your own cauliflower rice by putting cauliflower florets into a food processor and pulsing them until crumbles form. I still recommend roasting them after this as it will help them be more tender and reduce the stovetop cooking time.

Use your favorite herbs here – rosemary, sage, parsley… any of them will work well!

  • Category: Lunch, Dinner
  • Method: Stovetop
  • Cuisine: American

Nutrition

  • Serving Size: 1/6 of recipe
  • Calories: 156
  • Sugar: 5.2 g
  • Sodium: 227.8 mg
  • Fat: 10.6 g
  • Saturated Fat: 5.3 g
  • Unsaturated Fat: 1.75 g
  • Trans Fat: .2 g
  • Carbohydrates: 5.49
  • Fiber: 4.4 g
  • Protein: 7 g
  • Cholesterol: 26.1 mg
  • Net Carbs: 6.49 g

Keywords: cauliflower risotto, riced cauliflower recipes, bacon risotto recipe, mushroom risotto recipe

Primal Kitchen Avocado Oil

The post Mushroom and Bacon Cauliflower Rice Risotto Recipe appeared first on Mark’s Daily Apple.

Be Nice and Share!
This post was originally published on this site

http://www.marksdailyapple.com/

Research of the Week

Both breastfeeding and waiting until a child is 6 months old to introduce gluten may reduce the risk of type 1 diabetes.

Interactions between taurine and strength training.

Doing a 4 second sprint every hour can offset some of the negative effects of sitting.

Links between bipolar disorder and creative professions.

In magnesium and vitamin D-deficient kids with ADHD, magnesium and vitamin D supplementation improves symptoms.

New Primal Kitchen Podcasts

Episode 5: Vegan-Turned-Omnivore Yovana: Morgan chats with Yovana about Internet fame, fertility, cyberbullying, and leaving veganism.

Media, Schmedia

Choose your neighborhood wisely.

Hominids have been burying their dead for many many years.

Interesting Blog Posts

On the Bushmen and all those mongongo nuts.

Is this the end of the amyloid plaque hypothesis of Alzheimer’s?

What would happen to dogs if humans died out?

Social Notes

Hilarious.

My approach to stress.

Everything Else

Life finds a way.

Synthetic fertilizer shortage.

Scientists use a strand of Sitting Bull’s hair to confirm the identity of his great grandson.

Things I’m Up to and Interested In

This will be good: Dr. Malcolm Kendrick’s book on heart disease, The Clot Thickens, is out.

Another “paradox” for the books: The centenarian who lives off clotted cream.

Potatoes for peace: The introduction of potatoes into the Old World reduced conflict.

Interesting article: Your brain is not a computer.

Not a phrase you want to hear: “Waning immunity.”

Question I’m Asking

Have you sprinted lately?

Recipe Corner

Time Capsule

One year ago (Oct 30 – Nov 5)

Comment of the Week

“the metaverse doesn’t exist yet – this is being sold well ahead of anything that works.

and once it is built, VR works with.. two of the five senses. Touch, smell, taste, aren’t even on the roadmap. It’s a video game with goggles. I am underwhelmed..

In other news, had a delicious elk steak last night, from an animal I shot in early October. The metaverse could show me the shot maybe: not the blisters that distracted me as I aimed, not the smell of the leaves, and not the delicious meat afterwards..”

-I agree with you.

Primal_Fuel_640x80

The post New and Noteworthy: What I Read This Week—Edition 153 appeared first on Mark’s Daily Apple.

Be Nice and Share!
This post was originally published on this site

http://www.marksdailyapple.com/

My mission has always been to help people take control of their health through education and coaching. You see it in the articles I publish here on Mark’s Daily Apple every week and in my books. And it’s what drives my work at Primal Health Coach Institute where we’ve now trained and certified several thousand health coaches to the highest standard.

My newest venture, one that I’m very excited to share with you today, continues in this theme. It’s something that my team at Primal Health Coach Institute and I have been working on for well over a year and has now officially launched.

It’s called myPrimalCoach.

myPrimalCoach helps people achieve their health and wellness goals, whether it’s to lose weight, gain strength and energy, sleep better, reduce stress, or manage chronic health conditions. It does this by providing clients with daily lessons and personalized step-by-step instructions, activities, and prompts that guide them toward meaningful behavior change and lasting results.

Further, and most importantly, myPrimalCoach clients receive 1-on-1 access to their very own certified health coach through in-app text messaging, with the option to schedule a video call at any time.

And when I say, “health coach,” I don’t mean some AI robot or automated message response system like many apps use as a poor proxy for actual health coaching. No, I mean real, live human beings that are highly qualified and experienced as coaches, that understand your needs and circumstances, and that will work with you to get you the results you desire.

Here’s a quick preview of how myPrimalCoach works:

If you want to lose weight or make other improvements to your health, I encourage you to give it a try.

For a limited time, it’s only $1 to get started and you can cancel anytime. Just visit the homepage here and choose one of the two available options, where you’ll be prompted to answer a health questionnaire.

myPrimalCoach also supports Enterprise Coaching. So, if you own or work at a company that could benefit from a proven corporate wellness program, please contact my team here. We’re already working with hundreds of employees around the world, and we would love to help improve your team’s mental and physical well-being so they can be happier, healthier, and more productive.

That’s all for today. Thank you for your ongoing support and do check out the myPrimalCoach site when you have a moment. We’re here to help and we can’t wait to hear what you think!

my primal coach banner

The post A Big Announcement: myPrimalCoach Is Now Live appeared first on Mark’s Daily Apple.

Be Nice and Share!
This post was originally published on this site

Originally posted at: http://www.nerdfitness.com/

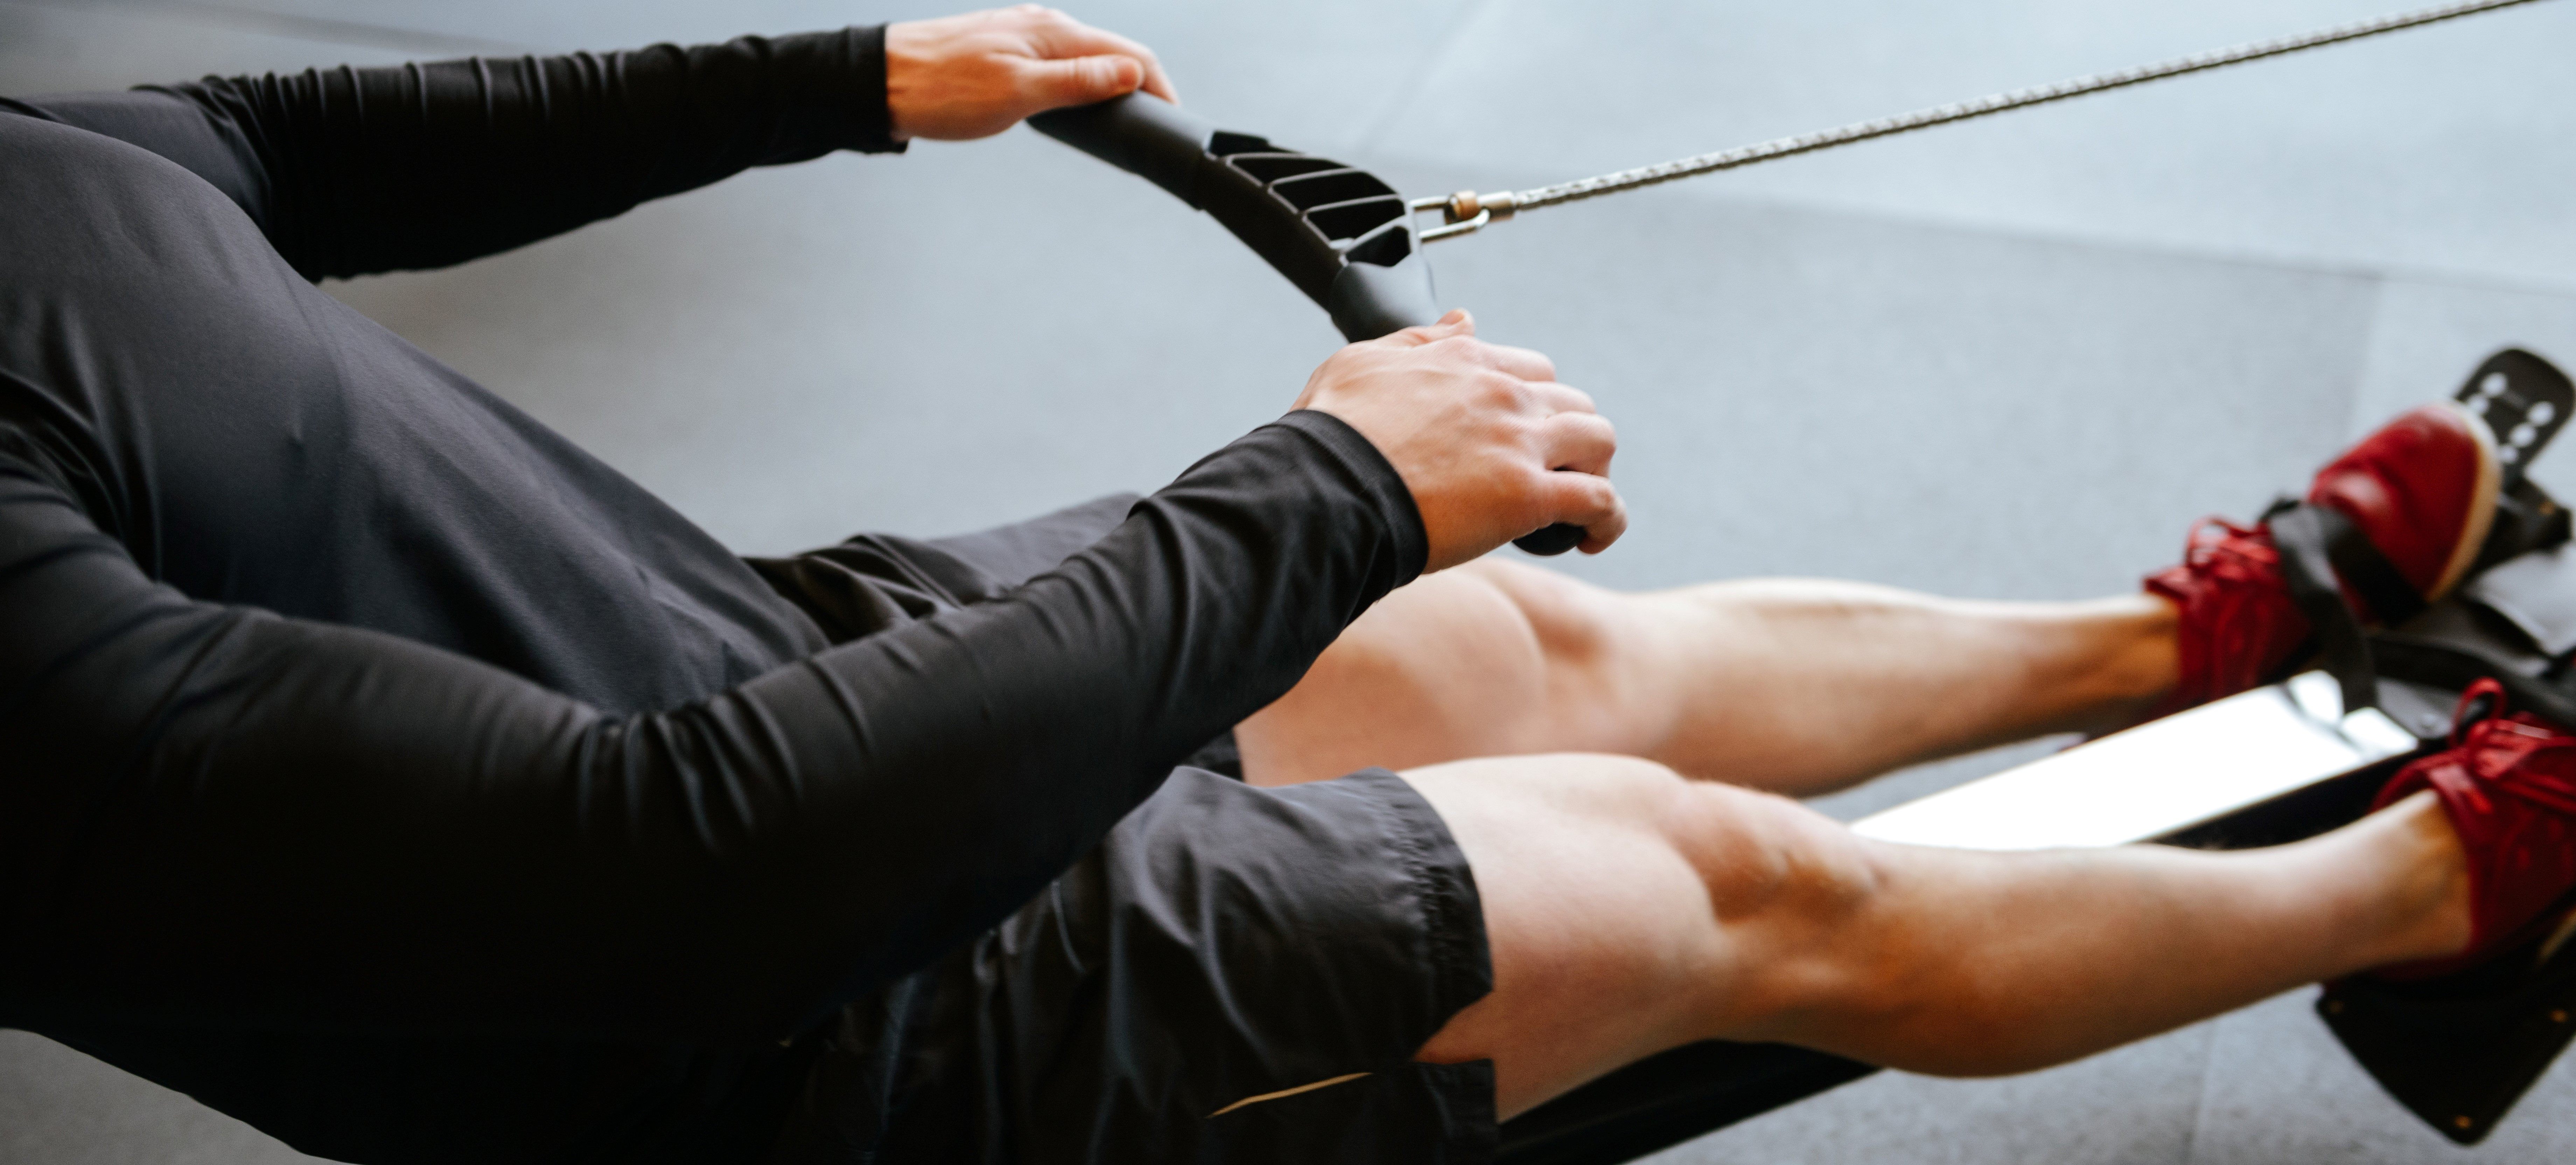
Man using row machine

The rowing machine – it’s so hot right now.

Rowing classes are everywhere. It’s easy to find professional and Olympic athletes hyping up the machine’s ability to provide a full-body workout.

All well and good…but how do you actually use the thing?

Well my friend, you’ve come to the right place to find out.

Many clients in our Online Coaching Program tell us they want to start rowing, but they don’t know how. Today, we’ll explain how we get them going with row machine workouts.


Here’s what we’ll cover:

Alright, you ready?

Let’s row, row, row your rower.

How to Use a Rowing Machine (Video Tutorial)

In the video above, Coach Staci explains the ins and outs of using a rowing machine.

What? Who’s Staci?

Welp, she’s a Senior Coach here at Nerd Fitness and an all-around badass powerlifter.

She also knows a thing or two about using a rowing machine, since she’s gotten several CrossFit certs (they love the rowing machine at CrossFit).

If you’re going to learn about using a rowing machine, she’s not a bad person to talk to.

But first, let’s back up here a bit…

What Are the Benefits of Using a Rowing Machine?

Team of Lego men rowing a boat

The rowing machine was originally invented for water rowers to train offseason.

You might hear the indoor rowing machine called an ergometer, or “erg” or “ergo.” They get this name since rowing machines often measure the energy produced from the workout in units of ergs.

Animation of the words

They’ve grown in popularity, because of the many benefits offered by this one stationary machine.

For example, the rowing machine offers:

  • A Full-Body Workout. If we use proper rowing technique, we’ll hit every major muscle group in our body. Upper, lower, core, we’ll work it all. This is one of the main reasons they’ve become so popular.
  • Low-Impact. While a workout from a rowing machine can get intense, it’s considered to be little to no impact. That’s why it’s sometimes recommended to patients with osteoarthritis.[1]
  • Versatility. We can do a lot with an ergometer. We can train for duration and/or intensity. We even do a HIIT workout. Or we can combine it with bodyweight movements in a circuit. Plus, since some of them fold up, they’re perfect for those who need to train in small spaces.

Alright, let’s now go over some terminology so you know what’s what with the ergometer.

Rowing Machine 101: Terms to Know

Row machine

When it comes to the rowing machine, there’s some vocabulary that would be worth discussing quickly.

First, let’s chat about the rower itself:

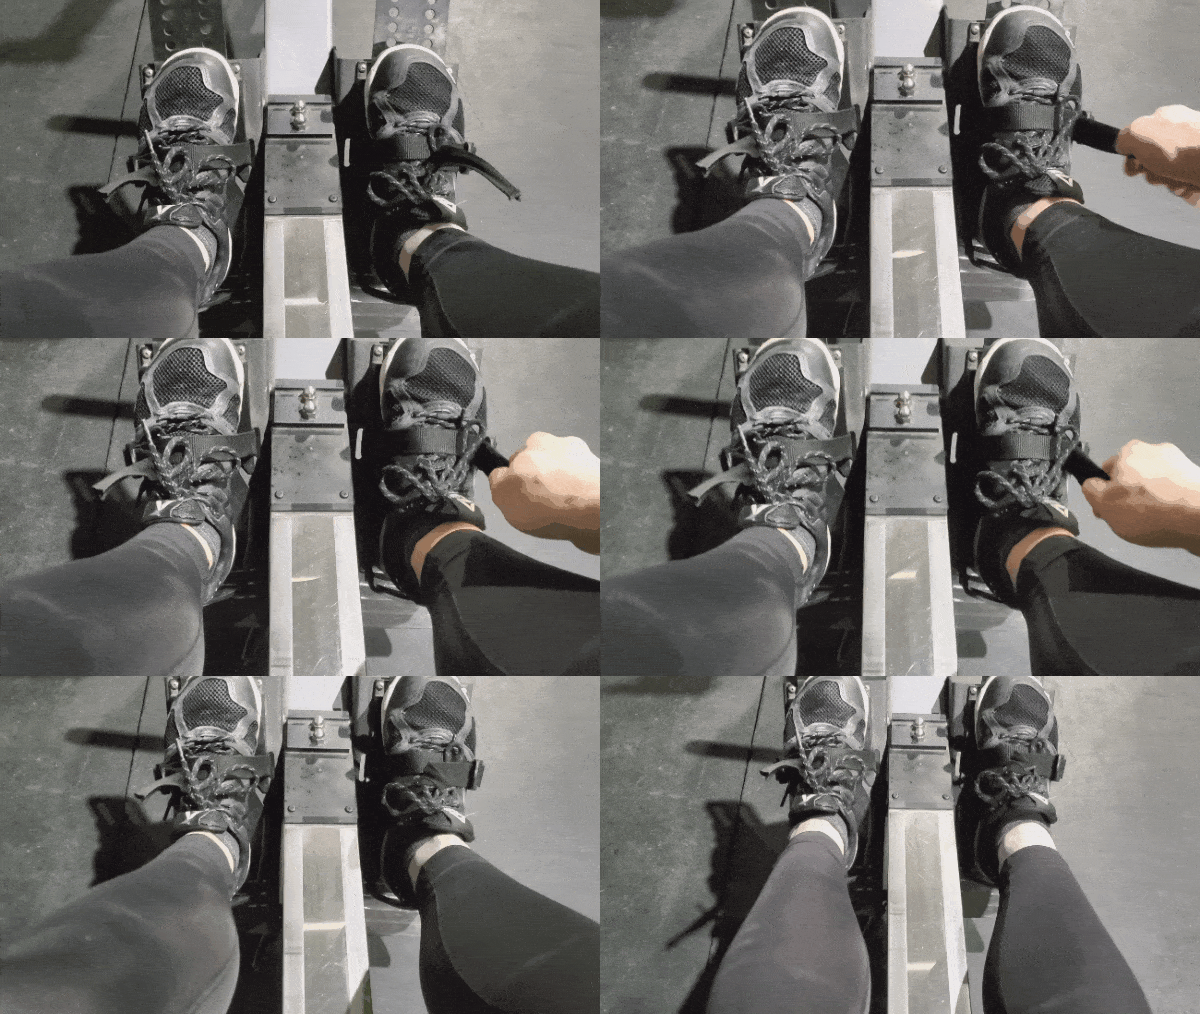
#1) Foot Plate – no matter the rower, there will be a place for you to strap your feet in.

Strapping feet into row machine

You’ll want to set your feet so that the strap goes over the ball of your foot. This will allow you to have the most powerful stroke.

Coach Staci demonstrating proper stroke technique

You should be able to lift your heel in this position.

#2) Handle – also called “the bar.” This replicates the handles of an oar.

Your hands should be approximately shoulder-width apart.

#3) Rail – the central beam of the rower, which allows the seat to roll forward and back.

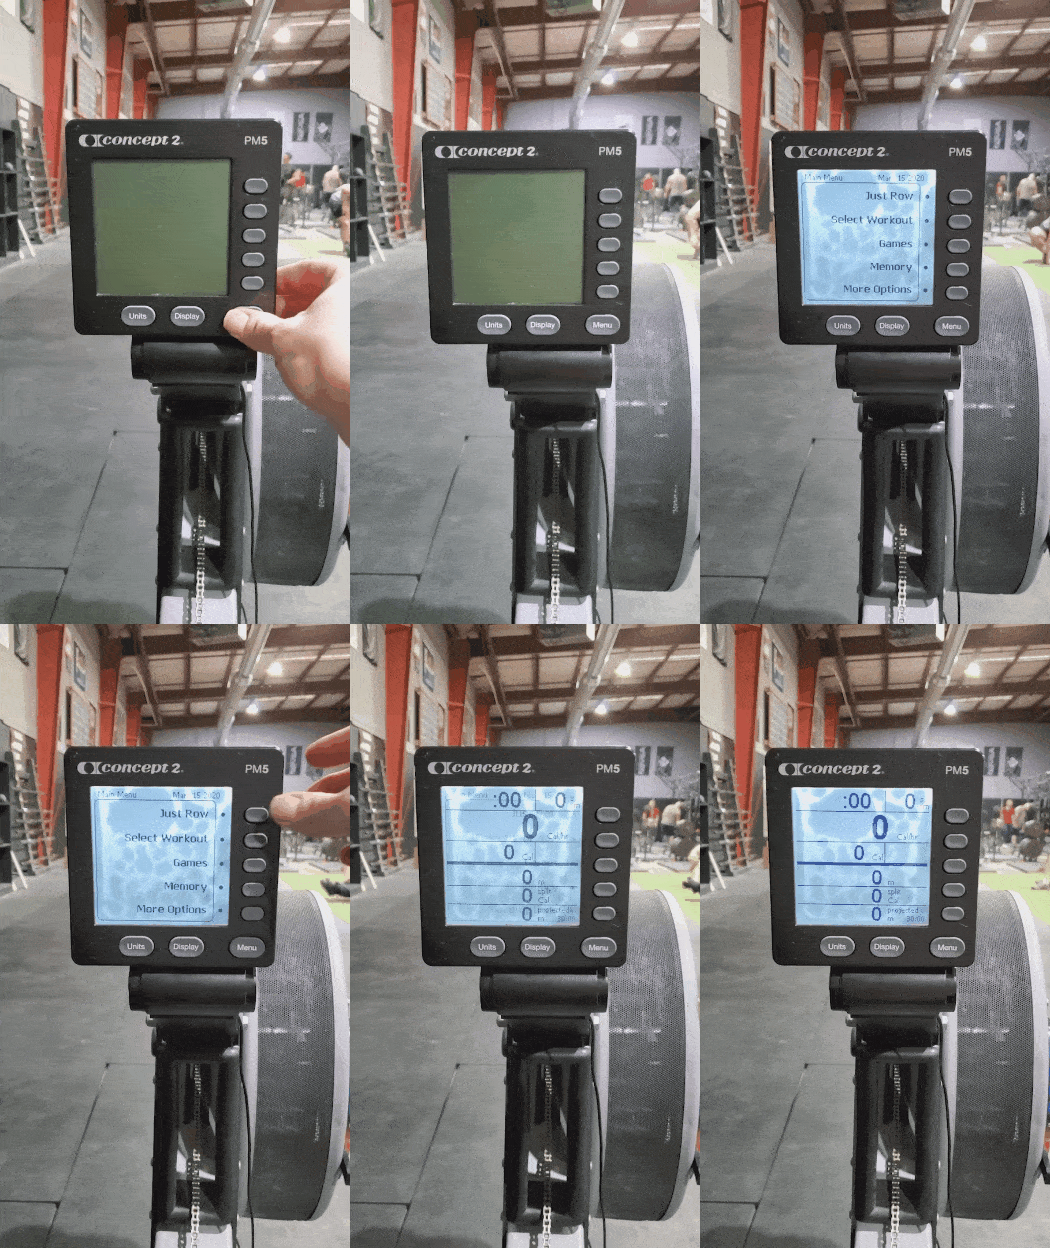
#4) Display Monitor – while these will differ from model to model, the rower will normally have a screen to show some basic info:

  • Strokes per minute (Stroke Rate)
  • Split Time (more on this momentarily)
  • Duration of workout

Etc.

For the Concept2 model – the rower Coach Staci demonstrates above – you can hit any button and select “Just Row.”

Demonstration of monitor for Concept2 row machine

This will be the easiest way to get going.

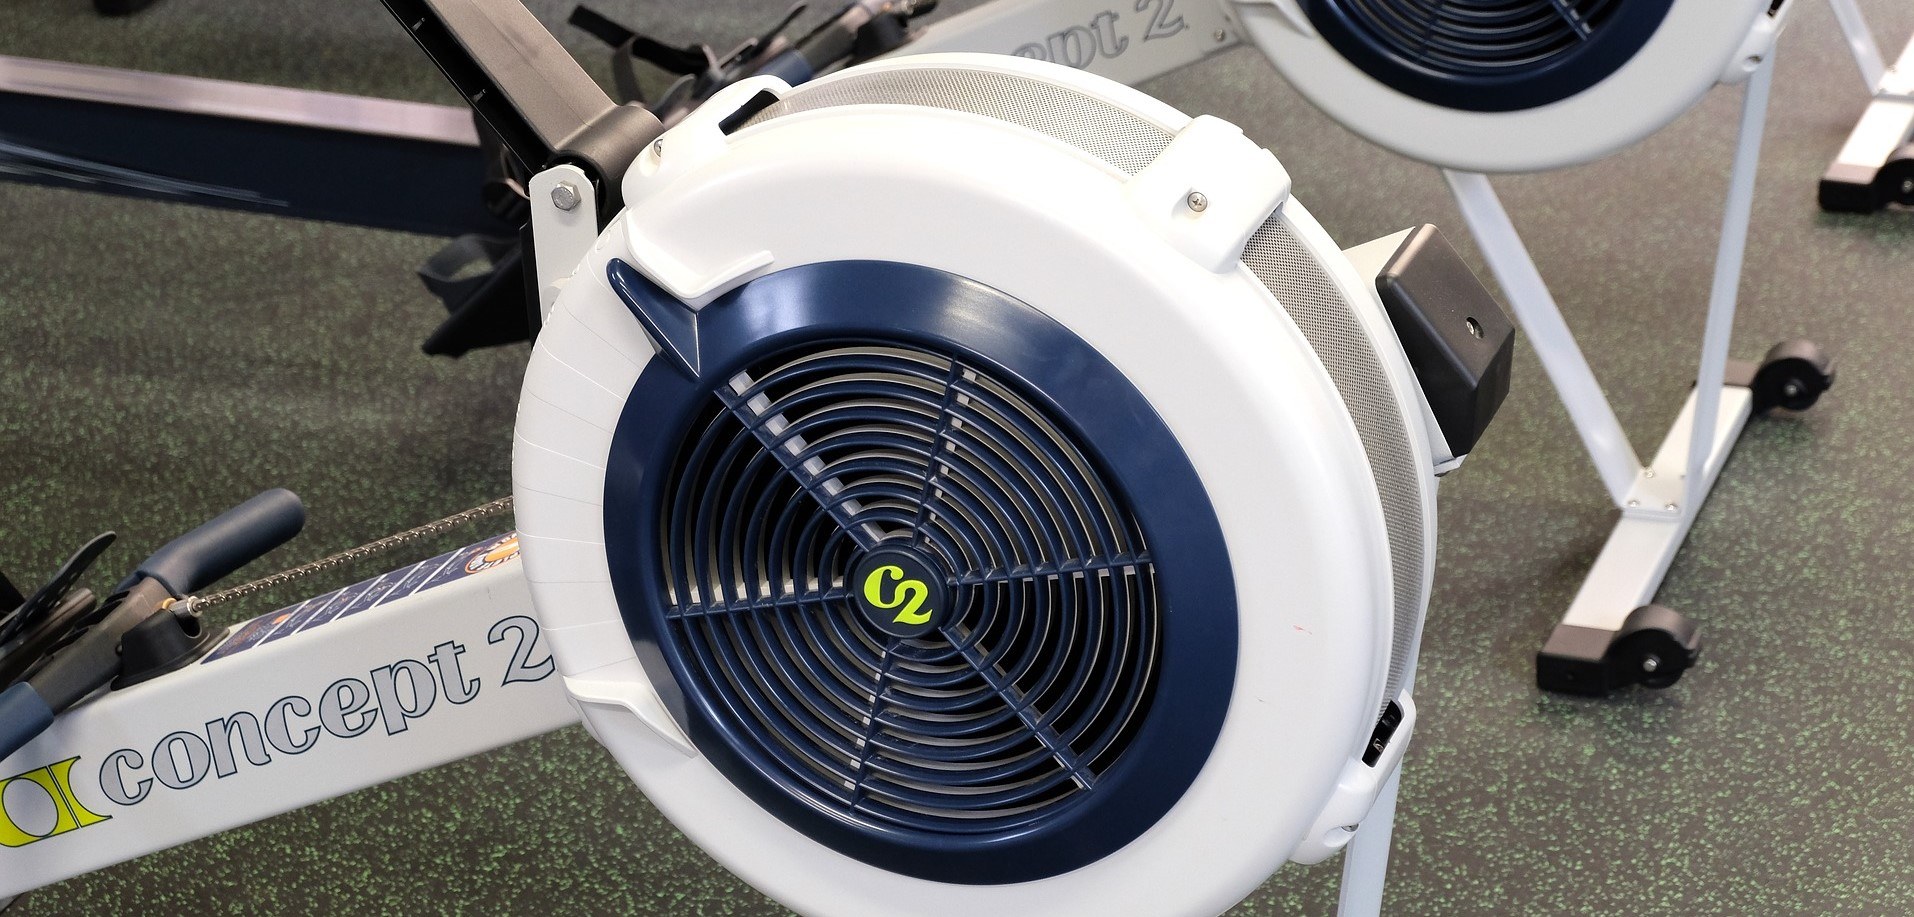
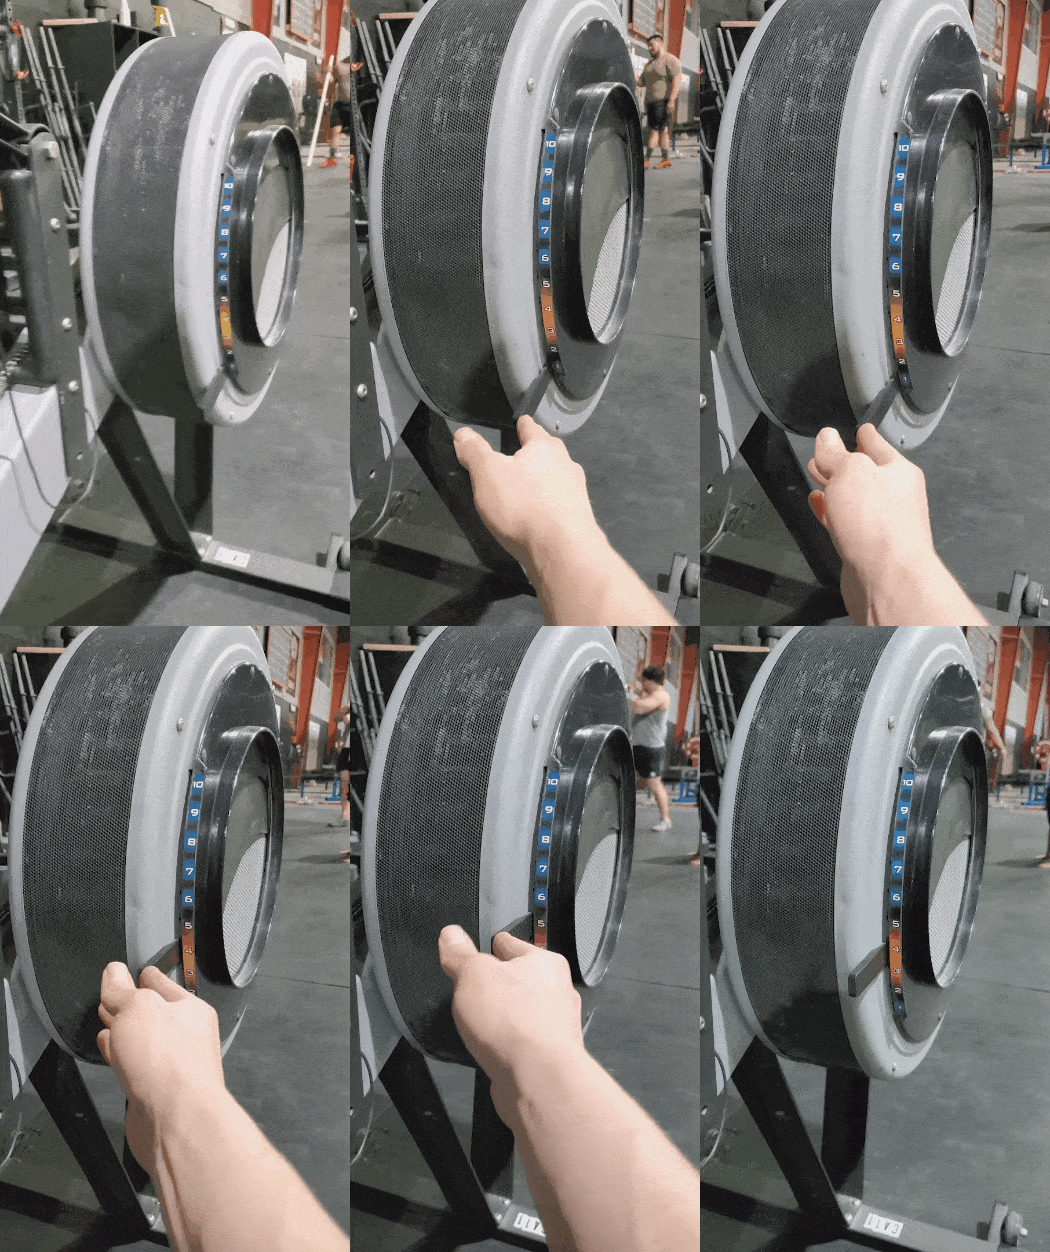
#5) The Damper – The lever on the side of the flywheel housing (or fan cage) that controls airflow.

Demonstration of row machine damper

The difference in Damper settings:

  • The higher the setting, the more air is allowed to flow. This requires more work to spin the flywheel.
  • The lower the setting, the less air is allowed to flow. This requires less work to spin the flywheel.

Think of this sort of like bicycle gears – it affects how the rowing feels but does not necessarily reflect the resistance:

  • A setting of one will feel fast and easier to pull, but you’ll need to move quickly to generate power.
  • That said, cranking the damper up to ten doesn’t mean a better workout either. It just means a tougher pull – like trying to move a rowboat.

We recommended you aim for a Damper setting between 3 and 5 (which is also where most competitive rowers have it).

Note: some indoor rowers use a water tank to create resistance, so any similar Damper setting controls the amount of water moving through the system. You can still use the same recommendations for damper numbers.

More on that here:

Next, let’s talk about some terminology for the sport of rowing itself.

Rowing has been around for centuries and a lot of the vocabulary has carried over to the indoor sport.

Rowing Terms to Know:

#1) Split

Split time refers to the time it takes to row 500 meters, also known as the “split per 500.” This will likely be shown prominently on your Display Monitor.

If the number goes down, it means you’re going faster! Woot.

#2) Strokes Per Minute (SPM)

This is also called Stroke Rating and it’s exactly what it sounds like: the number of strokes you take per minute.

A higher SPM doesn’t necessarily mean you’re going faster – you can also go faster by putting more power into each stroke.

#3) Paddle (or Rest)

Normally in the sport of rowing, you never stop completely. You just row or “paddle” a little bit easier.

Sort of like you do in HIIT workouts.

However, if you need to stop completely in your workout, don’t stress it. It’s fine to even get off the rower from time to time…it’s not actually a boat.

You do you.

Batman giving thumbs up

Next, we need to discuss the four parts of the rowing stroke, but we’ll jump to a new section for that.

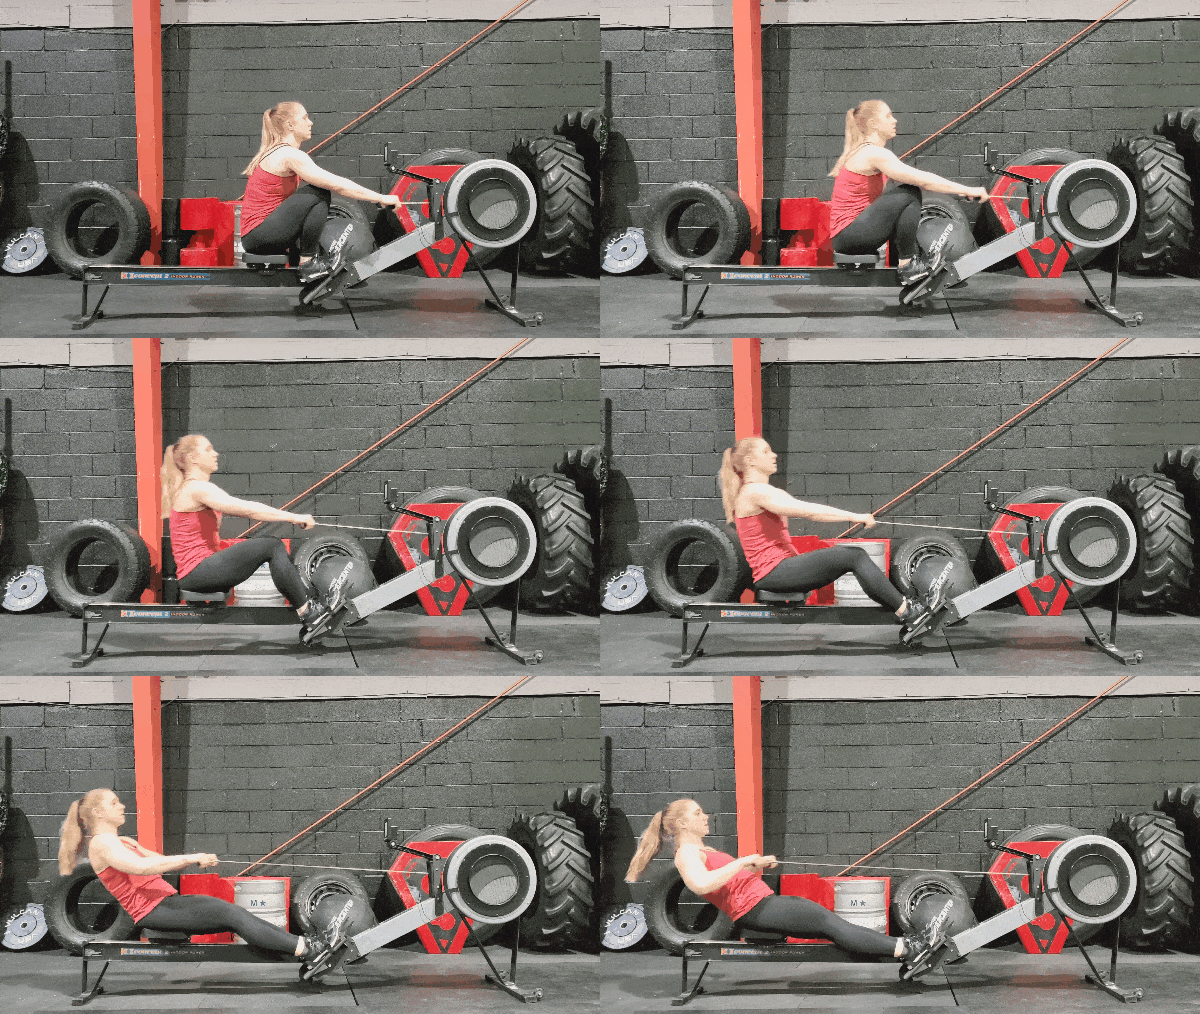
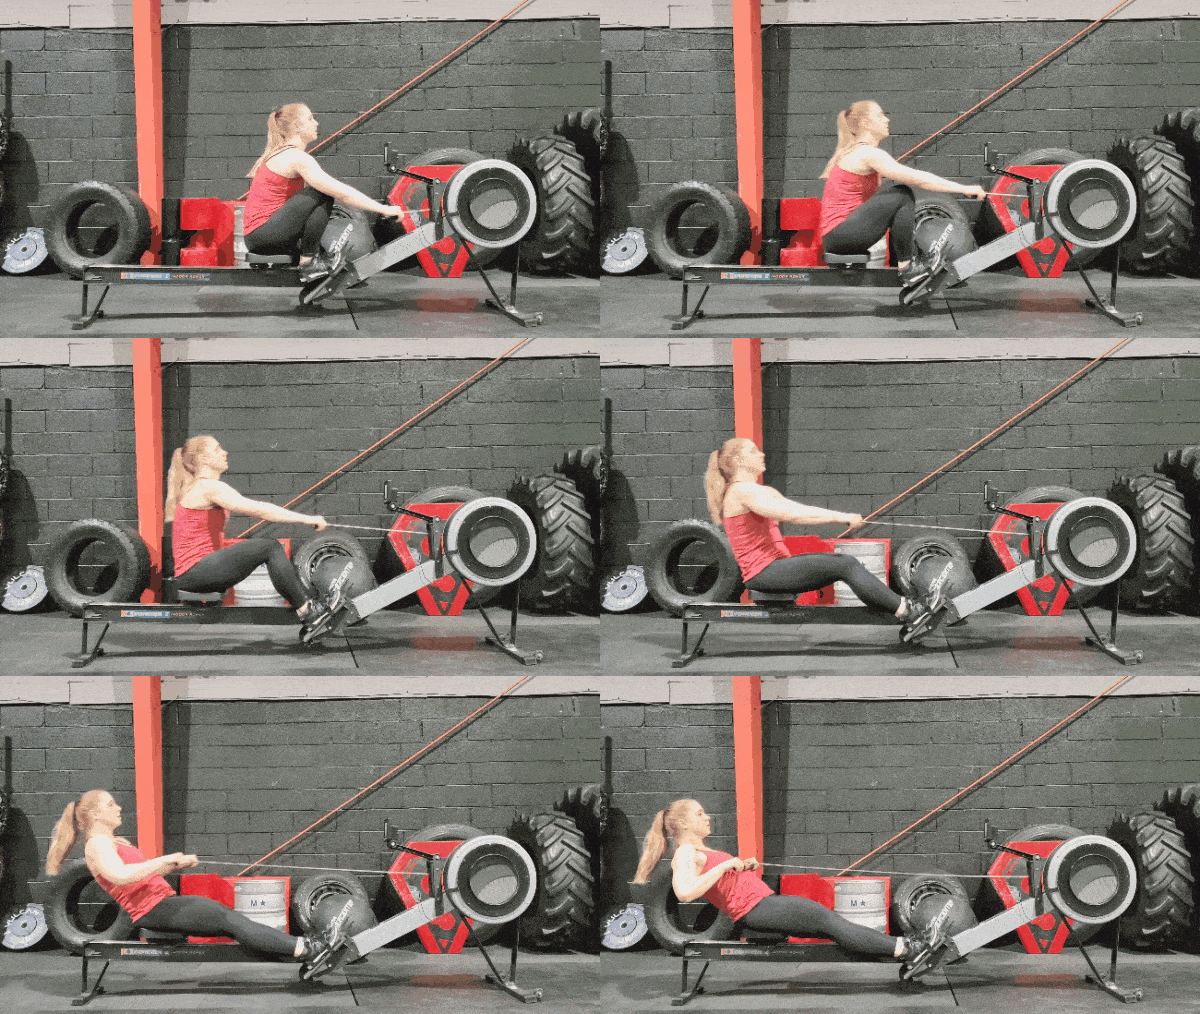
The Four Parts of the Rowing Stroke

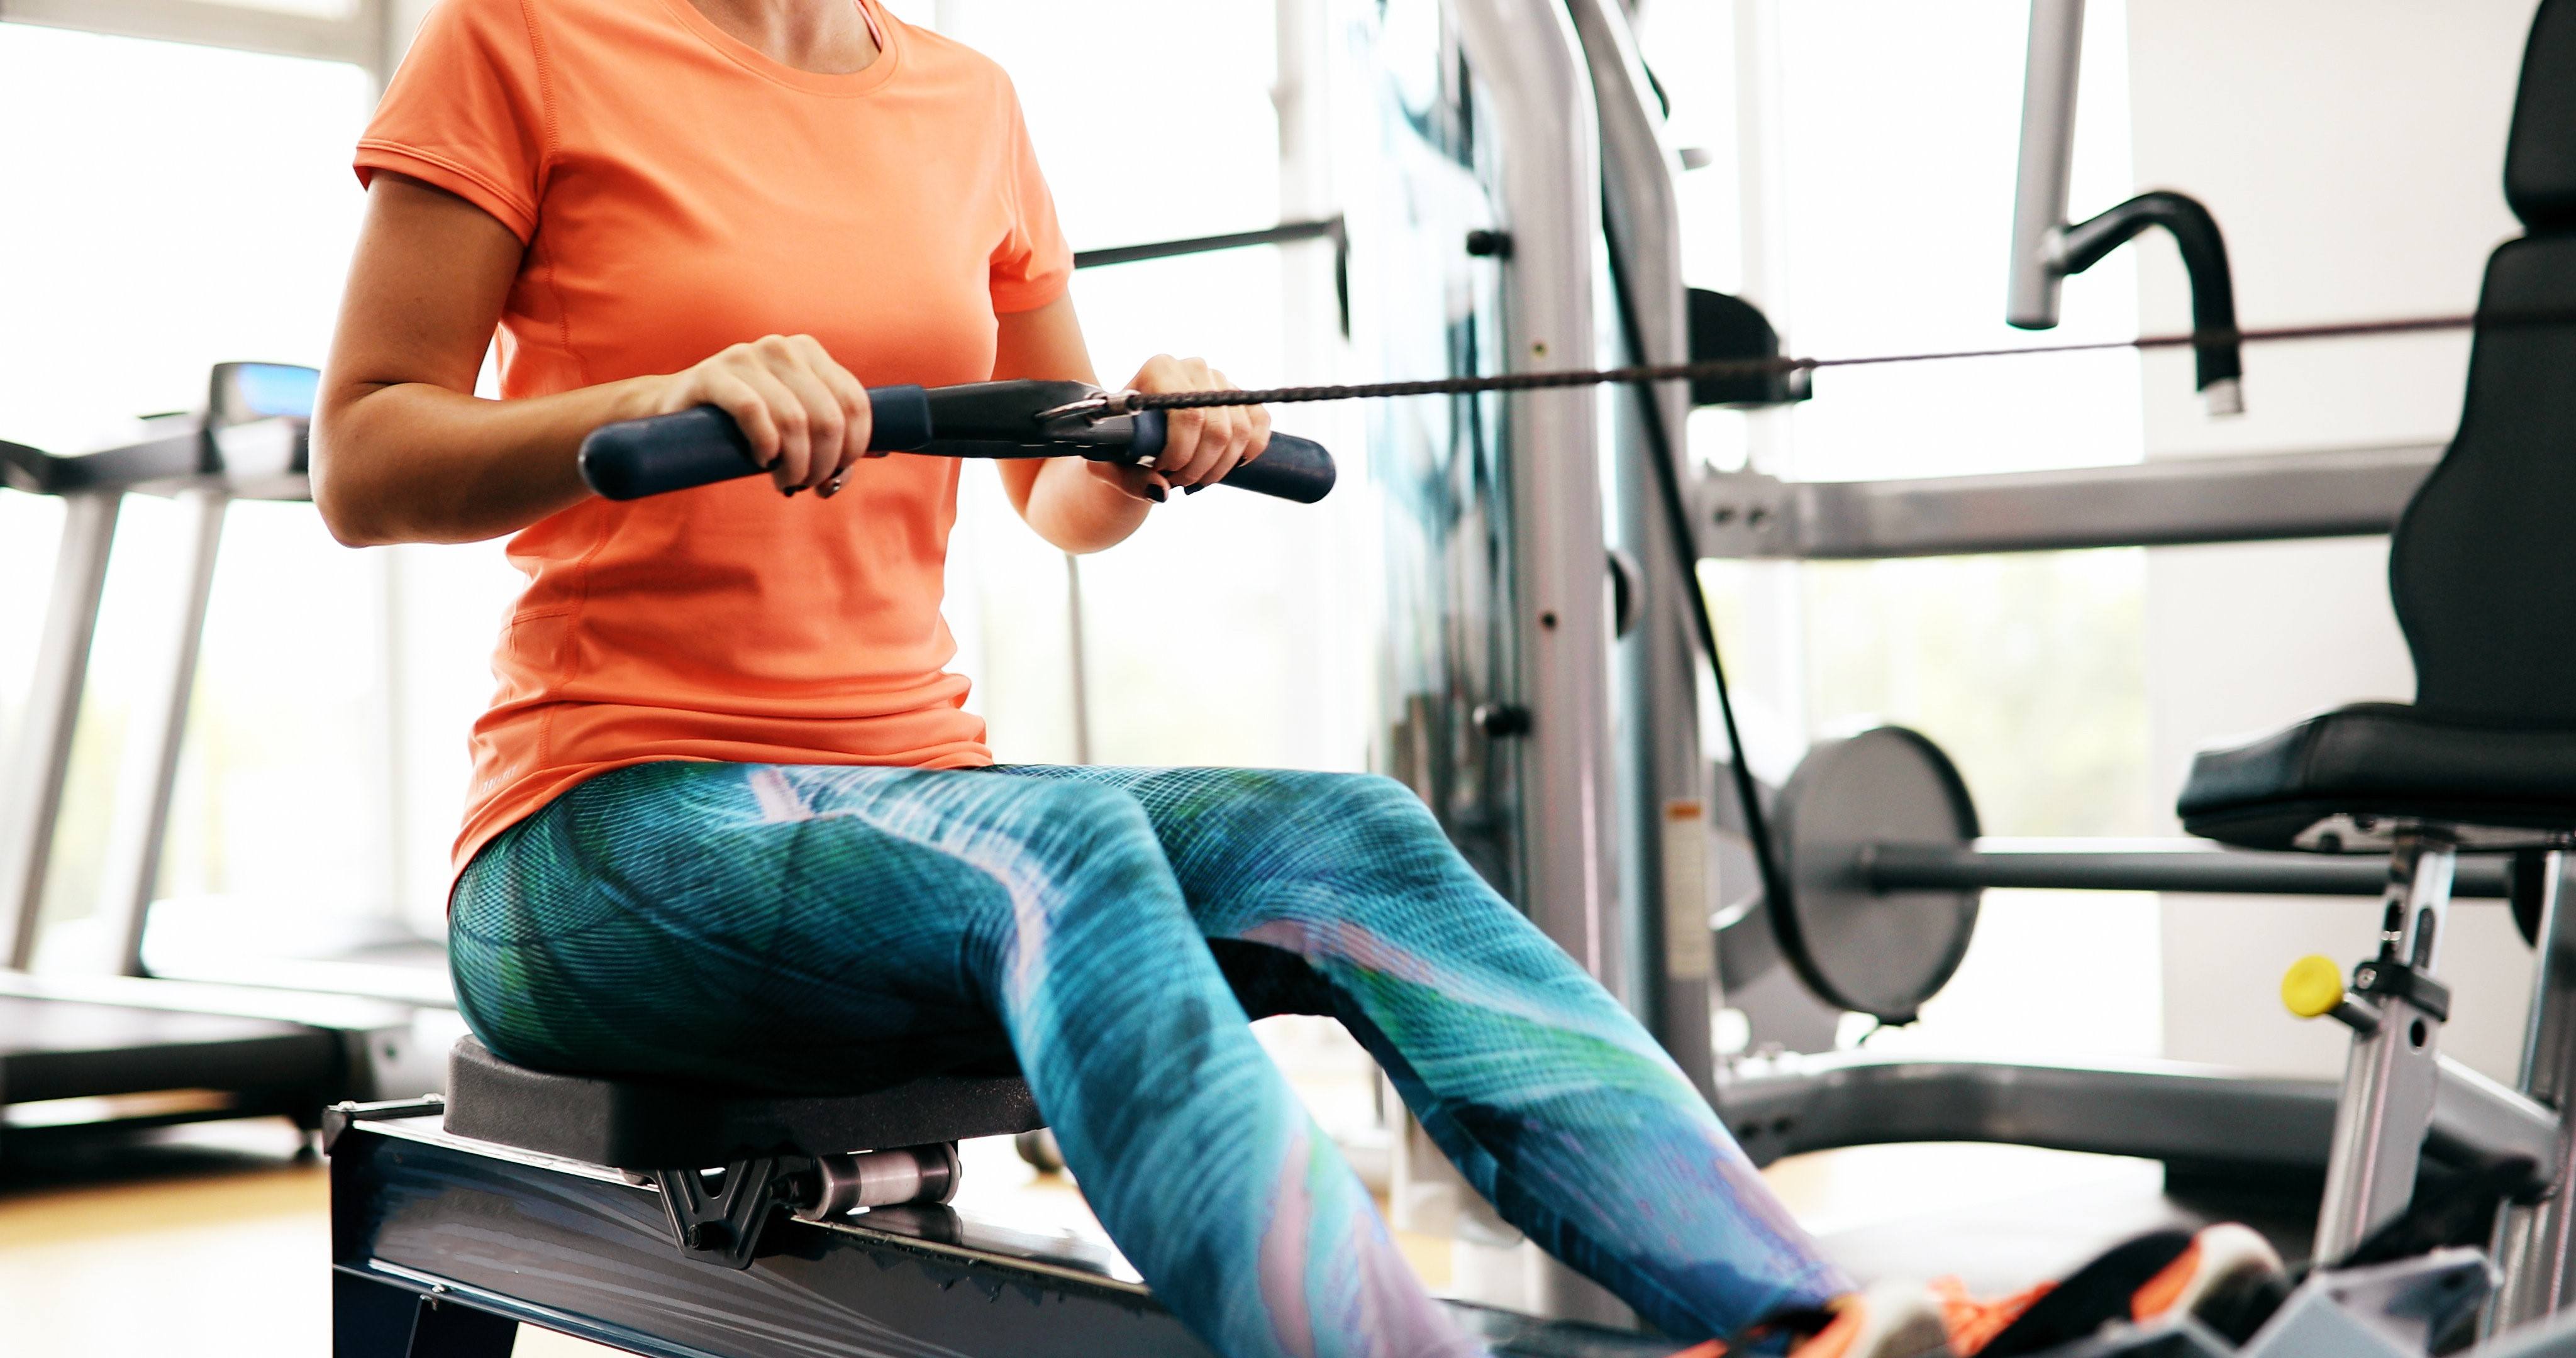
Woman on row machine

The rowing stroke is broken out into four parts:

  1. The Catch
  2. The Drive
  3. The Finish
  4. The Recovery

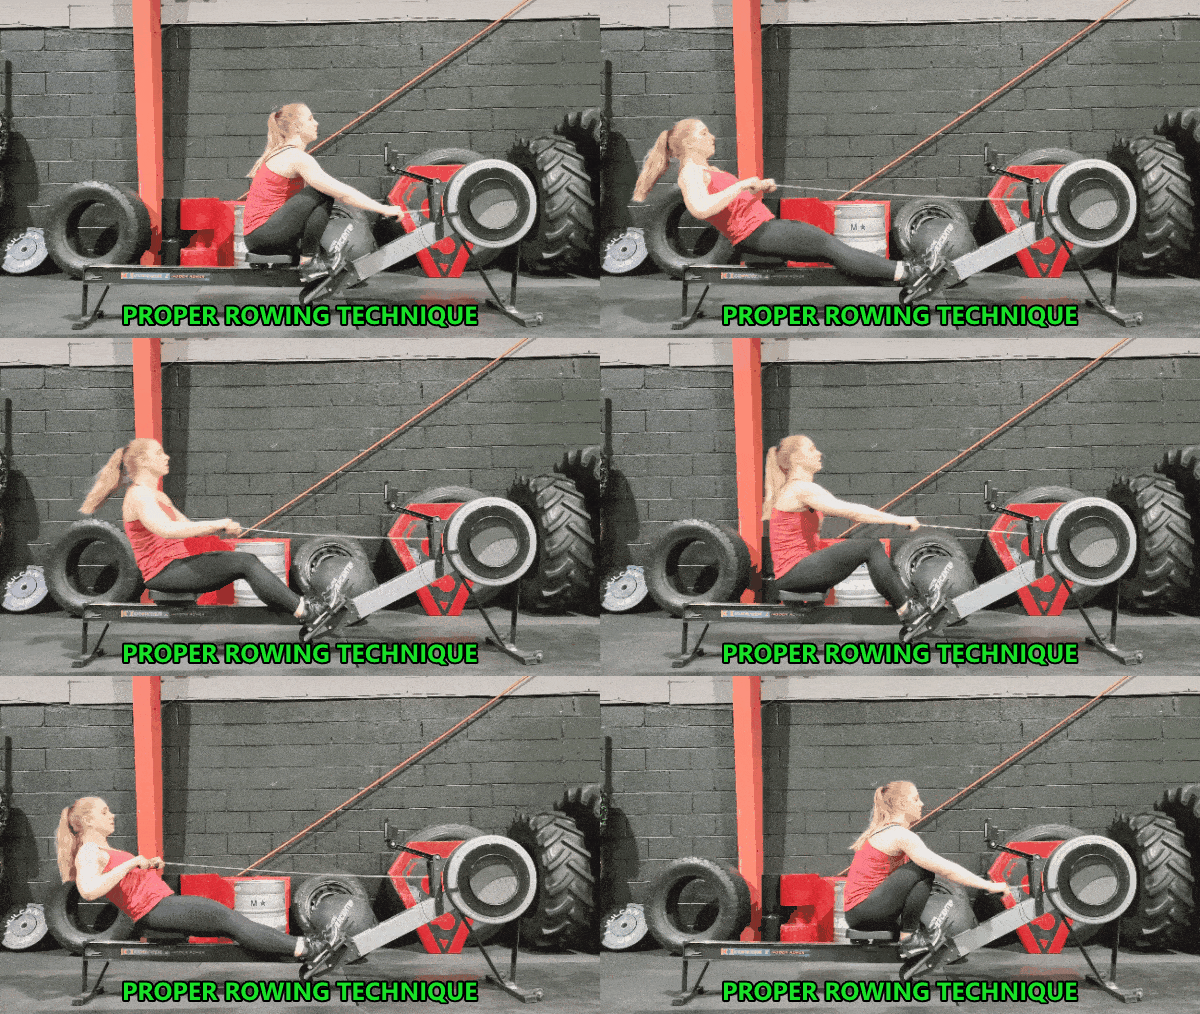
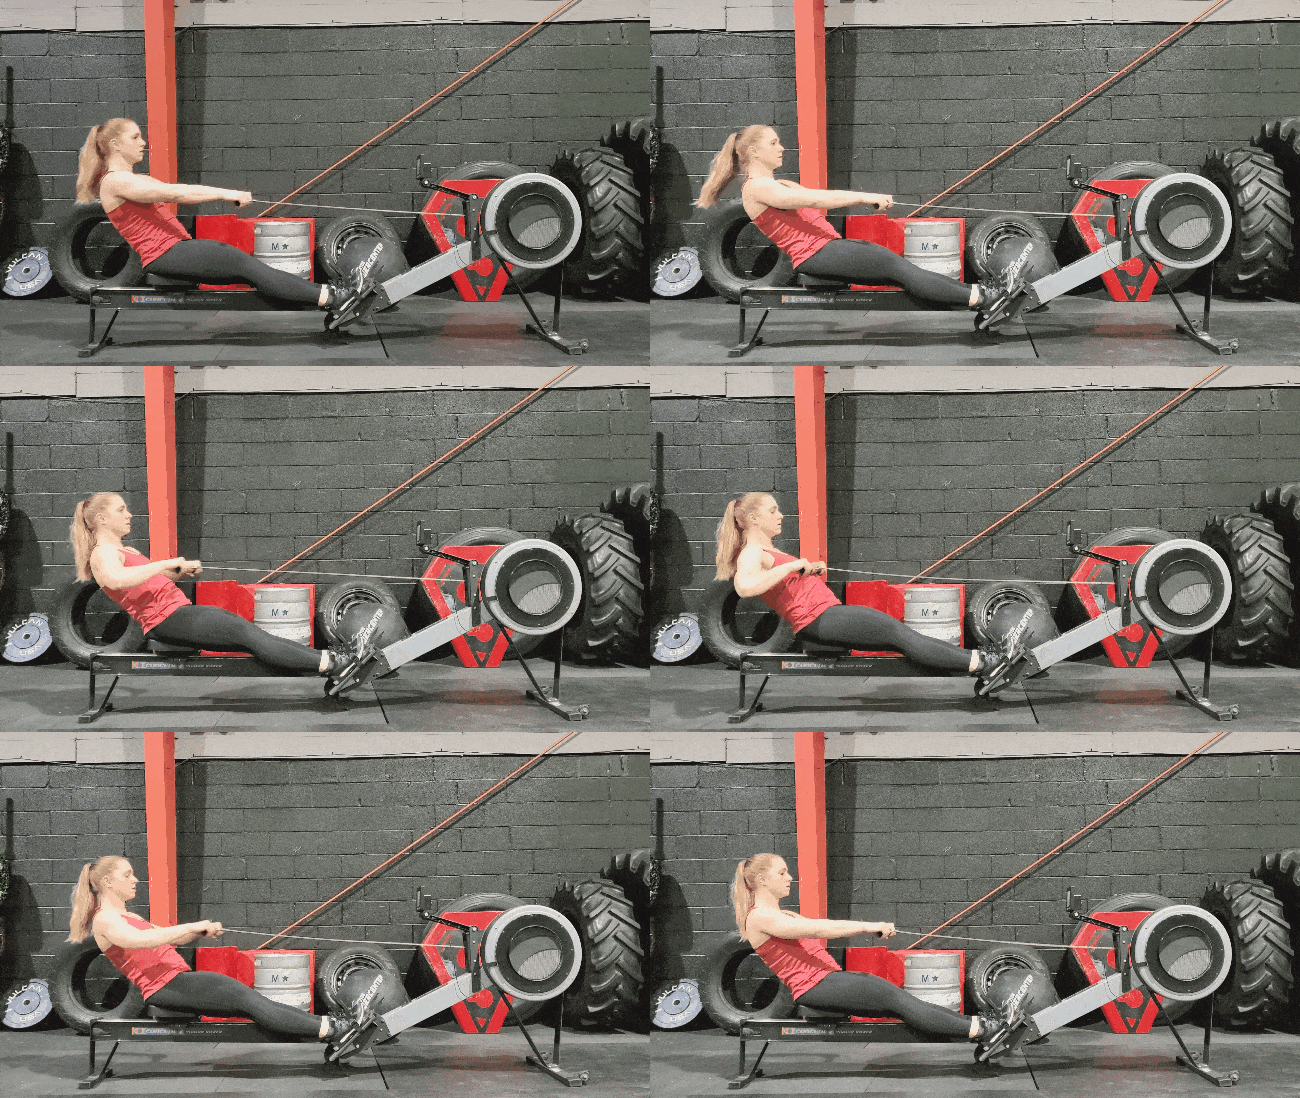
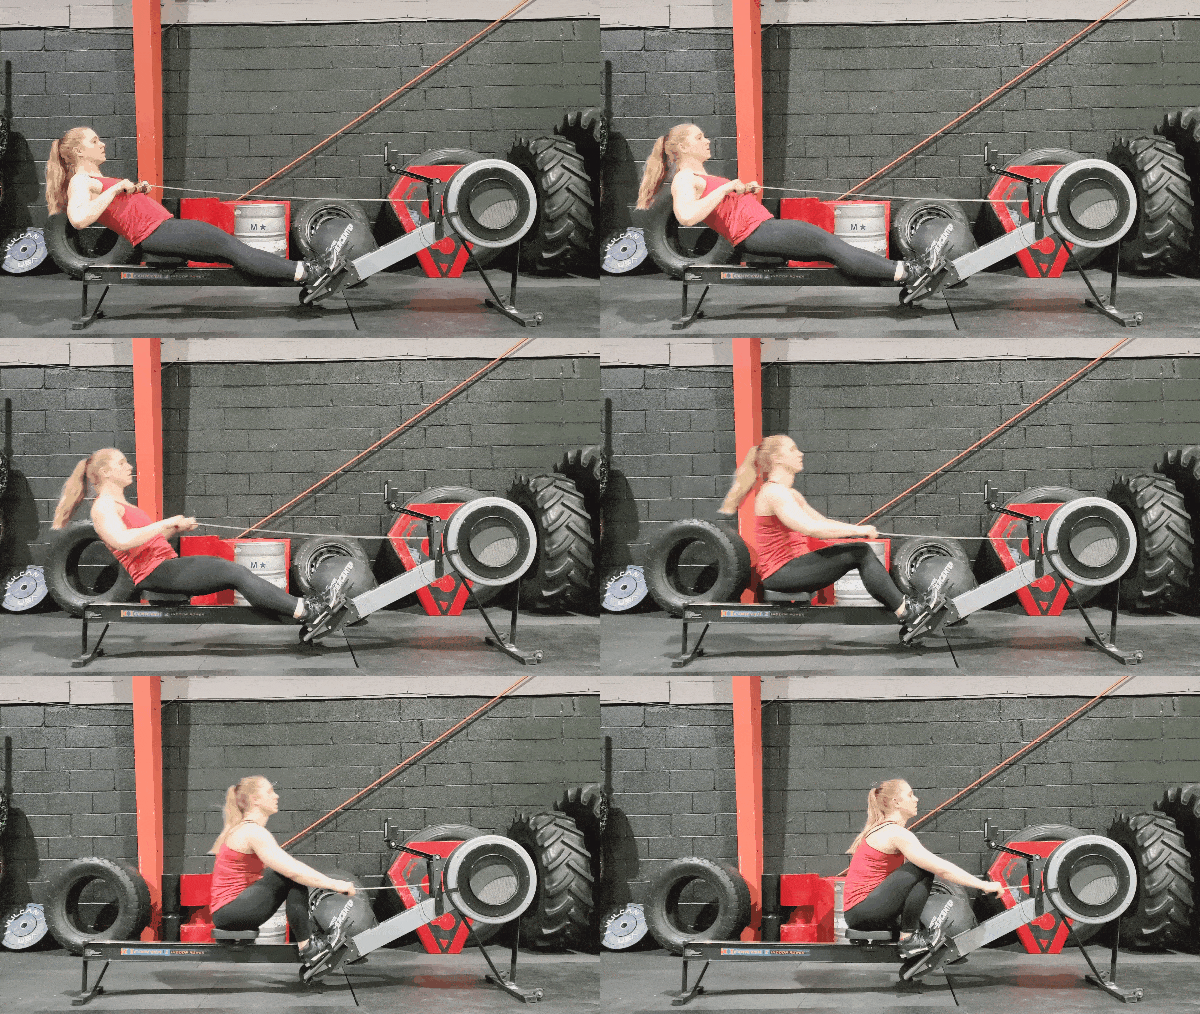
It’ll look like this:

Coach Staci demonstrating proper rowing technique

Let’s cover each.

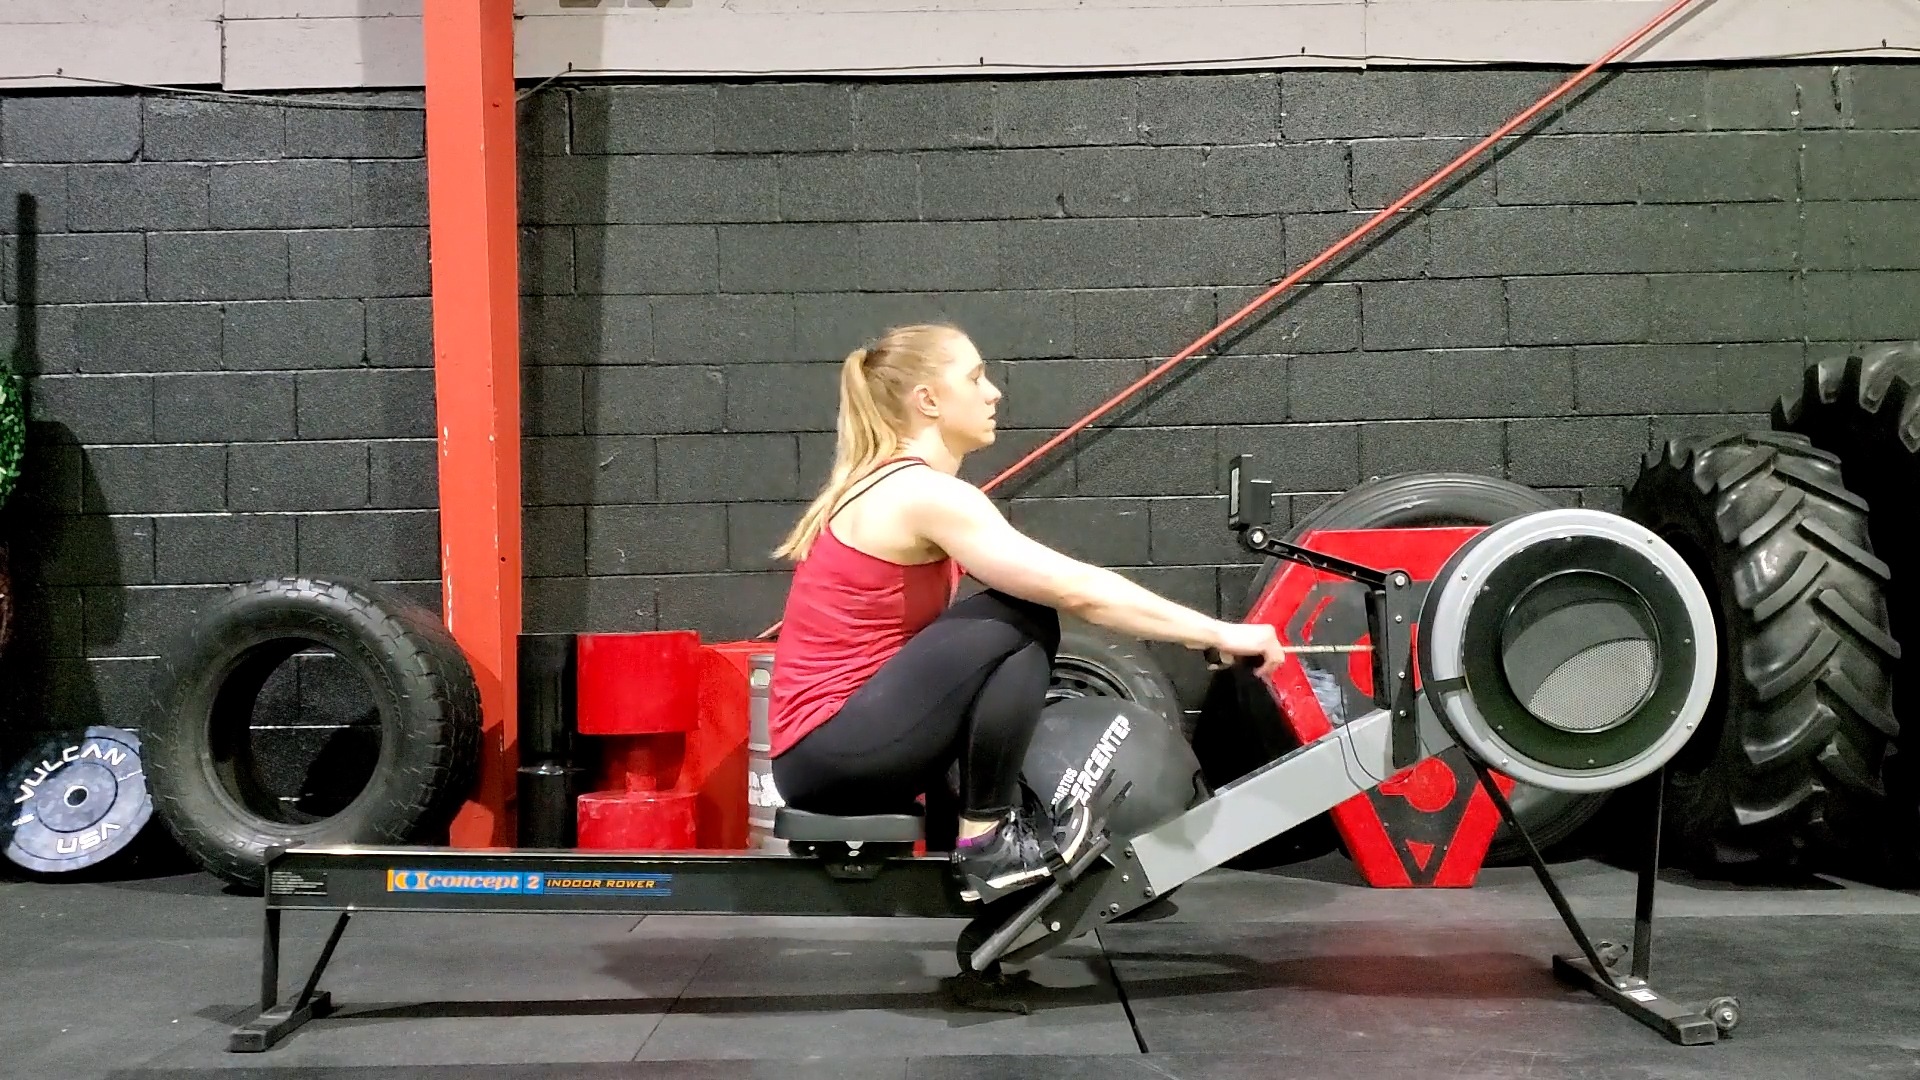
#1) The Catch

This is the start of the stroke:

  • Our knees are bent and our shins are roughly vertical.
  • Our body leans forward slightly to about a 1 o’clock position and our arms are straight.

Like so:

Coach Staci demonstrating the catch position

This puts us in the ideal position to generate power.

#2) The Drive

As the name would suggest, this is where we’ll be driving and generating power for the stroke.

The order in which we generate power is key:

  • It should go legs first
  • Then lean back with the body
  • Then pull with the arms

It’ll look like this:

Coach Staci demonstrating the drive

They should blend smoothly right into each other, so a good reminder is:

  1. Legs
  2. Body
  3. Arms

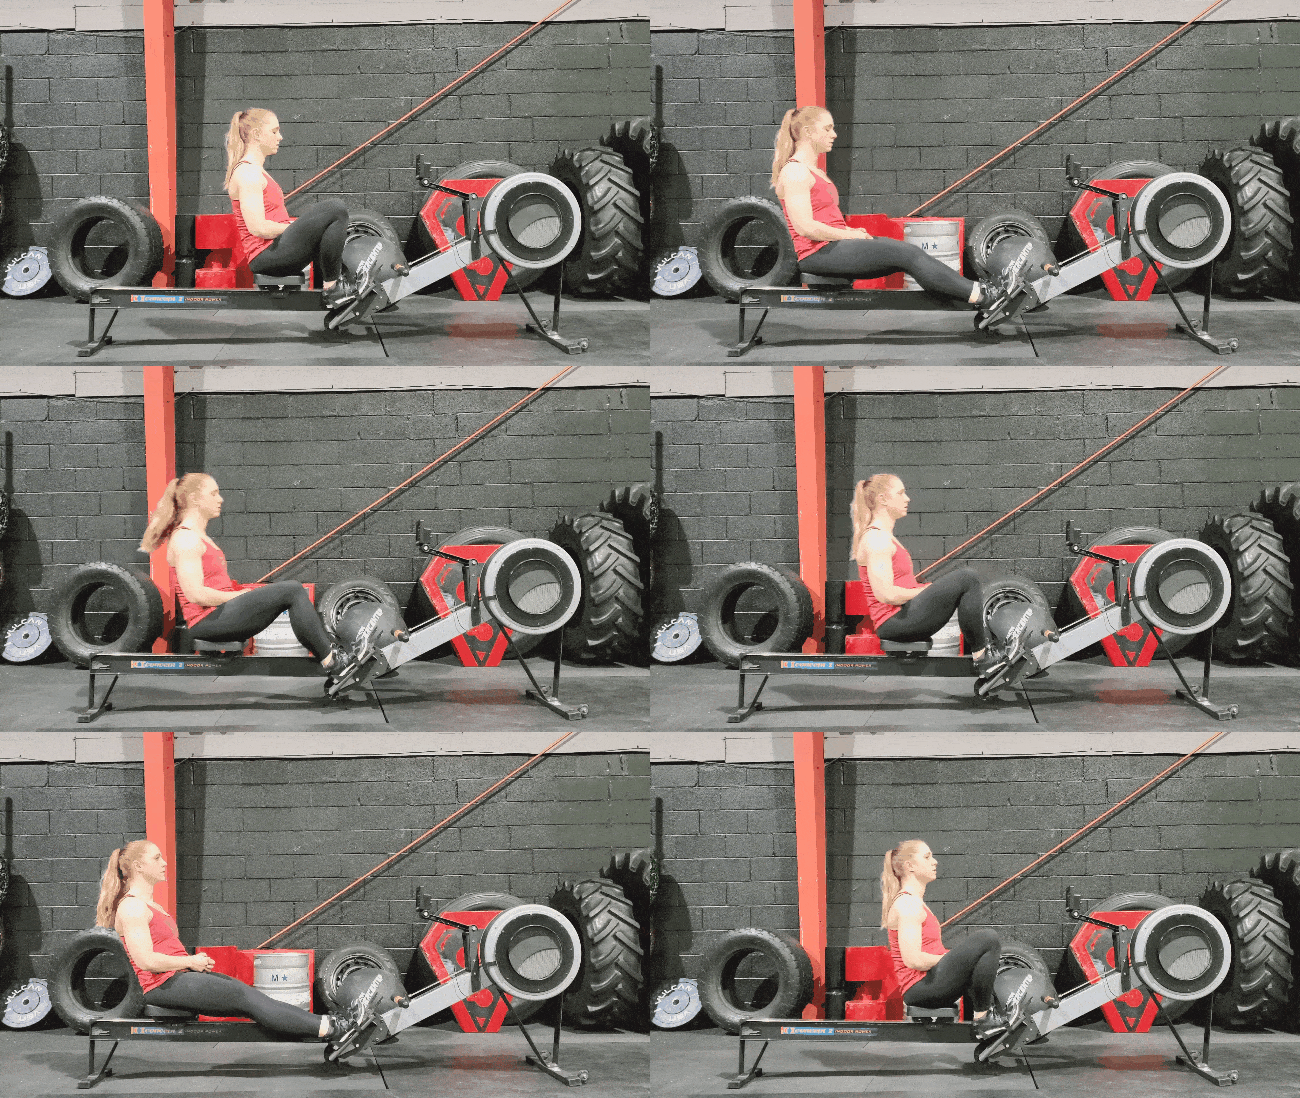
A great drill to practice the Drive: 

Start with JUST the legs:

Coach Staci demonstrating legs only drill

THEN the legs and a slight backward lean with the body:

Coach Staci demonstrating drill with legs and leaning body

FINALLY, the legs, body, and arm pull together:

Coach Staci demonstrating drill with legs, body, and arms

This can be done with or without the rowing handle.

Common mistakes with the Drive:

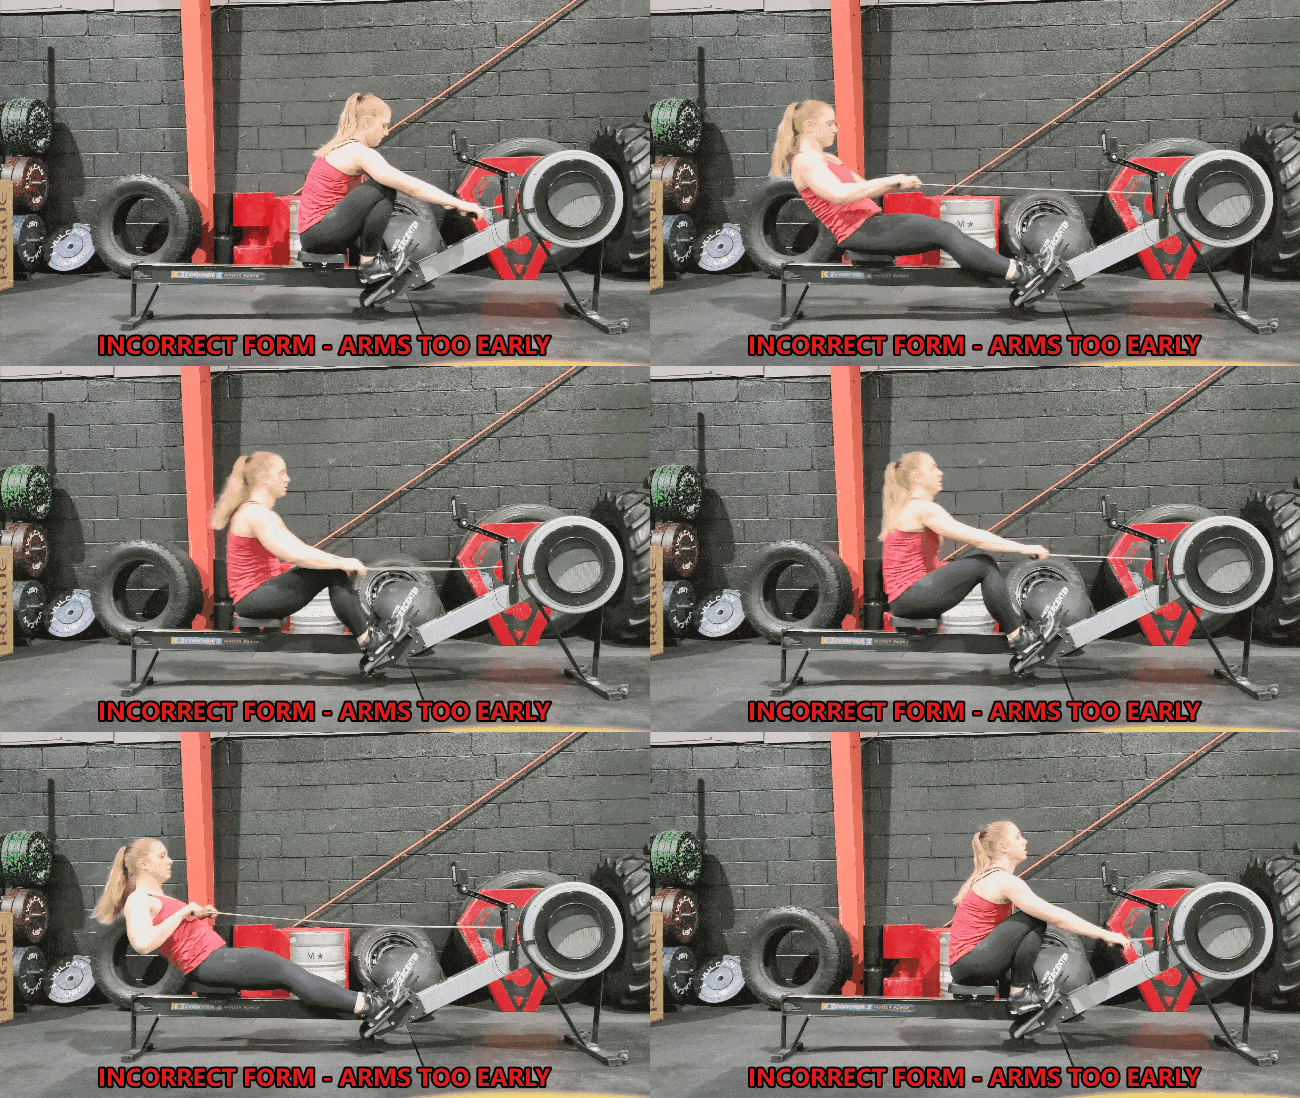
A) Pulling hard with the arms first. We’ll see the elbows bend early. This greatly decreases the amount of power we can put into the stroke.

Coach Staci demonstrating incorrect form, pulling arms too early

We want to keep the arms straight and wait until the handle passes the knees BEFORE we first bend the arms.

B) Letting the body pull forward while we’re driving with the legs.

Coach Staci demonstrating incorrect technique, by being pulled forward during the return.

Instead, we want to keep a strong and stable midsection so that we can go smoothly from the leg drive to the body lean.

#3) The Finish

This will be our position after the Drive:

  • Our legs are extended and our body is leaning back slightly.
  • The handle is about at our solar plexus.
  • Our shoulders are down and our wrists are straight.

It’ll look like this:

Coach Staci demonstrating correct finish position

A great drill to practice the Finish: just work on the arm motion. 

Coach Staci demonstrating a rowing drill by just using her arms while leaning.

Keep the legs extended and lean back slightly. Then pull with just the arms.

Common mistakes with the Finish:

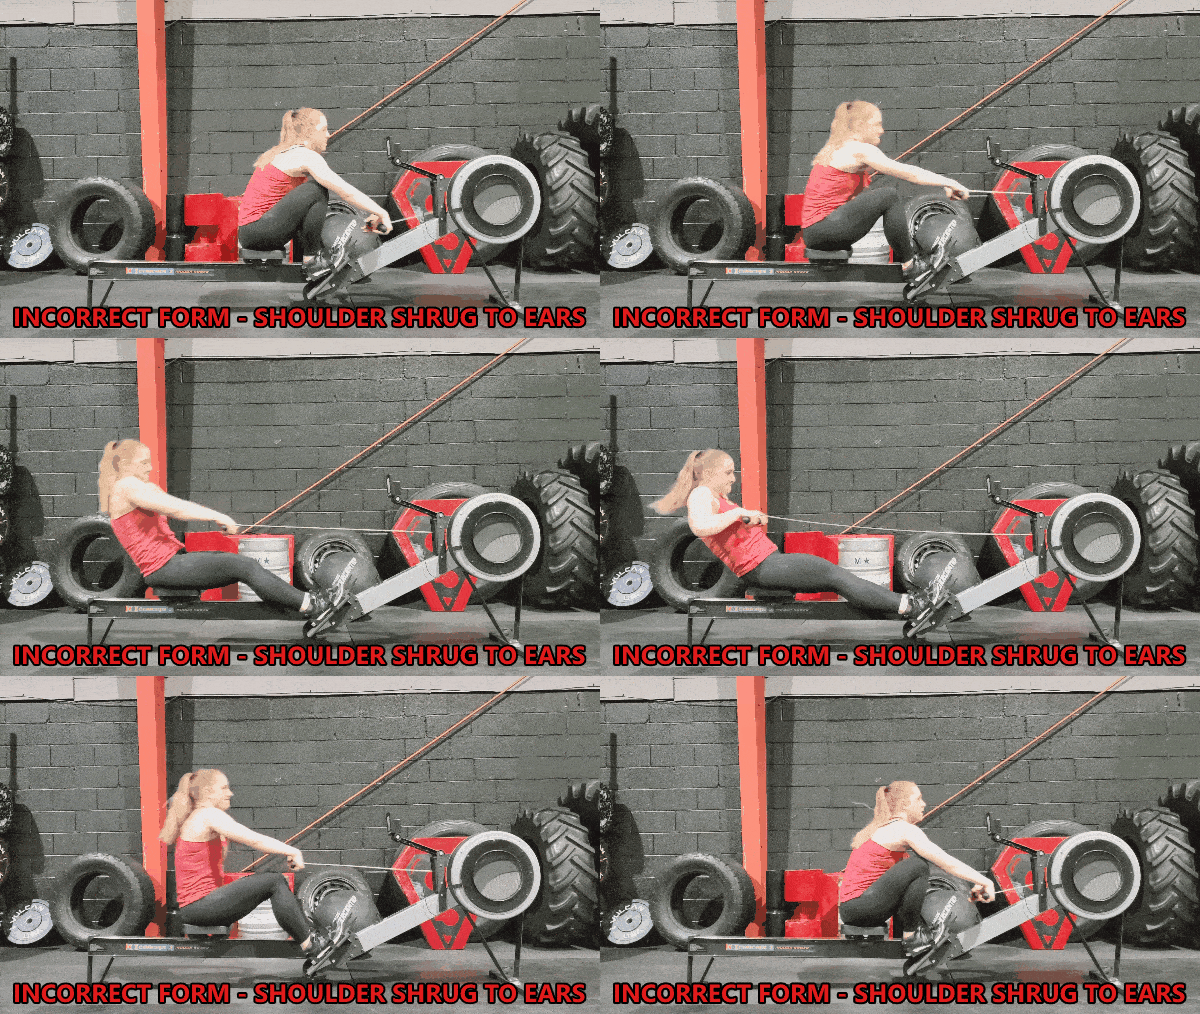
A) Shrug the shoulders up by the ears.

Coach Staci demonstrates incorrect form with shoulders shrugged

This is often accompanied by bent wrists and chicken wing arms.

Coach Staci demonstrates incorrect form with "chicken wings"

Instead, we want the shoulders down and the elbows closer to the sides, with enough space between the arms and body for a grapefruit to fit.

B) Pulling the handle too high – to the neck or face.

Coach Staci demonstrates incorrect form with the handle too high

We want the handle down at the solar plexus, not up orbiting in the solar system!

C) Leaning back too far – we’re not trying to perform the one-person luge here!

Coach Staci demonstrates incorrect form leaning too far back

We only need to lean back slightly, at about an 11 o’clock position.

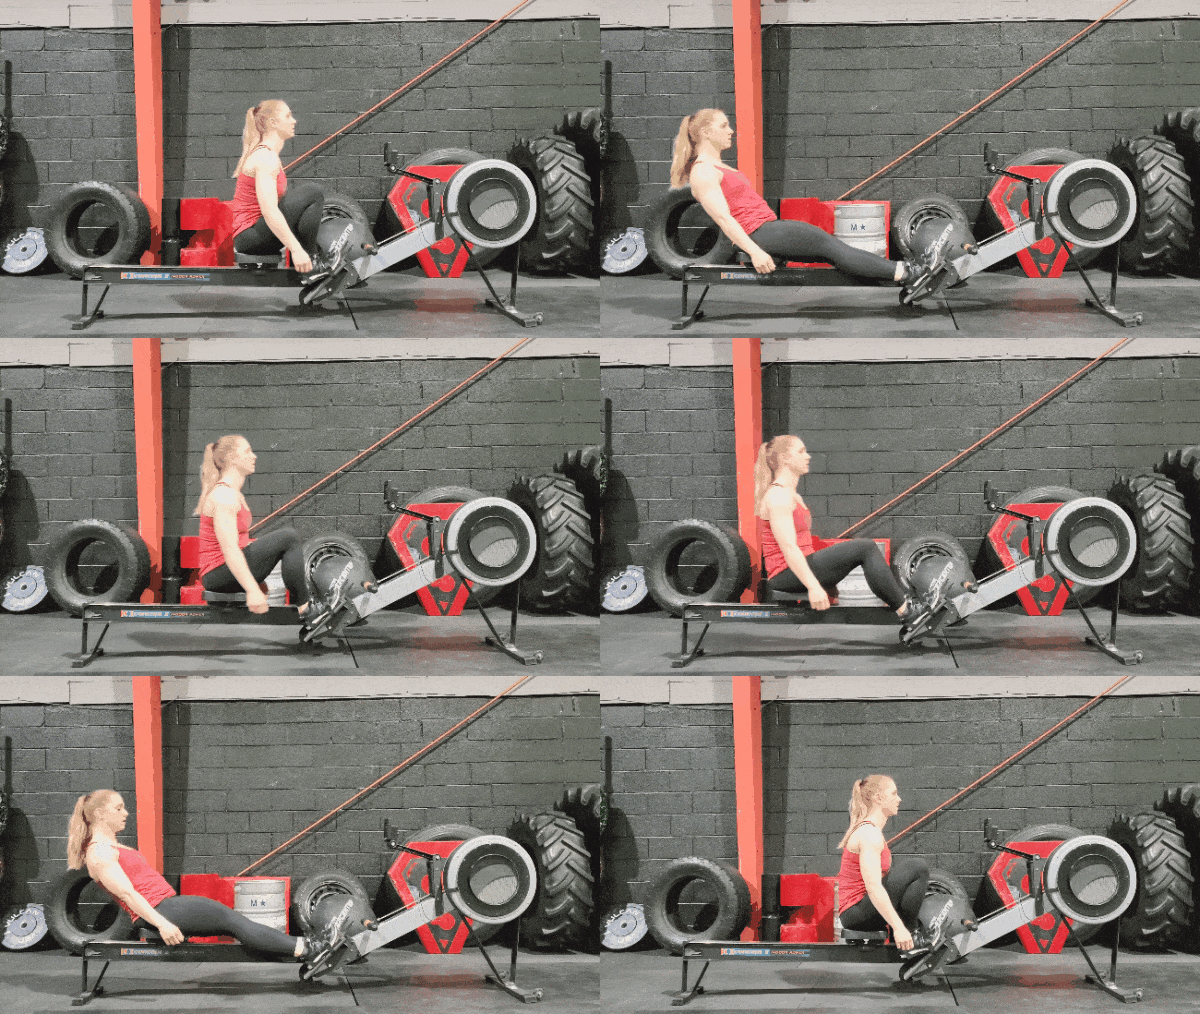
#4) The Recovery

Coach Staci demonstrates proper technique for the recovery

This is how we return back to the starting position.

  • Just as we had a proper order for the Drive – legsbodyarms – we’ll have a proper order for the recovery by reversing it – arms, body, legs.
  • Straighten the arms, then lean the body forward slightly, and finally bend the legs to head back to the Catch.

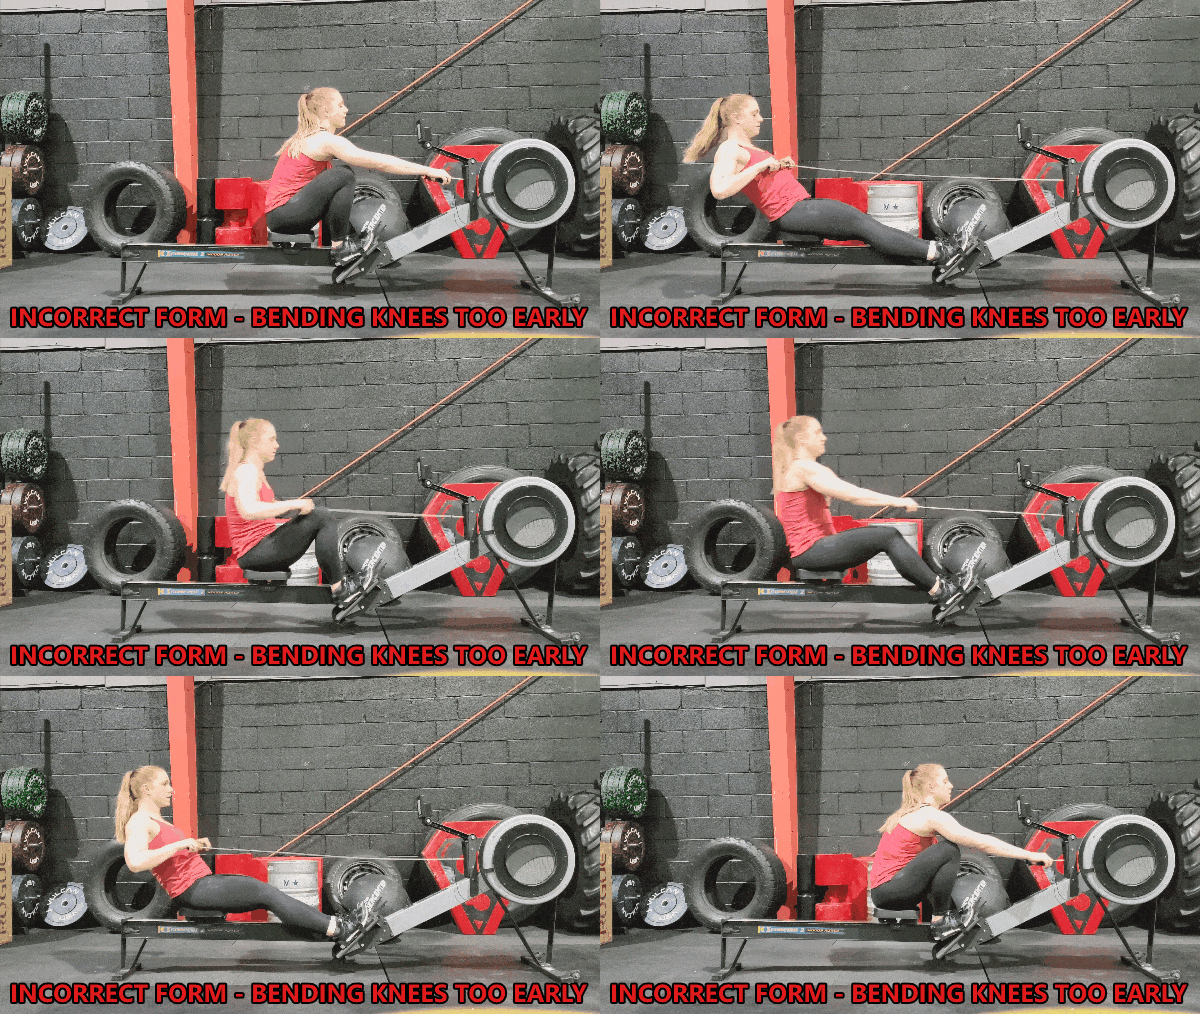
Common mistakes with the Recovery: Bending the legs too early when recovering from the stroke. You’ll know you’re doing this when you have to lift the handle up and over the knees.

Coach Staci demonstrating incorrect technique, bending the knees too early

Instead, wait for the handle to PASS the knees before fully bending the legs.

There you have it, the four parts of the rowing stroke.

You’ll get better at this as you go, I promise.

Rowing is like golf: the relentless pursuit of the perfect stroke.

Happy Gilmore being coached on his swing with caption "it's all in the hips"

One way to check your form would be to record yourself doing a rowing stroke.

If it looks close to the gifs and videos found in this guide, you’re doing great!

Oh, and if you want an expert to review your form, you can do so in our snazzy Coaching app.

You can learn more here:


When to Add the Rowing Machine to Your Workout

A coupe rowing machines in the gym

A rowing machine can fit into our workout in all sorts of ways.

We can row:

If you want to give the rowing machine a whirl, including it as part of your warm-up wouldn’t be a bad idea. Since it’s a full-body exercise, it’s a great way to prep our body for the workout ahead.

To warm up with the rower, aim for about 5-10 minutes at a steady pace. 

Once you get the hang of the rower, you can look to incorporate it with some of these ideas:

#1) Interval Training

Interval training or HIIT is all about flipping between intensity.

Going hard one moment, then resting another.

So after your warm-up, you could row intensely for two minutes, rest or “paddle” for a minute or two, then back to intensity.

A fun way to do this is to build up the duration and then pull it back with a “Meter Pyramid.”

To Row a Meter Pyramid:

  • One minute of intensity, followed by one minute of paddle.
  • Two minutes of intensity, followed by two minutes of paddle.
  • Three minutes of intensity, followed by three minutes of paddle.
  • Four minutes of intensity, followed by four minutes of paddle.
  • Three minutes of intensity, followed by three minutes of paddle.
  • Two minutes of intensity, followed by two minutes of paddle.
  • One minute of intensity, followed by one minute of paddle.

If you start this off with a 5-minute warm-up, it’ll take about 37 minutes.

#2) Circuit Training

You could also mix in some other exercises as part of your rowing workout. Flipping between rowing and some bodyweight exercises, for example.

Here’s an example Row Machine Workout Circuit:

Repeat.

We could aim for 3-4 circuits here, but even 1-2 is a great start.

#3) Steady State

This is exactly what it sounds like: rowing at a constant pace.

After a warm-up, find a pace that you can stay with. Then stay with it.

A good frame of mind here would be about 50% of your effort, but don’t overthink this.

Put on a good podcast or your favorite playlist, find a Stroke Rate you can maintain for 10-30 minutes, and get rowing.

You can pretend you’re in a competition if it helps!

Two people rowing outdoors

Also, mix and match! The important thing is that you’re doing some type of workout. Don’t fret if it doesn’t fit into the exact format you find here or on other websites.

For more ideas here, check out How to Build Your Own (Full-Body) Workout.

Should a Beginner Use a Rowing Machine? (Next Steps)

Team rowing boat in bay

There you have it, my friend.

You now have everything you need to get started rowing.

Don’t overstress if you’re not doing anything 100% right as you start.

Like anything, you’ll get better at it as you go.

Plus, it’s not like you’ll be ejected into the water from an indoor rower.

Rower falling overboard

But, if down the road you do want to take it outside, there are all sorts of leagues and clubs you can join.

It could be a great way to get out and make friends!

Granted, you’ll need SOME type of body of water around you, but if you live next to a lake or large river, there’s likely a team out there that would love to meet you.

Practice indoors for a bit, then take 20 seconds of courage to put yourself out there.

What’s 20 seconds of courage?

We explain it all to you in this video:

Oh, and if you want to continue having Nerd Fitness propel your journey, here are three ways we can help:

#1) Our Online Coaching Program: a coaching program for busy people to help them make better food choices, stay accountable, and get healthier, permanently.

If ever you come across a snazzy piece of equipment and what to learn how to use it, your very own coach can help you!

Plus, they can guide your nutrition and help you level up all areas of your life. 

You can schedule a free call with our team so we can get to know you and see if our coaching program is right for you. Just click on the image below for more details:


#2) If you want an exact roadmap for building a full-body workout, check out NF Journey. Our fun habit-building app tells you exactly what days to exercise, what days to rest, and helps you track it all so you know if it’s working for you.

Interested?

Try your free trial right here:

#3) Join the Rebellion! We need good people like you in our community, the Nerd Fitness Rebellion.

Sign up in the box below to enlist and get our Rebel Starter Kit, which includes all of our “work out at home” guides, our Strength Training 101 eBook, and much more!

Now, your turn:

  • What’s your experience with row machines?
  • Do you use them as part of your training?
  • Any workouts I’m missing?

Let me know in the comments!

-Steve

###

Photo source: vadymvdrobot © 123RF.com, Legoland Somerville (Boston), indoor rower, nd3000 © 123RF.com, malkovkosta © 123RF.com.

Footnotes    ( returns to text)

  1. The Arthritis Foundation takes a closer look.

The post How to Use a Rowing Machine (Beginner’s Workout) first appeared on Nerd Fitness.

Be Nice and Share!
This post was originally published on this site

http://www.marksdailyapple.com/

woman taking cla conjugated linoleic acid supplementCLA, or conjugated linoleic acid, is the “good” trans-fat that occurs naturally in meat and dairy, especially from grass-fed animals. In the stomach of ruminants like cows, sheep, or goats, millions upon millions of bacteria help the animal digest its food. They also help convert dietary grass-based linoleic fatty acids into saturated fatty acids. Well, that conversion takes several steps, and one of the steps is the creation of CLA, some of which never gets fully saturated and instead shows up in the animal’s body and milk fat.

Twenty-eight different CLA isomers, or structural arrangements of the molecules, appear in CLA-rich animal fat. It’s very complex and quite different from trans-fat created by partially hydrogenating vegetable oils. Those lab-created trans-fats have definite negative metabolic and health effects, while the panoply of various CLA isomers from grass-fed dairy and meat seem to be beneficial.

What about CLA supplements? Is synthetic CLA just as good for you as naturally-occurring CLA?

What is a CLA Supplement?

Conjugated linoleic acid production is a booming industry with many players. You’ve got the new guys creating the stuff on a massive scale, getting their hands dirty in the lab, converting linoleic acid derived from safflower or sunflower oil into various isomers of CLA. Then there are the stalwarts, those ruminant stomachs filled with microscopic bacterial sweatshops toiling away as they convert unsaturated fats to saturated fats and make various CLA isomers in the process. An isomer called cis-9, trans-11 (or c9, t11) isomer is the primary one. CLA with a trans-10, cis-12 isomer is also evident, but in far scanter quantities. Same type of molecules – different arrangement. In fact, c9, t11 CLA  accounts for between 80-95% of the CLA in ruminant and dairy fat, with t10, c12 making up most of the remainder. Supplement makers have the luxury of focusing on other isomers, of course, so they typically produce CLA supplements containing equal amounts c9, t11 and t10, c12.

Are CLA Supplements Healthy?

At first glance, they seem effective in isolated in vitro studies and can help people lose body fat.

  • T10, c12 can inhibit the growth of human colon cancer cells in vitro (with c9, t11 having no effect).1
  • In another in vitro study, this time connective tissues isolated from human body fat, t10, c12 inhibited lipogenesis, or (something analogous to) body fat creation, while c9, t11 did not.2
  • It also showed promise as a promoter of lean mass versus fat mass in humans.3

However, while the t10,c12 isomer looks to be better at burning body fat, it comes at a cost. In a totally unsurprising twist, results change when you start feeding the stuff to live organisms and paying attention to the full effects (beyond just “does it result in 2% more fat loss?”). Let’s take a look at a few examples.

To sum up, while t10, c12 supplementation can decrease fat mass, it can also raise LDL, lower HDL, and overall worsen the cholesterol profile, as well as increase insulin resistance, blood glucose levels, and insulin. C9, t11, on the other hand, seems to improve lipid metabolism overall.

Are you noticing a pattern? Again and again, individual CLA isomers appear to be protective or beneficial in isolated studies, usually in vitro, but when you actually feed an animal or a human a CLA supplement with the same isomer ratios, the benefits either disappear or get counterbalanced by a negative effect. You might burn some body fat, but you’ll also become insulin resistant. You may keep off the baby weight, but your breast milk will contain less fat as a consequence.7 I’m a big supporter of supplementation, but in my opinion, CLA supplementation simply isn’t worth it.

The right CLA supplement employing the right isomers in grass-fed ruminant-fat proportions could be helpful, but after taking an admittedly brief look at the top CLA supplements results on Amazon, I couldn’t point you toward any that fit that description. They may exist. Heck, they probably do exist, but it’s not obvious. I think you’d be better served simply eating grass-fed animal products: butter, cheese, and meat with fat intact.

In fact, we have good evidence that these “CLA supplements” are the healthiest available and give real benefits.

  • In one study, sheep cheese “naturally enhanced” with CLA improved lipid markers and reduced the levels of anandamide—an endocannabinoid that increases hunger and food intake—in patients with high cholesterol.8 Imagine that: giving high-fat cheese to people with high cholesterols and seeing their numbers improve. Incredible (and totally unsurprising if you know what’s what). Of course, “naturally enhanced” means the sheep ate grass and converted the fatty acids into CLA.
  • In another, pecorino romano cheese (a proprietary Italian cheese that can only come from grass-fed sheep) “naturally rich in c9, t11 conjugated linoleic acid” improved markers of atherosclerosis in those who ate it. CLA-rich sheep cheese actually reduced the risk of heart attack.9

As so often is the case, food is the best way to get your nutrients. Supplements have a place, but only if they emulate the natural form. Supplements with novel forms of nutrients should be viewed with suspicion and confirmed with research.

Primal Kitchen Pizza Sauce

The post Dear Mark: CLA Supplements appeared first on Mark’s Daily Apple.

Be Nice and Share!