Agriculture (and increased availability of carbohydrates) increased the frequency of genes controlling blood sugar. People with the ancestral version of the gene have an easier time maintaining blood sugar while fasting but tend to have more trouble controlling blood sugar after carb consumption.
For the first time ever, scientists directly observe the transfer of RNA from an animal’s brain to its sperm and onto its offspring. Is this the mechanism for transgenerational inheritance?
Trigger warnings don’t actually help students reduce stress or learn any better but they make students believe in their efficacy.
Pesticide exposure linked to increased depression in teens.
Episode 353: Endurance: Brock Armstrong: Host Brad Kearns talks with frequent guest Brock Armstrong about synching endurance training and goals with quality of life and losing fat the healthy way.
Episode 354: Oren Jay Sofer: Host Elle Russ chats with Oren Jay Sofer about nonviolent, mindful communication.
Each week, select Mark’s Daily Apple blog posts are prepared as Primal Blueprint Podcasts. Need to catch up on reading, but don’t have the time? Prefer to listen to articles while on the go? Check out the new blog post podcasts below, and subscribe to the Primal Blueprint Podcast here so you never miss an episode.
This is a powerful story: A boy had a rare genetic lymphatic disorder. Doctors inserted the relevant genetic mutation into 10 sets of zebrafish, tested different drugs in each set, and gave the one that worked to the boy. It worked in him too.
Question I’m Asking
Read the Norwegian packed lunch article from above. Can you come up with a similar concept for no-frills, easy-prep, near zero-cleanup Primal or keto lunches?
“Like most of us, I sometimes procrastinate for what seems to be no good reason. However, I’ve found two categories of procrastination that actually make me more productive.
With the first type of deliberate procrastination, I will put something off to allow for ‘subconscious fermentation.’ I find this very useful for certain tasks that involve problem solving that I am highly motivated to get done right away, but backing off for a day or two improves my effectiveness at tackling the task. For example, I had very large limb from a tree on my property break in a wind storm and get hung up in another tree with both ends suspended ten-plus feet off the ground. My first instinct was to deal with it right away. That meant either calling a professional and paying several hundred dollars or climbing up a tall ladder and wielding a chainsaw at a height that seemed precarious—neither of these options was particularly attractive to me, but something had to be done. I so badly wanted to get moving on this the day it happened, but I forced myself to procrastinate to allow my mind to work on the problem in the background. Two days later inspiration struck: I threw a rope over the limb, tied a large trash can to the rope and hoisted it several feet in the air, tied it off, put a garden hose in the trash can, turned it on, stepped back, and let the gradually increasing weight of the water-filled can safely pull the limb out of the trees and to the ground. Thank you, procrastination!
The second type of planned procrastination I use is for completing simple tasks I don’t care for that I have a tendency to do inefficiently and/or lament over if I give myself plenty of time. Put another way, some tasks become less unpleasant when I use procrastination to force a sense of urgency. For me, packing for a trip is a good example. I find if I decide to wait almost until the last minute (critical to this is giving myself a reasonable window of time), I’m forced to be highly focused in getting all my stuff together and the work becomes much more enjoyable and I spend my time more effectively.
With both of the above types of procrastination, I find I need to make a deliberate decision to delay. For the first type, it allows for more effective solutions to complex tasks. For the second type, it helps me to be more efficient and avoid the unease of anticipating doing a task I otherwise find monotonous or distasteful.”
As summer heats up, more and more people are spending time in the wilderness and taking exotic trips to foreign destinations. However, other things are stirring as well. These dangerous diseases are passed by blood-sucking insects and could impact you, so it is important to know the symptoms and be on the lookout for any […]
For today’s edition of Dear Mark, I’m answering three questions.
First, why did I leave out soy sauce from the Primal Kitchen® No Soy Teriyaki Sauce? Second, what slackline do I recommend beginners buy? And third, is keto safe for people with type 2 diabetes?
Let’s find out:
Hey Mark,
How come you didn’t use soy sauce in the new teriyaki?
First of all, I make this stuff for you guys. For the people who’ve been there from the beginning. For the people who got into this Primal/paleo stuff because they had unexplained rashes, weird weight gain, gut issues, even though they were eating the conventionally “healthy” diet. And many of you (as many of you have told me over the years) have figured out that you have intolerance issues with soy—even if it’s fermented to high heaven. The last thing I want to do is exacerbate an autoimmune issue, especially if the ingredient in question isn’t actually necessary.
And two, I knew I could make something delicious and unique without soy. I didn’t need it. Maybe it’s not exactly like teriyaki sauce you’ve known and loved. For one thing, it has far less sugar. But it’s really, really good. It serves the same purpose as teriyaki sauce. It even manages to give the appearance of sweetness (at least, if your taste buds haven’t been deadened by decades of sugar baths) without actually having any added sugar—just balsamic vinegar. Soy simply wasn’t necessary.
Believe me: we tried different formulas that included soy sauce. They were fine, sure, but they weren’t necessary to get the result we wanted. And so we left it out. Why not leave out a potential allergen, one that a disproportionate number of our customers seem sensitive to? It was a no-brainer.
There are plenty of decent teriyaki sauces out there (although you might have to whip it up yourself to limit the sugar). Ours is just unique.
I definitely feel that procrastination is a mechanism of self-defense. After a long day of “mental work”, when I come home it’s not that “I’m tired” is more “I need to decompress”. One of my go-to phrases: “I’ll do it in the morning”. I still haven’t gotten myself one of those slacklines… is there a particular one you recommend?
I’ve always loved the Gibbon slacklines. The basic one is more than enough for most people.
A few beginner tips I always give to newcomers:
Focus on standing on one leg. Get comfortable there. Then spend even more time on one leg before trying to take steps.
Use trekking or ski poles to get comfortable. If you aren’t making any progress at all, there’s no shame in using a little assistance.
Know that the line won’t swing out from under you when you take a step. It feels like it will, but it won’t. Trust and have faith (kinda like life).
Let your arms swing where they may. Keep them fluid (like a gibbon), not rigid.
Whatever you do, don’t get discouraged. The first couple hours on a slackline is really humbling for almost everyone. I have a long history of board and “balance” sports (snowboarding, standup paddling, etc), and my first time on the slackline I could barely stand up. Your leg will wiggle more than you ever thought possible. Keep going. Even though it won’t feel like you’re making progress, you are. Your brain is taking notes, drawing new paths between neurons. It’s learning. Giving up gives your brain the message that this task is too difficult for you, and it’ll stop learning.
Is Keto dieting ok for us type II diabetics?
Most signs point to “yes.”
Type 2 diabetes has been described as a disease of carbohydrate intolerance. If that’s true, then removing or severely restricting the thing you’re intolerant of seems logical. What happens when you do that?
Very recently, a large study came out that supports the use of keto in this population. Two groups of type 2 diabetics were placed either on a very low carb ketogenic diet or a standard diet for two years. The ketogenic group:
Lowered their HbA1c.
Reduced their diabetes medication usage.
Lost visceral body fat.
The control group experienced none of these benefits.
Furthermore, 55% of the keto group reversed their diabetes and 18% went into remission.
I’ve heard some people make the point that because keto doesn’t necessarily give a type 2 diabetic the ability to eat a big baked potato and have normal blood glucose, it’s not actually a “cure.” Maybe. But would you say the same thing to an alcoholic who no longer drinks? Is sobriety not a viable treatment for alcoholism because if the alcoholic took a drink he’d fall off the wagon? No. That’s ridiculous.
That’s it for today, folks. Happy 4th to all my U.S. readers out there. Enjoy a safe and healthy holiday weekend.
I don’t like being told what to do. That’s why I’m not a fan of hard and fast food rules, as I’ve written before. Don’t get me wrong, that doesn’t mean I believe all foods are created equal. There are foods that aren’t health-promoting in any context. (I’m looking at you, processed chemical nacho cheese-like sauce.) Nevertheless, I’m incredulous when people suggest that they’re not “allowed” to eat certain foods on a Primal or keto diet.
Sure, we Primal folks choose to center our diets around the foods in the Primal Blueprint Food Pyramid. And once you go keto, higher-carb foods—even nutrient-dense ones—are harder to fit into your daily macros if staying in ketosis is important to you. However, I’ve found that keto people are overly prone to policing one another’s food choices based on their notions of keto.
Context is important. As a metabolically healthy person, I recognize that I have the luxury of eating more carbs than someone who’s insulin resistant and who struggles to regulate blood glucose. I also have the freedom to move in and out of ketosis in a way that someone doing a therapeutic keto diet might not.
Depending on your circumstances, the “rules” of keto might be different for you than they are for me. My beef is with people who insist that everyone adhere to the strictest possible version of keto no matter the context or who villainize “carbs” as if that’s a discrete food group. Different foods provide different benefits, so I prefer to incorporate as many types of food as I can within reason. Plus, variety helps me enjoy my diet more.
I don’t want to exclude foods just because they don’t work for someone else—or because of some arbitrary notion that they “aren’t keto.” In fact, here’s a list of foods that people have genuinely told me I’m not allowed to eat on keto, presumably because they’re too high-carb. (And, yes, I eat all these foods even when I’m keto.)
Disclaimer: Of course, I’m not suggesting that you have to eat these just because I do. This is simply a reminder that you don’t have to listen to the keto police. You can and should find a way of eating that suits you personally.
(Note: the carb counts are from Cron-o-meter and reflect the servings I’m used to eating while keto.)
1) Beets
I love beets, so the blame and shame around beets while keto makes me shake my head. Sure, as a root they’re higher in carbs than above-ground veggies. The ½ cup of cubed cooked beets I add to my Big-Ass Salad comes in at 8 grams of carbs.
To me, that’s not bad, especially weighed against the health benefits of beets. They happen to be a fantastic source of folate, manganese, potassium, and other nutrients. The betalain found in beets has been studied extensively as an anti-inflammatory, antioxidant compound with a variety of potential medical applications. Beets are also rich in nitrates, which can be cardioprotective, improve blood flow to the brain, and—of particular interest to me—improve cardiorespiratory endurance in athletes. (Although research focuses mostly on beetroot juice or concentrate, eating whole beets appears to work, too.)
You’ll see a lot of soapbox rants on keto boards decrying berries, which is surprising because berries are GRAOKFK (generally regarded as O.K. for keto). Nonetheless, there are plenty of people out there proclaiming that blueberries are too high-carb for keto. I’ve also seen people argue that only blueberries are allowed (presumably because they’re a “superfood”—more on that in a moment).
Take a look at the carbohydrates in these common berries:
Blueberries (1/3 cup ): 7 grams
Blackberries (1/3 cup): 5 grams
Raspberries (1/3 cup): 5 grams
Strawberries (1/3 cup): 4 grams
As you can see, blueberries actually deliver the most carbs among these options, but their carb count is still pretty modest. Anyway, berries are healthy and delicious. All berries score well on the antioxidant charts, but blackberries and raspberries actually have slightly higher ORAC values than “superfood” blueberries (the blueberry industry must have a better marketing team). Berries also score low on glycemic index (GI) and glycemic load (GL), although blueberries push the middle range of GI.
The bottom line is: if your carb budget is tight, sure, go for strawberries instead of blueberries, but blueberries are hardly a “non-keto” food.
3) Carrots
There’s a running joke in our Keto Reset Facebook group about carrots. Along with beets, carrots tend to be metaphorically slapped out of your hand if you admit to eating them in some of the other online keto groups.
I’ve known keto folks who’ll pick the shredded carrot out of packaged broccoli slaw or restaurant salad mix. The thing is, if you manage to painstakingly pick ¼ cup of shredded carrot from your salad, all the painstaking effort saves you less than 3 grams of carbs. (Not worth it if you ask me.) Even a large whole carrot contains only 7 grams of carbs—and low-GL carbs, at that.
I don’t know where this fear-mongering came from. Perhaps it’s because carrots are a root vegetable, and one of the keto police rules is that root veggies are not keto. While it makes sense that most of your vegetable intake should be in the form of above-ground vegetables, that doesn’t necessitate avoiding every shred (literally) of healthy root vegetables.
4) Cashews
Truth be told, I don’t eat cashews all that often. At 10 grams of carbs in ¼ cup, they are higher carb than any other nuts I eat regularly, and for no special health benefits. Check out my Definitive Guide to Nuts for the lowdown on how different varieties compare.
One application I do appreciate is cashew cream for dairy-free and egg-free recipes such as this one. Personally, I have no problem with dairy, but for people with food sensitivities, this can be a nice option.
5) Grapefruit
I used to have a grapefruit tree in my backyard, and I’ve enjoyed incorporating fresh grapefruit into summer salads now and then. Arugula, shaved fennel, avocado, and grapefruit is a tasty combo.
Caveat: this one is probably the biggest stretch for people who are still struggling with insulin and glucose regulation. Half a small grapefruit—enough for two servings of the aforementioned arugula salad—packs 11 grams of carbs. That said, grapefruit are among the lowest GI and GL fruits, on par with raspberries. If you’re at a place with keto where you’re ready to test your metabolic flexibility and see how you respond to introducing some fruits in moderate quantities, grapefruit might be one to try.
6) Pumpkin
One-quarter cup of homemade cooked pumpkin has 3 grams of carbs (canned unsweetened pumpkin has 5 grams).
So, go ahead and whip up a homemade PSL sweetened with stevia. There’s a recipe in The Keto Reset Diet Cookbook. In fact, you’ll find several pumpkin recipes in there, including directions for making your own puree.
7) Tomatoes
Tomatoes are another one of those “they taste kind of sweet, so they must be bad for keto” foods. Nah. It’s tomato season right now, and I’m enjoying a Caprese salad with cherry tomatoes every single day. The ten cherry tomatoes in my salad have fewer than 7 grams of carbs. A thick slice of tomato on your lettuce-wrapped burger comes in at a whopping 1 gram of carbs.
Keto folks do need to be mindful of the carbs in sugary store-bought ketchup (which is why I created Primal Kitchen® Unsweetened Ketchup). The carbs in a huge plate of zoodles with marinara can definitely add up. As with all the foods on this list, the quantity matters.
Finally, Did I Mention That Context Is Important?
If you’re looking at this list, going, “There’s no way I could allot XX grams of carbs to ____!”, is it because you’re limiting yourself to 20 or 30 grams of carbs per day? If yes, is there a specific reason? The Keto Reset Diet recommends that most people aim for 50 grams of carbs per day, not counting non-starchy vegetables and avocados. (If you’re doing a therapeutic keto diet, or if you’re highly insulin resistant, you might do better starting at 30 grams per day.)
With any of these foods, if you aren’t sure if they work for you, consider experimenting. I’m not a huge proponent of measuring and assessing everything, but in this case it might offer helpful info. Eat the food you want to include, then test your blood glucose and ketones two hours later. For example, if you want to add a handful of blueberries to your Big-Ass Salad, try it and see how your body responds. Of course, this only works if you know your baseline blood glucose and ketones—and if you also know how your body responds to the salad without the blueberries.
Or you don’t have to be that systematic about it. Barring a medical need to be in ketosis all the time, you can go by subjective evaluations of how you feel when you include certain foods.
As summer temperatures rise and drought sets in for many parts of the country, prime wildfire season has arrived. With more people recreating in the wilderness and summer lightening plentiful, there are lots of ways that fires can start. Whether it be from mother nature or man, wildfires can have tragic consequences and even be […]
Neuroplasticity is the idea that your brain can “rewire” itself in response to a variety of factors—including negative ones, like chronic illness and trauma. The Dynamic Neural Retraining System (DNRS) allows us to correct those patterns and heal. In this episode of Revolution Health Radio, I talk with Annie Hopper about how to use DNRS to correct chronic disease patterns in your brain and regain your health.
Today’s post is part two of a postpartum series inspired by a reader question. You can read part one here.
Diastasis recti (DR) is usually described shorthand as a separation of the ab muscles. More accurately, it’s a deformation of the linea alba, the line of connective tissue that runs down the front of your torso from your ribcage to your pelvis. The linea alba is basically where all the abdominal muscles meet in the middle; I think of it like the spine of a book. When the linea alba becomes deformed for reasons I’ll discuss in a moment, the rectus abdominis muscles, aka your “six-pack” muscles, pull apart. This is the (often visible) sign of DR.
More than a cosmetic issue, this compromises the integrity of your core and can be associated with a whole host of other problems if not corrected. Although it’s difficult to establish clear causal relationships, DR is often related to pelvic floor issues and incontinence, back pain, hernias and prolapses, and difficulty exercising. While some DR resolve on their own, often they require intervention—targeted exercises to bring the muscles back together or, in some extreme cases, surgery.
What Causes Diastasis Recti?
To understand DR, you have to understand that the abdominal cavity is always under pressure. Wedged as it is between the thoracic (chest) cavity and the pelvic cavity, the pressure in your abdomen is always shifting based on your breathing, movement, digestion, and so on. If the pressure isn’t too great, it’s no problem. However, when the pressure increases—say perhaps because you have a growing baby taking up more and more space in there—one of the ways that pressure can manifest is by pushing outward on the front of the belly. The linea alba stretches and weakens, and the rectus abdominis ends up abnormally separated.
I say “abnormally” because some separation can be classified as normal, especially during pregnancy, and can simply reflect individual structural differences. Estimates of the prevalence of DR among pregnant women range from 66%-100% of women experiencing some degree of DR by the end of pregnancy. Abdominal separation that does not resolve on its own soon after pregnancy, or DR not associated with pregnancy, needs to be addressed as soon as possible.
That’s right—men, children, and women who have never been pregnant can all have DR. Any conditions that increase intra-abdominal pressure and stretch and weaken the linea alba can lead to DR. These include things like overdoing traditional ab exercises like sit-ups, chronic coughing, and chronic constipation leading to straining. Injury to the linea alba, including from abdominal surgery, is another risk factor.
Renowned biomechanist Katy Bowman believes that alignment (how we hold our bodies throughout the day), movement, and even breathing all play a key role in preventing or developing DR. This isn’t to say that breathing incorrectly will make your abs split apart. Rather, the types of loads we place ourselves under can make us more or less susceptible to developing DR. On the flip side, by fostering proper alignment and movement patterns, you might be able to avoid DR even during and after pregnancy. More on this later.
How Do I Know If I Have Diastasis Recti?
Unfortunately, DR is often overlooked even in the antenatal and postpartum periods. However, it’s easy to test for yourself whether you have DR. The most obvious sign is if your stomach bulges when you do a traditional crunch (don’t do crunches if you think you have DR, or ever really—they aren’t a particularly safe or effective ab exercise), cough, or otherwise load your abs. This might look like a small football in your tummy, a loaf of bread, or just a mound. It is most likely to appear right around your navel, but it can also happen above or below your navel, or all of the above.
Even if it’s not visible, if you have pelvic floor weakness (no ladies, we shouldn’t be peeing when we run or jump rope), chronic back pain, hernias, or even digestive issues like constipation or bloating, you should check yourself for DR. Likewise if you feel like your abs are weak or aren’t holding you in, for lack of a better term, perform a self-test.
To do this, lower yourself carefully onto your back and lie flat with your feet on the floor and your knees bent. Lift up your shirt and slide your waistband down so you can feel your abs from your pubic bone to your sternum. Take two or three fingers and with your palm facing you, press down firmly at the top of your navel while you slowly lift your head off the floor like you’re beginning a crunch. You should feel your rectus abdominis muscles tense on either side of your fingers. Relax your head back to the floor. Repeat this test below your navel and above your navel up to your sternum. (Check out the video here if you need more guidance.)
You are feeling for two things:
What is the gap between the ridges of your muscles? Anything greater than about two finger-widths is considered positive for DR. (The generally accepted medical standard is a gap of 2.7 centimeters.)
How “squishy” is the linea alba? In other words, how far down do your fingers sink when you press? Ideally your linea alba would feel firm and resist being pressed down.
Don’t freak out if your fingers sink down in there! Now you know and can do something about it.
I Have a Diastasis… Now What?
If you believe that you have DR, it’s a good idea to get it checked by a doctor so you can get a referral to a physical therapist if needed. Look for a PT who specializes in DR and, if applicable, postpartum fitness. While surgery is sometimes recommended for serious cases of DR, it’s not to be taken lightly and might be avoidable with the help of a knowledgeable PT. Of course this is a decision that you must make with your doctor. Mild-to-moderate cases are often correctable with simple at-home techniques, but especially if you’re pregnant or have recently delivered your baby, I am still going to advise checking in with your doctor first.
Even if your doctor determines that you don’t meet the medical criteria for diagnosis, the exercises suggested to resolve DR will be helpful for anyone wishing to improve alignment and increase core strength and stability. That’s to say, even if you don’t have significant DR, you’ll likely still benefit from what I call the ABCDs of fixing DR. They are generally regarded as safe during pregnancy to help mitigate the damage of DR, but always talk to your doctor or midwife to be sure.
Alignment
Katy Bowman reminds us that we can’t look at any one body part in isolation. While we might think of DR as a problem in the abdominals, in fact the pelvis, abdominal muscles, and ribs are all connected. Moving any other body part that also moves the pelvis or the ribs will therefore affect the abdominal muscles and connective tissue.
Katy’s book, Diastasis Recti: The Whole-Body Solution to Abdominal Weakness and Separation, is a great resource. She focuses on proper alignment as both a preventative and restorative practice, and then she walks readers through a series of whole-body exercises, starting small and progressing to larger movements, that can improve DR. Her alignment checklist is as follows:
Straighten your feet
Back your hips up
Align your knee pits
Adjust your pelvis
Drop your ribs
Relax your diaphragm
For help understanding what this looks like in practice, I recommend starting with this video. It’s designed for runners, but it demonstrates the same principles that are important here. Katy also provides tons of information and resources on her website, Nutritious Movement. (Start with her Under Pressure post.)
You can’t have proper alignment if you’re walking around in heels all day, unfortunately, so it’s time to embrace going barefoot and wearing minimalist shoes as often as possible. If you’re used to wearing heels or even just traditional shoes (which often have a heel lift that we don’t even notice), make sure you take care to transition to a minimalist/barefoot lifestyle safely.
Breathing
The goal here is diaphragmatic breathing that engages the transverse abdominis (TA) muscles. Quick anatomy lesson: What we call “the abs” are not just the rectus abdominis muscles that make the six-pack. There are actually layers of muscles and connective tissue criss-crossing around in there. The TA are the innermost layer. They wrap all the way around the torso from the spine to the linea alba, and they are often described as looking like a corset.
In order to close a DR, we need to be able to recruit the TA, which means connecting to it and learning to activate it in the first place. This is where diaphragmatic breathing comes in. I find it easiest to feel my TA and understand what diaphragmatic breathing is supposed to feel like when lying on my back, but you can also do this kneeling. Place a hand on your belly and try to breathe into your hand, meaning you should feel a slight expansion of the belly as you breath. You aren’t forcing your belly out, but you want the motion as you inhale to be under your hand, not in your chest.
Next, place your fingers just above your hip bones on either side. Inhale through your belly, then exhale with some force, making a hissing noise. As you exhale, imagine tightening your core so your fingers move toward each other ever so slightly. This is not sucking in your belly, this is engaging that TA that wraps around from your back. Your belly should neither suck in nor pooch out, it should feel like it’s flattening (even if you can’t see it). Another cue my trainer sometimes uses is imagining zipping up the “corset” from the pelvis to the sternum.
Feeling the flexion underneath your fingers can be helpful for knowing you’re doing it right. If you’re having trouble understanding the technique, check out this video for a demonstration. Once you feel really connected to the TA, you can proceed to other strengthening exercises.
Core Exercises—but Only the Right Ones
I’m going to reiterate here that it’s important to consult with your doctor if you are concerned that you have limitations that might make any kind of exercise unsafe or inadvisable for you. In the case of DR, it’s a good idea to find a physical therapist and/or someone trained in DR or postpartum fitness who can help check that you’re doing the alignment and TA activation pieces correctly, and who can advise you on proper core exercises.
That said, there is widespread agreement about what not to do if you have DR, and that is any core exercise that increases intra-abdominal pressure. These include traditional crunches and sit-ups and, yes, planks. I know planks are one of the Primal Essential Movements, but they aren’t for you right now. Likewise experts advise avoiding twisting motions such as Russian twists and even certain yoga poses; high-impact exercises such running; and full-body exercises that require core activation like burpees, push-ups, and pullups (two more Essential Movements bite the dust) and heavy lifting.
Yes, that’s a lot, and it’s a bummer. That means you shouldn’t sign up for a 5k or get back to CrossFit until you take the time to address the DR. Bear in mind, though, that if you can’t properly engage your core during exercise, you’re at significant risk for injury and additional problems down the road. Although you likely have to back-burner some of your favorite activities in the short term, long term it is worth it to fix the DR first.
In order to do so, you need to work on gentle, appropriate exercises to strengthen the entire core. I’m not a PT or personal trainer, so I’m not going to give you specific exercises here. As I mentioned, Katy Bowman’s excellent Diastasis Recti book includes a whole series of progression exercises, and there are many resources and programs available online. You can also check out the movements here, here, and here for examples of the types of exercises that are generally regarded as safe and beneficial for DR. Did I mention you should check with your doctor first and consult a PT if you can? Good. I will also put some additional resources at the bottom of the post.
Diet
Because DR can be thought of as an injury to the connective tissue, you can support recovery by eating a nutrient-rich, anti-inflammatory diet that includes a variety of vegetables, sufficient protein, and essential fatty acids to promote healing. Since this just so happens to describe the Primal way of eating, hopefully you already have this box checked.
Also include plenty of collagen-rich bone broth. Use it in cooking or simply sit on a mug of broth during the day. You can jazz it up by blending in different herbs and spices. My favorite is using my immersion blender to blend 2 teaspoons butter or ghee, ¼ teaspoon turmeric (an anti-inflammatory powerhouse), and a pinch of black pepper into a mug of ghee to make a frothy golden “latte.”
To Splint or Not To Splint?
Experts disagree about whether it’s advisable to wear a splint or brace to support the abdominals while you work on closing your DR. Since there’s no consensus, this is another area where you should consult your doctor or PT about your specific needs.
But When Can I Start the Real Exercise?
If you’ve recently had a baby, you probably miss the physical activities you couldn’t do later in your pregnancy. It’s hard to be patient and do breathing exercises when you really want to be going for a run and hoisting a barbell over your head.
I implore you to be patient. It will pay off in the long run! And please, please don’t push your body too far too soon because you’re feeling pressure to get back to exercise ASAP so you can “get your pre-baby body back.” With proper care, a DR might start to resolve in a matter of weeks, but realistically it might be several months or longer before it is fully fixed.
Only after you have done the foundational work of the ABCDs should you move on to other exercise.Make sure you’re selecting safer movements that don’t put excess stress on the DR. You should ease slowly into more strenuous or vigorous exercise, paying attention to how your body responds. If you can, work with a qualified trainer or coach who can help you determine a safe progression back into your exercise modality of choice.
What If My Post-baby Belly Isn’t DR?
Even if you don’t pass the two finger test, you can benefit from working on alignment as Katy Bowman describes, as well as working on activating the TA, the foundation of a strong and healthy core and pelvic floor. Everyone should be doing these things, really.
If you’ve done all this and still feel like you look bloated or pregnant despite being well into the postpartum period, you might be experiencing bloating due to food sensitivities or gut issues such as imbalances in the microbiome. Talk to your doctor or find a functional medicine practitioner to help you dig into that more. If your issue is an accumulation of fat in the midsection, that can be related to stress and excess cortisol. You can work with your doctor to diagnose this, and/or start working on your own to manage stress.
At the end of the day, you might also have to accept that your body isn’t going to look exactly the same as it did before, and that’s ok. If you’re struggling with that, please check out my previous post on postpartum body image for support.
RESOURCES:
Find a professional to help diagnose and treat your DR:
The following offer paid programs designed to fix DR. They are endorsed by a variety of individuals and professional organizations. We at Mark’s Daily Apple do not have personal experience with these programs.
One of the best exercises for you, whether you’re trying to build muscle or lose weight (or both) HAS to be the squat.
However, it’s also one of the most difficult exercises to do properly unless you actually know what you’re doing!
Have no fear, after reading today’s big ass squat guide (pun intended, I suppose?) – part of our Strength 101 series – you can start performing this compound exercise safely and effectively.
Click any link below or scroll down to read the whole guide:
We work with tons of 1-on-1 coaching clients to teach them how to squat, but we’ve also created this epic guide and even turned it into a free PDF you can download and read at your leisure (bonus points if you read it while sitting in a squat!).
Get it when you join The Rebellion by signing up in the box below 🙂
Download our comprehensive guideSTRENGTH TRAINING 101!
Everything you need to know about getting strong.
Workout routines for bodyweight AND weight training.
How to find the right gym and train properly in one.
Woman
Man
What Are the Benefits of Squats?
Squats are one of the most foundational functional movements in our lives. Let’s talk about the benefits and why you should be squatting all the time.
#1) We’re designed to squat: We’ve been squatting since we were babies, but as we get older and sit in unnatural positions all day, our squat form goes from perfect to terrible.
Crap.
In many countries, people often sit in a full squat for hours at a time.
In other countries, the toilet is simply a hole in a floor, rather than a porcelain throne – over which to squat.
From an evolutionary standpoint – it makes sense that we are genetically designed – and can be really good at – squatting. Before modern day furniture and technology you didn’t stop sitting in a full squat once you got older like we do today…you continued squatting your entire life.
#2) Squats are a compound movement that recruits most of our muscles – this means it’s a movement that uses more than one joint (your hip and knee joints) to complete.
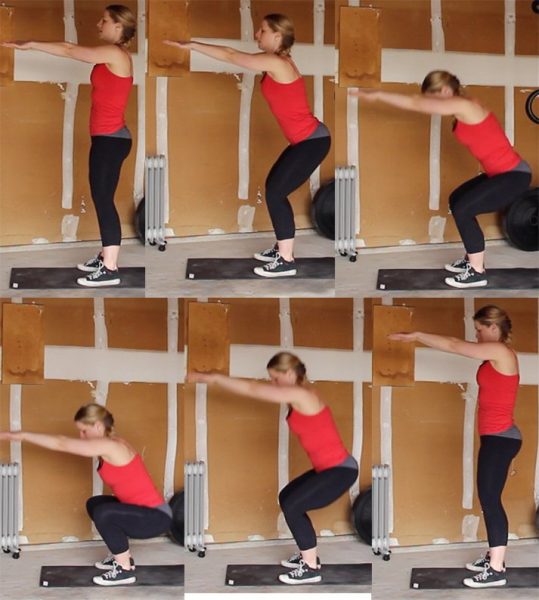
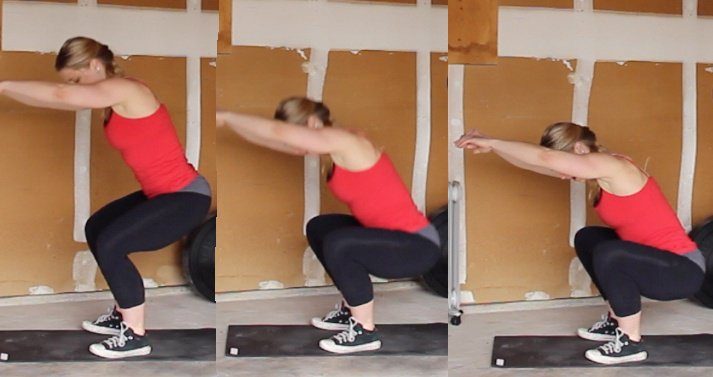
Like so:
A simple bodyweight squat – which I’m demonstrating above – uses almost every muscle in the core and lower body. If you add a dumbbell or barbell into the equation, I would even argue that they use every single major muscle group to complete.
Think about it: in addition to every muscle in your “legs,” you need your hips, your back and core, your shoulders and arms. Nothing is left out with this monster movement.
Because of the utilization of a large amount of muscle groups, squats cause your body to increase our anabolic hormone production, helping us lose fat and build muscle.[1]
#3) Squats will help strengthen your bones and your muscles (and your knees!), and can also increase flexibility.
Increasing the strength in your knees and hips (and entire body) reduces your chance of injury while doing both athletic movements and everyday life things (such as shoveling the driveway or standing up and sitting down).
And by learning to squat deeply, safely, you’re improving your range of motion and helping make you antifragile and protecting yourself against future injury. Bazinga!
If your goals are to:
Build muscle and get stronger, squats will get you there faster.
Lose weight and get ‘toned,’ squats will get you there faster.
Look better naked, squats will get you there faster.
Get healthier and happier, squats will get you there faster.
Feel like an absolute badass in the gym, squats will get you there faster.
In short, squats are amazing.
Squats also make you look amazing in shorts.
(see what I did there?)
I’m the lead female trainer at Nerd Fitness, and my life has been absolutely transformed by barbell training, which is why I’m so excited to share this guide with you.
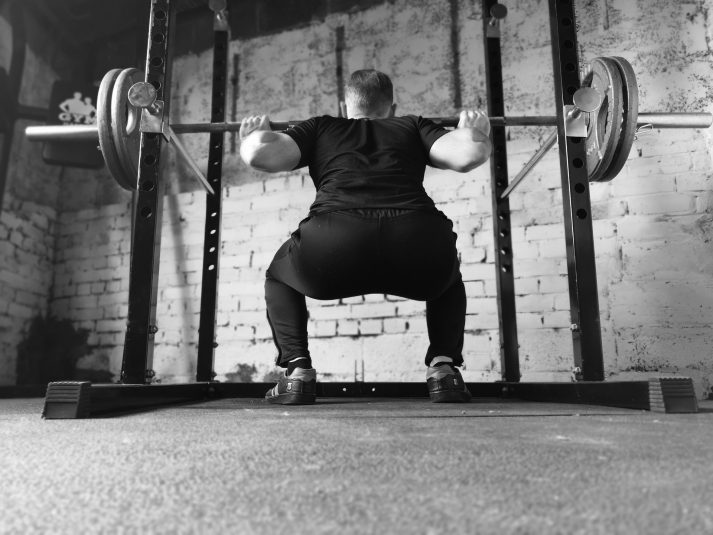
Back in 2011, I could barely pick up a pink dumbbell, and now I regularly compete in powerlifting competitions. Here I am squatting 253lbs for 3 sets of 5 at a bodyweight of 150 pounds:
I am so excited to teach you how to squat today, as I’ve taught tons of coaching clients how to get started too.
Let’s start off by taking a look at the bodyweight squat – the first move you should master before you add weight.
How to Do a Bodyweight Squat With Proper Form
The setup for the squat exercise is incredibly simple.
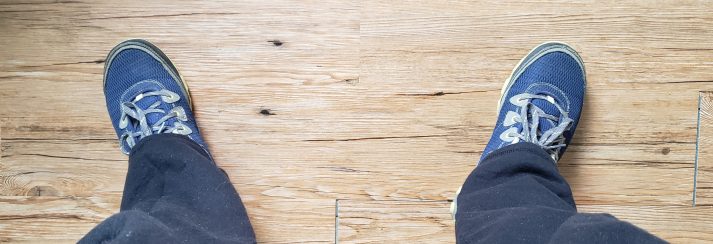
Stand with your feet slightly wider than your hips.
Your toes should be pointed slightly outward – about 5 to 20 degrees outward.
Look straight ahead and pick a spot on the wall in front of you.
Look at this spot the entire time you squat, not looking down at the floor or up at the ceiling.
I go over the setup and the full movement in this video:
Put your arms straight out in front of you, parallel to the ground.
Keep your chest up and proud, and your spine in a neutral position.
Think about where your weight is on your feet – it should be on the heels and the balls of your feet, as if you were pasted to the ground. You should be able to wiggle your toes the entire movement (though that’s not a part of squatting!).
Keep your entire body tight the entire time, your core flexed like you’re bracing to be punched in the gut!
Breathe deep into your stomach, break at your hip and push your butt back. Keep sending your hips backwards as your knees begin to bend. It’s important to start with your hips back, and not by bending your knees.
As you squat down, focus on keeping your knees in line with your feet. Many new lifters need to focus on pushing their knees out so they track with their feet. When they start to come inside the toes, push them out (but not wider than your feet). Think about it like this: if you were to attach a laser to the end of each of your knees, the laser would track between your second and fourth toes. Make sure your knees are out!
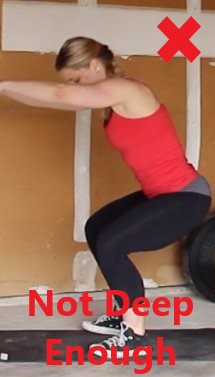
Squat down until your hip joint is lower than your knees (what we call “parallel” in the squat game). Note: if you THINK you might not be squatting deep enough, you probably aren’t!
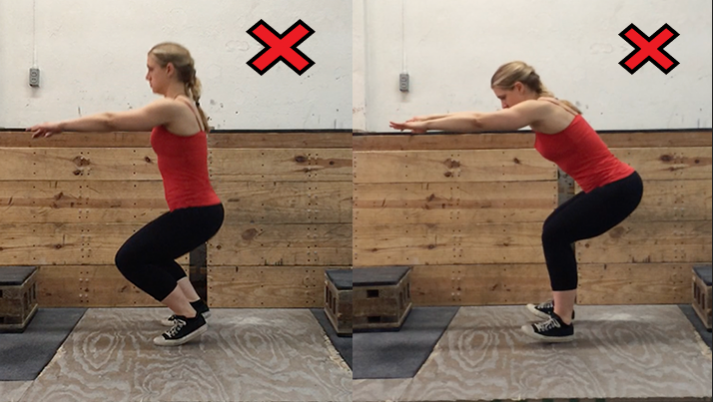
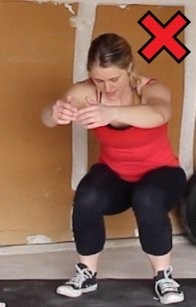
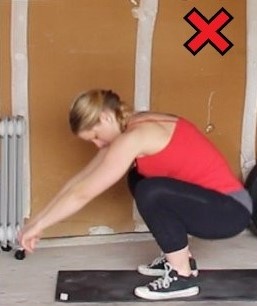
So not like this:
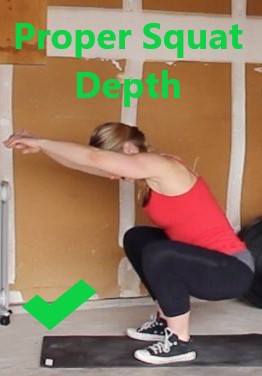
But like this:
Depending on the size of your thighs, your squat may appear to be less deep than it truly is. You can go deeper than this, however, anything less than parallel is a partial squat. That’s a power curtsy. We don’t do those at NF. We do full squats!
Once at the bottom, it’s time to stand back up from your squat:
Keeping everything tight, breathe out and drive through your heels (keep the balls of your feet on the ground as well).
Drive your knees outward (away from each other) the same way you did on the way down, and squeeze your butt at the top to make sure you’re using your glutes.
Here is a video from us nerds at Team Nerd Fitness (with instructions from Jim, lead trainer at our 1-on-1 Online Coaching Program) that will teach you good form on a bodyweight squat:
Once you can do multiple sets of 15+ deep bodyweight squats with proper form, it’s time to move onto barbell squats!
If you are unsure about being able to do squats with a 45-pound barbell, you can follow our Gym Workout Level 4 Program, which includes dumbbell goblet squats, a good stepping stone to barbell squats:
Note: Due to the fact that all of our bodies are different (you are a unique snowflake), none of our “perfect” squats will look exactly the same. Someone with a longer femur, for example, will squat slightly different than someone with a shorter femur.
Also, the majority of the population has some sort of mobility issue (including myself!) that they are working on fixing – so if your squat looks different than the person next to you, that does not mean you’re doing it wrong!
We have LOTS of 1-on-1 coaching clients who are new to squatting, and it often comes down to ankle flexibility and hip mobility. If you spend all day every day sitting in a desk chair, this might be you!
If you want us to help you fix your squat depth and start getting stronger, that’s what we’re here for!
How to Do the Barbell Back Squat, Step-By-Step
BARBELL BACK SQUAT SETUP:
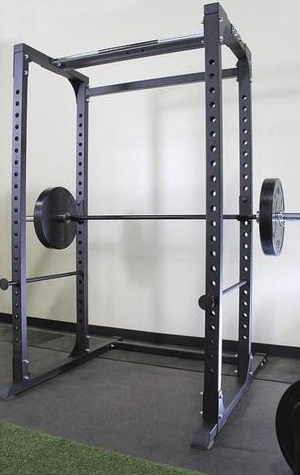
#1) Find – find a squat rack, power cage, or a squat stand. It’ll look something like this, with an unattached barbell:
A. Squat Rack:
B. Power Cage:
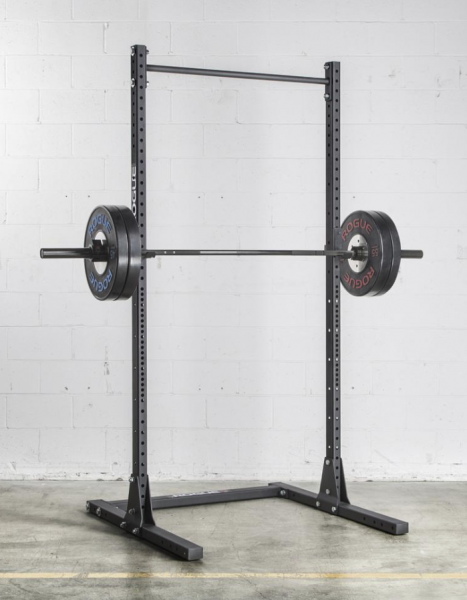
C. Squat Stand:
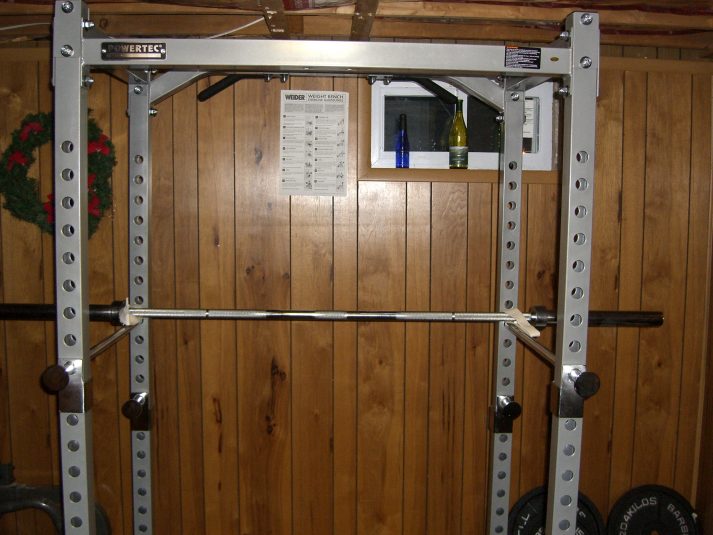
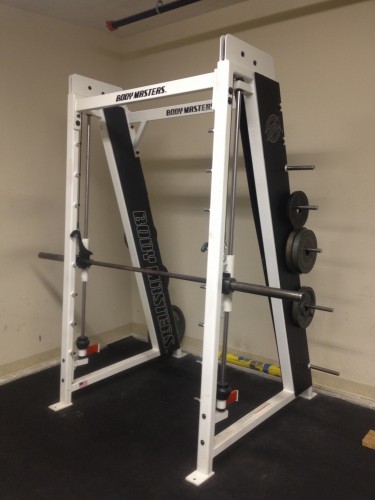
Note: this is NOT the same thing as a Smith Machine, where the barbell is attached to the machine:
You do NOT want a Smith Machine. You need a completely unattached barbell in order to do a barbell squat properly and safely. Don’t squat in a Smith Machine.
#2) Set the height of the bar to be about the same height as your collarbone. Not sure how to set the height of the bar? I got you:
If your options are either too high or too low, it’s always best to go too low. You don’t want to have to get up on your toes to rack/unrack the bar, especially as the weight gets heavier.
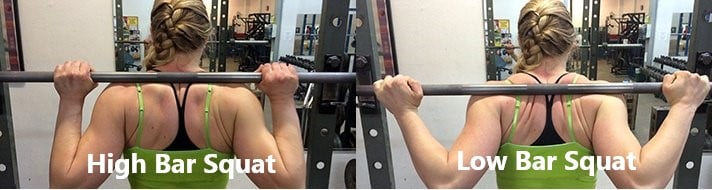
#3) Decide if you are going to do a high bar squat, or a low bar squat. Either is fine, but there IS a difference:
The “Low Bar Back Squat” is the most common form done by beginners, general lifters, and powerlifters. It’s also the form taught in Starting Strength, one of the best books for beginners on the market. So we’ll be focusing on that version for the rest of this section:
#4) Always squat with just the bar to start – as we discuss in “How much weight should I be lifting,” even if you’re planning on squatting 500 lbs, always start with just the bar!
HOW TO DO A PROPER BACK SQUAT:
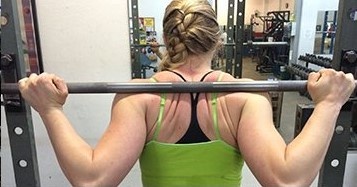
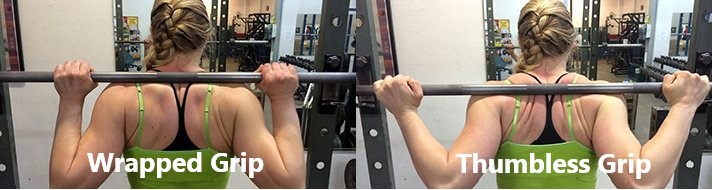
Facing the bar, step under it, and put your hands around it on either side of you. For this type of squat, we are going to want a thumbless grip, so that our wrists are properly aligned with our forearms.
The width of your grip will be dependent on flexibility, but generally a narrower (closer to your shoulders) grip will help create a meaty shelf for you to place the bar on out of the muscles in your upper back – the bar will end up sitting on your rear deltoids (see the above image).
If you lack the flexibility for the narrower grip (which is super common), start out wider, then slowly bring it in as you get more flexible.
See the difference here between a “high bar, wrapped grip” (Left) and “low bar, thumbless grip” (right):
And now time to SQUAT!
Here is how to barbell squat:
With the weight on your shoulders, step back from the supports
Your feet should be slightly wider than hip-width apart
Your toes should be slightly pointing outward
Flex your stomach, squeeze your glutes, inhale deeply into your stomach
Move your butt back, squat down slowly
Continue to drop until the tops of your legs are parallel or lower (the crease of your hip is below your waist)
Explode back up to the starting position
After your set is complete, walk carefully forward to return the weight to the rack, and lower it down safely onto the supports
High five yourself, you just did a barbell squat!
Not sure if you squatted deep enough? Record yourself! 95% of the people I see doing squats in a gym don’t go deep enough!
Nervous about squatting correctly? Yes, I am a mind reader, and yes we can help you!
If you want an expert to check your squat form check out our 1-on-1 Coaching program. Our coaching app lets you record and send a video of your movement directly to your coach, who will provide specific feedback and build a custom program just for you.
Interested? Click below to jump on a free call with our team to see how our online coaching program will get you the results you’re after:
How to Do a Proper Front Squat
The last version of the squat that we are going to cover in this guide is the front squat.
Due to the placement on the front of the shoulders instead of on the back, the front squat is more quad dominant (the front of your upper legs), but also requires you to be able to keep your torso much more upright than with the back squat (both versions).
How to set up for a Front Squat:
Make sure the bar is set at the proper height (see the previous section on squat set-up!)
Facing the bar, place the bar on the front of your shoulders.
Grab the bar with your hands. This is the most difficult part with the front squat – it requires a lot of wrist mobility and flexibility.
Here’s a video demonstrating the barbell front squat from the Nerd Fitness Academy:
How to front squat:
Keep your elbows high and the weight firmly in place on your shoulders.
Flexing your stomach and squeezing your glutes, inhale deeply into your stomach.
Move your butt backwards and begin your movement downward.
Drop until your hip crease is below your knees (below parallel).
Explode back upwards to your starting position.
Most people can not front squat with a full grip around the bar, and instead will let the bar roll onto their fingertips (a three finger grip is okay here).
If you can’t even get your fingers around the bar, there are a few variations you can start with until your shoulder and wrist mobility improve.
The Genie Front Squat:
Keep your hands holding on to the bar if you can (it’s okay to let the bar roll onto your fingertips), and keep your elbows up so that your upper arms are as parallel to the floor as possible.
The Dumbbell Front Squat:
Stand slightly wider than shoulder-width apart with your toes pointed slightly outward. Raise the dumbbells to your shoulders and hold them there. Keeping your core tight and butt flexed, sit down and backward with your butt. Go down until the tops of your thighs are lower than parallel.
Once you get good at these movements, you can think about rocking the front squat:
#1) Keeping your elbows as high as possible the entire time. As soon as you let them drop, the weight will likely pull you forward out of correct positioning, and you will either drop the weight or potentially get injured.
#2) The barbell should be on the meaty parts of your shoulders, with your hands there to keep the weight in place. If you let the weight roll towards you too much, you’ll feel the barbell across your throat and might have trouble breathing. As you can guess, we want to avoid this!
Not sure if you’re front-squatting correctly? It’s a fairly technical movement that requires flexibility and mobility in all of the right places. If want an expert to not only check your form, but also help you get flexible and stronger, you’ve come to the right place!
How Do I Bail Out of a Squat Safely?
If you are going to squat, you have to know how to “fail” at squatting safely! After all, there’s nothing more scary than being stuck in the bottom of a squat movement and not knowing how to get out of there!
A squat is very different from a barbell deadlift in that aspect: if you fail on a deadlift, you just don’t pick up the weight. If you fail on a squat, you’re trapped under a bar with potentially a lot of weight on it.
This can lead to SERIOUS injury. So please, learn how to bail out of a squat safely before you start attempting to do heavy barbell squats.
This will help give you the confidence to push yourself and get stronger!
6 Common Mistakes When Doing Squats
The squat is a basic movement, but those new to lifting often fall victim to a handful of common mistakes.
Let’s take a look at some of the big problems and how to fix it!
#1) Coming up on your toes with your knees forward during your squat
It’s important to keep your heels on the ground the entire time you’re squatting.
You should be driving down through your heels, and in order to do that, they need to be on the ground!
While some of your weight will be on the balls of your feet, you never want all of your weight to be on the balls of your feet or your toes.
You should be able to lift your toes up off the ground and wiggle them at any point and it shouldn’t change anything about your squat.
#2) Not hitting enough depth for your squat
Your squat should hit at least parallel – where your hip joint goes below the knee.
Depending on what you’re training for, you can go lower, but in order to maximize the muscles worked in the squat, it needs to be done to at least parallel or lower.
If you squat above parallel (a partial squat) you’re leaving the hamstrings out of the movement. This puts more pressure on the knee – the force put on your knee is actually reduced as you drop below parallel.
Unfortunately, there’s a lot of misunderstanding about squats and knee issues.
The deeper the squat, the more glutes that are activated as well. Deeper is typically harder, both strength and flexibility wise. However, depending on your goals, squatting to parallel may make more sense.
If you’re struggling hitting depth there could be many causes – you could have poor ankle mobility, tight hip flexors and/or hamstrings, weak glutes, or poor pelvic alignment (among many other things).
This is something we work closely with our coaching clients on, and often prescribe ankle and hip mobility drills to help clients reach proper depth on squats!
#3) Knee Positioning
When you squat, you want your knees to track along with your toes. This means if you are looking down at your knees and feet, your knees should be aligned at the same angle as your feet throughout the movement.
Everyone’s exact positioning is going to be slightly different, but they should not be on the outside or the inside of the foot.
#4) Back Positioning
Your chest should be up and shoulders should be back, like you’re King Kong about to pound your chest proudly. Your body should stay in this position the entire time. You don’t want your shoulders to round forward, but you also don’t want to hyperextend your back either.
Keeping your spine in a neutral position will help your spine safe and build a strong foundation throughout the heavy squat movement.
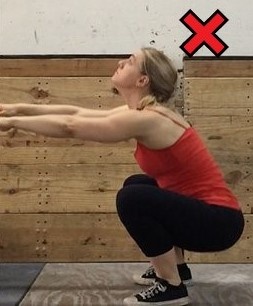
#5) Head Positioning
Many coaches will tell their lifters to look up, as that is the direction in which you want to be moving, but this is actually the last thing you want to do. Take a second quick and look at the ceiling (I’ll wait! 🙂 ).
Now, see that position your neck vertebrae are in? That is a very unsafe position for your spine to be in, especially when weight starts getting included in the equation. You also don’t want to be looking directly at the floor.
Look straight out in front of you the entire time, with your head in a “neutral” position. Your chin should be in a position where you could hold a tennis ball between your chest and your chin.
#6) Too much weight on the heels/on the outside or inside of feet during your squat
When trying to fix coming up on your toes, or your knee positioning, it is common for people to focus so much on keeping their weight on their heels that they forget to keep the balls of their feet on the ground! Some of your weight will still be on the ball of your foot – if you are truly only having weight on your heels, it’s pretty hard to balance.
To the same effect, if the inside of your foot or the outside of your foot comes up off the floor, this is also not a good thing!
How do you know if you’re making these mistakes? Simple! Record yourself doing squats. I do. And so does anybody else who is serious about improving their squats.
Often we look VERY different than we think we look when doing an exercise, so having a video of the movement is often the only way we can improve.
If you can’t self-diagnose your squat challenges, let us help!
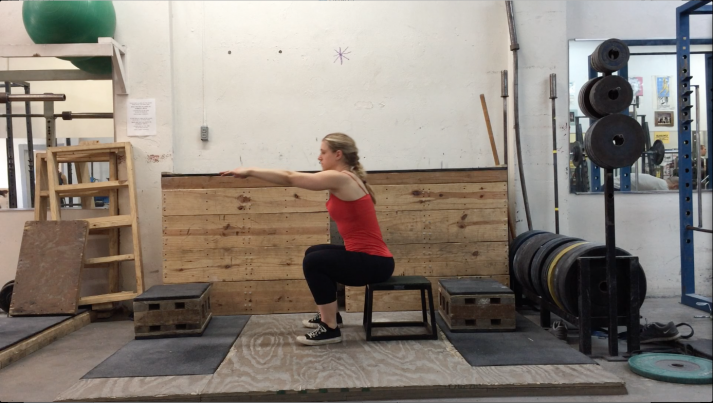
Squat Variations for Beginners: The Box Squat
In this section, we’re going to go over some squat variations to help you improve your form and build confidence before hitting the free weights section of the gym.
If you’re struggling to do a squat correctly, don’t fret!
I’m going to teach you about…
BOX SQUATS!
Squatting to a box will help teach you to sit back and keep your weight on your entire foot, instead of squatting with your knees forward and up on your toes.
Squatting back to a box is also great for people who have bad knees and can’t do bodyweight squats anymore.
You can do box squats with a barbell as well, but for this explanation, we’re just going to keep it simple with bodyweight box squats.
In order to do this, find a box or a chair that is the right height so when you sit on it, you are at parallel with your squat. Your options include things like step stools, milk crates, or the smallest box at the gym (there’s usually a set of plyo boxes, and the shortest is around 10″.)
The lower the box, the more it will help you develop stronger hips and low back – the box at exactly parallel will help you more with quad strength.
Set up exactly as if you were going to do a regular bodyweight squat, only standing about a foot in front of the box.
Breathe in deeply, brace your core, move butt back, and keep your knees in line tracking in the same direction as your toes and squat back until you sit completely on the box. Don’t plop back on the box, make it slow and deliberate while keeping your entire body tight.
Now, don’t move! Think about your positioning. Are your back and core still super tight? Is your weight on your heels and your mid foot? Is your head in a neutral position? Great, now stand up by driving your hips upward, don’t let your weight shift forward and onto your toes (drive through your heels!), shoulders and chest up, knees out keeping them lined up with your toes.
For your first few, feel free to sit on the box while you evaluate your positioning, but as you get better at them, sit back and then quickly stand up again.
You know you’re doing a good squat when you can stand back up from the bottom of a squat position without having to lean forward and use momentum to get up.
You can squat, touch your butt to the box, and then stand back up without having to shift your weight around! KEEP THAT BUTT BACK!
I know all of this can be overwhelming, so the important thing is that you START! I realize I sound like a broken record at this point, but I really want you to begin strength training today. We created our free guide, Strength Training 101: Everything You Need to Know, just for that purpose. I’d love to send it to you, because I know it’ll help you overcome any fears and confusion and have you getting stronger TODAY
Get it when you sign up in this box below – I’m excited to hear what you think of it!
Download our comprehensive guideSTRENGTH TRAINING 101!
Everything you need to know about getting strong.
Workout routines for bodyweight AND weight training.
How to find the right gym and train properly in one.
Woman
Man
How to Start Squatting Like A Pro
Squats are awesome.
How awesome? This kid dropped into a perfect squat just to impress his bunny friend.
And if you want to learn more about squats, or you’re looking to build more confidence before you get started, we have a few options for you:
You’ll work with our certified NF instructors who will get to know you better than you know yourself, check your form, and program your workouts and nutrition for you.
2) Good at following instructions and want a blueprint to follow? Check out our self-paced online course, the Nerd Fitness Academy.
20+ workouts for both bodyweight or weight training, a benchmark test to determine your starting workout, HD demonstrations of every movement, boss battles, nutritional leveling system, a questing system, and supportive community.
3) Download our free Strength 101 Guide, which you can get when you sign up in the box below:
Download our comprehensive guideSTRENGTH TRAINING 101!
Everything you need to know about getting strong.
Workout routines for bodyweight AND weight training.
How to find the right gym and train properly in one.
Woman
Man
And I’d love to hear from you! PLEASE leave your questions, squat or fitness or otherwise below so we can answer them and become best friends:
What struggles do you have when trying to squat?
What questions do you have?
If you haven’t squatted before, what else do you need us to tell you to give you the confidence to start squatting TODAY!?
-Staci
PS: Be sure to check out the rest of the Strength Training 101 series:
Today Lindsay’s here sharing one of her favorite keto-friendly sauces—chimichurri. One of the best ways to keep your keto eating varied and flavorful is to experiment with great tasting sauces. Chimichurri is one the most versatile choices as well as one of the easiest to adapt to you own personal tastes.
In less than five minutes you can have a double batch ready for the week ahead. Enjoy!
Chimichurri
Servings: 4
Prep Time: 5 minutes
Cook Time: none
Ingredients:
1/2 cup parsley, chopped
1/4 cup fresh oregano (discard stems)
4 garlic cloves
3 tablespoons red wine vinegar or apple cider vinegar
2 teaspoons crushed red pepper flakes
Salt and pepper to taste
1/3 cup vinegar (red wine, apple cider or coconut vinegar)
A squeeze of lemon in your water is refreshing and tastes great. Apart from using lemon to add zip to salads, soups, and fish, there are countless other ways to employ this fun little citrus fruit. Some of them may even surprise you. Fight stinky armpits Lemons have properties that help them act as a […]
For now classes are 6pm and 640pm at 2840 Wildwood st in the Boise Cloggers studio.
Book your class NOW!
click this ==>
Warrior Fit Testimonials
First, I want to say thank you for convincing me to do Tabata! I was struggling to lose weight and Finally I found something that helped! I really appreciate your coaching! - Craig T.
Ever since I was convinced to do Tabata I have seen huge results, I lost 6 pounds and gained energy in the first 3 weeks. I have been working out for 3 months before I decided to do Tabata and I struggled to lose weight.
At first I thought "How am I losing weight by bringing my heart rate up then cooling down then bringing it up again?" I don’t know how it works but it does!
Thank you!! - Theresa F.
The first day of Tabata, I wondered WHAT AM I DOING - I AM 56 !! Five weeks later I knew that it was what I needed. I learned that I could push myself well beyond my comfort zone and feel good later. I have a marked improvement in physical as well as emotional endurance. - Lyn C.
When I was first told about Tabata I was very excited from the word go, however that excitement stemmed from the fact that I had no clue what it meant. I missed the first week of class b/c I was traveling for work so when I came in during the 2nd week I had some making it up to do.
It was hard at first b/c my body wasn't used to working out at such a fast pace, but once I got into a rhythm I started to feel very good. These classes are no joke. If you stick with it you will leave there feeling stronger, healthier and overall better about yourself and what you've accomplished.
I would recommend these classes to anyone. Darrin is a great trainer and he'll keep you going with his energy.
- Jami L.
Warriors Fit Audio
Warrior Fit uses High Intensity Music to get ya Moooovin' So we can all "Get Our Sweat On"
The link below will give ya a freeee shot at Audible plus a couple audio books just to try it out and if you haven't used audio books on your commutes you are missing out. Get pumped up before you get to where you are going and exercise your mind. I use it Everyday. Go get yours now!


 For today’s edition of Dear Mark, I’m answering three questions.
 I don’t like being told what to do. That’s why I’m not a fan of hard and fast food rules, as
 Today’s post is part two of a postpartum series inspired by a reader question. You can read part one


 Today Lindsay’s here sharing one of her favorite keto-friendly sauces—chimichurri. One of the best ways to keep your keto eating varied and flavorful is to experiment with great tasting sauces. Chimichurri is one the most versatile choices as well as one of the easiest to adapt to you own personal tastes.
 For now classes are 6pm and 640pm at 2840 Wildwood st in the Boise Cloggers studio.
Book your class NOW!
click this ==>
For now classes are 6pm and 640pm at 2840 Wildwood st in the Boise Cloggers studio.
Book your class NOW!
click this ==>


