
Originally posted at: http://www.nerdfitness.com/
Deadlift day is my favorite day of the week.
And soon, it will be yours.
There’s nothing more satisfying than picking up a ton of weight off the floor and holding it in your hands.
Jón Páll Sigmarsson, the Icelandic Strongman/Powerlifter once said (while deadlifting 1005 lbs), “There is no reason to be alive if you can’t do a deadlift.”
Now, that may be a bit extreme, but deadlifting is truly a romantic lift.=
On deadlift day, I don’t need assistance or a spotter – it’s just me, the barbell, and the weight. I love nothing more than to put my headphones in, put on a favorite playlist, and focus on nothing but me and that weight.
This is the next article in our strength training from our lead female NF Coaching instructor, Staci, covering all things strength training.
As for her story, she went from this to this thanks to heavy strength training:
![]()
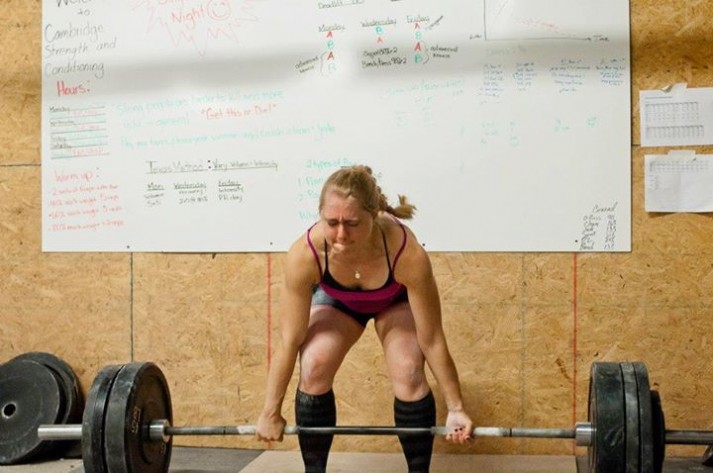
And for her credentials, here she is easily deadlifting 400+ lbs at bodyweight of 150 lbs:
A post shared by Staci Ardison (@staciardison) on Oct 11, 2017 at 5:01pm PDT
Staci has been part of Nerd Fitness for the past 7 years, and is now the lead female trainer in our 1-on-1 Online Coaching Program!
You might be reading this article, or on the hunt for strength training basics, and you’re overwhelmed:
- Am I doing my deadlifts correctly?
- What kind of workout should I follow?
- How often should I train?
- What if I’ve never worked out in a gym before?
Deadlifting in itself is not dangerous – but like with any movement, deadlifting incorrectly can be. Properly executing the deadlift will allow you to build a stronger posterior chain, less fragile joints, and a body that can handle whatever life throws at you.
We love the Deadlift more than any other exercise at Nerd Fitness, but it’s also one of the more intimidating exercises out there. It’s also easy to get wrong, and easy to injure yourself if you start to develop bad habits with it!
Many people are afraid of the deadlift and avoid it at all costs, because they’re afraid of splitting themselves in half or getting injured in another way.
Strength training and fear of injury can be scary enough to keep MOST people from starting, which is actually why we created our 1-on-1 Coaching Program. Your coach gets to know you, builds a program based on your experience and goals, will check your form on each movement (via video), and keep you accountable and on track!
You can learn more about our coaches and schedule a free call with us by clicking the image below:
Okay, today we’re going to fall in love with the deadlift, and make sure you can do them right!
Why Should Everybody Deadlift?
The deadlift is a true full body movement.
While most people would consider it a “back” exercise, others will argue that it’s a “leg” exercise. In my book, it’s an everything exercise.
When you deadlift, you use every single muscle in your body:
- Your arms, forearms, and hands hold onto the barbell and make sure the bar stays in the right position and stays stable throughout the lift.
- Your shoulders and traps hold the weight and hold it stable.
- Your back and core help keep your entire body tight and stable to help keep your spine secure.
- Your posterior chain and legs to act as a lever and lift the weight.
Whenever anyone asks me where I got my shoulders/abs/etc, I answer the same: deadlifts.
Why do a million crunches when I can just do deadlifts instead?
Way more fun! Plus, deadlifting is actually more effective.
On top of that, the deadlift is a basic human movement. Other than the squat, there might not be another movement that is more “functional.”
From the grocery store, to moving a piece of furniture, to picking your child up off the floor – you are deadlifting (and probably with poor form!).
As you build solid form deadlifting in the gym, using better form when picking things up in real life will become second nature.
This means you’ll be less likely to injure yourself now and later down the line (not only because you are stronger, but because your body knows how to properly handle weight).
And this goes further than just picking up objects – how you move while shoveling snow, doing yard work, and doing other basic every day life tasks will all dramatically improve from deadlifting.
Don’t be that guy/gal with back problems from lifting that random object years from now!
Oh, and by the way, the effectiveness of the deadlift isn’t limited to an age or gender – even grandma thinks they’re cool.
The deadlift is awesome – perhaps the purest measure of strength: either you can pick the weight off of the ground, or you can’t.
Let’s take a look at how to do them right.
Choosing a Deadlift
NOTE: Before we begin, if you have a spinal injury (or really any injury), please check with your doctor before you start.
In the deadlift you’ll be lifting dead weight (motionless) off the ground hence the name).
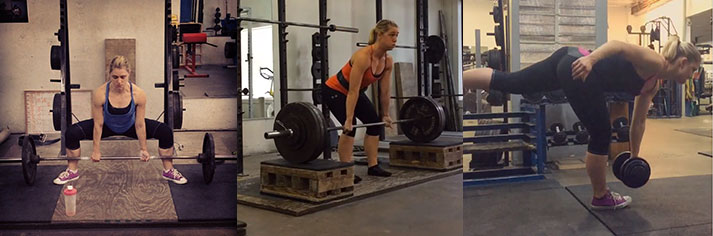
Here is the Conventional Deadlift, as demonstrated by me (Staci) and Jim from the NF Coaching Program:
And here is the Romanian Deadlift:
To deadlift, you take a loaded barbell (which is not in motion on the floor), grab it, and stand up with it until your shoulders, hips, and knees locked.
Your arms will stay straight throughout the lift. At the end of the lift the weight, depending on the length of your arms, will be at about hip height.
There are many different kinds of deadlifts:
1) Conventional Deadlift – Your hands are just outside your feet, standing at about hip width apart.
2) Sumo Deadlift – Your hands are inside your feet with a wider stance.
3) Hex or Trap Bar Bar Deadlifts – Use a specialty bar made just for deadlifting which changes the biomechanics.
4) Snatch Grip Deadlift – Your hands will use a wide grip like in the Snatch.
5) Romanian Deadlift, Stiff Legged Deadlift, Straight Leg Deadlift -These are variations that are all commonly confused. Bret Contreras has a great post where he goes into the differences between these variations in detail here.
6) Deficit Deadlift / Rack Pulls: These are movements that increase the range of motion or decrease the range of motion (respectively) and are used as accessory movements.
7) Dumbbell Deadlift Variations: For either accessory work, or if you don’t have access to a barbell and weights.
Today we are going to cover principally the conventional deadlift (we will cover variations in future articles).
Other than a barbell and weights, there are two optional equipment items you should consider:
- Flat shoes, if your gym requires shoes. Chucks work great. I personally prefer to deadlift in either socks or zero drop minimalist shoes. Many powerlifters wear deadlift slippers – basically just a fancy sock that’s approved footwear for competition.
- Chalk is optional and initially won’t be incredibly useful. However, after you start to put some weight on the bar chalk will be enormously helpful for hanging on to the bar.
The deadlift can actually be taught in one sentence – however, each piece of the deadlift has little intricacies that need to be done right, or you will hurt yourself.
If you’re somebody that is itching to get started with deadlifts now, or all of the above is overwhelming, I hear ya. It’s why we took all of this and turned it into an easy-to-digest downloadable guide so you can start deadlifting with confidence.
Grab our Strength Training 101: Everything You Need to Know when you sign up in the box below:
- Everything you need to know about getting strong.
- Workout routines for bodyweight AND weight training.
- How to find the right gym and train properly in one.
Woman
Man
The Conventional Setup
While your choice of deadlift may vary depending on your body type or training goals, the conventional deadlift is a great starting point for just about any situation.
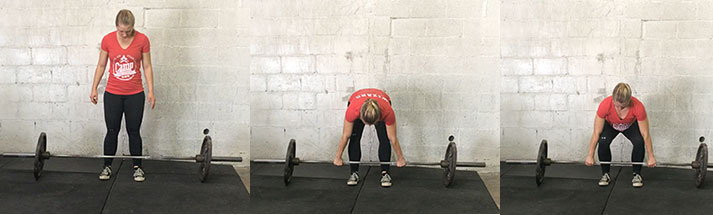
Let’s dive into the basic conventional deadlift setup:
*NOTE: Always warm up properly, and start with just the bar, even for deadlifts!
- Load the bar and secure the plates with collars. If you are just starting out with the movement, begin with 5-10 lb plates, using boxes or blocks to elevate the bar to about where it would be with 45 lb plates attached (if your gym has training plates that are this size, even better!). You may also be able to use your gym’s power rack for this.
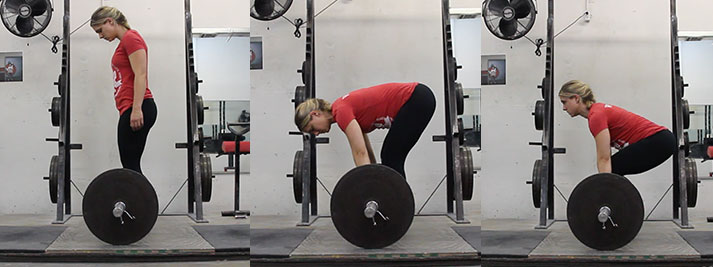
- Stand with your feet about hip width (8-12 inches) apart, and your feet slightly angled outwards (5-10 degrees).
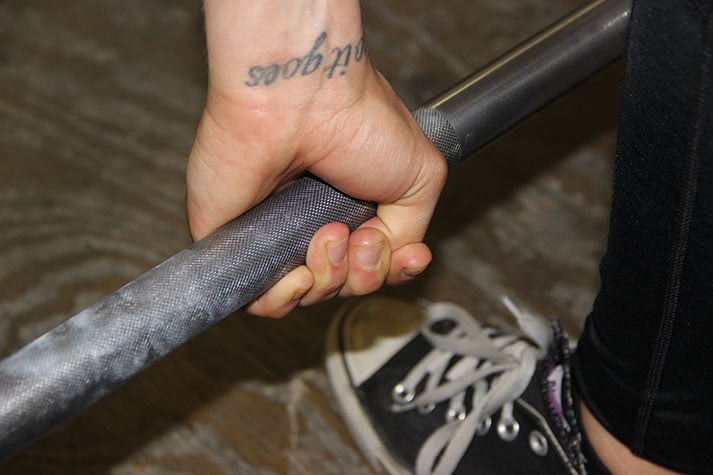
- Look down – the bar should be over the middle of your feet. If you’re wearing laced shoes, the bar would be approximately over the tied part of your shoelaces.
Now, from here, until you are actually lifting, don’t move the bar!
- Next, without moving the bar, or your hips, lean over and grab the bar. Your legs should still be straight at this point. Your grip width will be slightly outside of your legs, but not so they touch.For now, a simple double overhand grip will work. We will discuss options in grip in more detail later!
- Now that you’re holding onto the bar (and not moving it), move your hips down. While you do this, your shins will come forward until they touch the bar (stop moving your hips down when your shins touch the bar). Squeeze your chest up. As you do this, your back should flatten, and your back should go into a neutral spine position.
This is the final starting position of the deadlift.
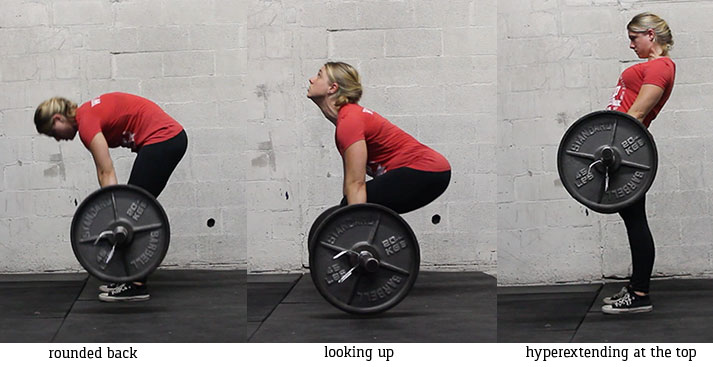
We DON’T want your back to round or hyper extend (left and right images below).
If you’re just starting out, getting into a neutral spine might feel like you’ve gone too far (hyper extended), so don’t be afraid to ask a friend for help or to record yourself so you can see what you’re doing.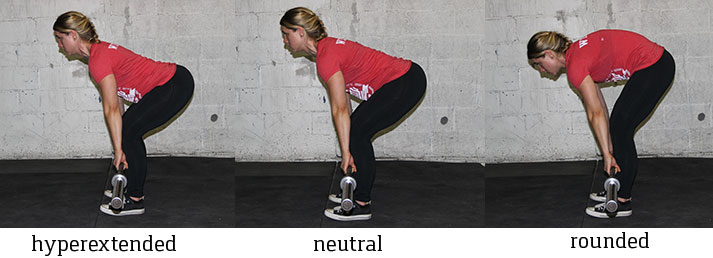
Keeping a neutral spine throughout the lift is vital, and thus it is important you set up right. Note that while your spine has a natural curve to it, that curve should not be over exaggerated.
In addition to your spine, use the muscles in your upper back to help lift your chest up (Think about what King Kong looks like when he’s ready to pound his chest).
At this point: your shoulders should be slightly in front of the bar, and your arms should be straight and perpendicular to the floor. This is where the fun part comes!
Depending on your specific body, the set up position may look different from the person standing next to you. This is normal!
Think about it – since we want our arms to be straight, someone with super long arms will have a different look to their setup than someone with short arms.
The Deadlift
If your setup looks and feels good, you’re ready to lift.
Make sure that before you pull there is no slack in the bar – your muscles should already be slightly engaged and your entire body tight.
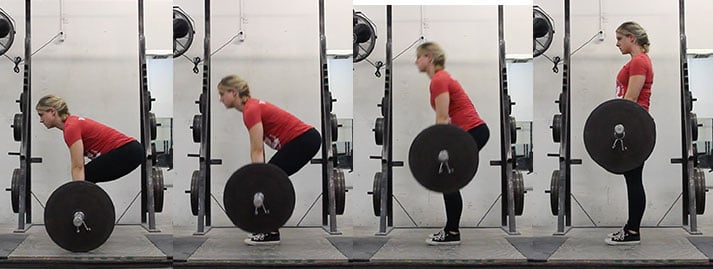

Take a deep breath in, and while keeping your entire back and core tight and your chest up, drive through your heels and pull!
A popular cue that helps many lifters execute the right form is to visualize the deadlift not as a pull, but rather a push. Imagine you are pushing the world away from the bar… rather than pulling the bar up.
Like you’re holding onto the bar and driving your feet down through the earth.
As you pull, remember:
- All of your weight should be on your heels and mid foot. You should be able to wiggle your toes the entire time (though that is not a part of deadlifting!).
- During the movement, your entire body should move upwards at the same speed. This means that your butt should not rise faster than your chest, or vice versa. You may have heard of the term “stripper deadlift” – this is when your butt rises first before your chest.
- Think about leading with your chest as you drive through your heels, and make sure you keep it up and tight.
- Your arms should stay straight the entire time. They are literally just there to hold onto the bar – they are not bending or pulling at all.
- The bar should stay in contact with your body the entire time – you will literally be dragging it up your thighs. This is why you see many powerlifters with chalk or baby powder covering their legs (and why they typically wear socks that cover their shins, to prevent cuts and scrapes). Do not let it come forward. If you were to draw a line that follows the bar’s path from the floor to lockout, it should be a straight, vertical line.
- As you are pulling, you should be squeezing your glutes. Once the bar passes your knees, think of getting your hips under the bar by squeezing your glutes. So while you’re pulling with your arms, you’re pushing through the floor with your feet, pushing your butt under the bar.
- At the top of the movement, you should be standing tall and proud with your chest open, like if you were King Kong getting ready to pound his chest.
- At the top, do not hyper extend and lean back. You want to keep your spine neutral and everything tight.
Now, at this point, the first thing I want you to do is do NOT lose tightness in your body. We are going to practice putting the bar down (not dropping it).
Setting the Bar Down
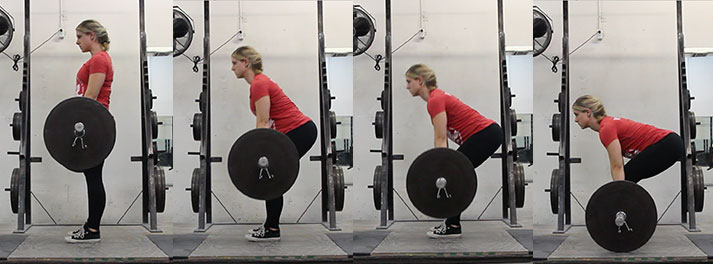
Your body should descend all at the same time, just as it ascended, only backwards.
Unlock your hips and knees and slowly lower the bar to set it down (make sure you unlock them at the same time. Unlocking your knees first will cause a lot of awkward movement, and possibly your lower back to round).
Don’t lose tightness until you let go of the bar. This is extremely important – a large amount of deadlift injuries come from people getting super excited about making a lift, losing tightness, and then putting the bar down wrong.
You want this to be a quick movement – lowering the deadlift slow will take a lot out of you and leave you sore for days.
Notes on dropping the deadlift:
The eccentric part of the deadlift (lowering it) is actually riskier than the concentric (picking it up) part of the deadlift, and it is the part of the deadlift that will give you the most DOMS (delayed onset muscle soreness). Because of this, many coaches will advocate dropping your deadlift (especially with advanced athletes where they can’t afford to sacrifice performance later in the week).
I would recommend putting the bar down (especially if you want to powerlift – the lift does not count if you drop it). So, practice on putting the bar down properly. It’s just as (if not more) important as practicing picking it up.
How to Grip The Bar, Straps, and other Equipment
Grip strength is a huge part in the deadlift, because if you can’t hold on to the bar, you can’t lift it!
There are two main grips that you see with the deadlift. The first is the double overhand grip. With this grip, your palms are both facing towards your body.
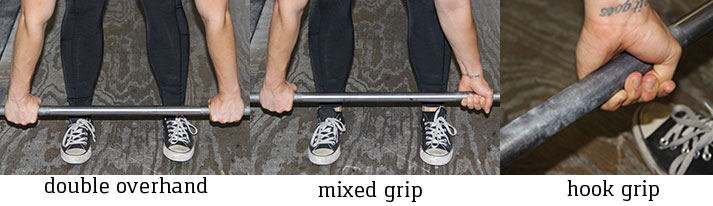
The second is an “over-under” or “mixed” grip, where one hand is flipped (one of your palms is facing away from you).
The double overhand grip is the safest grip, and the best grip for beginners.
The mixed grip offers quite a few disadvantages – it places uneven stress on your shoulders, can aggravate problems in the biceps on the side in which your palm is facing outwards, and its easier for your lift to be uneven as you’re literally gripping it uneven.
So why do it? Well – you can physically lift more using this grip. At first, you won’t notice a difference because your grip strength is most likely stronger than your back.
However, as your back gets stronger, your back strength will eventually outmatch your grip.
This is when you would consider adding in a mixed grip, but be sure to use the double-overhand throughout your workout until you get to the point where you need to switch. Consider doing grip strength work as well.
Finally, there is the hook grip – Hook grip is a grip where you put your thumbs under your fingers.
What about gloves and straps? Straps can help you lift more than your hands can hold, but could cause your grip to be undeveloped later down the road. Personally, I only use straps if I’ve got a ripped callus or if my hands are just exhausted from a long day of training.
Consider using straps strategically, but not regularly.
While many people wear gloves to get a better grip on the bar, gloves actually create space between you’re the hand and the bar, and it reduces your grip security, increases the diameter of the bar, and makes the bar harder to hold on to. I don’t recommend using them unless you have an injury like a ripped callus.
Speaking of ripped calluses – make sure to take care of your hands and they are less likely to happen!
“Do I need to use a belt?” When starting out, don’t worry about a belt. However, as you get into heavy weight, it may be something to look into. Belts need to be worn correctly in order to be effective.
Note: While you may be able to lift more using a mixed grip and a belt, they’re definitely not necessary to lift heavy. Here’s a video of Anthony Mychal deadlifting 550 lbs at the powerlifting competition at Camp Nerd Fitness – double overhand with no belt.
I realize ALL of that stuff above is a LOT to remember – we have a whole chapter in our Strength Training 101 guide that can help keep this stuff straight in your head! Download the guide when you sign up in the box below:
- Everything you need to know about getting strong.
- Workout routines for bodyweight AND weight training.
- How to find the right gym and train properly in one.
Woman
Man
Common Faults ANd Mistakes while Deadlifting
DON’T DO THESE THINGS:
Rounded Back – not keeping your spine in neutral the entire time. Letting your lower back round at all is a huge no no. (Note: there are some powerlifters that purposefully round their upper back to decrease range of motion, but this is a sport specific move, still a fault, and something you should not consider as a beginner.)
Looking up (with your neck) – Along with keeping a neutral spine, hyper extending your neck to look up is also something we want to stay away from.
Hyperextending at the top – It became popular to over exaggerate the top of the deadlift in fitness competitions, where you needed to quickly show a judge that you achieved lockout. This hyper extending at the top is actually not something we actually strive for – the spine should still be in neutral even at the top.
ALSO, DON’T DO THESE THINGS!
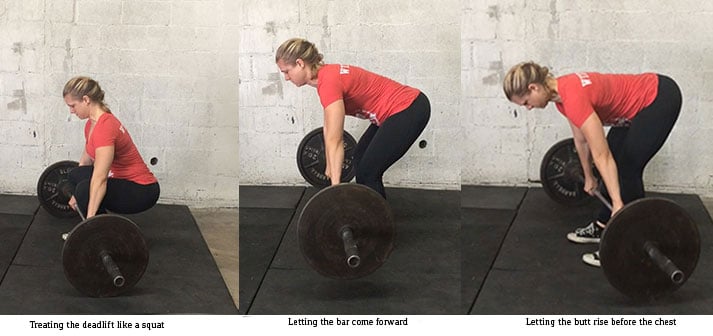
Treating the deadlift like a squat with the bar in your hands. You are not starting in a squat position and standing up – it is a different movement.
Letting the bar come forward – The bar needs to stay over your midline and be dragged up your body the entire lift – any movement forward of your midline should be avoided.
Butt rises faster than your chest (also known as the “stripper deadlift”) – your chest should lead the movement, and your entire body should move upward at the same pace.
Bending your arms – your arms should stay straight. Don’t bend your elbows to try to get the bar up faster.
Frequently Asked Questions
“What do I do if I can’t get into the proper starting position?”
While you are getting the mobility to get into the correct starting position, you can put the bar on blocks to raise it up a few inches to help you get in the right position. Each workout, start with the bar a little lower, until it is just on the floor.
“What weight do I start with?”
Just the bar 🙂 Then progress as described here.
“What is the difference between doing multiple reps from dead stop and touch and go reps?”
Touch and go reps are easier – for a few reasons. First, we get a stretch reflex (think about the “bounce” you get at the bottom of the squat). Second, when you lower the bar it is already in motion, so it’s simply easier to lift something that is already moving than it is to lift something that is completely stopped.
If you are at a gym that has rubber bumper plates, these plates actually will bounce a little when they hit the floor – helping you lift the weight.
However, while touch and go are easier, they are also more dangerous. It’s easier to mess up your form if you aren’t resetting every rep, and easier to get fatigued.
It is in the eccentric (lowering) part of touch and go deadlifts that most people get hurt. Resetting every rep is preferred for general strength programs. This allows you to reset, get your form right, and get your breathing right on every rep.
“Okay, I get it. Deadlifts are great! I should do them ALL THE TIME, right?!?”
Woah, hold on there. I appreciate your enthusiasm, but there are some things we need to take into consideration when adding deadlifts into our program.
Heavy deadlifts are extremely taxing on the central nervous system. This means your body needs more time to recover. In fact, it’s so taxing that some coaches recommend taking the deadlift out completely for their more advanced, sport specific athletes.
Most good strength programs only deadlift once a week – and it’s lighter volume than with your squats. Both starting strength and stronglifts only include ONE set of 5 deadlifts. Meanwhile, they program 5 sets of 5 for squats.
Get Out There and Pull
I am so excited for you to start deadlifting, because it’s the ultimate physical AND mental exercise. Believe it or not, keeping mental focus and staying in the right frame of mind is especially important here.
When you’re at the bottom of a squat or underneath a bar in the bench – you need to finish the lift so you literally won’t be crushed. Finish the lift or fail and be pinned.
With the deadlift, the weight doesn’t work in your favor – it works against you. As the deadlift gets heavy, you know how easy it is to just not pick up the weight. You have to want it. You have to know you can get it.
As Mark Rippetoe said:“The deadlift also serves as a way to train the mind to do things that are hard.”
If you are looking for more specific guidance on how to become a deadlifting machine like Staci, or you’ve been at it for months/years without getting results and think you’re a lost cause, you’re not alone!
I honestly thought I was a lost cause because I spent 6 years training without seeing results. It wasn’t because of my genetics, it was because I was following bad advice, had a bad training program, and didn’t have the right nutritional strategy!
If you are somebody that is tired of not getting results, wants to avoid trial-and-error, or you just want to be told exactly what to do to reach your goals, check out our popular 1-on-1 coaching program. You’ll work with our certified NF instructors who will get to know you better than you know yourself and program your workouts and nutrition strategy for you.
Now, if you are somebody that is more of the “do-it-yourself” type, check out our self-paced online course, the Nerd Fitness Academy.
The Academy has 20+ workouts for both bodyweight or weight training, a benchmark test to determine your starting workout, HD demonstrations of every movement, boss battles so you know when you to level up your routine, meal plans, a questing system, and supportive community.
I’ll leave you with the following quote from Henry Rollins that perfectly embodies how amazing strength training can be:
“The Iron never lies to you. You can walk outside and listen to all kinds of talk, get told that you’re a god or a total bastard. The Iron will always kick you the real deal. The Iron is the great reference point, the all-knowing perspective giver. Always there like a beacon in the pitch black. I have found the Iron to be my greatest friend. It never freaks out on me, never runs.
Friends may come and go.
But two hundred pounds is always two hundred pounds“
What do you think? Do you jump for joy or cringe when it’s deadlift day?
Big or small, what questions do you have on the deadlift?
-Staci
PS: Not ready to try out of one of programs yet? That’s cool! We have a TON of free resources, including a massive “Strength Training 101” Ebook I’ll send you way when you sign up in the box below. Welcome to the Nerd Fitness Rebellion!
- Everything you need to know about getting strong.
- Workout routines for bodyweight AND weight training.
- How to find the right gym and train properly in one.
Woman
Man
PPS: Here are our other free articles in the Strength 101 Series:
- Strength Training 101
- Strength Training 101: Equipment
- Strength Training 101: Finding the Right Gym
- Strength Training 101: Where do I start?
- Strength Training 101: How much weight should I be lifting?
- Strength Training 101: Inverted Rows
- Strength Training 101: How to Squat Properly
- Strength Training 101: The Overhead Press
###
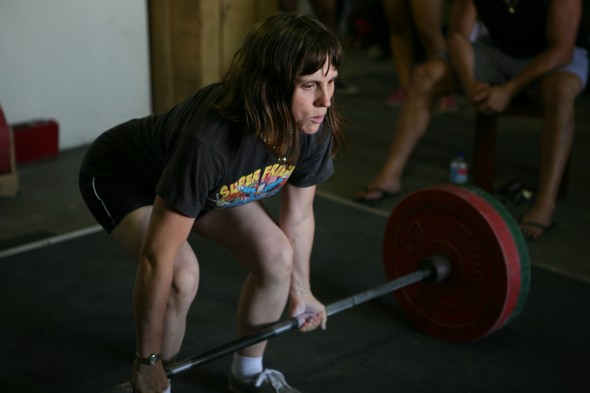
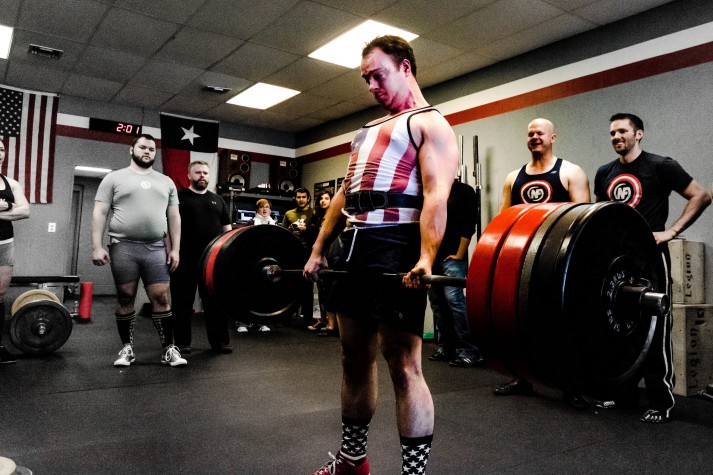
photo source: AKLuLu: Rapton and Emcee at 4T NF Meet, Bigm141414: thisisseth deadlift
Filed under: Fitness
 For now classes are 6pm and 640pm at 2840 Wildwood st in the Boise Cloggers studio.
Book your class NOW!
click this ==>
For now classes are 6pm and 640pm at 2840 Wildwood st in the Boise Cloggers studio.
Book your class NOW!
click this ==>


