This post was originally published on this site

https://www.girlsgonestrong.com/

If you’re looking for strong and stable shoulders, dialed-in technique, laser focus, improved grip strength, and an incredible lesson in tension, the bottoms-up kettlebell position might just be your new favorite thing!

What Does Bottoms-Up Mean?

The bottoms-up position refers to a kettlebell held vertically by the handle with the bottom of the kettlebell facing up and the handle on the bottom — hence the name “bottoms-up.” It might elicit some funny looks from across the gym floor, but the bottoms-up position packs a serious punch.

What Exercises Can Be Performed Bottoms-Up?

The bottoms-up position lends itself well to pressing and carries, as well as any movement you would do with a kettlebell in the rack position (squats, lunges, etc.) or overhead (get ready for the most focused Turkish get-ups you’ve ever done!)

Even ballistic movements like cleans and snatches can be performed in a bottoms-up fashion.

6 Benefits of Bottoms-Up Training

Want more incentives to start working this way? Consider the following:

1. Cultivate Stability and Strength Through Instability

A bottoms-up kettlebell is inherently unstable, and therein lies the magic: to overcome the challenge, a greater number of motor units and muscle fibers are recruited.

You’ll feel the work in the muscles of your rotator cuff, lats, core, wrist and forearm during carries, presses, and more dynamic movements.

2. Sharpen Your Focus and Get Instant Feedback

One of the biggest reasons I love incorporating bottoms-up work in my sessions is the focus that a bottoms-up kettlebell requires. While you can get away with a less-than-great kettlebell press or Turkish get-up when you’re working in the rack position, the bottoms-up position is unforgiving. If you lose your focus and control, that bottoms-up kettlebell is likely to come crashing down.

There’s an additional benefit in the instant feedback received by the bell either staying vertical or flopping over: you’ll know it when you’ve nailed it!

The bottoms-up kettlebell provides clear, instant feedback on whether or not you’re executing the movement well.

3. Polish Your Positioning

If you’re struggling to dial in your technique for the kettlebell press, a bottoms-up version is a great place to spend some time greasing the groove. The bottoms-up press requires the bell to stay held vertically overhead, demanding a vertical forearm and a smooth path up, led by a strong and stable shoulder. Because of this, the bottoms-up kettlebell press is one of the easiest ways to learn and teach superb pressing mechanics.

While everyone’s body is different, those who struggle with traditional overhead pressing can often find a welcome variation in the bottoms-up kettlebell press. If your shoulders have been less than thrilled in previous attempts, flip over your bell and give the bottoms-up a try!

4. Get a Grip

The bottoms-up kettlebell position challenges the wrists in a different way than most other movements. In most movements that challenge our grip strength, the load is below our grip, as is the case with deadlifts, pull-ups, farmer’s carries, etc.

The bottoms-up position places the load above the grip, providing a novel challenge to the muscles of the wrist and forearm.

5. Perfect Tension and Core Connection

Learning to ramp up tension (or dial it down) and truly feel the integration of the core musculature with movements like squats, presses, and carries can be challenging for some. The challenge of the bottoms-up position teaches the necessity of “meeting the tension to the task” (a phrase coined by Antony Lo, PT).

Too little tension and the bell is tumbling. Too much and you’ll find it difficult to move (or will fatigue early). For the person looking to master that “Goldilocks” level of tension, bottoms-up kettlebell movements are an excellent tool.

Additionally, most bottoms-up movements are performed unilaterally, further requiring our deep stability system to do its job to keep us upright.

6. Make Use of Light Bells

Dust off those light bells you haven’t used in a while for a bottoms-up Turkish get-up, or overhead press! The degree of difficulty means that you won’t need much load to get a training stimulus.

If you’re somewhere with only light bells available, or you’re simply looking to get more use out of the bells you haven’t used in a while, bottoms-up kettlebell work is a great way to make the most of the range of kettlebells in your collection.

When Are You Ready for Bottoms-Up Work?

Want to get started on bottoms-up training, but not sure you’re up for the task? You might actually be more ready than you think!

Bottoms-up kettlebell training is a self-limiting activity, meaning it requires greater engagement, awareness, and connection. While bottoms-up work might look more advanced, I prefer using it early on in training to build greater awareness, teach the concept of tension, and solidify good habits.

As with anything else, we run into potential issues when we exceed our capacity. Starting to train bottoms-up positioning should be a gradual process aligned with your abilities.

Getting Into the Bottoms-Up Position

Those comfortable with cleans will likely find a clean to the bottoms-up position to be the most comfortable way to get into a bottoms-up position.

For this, you’ll start with the bell in front of you, with the handle turned 90 degrees (parallel to your feet, not perpendicular like a normal clean), hike the bell back, and then clean it so that it lands handle down, bell up.

If you aren’t comfortable cleaning yet, I would recommend curling the bell up to the bottoms-up position assisted by the free hand. Try to keep the bell balanced over your hand, forearm, and elbow, and keep your eyes on the bell at all times.

How to Get Started

Before moving to more advanced bottoms-up training, I invite everyone to feel solid in a bottoms-up hold with a light bell. You’ll want to clean or curl the kettlebell into the bottoms-up position and practice standing there with the bell held in its vertical position.

Consider this as you might a plank: start with 10 or so seconds and aim to work your way up to being able to breathe and balance the bell for 30–45 seconds each side before adding more complexity.

Once someone is proficient at isometrically controlling the bell in a standing position, I like to add the challenge of marching, walking, pressing, and squatting the bottoms-up bell (remember: any movement that is performed with a kettlebell in the rack or overhead position can be done bottoms-up!).

It can be tempting to jump straight to flashier movements with heavier bells, but remember that the benefits of bottoms-up movements are in the finer details; give yourself ample time to build the strength and skill and prioritize quality over quantity and load.

If you’re looking for a new challenge, you don’t necessarily need new equipment. Just flip that kettlebell bottoms-up!


FREE course –  5 SECRETS TO GET MORE RESULTS IN LESS TIME

Learn the most effective strategies for getting the exact results you want — without spending your life in the gym.

Our Girls Gone Strong Formula has helped thousands of women all over the globe get the results they’re looking for.

Now we’re sharing our secrets with you. Click the button below to get your first free lesson

stand the Blueprint and be willing to trust the process.

Get My Free Lessons!

The post Why You Should Try Bottoms-Up Kettlebell Training appeared first on Girls Gone Strong.

Be Nice and Share!
This post was originally published on this site

http://www.marksdailyapple.com/

The relationship between stress and carbohydrates is confusing, with seemingly contradictory arguments bouncing around the online health sphere.

There are those who say high-carb diets cause stress, and that eating more fat and fewer carbs is the solution.

There are those who say high-fat diets increase stress and eating carbs ameliorates it.

Who’s right? They can’t both be right, can they?

Well…

You’d be surprised.

Let’s dig into four common carb questions and assertions.

“Stress Increases Carb Cravings.”

This is well-established. You have a terrible day at the office, your kids have appointments twenty miles apart within fifteen minutes of each other, the traffic is backed up to your driveway, you’re late for work, the dog needs a walk, you haven’t even thought about what to make for dinner, you slept four hours last night—it adds up. People deal with a lot. And in that moment, a carbohydrate-based snack really does seem to take the edge off.

Across millions of years of hominid evolution, the human stress response developed in the context of real-world, short-term, and infrequent but intense stressors: battles, hunts, freak injuries, dangerous animal encounters, interpersonal conflicts. These were situations that demanded heightened senses, available fuel, and a rapid heart rate to deliver everything to the tissues that needed to move and act. It makes perfect sense for your body to pump out adrenaline to increase fat burning and glucose in the blood—you need that fuel to deal with the situation. It also makes sense for your body to follow that up with a blast of cortisol, which makes you crave high-carb junk food to replace the fuel you utilized. The problem is that our modern stressors are too frequent, they aren’t physically demanding, we aren’t utilizing the fuel we mobilize, and we have no real need for the carb cravings that come after.

What happens when we eat too many carbs that we never actually needed?

We get fat. Cellular energy supply becomes overloaded, impairing our mitochondria’s ability to process energy efficiently. This degrades metabolic flexibility—the ability to switch between different fuel sources—preventing us from burning the fat on our bodies in between meals. We become reliant on those carbs, and when we don’t get them fast enough, our bodies perceive that as a major stressor.

So while giving in to carb cravings can reduce stress in the short-term, it sets us up for longer-term, more chronic stress.

“What About Gluconeogenesis? Isn’t That a Stress Response?”

It can be.

A primary goal of cortisol is to increase glucose availability. It does this through multiple avenues. One I just mentioned is to increase carb cravings. Another is to make you insulin resistant, thereby preventing insulin from sucking up blood glucose. Gluconeogenesis—the creation of glucose from amino acids and other substrates—is another.

If you’re a sugar-burner, stressful situations will increase carb cravings, induce gluconeogenesis, and may even make you insulin resistant. If you’re fat-adapted, the story shifts.

A fat-adapted person will have ketones and fatty acids available to provide energy in between meals. A fat-adapted person will have ketones and fatty acids available to provide energy in stressful situations. A fat-adapted person will be able to utilize those ketones and fatty acids during stressful situations—their mitochondria will literally be primed to utilize those fuels, not just glucose. A fat-adapted person is less likely to perceive carbohydrate shortages as stress shortages because they’ve got all this other fuel available to burn.

This adaptation doesn’t happen overnight. If your diet is low-carb or keto, but your body is still reliant on sugar, you will perceive reduced carb availability as a stressor. That’s one of the hallmarks of the keto flu, and it’s one reason why some people have extended keto flu—their bodies are still expecting and demanding glucose.

Some people never get over the carb cravings; they never fully adapt. This is the subset of the population that doesn’t function or perform well on a long-term ketogenic diet. The cause is unknown, at least for now (I suspect it has to do with recent ancestry and genetic proclivities), but what matters is that these people exist. For them, a long-term keto or very low carb diet approach will probably always be stressful. But even in these folks, spending some time in ketosis—through short term low-carb eating, intermittent fasting, or even extended low-level endurance activity that primarily burns fat—is a good idea that will reduce stress and improve overall resilience.

“But Carbs Make Exercise Less Stressful!”

Exercise is stressful to begin with. But then you adapt to the stress and overcome it—and end up stronger, fitter, and faster than before. Without the stress, working out doesn’t work. A legitimate method for increasing your work capacity is to train-low (carb), race-high (carb). Athletes have been doing this for decades—training in a low-carb state to get better at performing without ample muscle glycogen, then going into a race with full glycogen reserves and the ability to perform without glycogen. Exercising in that low-glycogen state is stressful, but that’s the whole point. It makes them better, stronger, faster, and it conserves glycogen for when they really need it.

If you consistently perform glucose-intensive high-intensity anaerobic activity for extended periods of time—CrossFit style WODs done 3-5 times per week, for example—you will run up a glucose debt and should replenish some of the carbohydrates you expend or risk cortisol spikes. Fat-adaptation can improve your tolerance of anaerobic activity in a low-glucose state, but there’s a breaking point, a physiological limit.

Eat the carbs you earn. This is a subtle point I don’t often see made. The reverse is widely understood—don’t eat the carbs you don’t earn—because millions of obese and overweight people do that every day. It’s a big reason why we’re so overweight. But if you fail to eat the carbs you earn through intense, protracted physical activity, you’re creating an undeniable glycogen deficiency that your body may perceive as a stressor. It may turn out that fully fat- and keto-adapted athletes can perform intense medium-to-long-term activities at high levels, and there’s some indication that this is the case, but for the time being it appears that eating the carbs you earn can stave off the stress.

“Low-Carb Diets Are Stressful For Women.”

There’s a glimmer of truth here. Allow me to explain.

Women are inherently more sensitive to caloric fluctuations than men…on average. The reason is sheer biology. Human evolution is concerned with fertility and reproduction. Can you produce, foster, and support viable offspring? Awesome. Natural selection deems you fit.

To fulfill their biological role, men have to produce sperm. They can do so almost indefinitely. They don’t run out; they just make more. If a batch is damaged due to poor lifestyle or dietary choices, there’s more on the way. After a man gets someone pregnant, his biological involvement with the growing baby is done. What or when he eats has no impact on the survival of the growing baby.

To fulfill theirs, women have a finite number of eggs, or “chances.” Once an egg is gone, there’s no replacing it.

And so the body seeks to inculcate the egg from environmental insults.

When you are preparing to get pregnant, your body needs extra nutrients to build up a reserve and “prime the pump.”

When you are pregnant, the growing baby needs a reliable and constant stream of nutrients for almost a year.

After you’ve given birth, the growing newborn needs breastmilk. To make that milk requires additional calories and extra doses of specific nutrients. Modern technology allows us to skip nursing and go straight to the bottle, but your body doesn’t “know” that.

It all points to women being more finely attuned to caloric deficits. For example, women’s levels of ghrelin, the hunger hormone, are quicker to rise after meals. Even if you’re never going to have kids, your body is still wired to protect against these caloric fluctuations.

Where do carbs come in?

One’s carbohydrate consumption is uniquely hewed to our sense of caloric sufficiency. If carbs are plentiful, your body perceives that as a signal of environmental plenty: the weather is good, the plants are producing, the trees are bearing fruit, the men are bringing back lots of honey. Life is good. It’s the perfect time to get pregnant. Above all other macronutrients, carbohydrate consumption increases the short-term expression of leptin, a satiety hormone that signals the presence of incoming calories, caloric sufficiency, and environmental plenty.

There’s also the issue of extreme satiety. Low-carb diets often become low-calorie diets without you even trying. That’s why they work so well for fat loss, by inadvertently reducing the amount of food you eat and increasing satiety. But for some women, especially those at or approaching their ideal weight, going too low in calories can increase stress.

Summing Up…

Are you unable to access your own body fat in between meals for energy? Then you’ll be a ball of stress unless you can get those Jolly Ranchers unwrapped quickly enough. It’ll be a constant battle. And yeah, if you keep pumping yourself full of carbs to keep your blood glucose topped off, you’ll keep stress at bay—but you’ll always be teetering on that precipice.

Are you exercising? Then you should strike a balance between gaining the adaptive benefits of training in a low-carbohydrate state and eating the carbs you earn.

Are you a woman? Then you’re probably more sensitive to diet-induced stress and may benefit from occasional carbohydrate refeeds. You should watch out for excessive satiety on ketogenic diets, which is great for fat loss but can lead to stress issues down the line if calories get too low.

The relationship between carbohydrates and stress isn’t exactly straightforward, but it is navigable. Hopefully after today you have a better idea of where you stand in the relationship.

What’s been your experience with stress and carbohydrates? Has your tolerance for stress gone up or down since going low-carb or keto? Thanks for stopping in today.

collagenfuel_640x80

References:

Mcallister MJ, Webb HE, Tidwell DK, et al. Exogenous Carbohydrate Reduces Cortisol Response from Combined Mental and Physical Stress. Int J Sports Med. 2016;37(14):1159-1165.

Dirlewanger M, Di vetta V, Guenat E, et al. Effects of short-term carbohydrate or fat overfeeding on energy expenditure and plasma leptin concentrations in healthy female subjects. Int J Obes Relat Metab Disord. 2000;24(11):1413-8.

The post 4 Misunderstandings About Carbs and Stress appeared first on Mark’s Daily Apple.

Be Nice and Share!
This post was originally published on this site

Originally posted at: http://www.nerdfitness.com/

Pull-ups are my favorite exercise of all time.

They work all of the “pull” muscles in your body – your back, biceps, forearms.

They are indicative of your level of fitness – anybody that can do a pull-up is in pretty good shape.

And anybody that can do 10 or more is clearly in great shape.

Lastly, pull-ups make you feel like a badass after doing them.

However, pull-ups are also hard as hell, especially if you’re just getting started. Unlike other exercises that can be completed with just your body weight (like squats, lunges, and push ups), pull-ups and other exercises that strengthen your pull muscles require at least one piece of equipment or something to hang from!

On top of all of that, if you can’t do one yet, how the heck are you supposed to work on them to get better?

I’ve recently received thousands of emails from fellow rebels who are working towards their first pull-up but aren’t there quite yet.

Whether you’re 300 pounds overweight and can’t even look at a pull-up bar without freaking out, or you’re half an inch away from finally being able to do your first pull-up, this article is for you – sorry it took so long for me to write!

Pull-ups are quite the intimidating exercise, but like Optimus Prime has taught us, we can make small changes and improvements over time that will result in the ultimate goal:

One. Freaking. Pull-up. 

It will take a combination of two things to get your chin up over that bar:

  • Decreasing body fat so you have less weight to pick up!
  • Increasing strength to pick up your bodyweight and move above the bar!

I realize doing those two things is much easier said than done.

What most people don’t realize is that they spend too much time on the strength part, not realizing that decreasing their body weight is as important and impactful (if not more so!).

Which is why most people never get to do a pull-up!

After all, there’s nothing more frustrating than putting in the effort for months (or years) and not seeing results and getting demoralized. And unfortunately, this is what I see from most people: Lots of well-intentioned but misguided effort in the gym and no changes.

You probably don’t have years to make the mistakes that I did and want to skip this problem, and you just want to start getting results today.

In addition to the free resources below, we also offer 1-on-1 Online Coaching, where you’ll get personalized instruction for your body type and goals, and professional accountability from a Coach on Team Nerd Fitness!

You can schedule a free call with our team to learn more about coaching by clicking on the image below of Christina! She’s one of our coaching clients who went from 0 pull-ups to now doing sets of 10!

But enough of that, let’s get into the nitty-gritty of how to get your first pull-up!

A few tips to get started

This should hopefully be obvious, but the more you weigh, the more you have to lift in order to complete a pull-up. If you’re truly serious about completing a pull-up, start by getting your diet under control. I’m a HUGE fan of the Paleo Diet, because I know it works. A few folks have already lost 10+ pounds in just over a week following the Paleo Diet in the Nerd Fitness Academy. As you start to weigh less, you’ll have less weight to pick up and move up over that bar! Got it? Good.

MAKE YOUR BACK EXERCISES A PRIORITY. A lot of people do every other exercise before doing any back-related exercises, if they do any at all.  After warming up properly, your first exercise should always be the stuff that you want to work on the most – in this case it’ll be your back.

The progression below is just a path that I’ve created, but does NOT need to be followed to a T. I give sample sets and reps and when to move up, but if you feel like you can progress sooner or want to try doing full pull-ups sooner than I recommend, that’s OKAY.  This is the slower progression method, where some people will want to do fewer reps and progress to the next levels sooner – that’s okay.

I recommend moving up to the next level when you can do 3 sets of 8 reps of a particular exercise. If you want the accelerated path, move on up as soon as you can do 3 sets of 5 reps.

Almost every exercise below has a video to show you how to do it. Click on the picture or the video below it.

Level 1: Bent Over Dumbbell Rows


Bent Over Dumbbell Row Video

We’re going to start with these, the most basic of back exercises, in case you’re starting from ABSOLUTELY square one. For these exercises, focus on lifting more and more as you get stronger.  Every OTHER day, pick up a dumbbell that you can lift for three sets of 8 repetitions with a 2-minute break between sets.  As soon as you can do 3 sets of 8 reps, it’s time to move up to a heavier dumbbell.

  • As soon as you can do dumbbell rows with at least a 25-pound (10kg) dumbbell or heavier, consider moving up to the next level.
  • If you are a little bit bigger than the average bear, you might want to stick with this step until you lose a little bit more weight and get stronger – maybe go to 35 or 40-pound (18kg) dumbbells.

Level 2: Body Weight Rows


Body Weight Rows Video

Body weight rows are the PERFECT precursor to pull-ups – they work the same muscles, just at a different angle.  You can also make adjustments. You know how I HATE HATE HATE exercise machines? Here, I wholeheartedly recommend the use of a smith machine…but ONLY for rows!  Because you can adjust the height of the bar, you can adjust how difficult the exercise is.  If you’re just getting started, put the bar very high, so you only have to lean back slightly.  If you’re stronger, you can start with a lower bar.

Here’s a whole post I did on body weight rows (also called inverted rows).

My advice:

  • Clench your butt and keep your abs tight and body straight throughout the exercise.  Focus your mind on PULLING with your arms.
  • Set the bar at a height where it’s challenging for you to complete 3 sets of 8 reps with two minutes of rest between sets.
  • As soon as you can complete all 3 sets of 8 reps, lower the bar!
  • If you need to make the exercise easier, bend your knees and put your feet flat on the ground.  You can drop your hips too to make things easier.

A sample routine that starts with your back exercises

  • Monday – 3 sets of 8 reps of overhand bodyweight rows
  • Wednesday – 3 sets of 8 reps of underhand bodyweight rows (hands reversed)
  • Friday – 3 sets of 8 reps of overhand bodyweight rows
  • (And then go underhand, overhand, underhand the following week)

As soon as you’re doing bodyweight rows where your body is at a 45-degree angle or lower, you can progress to level 3.

IF YOU DON’T HAVE ACCESS TO A BAR FOR INVERTED ROWS: Try using your kitchen table, or move up to Level 3 and progress with caution there.

IF YOU HAVE ACCESS TO A GYM OR WANT TO JOIN A GYM, I know they can be intimidating! We have multiple chapters on how to find a gym and get started using the equipment, in our free guide Strength Training 101: Everything You Need to Know. Grab our nerdy guide when you join the Nerd Fitness Rebellion with your email in the box below:

Level 3A: Assisted Pull-Ups


Assisted Pull-ups Video

Personally, I don’t like using the assisted pull-up machine in a gym as it doesn’t give you the full feeling of a pull-up, but it’s certainly better than nothing.

Instead, I recommend doing one of these alternatives:

  • Assisted Pull-ups with chair – (either one foot or two depending on your needs) – your feet are ONLY there for support, use your upper body as much as possible.
  • Assisted Pull-ups with exercise band(you can get different types of exercise bands with different levels of strength).  Put your foot in the exercise band and pull yourself up.
  • Assisted pull-ups with a partner – (have a friend hold your feet behind you and help you complete each rep).  Have your friend use the least amount of help possible to get you through your workouts.

My advice:

  • Clench your butt and keep your abs tight throughout the exercise – try not to swing like crazy.
  • Keep your shoulder blades pinched behind you throughout the movement and focus on PULLING the bar down with your arms.
  • Use the least amount of assistance that you can handle – as soon as you can do multiple pull-ups with both feet on the chair, switch to just one foot.
  • If you’re using an exercise band, try to get a few bands of varying tension so you can decrease the resistance as you get stronger.
  • As soon as you can do 3 sets of 8 with assistance, it’s time to move on up.

A sample level 3 routine:

  • Monday – Assisted Pull-ups – 3 sets of 8 reps
  • Wednesday – Body weight rows – 3 sets of 8 reps
  • Friday – Assisted Chin Ups – 3 sets of 8 reps

Level 3B: Negative Pull-Ups

Now, let’s say you don’t have a rubber band, you don’t have somebody to hold your feet, and you don’t have a chair – you ONLY have a pull-up bar. That’s okay – you can do what we call negatives. When doing a negative, you jump above the bar and try to lower yourself slowly and in control until you’re at the bottom of the movement.  This can be very dangerous if you’re very overweight, which is why I’d recommend moving slowly through steps 1-3A first.

However, once you have a decent amount of back strength, doing negatives is a great way to build arm and back strength.

You can either jump above the pull-up bar, and then begin to lower yourself back down IN CONTROL, or you can hop up on a chair to get above the bar and then lower yourself back down. Again, the name of the game is “in control.”

You don’t need to lower yourself so slowly that one repetition destroys you…lower yourself in a controlled speed – Counting to three during the movement is a good tempo.

Here’s a sample workout using everything up to this point:

  • Monday – Assisted Chin Ups – 3 sets of 8 repetitions
  • Wednesday – Body Weight Rows – 3 sets of 8 repetitions
  • Friday – Negative Pull-ups – 3 sets to failure – capped at 5 repetitions for each set.

For your negative pull-ups, do as many as you can (up to 5 reps) per set – jump and lower yourself in control, then jump right back up and lower yourself.  If you can do 5, wait 2 minutes and then start again.  If you can’t do 5, do as many as you can in control, wait 2 minutes and then start again.

Once you’re doing 3 sets of 5 repetitions on your negative pull-ups, along with your assisted chin-ups and body weight rows…you’re ready.

Level 4 – Chin Ups and Pull-Ups


Pull-up Video

My dear rebel, it’s time.

Depending on your weight, your level of fitness and strength, and how far along you are in these progressions, you might be able to start with more than one pull-up.

For MANY people, especially if you have spent time in the gym in the past working on your biceps (like most guys do), you might find it easier to start with chin ups (with your palms facing toward you) for your first exercise before trying pull-ups (with your palms facing away from you).

I’ve already covered how to do a pull-up/chin-up in another article, so I won’t get into it too much here…just focus on these things:

  • Pull your shoulder blades back as you’re going through the movement, and focus on pulling the bar down.
  • Again, keep your butt clenched and your abs tight throughout the movement.
  • Get your chin above the bar, or it doesn’t count as a full rep.
  • Do whatever you need to get through the full rep.
  • If you can only do one rep, try to do at least 3 sets of one rep…after your three sets, add in some negatives to exhaust the muscle.

At this point, here’s a Level 4 routine set up for a week:

  • Monday – Chin ups – 3 sets for maximums repetitions
  • Wednesday – Inverted Rows – 3 sets for max repetitions
  • Friday – Pull-ups – 3 sets for maximum repetitions

Level 5 – Next steps

Once you’re able to do 3 sets of 10 pull-ups or chin-ups, you have a few options:

Personally, my favorite thing to do in a gym is weighted pull-ups; if you’re at this level and interested in doing so, here’s what you need to do:

  • Get a weight belt. I bought this one  on Amazon and it’s worked out incredibly well for me.  I’ve tried doing the whole “put weights in a backpack” and it certainly works, but the angle of the weights hanging off your back is weird.  With a weight belt, the weight hangs down between your legs (not a euphemism) so it feels more natural.
  • Add small amounts at a time. Most gyms will have 2.5 lb (roughly 1kg) weights; you might feel stupid putting on a big weight belt and only hanging a tiny weight off it, but you need to start somewhere.
  • Consistently add more weight. I’ll warm up with two sets of 5 pull-ups with no extra weight, and then do 3 sets of 5 weighted pull-ups.  If I can complete all 3 sets of 5 reps (with my chin over the bar for every rep), I’ll make a note to add 2.5 or 5lbs (1 or 2kg) to my weight belt for the next time.

So, here’s an advanced sample routine for back exercises:

  • MondayWeighted Chin Ups – 3 sets of 5 reps
  • Wednesday Elevated Feet Body Weight Rows – 3 sets of max repetitions
  • Friday – Wide Grip Pull-ups – 3 sets of maximum repetition
  • (The following week, I’d alternate by doing the chin ups without weight, and then doing weighted pull-ups

Don’t Make These Pull-up Mistakes!

My work here is done – it’s now up to you to take care of business.

As you start to get stronger with your pull-ups, it’s important to check in and make sure you’re doing them correctly. 90% of people I see doing pull-ups in a gym are doing them incorrectly!

Here are the 5 big mistakes people make when doing a pull-up:

I want this for you so badly, because in my head there’s no greater exercise than a pull-up. It makes you feel like a badass, you get super strong, and it’s an amazing benchmark and milestone on the path to a leveled up life!

Just ask Christina, who can now do multiple sets of pull-ups – her story is incredible:

Or Bronwyn, who lost 50+ lbs and now does chin-ups with her daughter on her back!

I know you might be overwhelmed right now, and you might be worried you’re gonna spend months without getting results.

Although that happens for many, it’s because they don’t have the right plan (or nutrition) in place!

You can absolutely do this on your own and follow the program above, but if you’re looking for more specific guidance or you want to avoid the guesswork and be told exactly what to do on what days to get to a pull-up on schedule, check out our coaching program!

We’ve helped tons of men and women get their first pull-ups with our 1-on-1 Online coaching program, where our coaches build a program that incorporates pull-ups and fits your busy life!

You can schedule a free call with our team to see how coaching can help you succeed by clicking on the image below:

Anyways! In case you don’t need a long article, here’s a the short version:

How To Do A Pull-up (short version)

  • Can’t complete a pull-up yet? Instead, begin with bent over rows or bodyweight rows, progressing until you can complete a pull-up.
  • Start with your hands on a bar about shoulder width apart, using an overhand grip (palms facing away).
  • Pull until the bar reaches chin level. Focus on pinching your shoulder blades down and back (towards each other), and keep your entire body tight. Lower yourself slowly.
  • Feel like a superhero after doing each one.

No matter your starting point, whether you’re a guy or girl, you CAN do pull-ups. And you WILL do pull-ups. You don’t need to follow the progression above exactly – it’s merely one path that you can take in order to reach the promised land…where the pull-ups flow like wine and the women instinctively flock like the Salmon of Capistrano.

Follow the path that works for your schedule, your experience, and your level of comfort with this movement – there’s no shame in going slowly and progressing safely.  And if you’re gung ho about pull-ups, ready for negatives and trying to squirm for that first rep, feel free to go for it.  Just be safe.

When you DO finally do a pull-up, I want to be the first to know – email me at steve@nerdfitness.com and tell me about it!

For the Rebellion,

-Steve

PS: If you are interested in learning more about pull-ups, bodyweight workout routines, and getting started with strength training, I applaud you – this is the BEST decision you make in your life.

If you want more specific instruction, we walk you through each step of the process in our free guide, Strength Training 101: Everything You Need to Know. Grab it free when you sign up in the box below:

###

Be Nice and Share!
This post was originally published on this site

Originally Posted At: https://breakingmuscle.com/feed/rss

Adaptation is when the body changes, and it’s a process, not the prize.


“Enlightenment, for a wave in the ocean, is the moment the wave realizes it is water.”


Thich Nhat Hanh


read more

Be Nice and Share!
This post was originally published on this site

http://www.thealternativedaily.com/

Have you noticed the price of olive oil and avocados going up lately? What about dairy, are you paying more for your butter and cheese? It is likely that you are dishing out more of your hard earned money for these items because, after a very long time in the dark,  fat is now back […]

Be Nice and Share!
This post was originally published on this site

Originally Posted At: https://breakingmuscle.com/feed/rss

You have to take control of your fears.

The fitness industry is wrought with lies.


read more

Be Nice and Share!
This post was originally published on this site

Originally Posted At: https://breakingmuscle.com/feed/rss

When you need help, get at least a few qualified opinions. Complement those with your own research, observations, and goals.

I love mountain sports. They energize, inspire, and motivate me—highly so. But sadly, I’ve become a regular patient at the orthopedic clinic. A renowned surgeon told me I need surgery on my right knee. As well as the left knee. And I trust the guy—yet, joint surgery is profoundly terrible. I know first-hand, I’ve been through it five times. Instead, I decided to see what I can do to stay active and put my back into knee cartilage regeneration through holistic and modern procedures and habits.


read more

Be Nice and Share!
This post was originally published on this site

Originally posted at: http://www.nerdfitness.com/

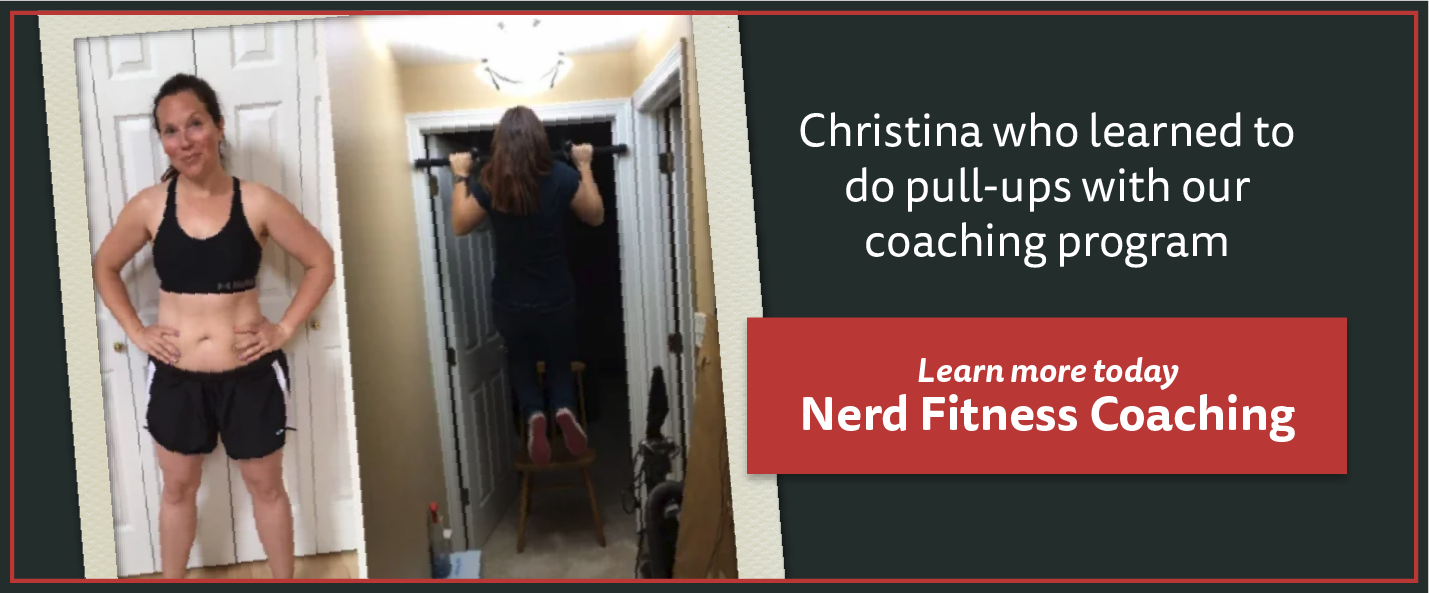
“She is seriously crushing it.”

When you speak with Emily, it doesn’t take long to realize how proud she is of leveling up her life.

And she should be proud! What she’s accomplished is simply amazing.

Emily, a dog walker from Chicago, had been obese her entire adult life – and it wasn’t like she didn’t try to lose weight.

Emily had attempted:

  • 1,200 calorie diets (too low for her)
  • 1,500 calorie diets (still too low for her)
  • P90x and TurboFire (both way too difficult)
  • Jillian Michael videos (boring)
  • An abandoned Planet Fitness membership (“I hate treadmills and elliptical machines with the fire of 1,000 suns!”)

Such start and stop patterns continued for years.

Then things changed.

Emily saw that Staci, our head female trainer for our 1-on-1 Online Coaching program, was accepting clients.

She knew it was time to try something different. And this time, things were different.

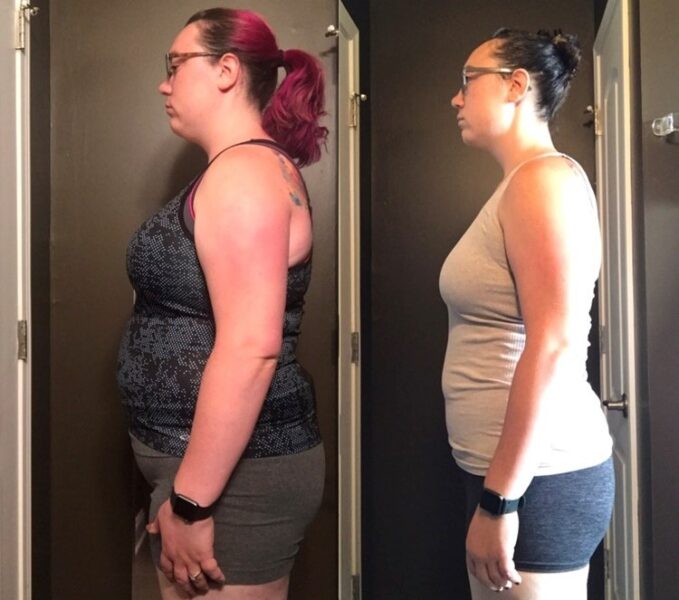
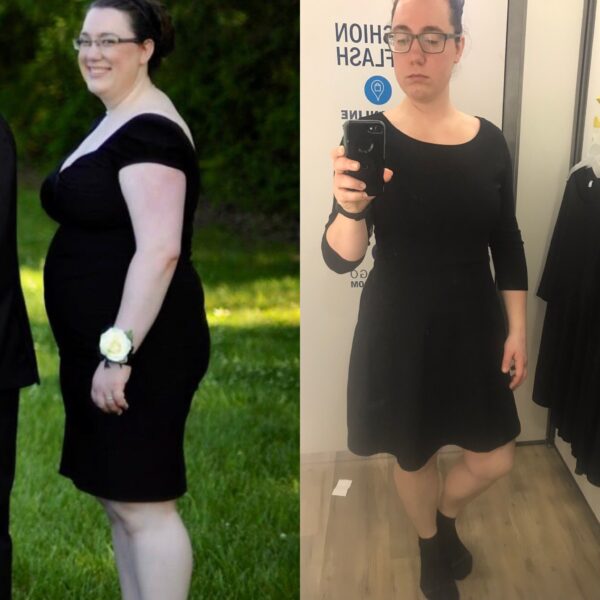
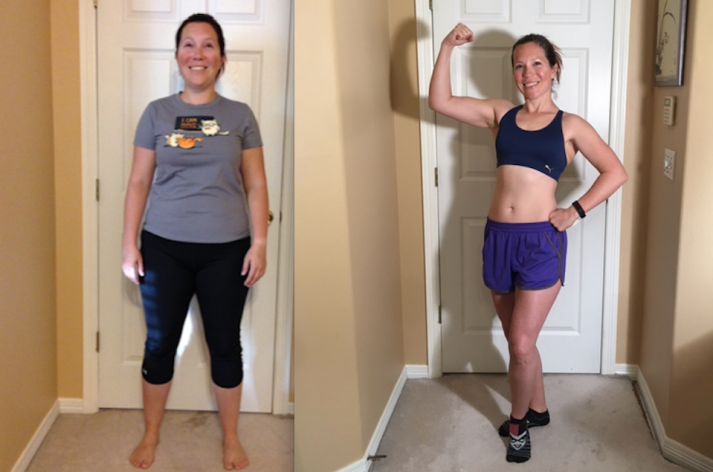
For starters, Emily, for the first time in her adult life, is no longer obese.

And when she heads to the gym, she crushes it, rocking 195 lb squats, 225 lb deadlifts, and 110 lb bench presses.

Awesome.

While all this is indeed super amazing, the thing I really want to highlight today is Emily’s mindset change.

Because she had tried getting in shape, multiple different ways, in the past.

However, a trap of “perfectionism” saw Emily abandoning all these earlier efforts.

But you don’t need to hear it from me. Let’s bring in Emily!

HOW EMILY LOST 65 POUNDS, LEARNED TO LOVE STRENGTH TRAINING, AND LEVELED UP HER LIFE

Steve: Hi Emily! Thank you so much for taking the time to chat with me.

I’d love to hear from you about your past – Can you take us through a typical day before you started your journey with Nerd Fitness?

Emily: A typical day for me looked something like this:

  • I’d wake up and get ready for work. I’d quickly look in the fridge and try to figure out what to bring for lunch. If there was a healthy choice available, I’d grab it, but often I’d just decide to pick up lunch somewhere later.
  • Next, I’d go to work walking dogs. When lunchtime arrived, I’d either eat what I brought or stop and grab a sandwich or something at the grocery store hot bar. Then the struggle would begin of avoiding buying chips and/or chocolate.
  • After work, I’d head home. I’d think about putting on a workout video, but I’d be tired from my job so the thought “Eh, I’ll just do it tomorrow” would cross my mind. Then, I’d figure out what to make for dinner. Again, I’d try to make a healthy choice, but would potentially give up and order takeout. Then I’d watch TV for a while, have a snack like popcorn or something to eat while watching, and finally off to bed.

I did a lot of living in the moment. It really felt like I was trying so hard all the time, but a lack of planning ahead gave me too many opportunities to slip up.  

Steve: Yeah, marketers really do place junk food at every angle in our grocery stores. It really is tough to avoid it all.

Was this the first time you had tried to get in shape?

Emily: Hardly.

I’d tried sticking to 1,200 calories a day for weight loss but just couldn’t do it. I ended up hungry and grouchy a lot.

Later, I tried again and bumped it up to 1,500 calories a day. Same results though, I ended up miserably and abandoned the effort.

As far as working out, I could never achieve consistency. There would be times when I wouldn’t even try and exercise. Other times, I’d try and work out every day. But I never felt good about what I was doing.

I gave the P90x and TurboFire programs a shot, but they were too tough for me.

I tried some Jillian Michaels videos but got bored.

I joined Planet Fitness, but it turns out I hate treadmills and elliptical machines with the fire of 1,000 suns. I tried their weight machines too, but it felt really awkward.

Going through all this has taught me a valuable lesson: if you don’t like what you’re doing, you probably won’t continue to do it.

Steve: You’re 100% right! We often tell people to exercise in a way they love and to do that as much as possible. That, and also strength training.

But since you’re working with Coach Staci, I’m sure we’ll get to more of that soon.

Was there a specific moment when you decided to ask for help?

Emily: There was.

I had just hit my highest weight ever. I was on the couch crying, looking through the subreddit r/progresspics (where people post before and after photos), and I was so frustrated.  

I felt like I was constantly trying to lose weight, making lots of good choices while still getting nowhere. I had been a member of the Nerd Fitness Academy for a while and had leveled up a lot of my choices, but the weight loss just wasn’t happening.  

Then, I saw that Staci was accepting clients for 1-on-1 Coaching, and decided to sign up.

Which has been a game changer.

In the past, I had a tendency to pick a shiny new program, try hard to be perfect, fail and burn out, and give up for a while until I found another shiny new program.

Staci really helped me focus, pick myself back up when I fell, and keep going.

Steve: I’m so happy to hear you hit it off with Staci.

Can we talk a little bit more about your “perfectionism?” I think jumping from one program to the next is something a lot of people can relate to.

Emily: Yeah, my perfectionism was really holding me back.  

I used to set ridiculously impossible goals. I’d do okay for a bit, then I’d have an eff it moment and eat half a package of Oreos. From there I’d spend the next two weeks spiraling in shame and frustration, wondering why I can never seem to stay on track.

Then I’d vow to get “back on the wagon” and the cycle would begin all over again.

I had to start where I was and learn to set teeny tiny incremental goals. Goals that I could still do even when everything felt impossibly hard. Goals like:

  • “Buy one vegetable and eat it before it goes bad”
  • “During meal times, drink water”
  • “Even when I overeat, still log it as best I can.”

I had been trying to jump into a healthy lifestyle with both feet, when what I really needed was to baby-step my way there.

So looking back, the most important change I’ve made is focusing on consistency over perfection:  

It doesn’t matter if my food log isn’t absolutely flawless, just that I log all my food as best I can each day.  

It doesn’t matter that every workout isn’t the most incredibly hard-core workout ever, just that I actually get myself to the gym three times per week.

Keeping myself moving forward even when I feel like giving up is the absolute most important thing.  

Steve: Yes! You nailed two key points: Often it’s easier to make small habits you can stick with instead of changing every single aspect of your life all at once.

The other is that consistency is the name of the game. No one is perfect, but a key characteristic of success is to keep going. Your response highlighted both ideas perfectly.

What’s your workout program look like? What is Coach Staci having you do?

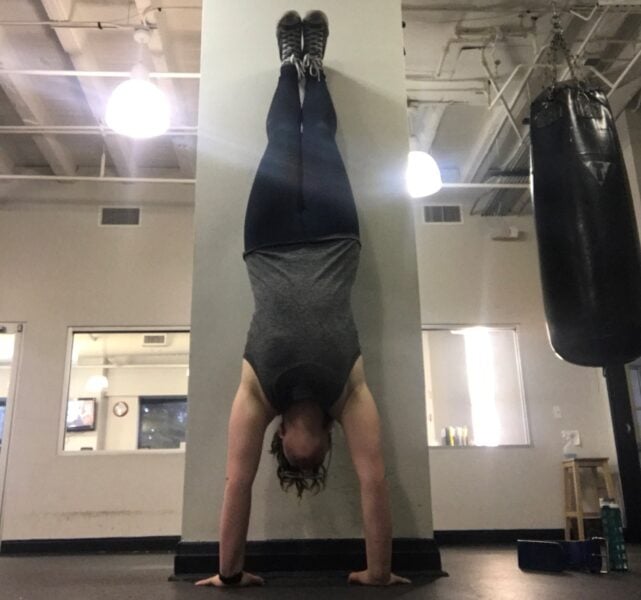
Emily: Strength training.

I lift weights on Tuesday, Thursday, and Sunday mornings first thing.

I also go to yoga class on Monday after work.  

I LOVE lifting, it makes me feel like such a badass. Once I picked up a barbell for the first time, I was like “Okay, this is it. I found my favorite thing to do.”

I’ve gone from basically just lifting the bar to a 195 lb squat, a 225 lb deadlift, and a 110 lb bench.

Steve: I don’t know if you can fully understand how happy you just made me! I’m so pumped that Staci helped you find a love of strength training.

Talk to me a little bit about nutrition. What have you done differently? What strategy are you following?

Emily: Since I was constantly hungry when cutting calories before, we knew we had to keep my volume up. Which meant eating vegetables to meet my calorie goals.

But I was convinced I didn’t like veggies. However, I decided to start an experiment. Every week I would pick up a vegetable I thought I didn’t like, and try cooking it a few different ways. If at the end of the week I still didn’t like it, that’s fine. I wouldn’t buy it again.

The thing is, I found I actually DID like a bunch of different veggies. I just didn’t like the kind forced on me as a kid: boiled to death and soggy with no seasoning.

Another thing that helped was making a food plan ahead of time. Planning helped me restructure my life and make the healthier choice easier, and the less healthy choice harder.  

For example: let’s say it’s Thursday evening after work. I had a hard day and I’m hungry, grumpy, and tired. I know that I’ll make the easiest choice available at the moment:  

Emily With No Plan hasn’t thought ahead, as though it’s a surprise that she has to feed herself every day. She could either figure out a healthy meal to make, probably have to swing by the grocery store and pick up ingredients, come home, prep everything and cook. Or, she could order delivery. Honestly, she’s probably going to order delivery.

Emily With A Plan is prepared! She previously decided that dinner is chicken fajitas. There’s chicken thawing in the fridge and the veggies are washed, chopped, and ready to go. In the moment there’s no tough decision to make. Plus, it’s faster to just make the fajitas. She’s probably not ordering delivery.

I’ve used this strategy a lot.

I ate a ton of chips, so I stopped buying them. When I wanted them I would have to go to the store and buy a single serving. That’s a lot of work for like 10 potato chips.

I ate a lot of cookies too, so I decided “I no longer keep store-bought cookies in the house.”

If I want them I have to make them from scratch. I’ve actually made them only a handful of times since implementing this rule, which has drastically reduced my cookie consumption. Shifting the regular structures of my life in this way has allowed me to use my laziness as an advantage. If I make unhealthy choices too much work, I’m WAY less likely to choose them.

Steve: That’s incredible. I made that same exact point in a recent article, “Super Simple Batch Cooked Chicken For Lazy People.” You really distilled down the argument on your example of fajitas.

Also, your strategy on learning to like veggies is the exact one I used! Great work all around.

What’s a typical day for you like now?

Emily: A typical day for me now:

  • If it’s a gym day, I wake up at 5:30am and go lift. I then run home and get ready for work. Otherwise, I wake up at 7:30am. I grab the lunch that I prepped over the weekend from the fridge and head out the door. (Or, if I’m intermittent fasting, skip this step).
  • Then it’s time to go walk some dogs for a while, and then I eat my lunch between visits.
  • When I get home, I’ve planned the whole week’s dinners over the weekend and have all the groceries I need already. No need to make a decision, I just make what’s planned.
  • Post dinner, it’s hanging out with my husband time. But no snacking. Then off to bed.

Planning ahead and setting up healthy habits has helped me so much:  

I don’t have to decide what’s for lunch or dinner, because that decision was already made.

I don’t have to white knuckle my way past junk food at the grocery store while picking up dinner ingredients because they’re already in the fridge.

I don’t have to decide to work out, because gym time is blocked out on my calendar. If it’s time to go to the gym, I just go.  

No decision, no skipping because I don’t want to, no internal drama. Just go. That also means when it’s not gym time, I don’t have to think about it or feel guilty that’s it’s been too long since I last worked out. I’ve set up the structure of my life to support healthy habits and remove opportunities for unhealthy behaviors.

Steve: You really are crushing it Emily. Both you and Coach Staci should be very proud.

Your appearance has changed? What else has changed about you?

Emily: I have completely changed.  

You’re right, how I look has obviously changed, but I’m also way more confident now.

I’ve proven to myself that I can do what I once thought was impossible. I can look my flaws square in the face and learn from them instead of running from them.

I can rebuild my life from the ground up. I’m more assertive now instead of letting people walk all over me like I used to do. I’m way more energetic than I ever was before. And I’m more social because I have the energy to go out and do stuff.

I even sleep better.

I’m like an entirely different person.

Steve: I’m so happy to hear that. We often talk about how one improvement in life can lead to another, and then another, creating a chain reaction.

I’m so happy you feel more confident as a result of your new habits.

Okay, real talk: NF Coaching isn’t cheap. You’ve been a client for a year and a half. What makes you stick with it and keep investing in yourself?

Emily: Coaching has definitely been worth the investment.

Just knowing Staci is there in my back pocket, that she believes unequivocally I can do it, and she’s there with me every step of the way has been invaluable.

She keeps me grounded and focused. She keeps me from getting distracted by shiny new programs. And when things get rough and I start to get overwhelmed, she helps me keep things in perspective and just keep trucking along.  

Interestingly enough, I’m actually better off financially now than I was before Coaching.

Managing my calorie budget has helped me with my financial budget – there’s a ton of overlap. It’s helped me hone my long-term planning skills.

Practicing the skill of not eating junk food even though I want it has helped me sharpen my ability to not buy things I don’t need. Both require trying to get the most out of limited resources. Both require putting long term goals before short term desires.  

Steve: I totally believe it. The financial and calorie budget analogy and overlap makes a lot of sense to me. You’re a clever one, Emily, and you’re okay in my book!

Alright, I’ve got to ask: do you have any nerdy passions or pursuits?

Emily: I read a ton of fantasy and sci-fi. My favorites are Name of the Wind, The Lies of Locke Lamora, and Way of Kings. I’m in three book clubs. I also love playing board games.

I consider myself a Trekkie, but have also cosplayed as Kaylee from Firefly.

Lastly, I just started playing D&D for the first time – my character is a kick-butt Druid.

Steve: A love of fantasy and sci-fi, cosplaying experience, and repping a D&D character: your nerd credentials are in proper order. We may proceed.

What’s next for you Emily? Where do you go from here?

Emily: Two main goals:

  1. Continue with weight loss: next stop is a healthy weight!
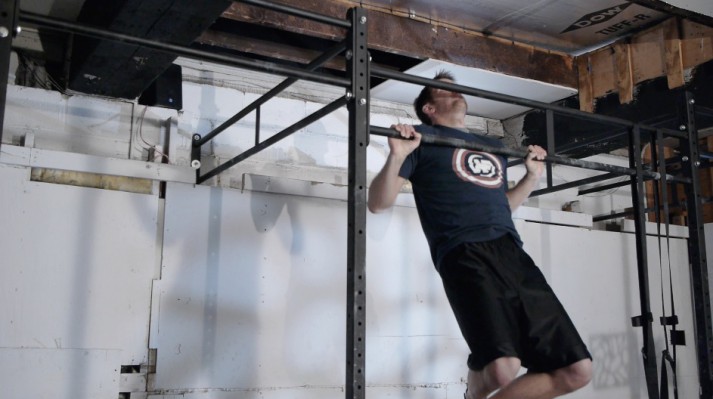
  2. Keep getting stronger. As I said, I’ve been lifting for a while now and I love it! Next big goals are 200 lb squat, 250 lb deadlift, and being able to do a chin up.

Steve: I have no doubt you will rock a chin-up soon. You’ve been crushing everything else you’ve sought after.

Best of luck Emily! And thanks again for taking the time to share your story with all of us!

THE 6 KEYS TO EMILY’S WEIGHT LOSS AND LEVEL UP SUCCESS

We can all learn a lot from Emily.

Losing weight and transforming yourself is tough. When someone around us does it, it’s worth analyzing their behavior to see if any lessons can be gleaned for the rest of us. Something we can ponder, and then take action with ourselves.

Emily’s journey provides plenty of good examples. In speaking with her, I distilled six key traits that set her apart. Six behaviors that helped Emily succeed despite the odds against.

Here’s what we can learn from Emily:

#1) EMILY DIDN’T GIVE UP

Emily had been trying to lose weight for years:

Restricting caloric intake to super low levels? Check.

Running mindlessly on treadmills? Check.

At home workout videos? Double check.

She tried all of it. And she didn’t like ANY of it.

So she’d move onto the next “shiny new program.”

What’s important is Emily never gave up. She kept trying new things.

Then, when she started working with Nerd Fitness Coaching, she tried something different: picking up a barbell.

Now, Emily loves strength training and feels like a badass for doing it.

There’s no ONE way to get in shape, and Emily finally found something she loves and will stick with.

The important thing is Emily kept trying until she got it right. Speaking of…

#2) EMILY IS WILLING TO EXPERIMENT

I love Emily’s willingness to experiment with vegetables.

Vegetables are nutrient dense, full of fiber, and low on calories.

If you’re trying to eat within your calorie goals, but don’t want to be “hungry and grouchy” the whole time, vegetables will be key.

Emily was convinced she didn’t like vegetables. But she decided to test her assumptions and try some out. She did this by picking out one new veggie a week.

If she cooked it and hated it, no big deal. She wouldn’t force herself to eat it again. But if she liked it…BOOM! A new vegetable could be added to the menu.

Emily discovered she liked many different kinds of vegetables, as long as they were prepared correctly.

Be open to experimentation. Try new things. Not everything you experiment with has to work. But some things you try just might.

#3) EMILY BUILT A SYSTEM AND HAS A PLAN

One of the true gems of Emily’s interview comes from the Emily With No Plan” and “Emily With A Plan” comparison.

She really nailed it. When you have a plan, like prepared meals for the week, you take all the guesswork out of “what should I eat?” Dinner time, which comes around every day, doesn’t have to be a surprise.

Emily knows exactly what to eat because she planned it out over the weekend. And she never has to stress about not having supplies, because she picked those up too over the weekend.

When it comes time to figure out what to eat, the easiest option available to Emily is the healthy meal she has planned for.

The same strategy can be seen on her workout schedule:

Tuesday morning? She’s up early crushing it at the gym.

Wednesday morning? She’s sleeping in.

Emily never feels guilty about waking up late, because it’s all part of her plan. Wednesday’s are her day to rest. The gym will be calling tomorrow.

Make a plan. Put it on your calendar. Make your healthy habits automatic instead of worrying about what to do from one moment to the next.

#4) EMILY DIDN’T LET PERFECT BE THE ENEMY OF GOOD

In the past, Emily had let “perfectionism” derail her efforts.

In her own words, Emily would find a “shiny new program.” She’d go all in, excited about her new endeavor.

Then…life would happen. She’d miss a workout. She’d eat some Oreos. She’d order takeout.

When this would inevitably happen, she’d have an “eff it” moment. Emily would abandon everything and “then spend two weeks spiraling in shame and frustration.”

Then, she’d try again, have another “eff it” moment and the cycle would repeat.

But not anymore.

Today, Emily is consistent. If she wants to have some cookies, it’s okay! She knows tomorrow it’s back to strength training and the chicken fajitas she has ready to cook.

No one is perfect. We all have moments where we stray from the path. The important thing is to not let one decision affect all future decisions:

Don’t let some potato chips today stop you from going to your yoga class.

Don’t let sleeping in and missing a workout this morning stop you from cooking dinner tonight.

Don’t let “perfect” be the enemy of “good.”

#5) EMILY INVESTED IN HERSELF AND ASKED FOR HELP

Emily had tried to get in shape many times before.

And Emily had stopped trying just as many times.

When Emily saw that Staci was accepting clients as part of NF Coaching, she decided to try again. But this time, she would ask for help.

It’s okay to ask for help. Even if you have to invest your time or money to do so.

You are not the first person to want to get in shape. Emily is not the first Rebel to transform herself. What makes them successful varies from person to person, but oftentimes it’s that they reached out for assistance.

It’s okay to ask someone for guidance. Someone who has helped others do exactly what you want to do.

Yes, you will most likely have to pay for this expertise. But oftentimes, it is indeed worth every penny.

I’ve personally had an online coach for 4 years, someone who knows exactly how to help me reach my goals, and it’s the best investment I’ve ever made.

Remember, you don’t have to make this journey alone.

#6) EMILY IS HAVING FUN ALONG THE WAY

I know it’s cliché, but getting in shape really is a lifestyle adjustment. Meaning this isn’t something you do for a week, a month, or even one year.

It’s something you will do for the rest of your life.

For this to work, you need to enjoy the journey ahead.

And Emily is enjoying herself!

She feels like a total badass when she deadlifts. And she should, because doing deadlifts is badass.

Emily doesn’t dread picking up the barbell. She looks forward to it.

That means she’ll keep doing it!  

Emily takes a yoga class because Emily likes taking yoga classes.

Emily makes chicken fajitas because Emily likes chicken fajitas.

Emily occasionally makes homemade cookies, because occasionally Emily likes making homemade cookies.

You need to enjoy what you do, otherwise, you won’t stick with it. You need to have fun today, so years from now you’ll still be doing it.

It’s a message I really push in the video “Want to get in shape? Think in days and years, not weeks and months”

We are not making temporary changes, because they will only create temporary results. We are making permanent changes, so our transformations will be permanent.

HOW WILL YOUR NEXT ATTEMPT BE DIFFERENT? BE LIKE EMILY

I’m super proud of what Emily and Coach Staci have accomplished.

And if you’re still reading this, I want you to know I’m proud of you too.

You’re still reading, which means you’re still trying (see #1). You found your way to our strange corner of the internet and you’re part of the Rebellion.

I’m so happy you’re here today.

We’ll continue to be here for you tomorrow, next month, and years from now.

No matter where you are on your journey, I would encourage you to think about what made Emily successful:

  • Don’t give up. Keep trying, keep reading. But try something different! If going full Paleo didn’t work out, try cooking one new vegetable a week as Emily did.
  • Experiment. Do you always shut your alarm off in the morning and skip the gym before work? That’s okay, you’re simply not a morning person. Try going to the gym in the evening – or try working out from home. It’s okay to try new things. Sometimes it takes many attempts before something “clicks.”
  • Have a plan and build a system. Batch cooking has changed my life and many other Rebels as well. It works because it’s part of a system designed to ensure I have a healthy meal whenever I’m ready. Plans and systems will outperform “motivation” every time.
  • Don’t let “perfect” be the enemy of “good.” Unless this site has been archived after the robot revolution, all of us are human. Meaning all of us are imperfect and flawed. That’s okay. Don’t let one inevitable slip up derail you for weeks. That’s where the real harm comes in.
  • Ask for help. Some people can completely change their lives on their own. Most can’t. If you have access to someone who knows exactly what to do to help, reach out. Most of us need a Yoda to become a Jedi.
  • Have fun. Embarking on a change that makes you miserable is a sure fire way for future abandonment. This is a lifelong journey, so discovering things you enjoy is critical.

If you found yourself relating to Emily’s story, jumping from “shiny new program” to “shiny new program” without getting the results you’re after, maybe it’s time for something different.

Depending on your current situation, our 1-on-1 NF Coaching Program might be the droids solution you’re looking for. You can learn more by clicking on the box below and scheduling a call with our team!

No matter what you do, here’s what I want you to take away from Emily’s story:

  • Having someone rooting for you is invaluable. It could be a coach, but it could also be a friend, a family member, or a co-worker who’s also trying to get in shape. If you can find a teammate, find a teammate.
  • If you’re having trouble with your nutrition, look into meal planning. It was a game changer for Emily and it’s been a game changer for me.

If you do those two things, I can almost guarantee you’ll be a healthier version of you in 12 months. Then maybe it’ll be your story on the website we’ll be sharing. And hey, maybe your journey will inspire change in someone else!

-Steve

PS: I want to give a special shoutout to Coach Staci, who helped turn Emily’s life around. Staci has guided and inspired hundreds if not thousands of Rebels and we are very lucky to have her on Team Nerd Fitness.

If you want to see if we can help you level up your life, check out our 1-on-1 Coaching program. We’d love to talk to you, no matter what you end up deciding.

Be Nice and Share!
This post was originally published on this site

http://chriskresser.com/

Using natural remedies to prevent or shorten a cold or flu can keep the illness from spreading between families, as it has with this couple.

The viruses that cause a cold or the flu lurk at work, school, daycare, and everywhere in between. And even if you yourself manage to stay virus free, there’s a high chance a family member or partner will bring a bug home. In the United States, the season is roughly fall and winter, peaking between December and February—but it can last until May.

Should you happen to catch a cold or the flu, you don’t have to turn to drugs and OTC medications to avoid the misery of nasal congestion, sore throat, coughing, fever, and just feeling wiped out. Read on to learn 20 natural remedies for the cold and flu that can significantly boost your immunity and shorten the duration of illness, so you can get back to feeling your best.

Table of contents:

Is It a Cold or the Flu?

Upper respiratory illnesses take a considerable toll on the American population. According to CDC estimates, Americans suffer approximately 30 million cases of the flu per year. (1) On top of that, American adults experience two to three colds per year and children even more—somewhere in the range of six to eight per year is a conservative estimate. (2) While both illnesses are unpleasant, there are some important differences between a cold and the flu.

You don’t need to suffer through cold and flu season, and you don’t need to turn to over-the-counter solutions to feel better. Check out this article for my top 20 natural remedies to ease symptoms and shorten your illness. #healthylifestyle #wellness #chriskresser

A cold is an acute, self-limiting viral infection of the upper respiratory tract. Colds can be caused by more than 200 different viruses, with coronaviruses and rhinoviruses the most frequent culprits. (3) The sheer number of cold-causing viruses in existence means that the body has a hard time building up resistance to them—this is why we have yet to develop a “cure” for the common cold! The common cold spreads through hand contact with an infected person, by touching a contaminated object they’ve handled, or by encountering aerosolized  droplets released during a sneeze or cough.

The flu, on the other hand, is a contagious viral respiratory infection that causes mild to severe illness. (4) There are four types of influenza viruses: A, B, C, and D. Humans are primarily affected by influenza viruses A and B—these viruses are responsible for seasonal epidemics of the flu each winter. Type C causes a very mild respiratory illness, and type D infects cattle, so these two are significantly less worrisome.

Like the common cold, the flu is spread by virus-laden airborne droplets when infected people cough, sneeze, or talk. Less often, a person may contract the flu by touching a surface or object that harbors the flu virus and then touching their own mouth, nose, or eyes.

Back to Top

Should You Get a Flu Shot?

The flu vaccine (or nasal spray) is available in doctors’ offices, drugstore chains, grocery stores, and even drive-through clinics. However, a growing body of research indicates that it may not always be as effective as we’ve been led to believe. Perhaps even more importantly, the flu vaccine may have some adverse health consequences. (5)

A flu vaccine “effective” in one season may increase your risk of developing the flu in a subsequent season. This effect is due to a process called “antibody-dependent enhancement,” which occurs when virus–antibody complexes adapt and find alternate ways into cells, typically after a person receives the vaccine. (6) Getting the flu vaccine may also blunt the effectiveness of subsequent vaccines and increase the chance that you will infect others. (7, 8)

The efficacy of the flu vaccine is also up for debate. Three large scientific reviews have noted only “a modest effect” of the influenza vaccine on reducing flu symptoms in children, adults, and the elderly. (9, 10, 11) In addition, a large part of the purported benefit of flu vaccines may be due to the “healthy-user bias,” a phenomenon in which the subjects that voluntarily enroll in a trial (such as to receive a flu vaccine) are, on average, healthier than the general population—meaning that they are less likely to get sick in the first place, thus exaggerating the vaccine’s preventive advantages in study results.

Last but not least, conflicts of interest abound in vaccine research. The authors of the reviews mentioned above noted that industry-funded studies were significantly more likely to report conclusions in favor of vaccines than publicly funded studies. Furthermore, they reported:

The review[s] showed that reliable evidence on influenza vaccines is thin, but there is evidence of widespread manipulation of conclusions and spurious notoriety of the studies. (12)

Who Should Consider a Flu Shot

While for many of us the flu is a temporary (albeit uncomfortable) problem, there are certain populations who are more at risk for serious complications related to the illness and may benefit from receiving the flu shot. Healthcare workers with direct patient contact may benefit from the vaccine, as they are in frequent contact with sick patients who may be carrying the flu virus. (13) Asthmatics may also benefit, since viral respiratory infections take a greater toll on their health than that of the average non-asthmatic individual. (14) Finally, the flu vaccine may also be valuable for immunocompromised and elderly people because in these populations, the flu can lead to serious and potentially life-threatening conditions such as bacterial pneumonia and respiratory failure. (15, 16)

It’s important to weigh the evidence and make your own decisions when it comes to the flu vaccine. If you’re worried about the possibility of serious complications, getting a flu shot might be the right choice for you.

Back to Top

Cold Medicines Only Suppress Symptoms

When many people feel the first signs of a cold or the flu, they begin popping over-the-counter pharmaceuticals such as decongestants, antihistamines, and non-steroidal anti-inflammatory drugs (NSAIDs), like ibuprofen and aspirin. However, evidence indicates that these drugs do nothing to shorten the duration of illness or prevent illness in the first place; they merely suppress symptoms. (17) Furthermore, many of these drugs come with significant side effects. See my article “How Safe Is Your Over-the-Counter Medicine?” to learn more about the health risks associated with these drugs.

Antibiotics Are Ineffective for Colds and Flu

A surprising number of physicians still prescribe antibiotics to patients with cold and flu symptoms, even though it’s well known that antibiotics—intended to prevent or kill bacterial infections—are completely useless for treating viral infections. According to recent statistics, a shocking 25 percent of antibiotics are inappropriately prescribed, and an additional 35 percent of prescriptions are “potentially inappropriate.” Many of these inappropriate prescriptions are given to patients (often children) with upper respiratory infections, sinusitis, and sore throats, which are most frequently viral in nature and not caused by bacteria. (18)

The indiscriminate prescribing of antibiotics is one of the primary reasons why antibiotic resistance has become such a pressing problem in our society. To stem the tide of antibiotic resistance, we need to significantly reduce our use of antibiotics, especially in cases where they aren’t even useful, such as in the treatment of colds and flu.

The Growing Problem of Viral Drug Resistance

It’s not just bacteria that are becoming resistant to pharmaceutical drugs; viruses are also developing drug resistance. Recent research has revealed that the influenza A virus, the virus responsible for seasonal epidemics of the flu, can quickly acquire resistance to anti-influenza drugs by mutating viral components. (19) This poses a problem for the conventional medical system, which relies on antiviral drugs to treat severe flu cases.

Due to problems with the flu vaccine and over-the-counter drugs, lack of efficacy of antibiotics, and the growing problem of viral drug resistance, there is a pressing need for novel treatment options for colds and flu. Fortunately, we already have a time-tested pharmacy for colds and flu at our fingertips in the form of remedies derived from plants and other natural products.

Back to Top

20 Natural Remedies for Cold and Flu

We can promote recovery when we catch a cold or the flu, and even prevent it from taking hold, without relying on drugs—because nature has provided us with an abundance of botanicals, vitamins, and minerals that boost our immunity and even attack the cold and flu viruses, thereby both reducing symptoms and shortening the duration of illness.

1. Andrographis: To Reduce Duration

Andrographis (Andrographis paniculata) is an herbaceous plant native to India and Sri Lanka. It is a primary herb for the treatment of fever and infectious illnesses in both traditional Chinese medicine and Ayurvedic medicine.

The antimicrobial and immune-enhancing properties of andrographis have garnered significant scientific attention, and research has shown that this botanical is a powerful ally in the treatment of colds and flu. When taken within the first 36 to 48 hours of illness, andrographis can significantly reduce the severity and duration of upper respiratory infections. (20) Andrographolide, a primary compound derived from andrographis, may also inhibit influenza virus replication and reduce virus-induced inflammation, the cause of multiple flu symptoms such as fatigue and muscle soreness. (21, 22) In fact, these beneficial properties have made andrographis a popular remedy in Europe for the treatment of influenza. (23)

Because the available research on andrographis is variable in terms of extracts and dosages used, it is difficult to determine the optimal dosage for treating colds and flu. (24) However, the lower end of the dosage range used in clinical trials is 400 mg of andrographis (standardized for andrographolide content) three times per day, and the upper end is 1,000 to 2,000 mg three times per day. Andrographis at these dosages is intended for short-term use.

2. Honey: For Coughs and to Speed Recovery

Honey promotes recovery from viral respiratory infections. Manuka honey, a type of honey produced by bees that feed on the nectar of the New Zealand tea tree, inhibits flu virus replication. (It also boosts the effectiveness of certain antiviral drugs used for the treatment of influenza—the prescription drug Tamiflu is one example.) (25, 26) Honey has also been shown to be more effective than dextromethorphan and diphenhydramine, the most common active ingredients in OTC cough medicines, at improving nightly cough and sleep quality in children with upper respiratory infections. (27)

Methylglyoxal (MGO) is the primary anti-influenza ingredient in Manuka honey. When selecting Manuka honey for medicinal uses, look for the “MGO” label on the jar—it should state a minimum MGO content of 83. The higher the MGO rating, the higher the level of antiviral activity of the honey.

3. Propolis: To Speed Recovery

Propolis is a resinous mixture produced when bees mix their saliva and beeswax with secretions gathered from tree buds and other botanical sources. Bees use propolis to protect their community from bacterial, fungal, and viral pathogens, essentially making propolis the “immune system” of the hive. It turns out that the “immune system” of the beehive also benefits the human immune system. Propolis contains polyphenolic compounds with anti-influenza activity and, when administered nasally, may significantly accelerate recovery from the common cold. (28, 29)

To accelerate recovery from colds and flu, begin with one tablespoon of high-MGO Manuka honey per day. Complement this with a propolis throat spray, such as this one by Beekeeper’s Naturals.

4. Bovine Colostrum: For Prevention

Bovine colostrum is the first milk produced a cow following the birth of a calf. It has a similar structure to human colostrum and proffers comparable immune-boosting benefits. In fact, bovine colostrum has been found to be three times more effective at preventing the flu than the flu vaccine and significantly reduces the number of episodes and hospitalizations for respiratory infections in children. (30, 31) You can purchase bovine colostrum as a powder or capsule; just choose a supplement from grass-fed, hormone-free, and antibiotic-free cows to ensure that you are getting the healthiest product possible.

5. Chinese Skullcap: For Prevention and Treatment

Chinese skullcap (Scutellaria baicalensis) is an antiviral that’s often effective against drug-resistant and nonresistant strains of influenza and cold-causing viruses. (32, 33) It’s been shown to stop viruses from reproducing, inhibit proteins present on influenza viruses that facilitate their adhesion to cells, suppress viral gene expression, protect cell membranes from virus-associated inflammation, and boost immunity.

The root extract of Chinese skullcap can be taken for colds and flu in tincture form at a dose of one-fourth to one-half teaspoon three times daily or as one teaspoon of powdered root three to six times a day. Chinese skullcap should not be taken during pregnancy and should be used with caution if you are taking any medications because it can increase the bioavailability of the drugs, intensifying their effects on the body.   

6. Echinacea: For Prevention and Treatment

Echinacea refers to a group of herbaceous flowering plants in the daisy family native to Eastern and Central North America. Historically, Native Americans used echinacea to treat severe infections; today, the anti-infective properties of echinacea have been demonstrated by several clinical trials.

In one trial, 755 subjects were given either Echinacea purpurea or placebo for four months; those in the echinacea group experienced a significantly reduced occurrence of virally confirmed cold episodes. (34) A second clinical trial found echinacea to be as effective as the antiviral drug oseltamivir (Tamiflu) for the early treatment of influenza virus infections. However, unlike oseltamivir, echinacea does not run the risk of inducing antiviral drug resistance. (35)

Echinacea can be consumed as a tea or tincture or in capsules. If you take echinacea in a liquid form (tea or tincture), retain the dose in your mouth for approximately 10 seconds before swallowing to boost the local antiviral effects on oral tissues. (36)

7. Elderberry: To Shorten Duration and Treat Symptoms

The small, dark purple berries of the elderberry plant have a long history of use for the treatment of colds and flu. Elderberry extracts alleviate cold and flu symptoms and can significantly shorten the duration of illness by two to four days. (37, 38) Elderberry may battle cold and flu viruses by increasing serum antioxidant capacity.

Elderberry syrup is a time-honored and palatable method for consuming elderberry and can be taken in a dosage of 15 mL four times a day until cold and flu symptoms abate. Elderberry lozenges are another option that also frequently contain other immune-supportive ingredients, such as zinc. Elderberry is safe to consume during pregnancy and has no known drug interactions.

8. Garlic: For Prevention and to Reduce Severity

The humble garlic bulb has quite a colorful history—in medieval times, garlic was worn on the body to ward off the “evil eye” and hung in homes to protect against supernatural entities believed to cause illness. Today, it has become clear that these superstitions held a grain of truth; while garlic may not ward off the evil eye or malicious spirits (or vampires), it does help to protect against disease-causing agents, including viruses.

Allicin, a compound released when a garlic clove is crushed, smashed, or chopped, has been shown to boost immunity against cold-causing viruses. (39) Aged garlic extract, a preparation that lacks the pungent scent of fresh garlic, may reduce cold and flu severity by enhancing the function of immune cells and reducing virus-induced inflammation. (40, 41)

The dose of aged garlic extract used in clinical trials for colds and flu is approximately 2.5 g per day. The optimal dosages of fresh and dried garlic for colds and flu have not been determined, but clinical trials examining the broad-spectrum antimicrobial properties of garlic have used dosages between 600 and 1,200 mg per day.

9. Ginger: For Prevention and Treatment

In China and Japan, ginger is a key supportive ingredient in traditional herbal formulas for treating the common cold. Scientific research indicates that fresh ginger may have antiviral activity against certain viruses that infect the respiratory system. (42)

To get the maximum antiviral benefits of ginger, I recommend making the following ginger tea recipe:

  1. Juice 1 to 2 pounds of ginger; place juice in a jar and refrigerate.
  2. Place 2 to 4 ounces of ginger juice in a mug with the juice of one-half lemon and a large tablespoon of honey. I recommend Beekeeper’s Naturals honey. Add one-eighth teaspoon of cayenne pepper and 6 ounces of hot water.
  3. Drink 2 to 6 cups of this a day, sipping slowly throughout the day.

10. Houttuynia: For Prevention and Treatment

Houttuynia cordata is a traditional Chinese herb active against multiple respiratory viruses, including influenza. It can be taken in a tincture or as a powdered dry herb. For viral respiratory infections, the recommended dose of tincture is one-fourth to one-half teaspoon six times per day or one-half teaspoon three to six times daily for the dried herb.

11. Licorice: For Prevention and Treatment

Licorice root (Glycyrrhiza glabra) is a botanical medicine with broad-spectrum antiviral properties. Glycyrrhizin, the sweet-tasting constituent of licorice root, can inhibit the replication of influenza virus while also reducing virus-associated inflammation. (43)

Licorice can be taken in tincture form at a dosage of 30 to 60 drops up to three times a day or in capsules at a dosage of 4 g per day in two to three divided doses. Licorice should not be taken in large doses or for long periods during pregnancy because it may have harmful effects on the unborn child. The phytochemicals in licorice root also have blood pressure-raising and mild estrogenic effects, so it should not be taken for more than 10 days by people with hypertension, hypokalemia, hypernatremia, or low testosterone levels.

12. Lomatium: For Treatment

Lomatium is a member of the carrot family native to western North America. While studies on the antiviral activity of Lomatium are scarce, the herb has a long history of use by Native American peoples for the treatment of infections. Anecdotally, herbalists have found lomatium useful for treating several types of influenza.

Lomatium should not be taken during pregnancy. Some people may experience a rash, which seems to be harmless, upon ingestion of lomatium. According to herbalist Stephen Harrod Buhner, the rash is typically dark red or purplish in color, covers the whole body, causes little to no itching or discomfort, and disappears in about a week’s time. Using lomatium as part of a mixture of herbs, rather than on its own, may prevent the rash.

13. Medicinal Mushrooms: For Prevention

Medicinal mushrooms are all the rage right now, and for a good reason: they have a broad spectrum of health benefits, including helping the immune system respond to viruses. Glucan, a polysaccharide found in medicinal mushrooms, enhances the immune response against the influenza virus. (44) Glucans are found in chaga, Cordyceps, reishi, and shiitake mushrooms.

Medicinal mushroom extracts are available in many different forms, including tinctures, capsules, and teas.

14. Probiotics: For Prevention

According to recent research, a healthy gut microbiota is crucial for initiating an appropriate immune response to the influenza virus. (45)

Fermented foods and probiotics that introduce beneficial bacteria to the gut are potent tools for preventing and fighting cold and flu viruses. A recent study found that when adults who suffered from frequent colds were supplemented with Lactobacillus paracasei, Lactobacillus casei, and Lactobacillus fermentum for 12 weeks, they experienced a significant reduction in the number of upper respiratory infections. (46) Eating lacto-fermented yogurt has also been found to reduce the risk of catching a common cold in healthy elderly individuals. (47)

In an animal study, mice were given Lactobacillus casei isolated from kimchi, a staple fermented vegetable dish in Korean cuisine. The mice treated with L. casei experienced reduced weight loss after virus infection and lower levels of viral replication in their lungs. (48)

Unfortunately, catching the flu does have some harmful effects on the gut; flu-infected patients experience reductions in intestinal microbiota diversity and increases in opportunistic E. coli and Enterococcus faecium. Taking Lactobacillus probiotics and eating lacto-fermented foods may help prevent or reduce these adverse effects.

15. Olive Leaf: For Prevention

Olive leaf contains three polyphenols—a type of micronutrient found in plant-based foods—with potent antiviral properties. Olive leaf extract changes the membrane of the influenza virus, preventing it from attaching to and penetrating cells. (49, 50)

Olive leaf can be taken in the form of a tincture, capsules, or tea. The typical dosage range is 500 to 1,000 mg per day.

16. Red Root: For Treatment

Red root (Ceanothus americanus) is native to the Americas. While there hasn’t been much scientific study on red root, the deep red tincture and tea extracted from its roots have long been used for treating respiratory infections.

In his excellent book Herbal Antivirals: Natural Remedies for Emerging and Resistant Viral Infections, herbalist Stephen Harrod Buhner provides a recipe for an herbal immune tonic that includes red root and several of the other antiviral botanicals I’ve mentioned above.

Here’s the formula for the immune-tonic combo:

  1. Mix two parts lomatium, two parts red root, two parts licorice, and one part isatis (all in tincture form).
  2. Take 30 to 60 drops mixed with 1 to 2 ounces of water each hour until condition improves. You may have trouble finding some of these botanicals locally, but you can get them fairly easily online.

17. Selenium: For Prevention

Selenium helps to balance and regulate the immune system and is crucial in optimizing your defenses against cold and flu viruses. Selenium deficiency has been found to cause the flu virus to mutate into more virulent forms, but replenishment of this trace mineral can improve the immune response to viral respiratory infections. (51, 52)

During cold and flu season, feel free to take 200 mcg of selenium three to four days a week. However, beyond the flu season, I don’t recommend supplementing with selenium long term because continuous selenium supplementation has been associated with an increased risk of prostate cancer in men. Instead of supplementing outside of cold and flu season, optimize your intake of selenium-rich foods such as:

  • Brazil nuts
  • Cremini mushrooms
  • Shiitake mushrooms
  • Cod
  • Shrimp
  • Tuna
  • Halibut
  • Scallops
  • Chicken
  • Eggs
  • Lamb
  • Turkey

18. Vitamins A and D: For Prevention

Vitamins A and D work synergistically to support your immune health. In fact, host resistance and susceptibility to influenza infection appear to depend importantly on the ratio of vitamin D to vitamin A activity in the body. (53) Extra-virgin cod liver oil is an excellent source of vitamins A and D in the proper ratio for promoting optimal immune function.

19. Vitamin C: To Reduce Duration

Over the years, there has been much debate over whether vitamin C is useful for treating colds and the flu. A recent meta-analysis of studies concluded that extra doses of vitamin C taken at the onset of a cold significantly reduce its duration. (54) During cold and flu season, consider taking 1,000 to 4,000 mg of supplemental vitamin C per day. I recommend a liposomal vitamin C because it is rapidly absorbed and highly bioavailable.

20. Zinc: To Reduce Duration

Zinc is another immune-boosting nutrient that many people don’t get enough of in their diets. According to a review of trials that assessed the body of literature on zinc for the common cold, zinc administered within the first 24 hours of a cold can significantly reduce the duration and severity of symptoms. (55) I recommend taking 30 mg per day of zinc picolinate or zinc gluconate at the first sign of a cold to speed up your recovery.  

Back to Top

For the Best Effect, Live a Healthy Lifestyle, Too

While the natural remedies I’ve mentioned above are excellent cold and flu fighters, they should be combined with healthy, ancestral lifestyle choices to achieve the greatest impact.

Getting high-quality sleep, reducing your stress, and eating a nutrient-dense, whole-foods diet will do wonders to support your recovery from a cold or the flu.

Get Plenty of Sleep

Getting plenty of sleep is essential for recovering from colds and flu, as well as preventing their onset. Insufficient sleep and poor sleep quality are associated with reduced resistance to the common cold; this effect undoubtedly holds true for the flu as well, since sleep deprivation compromises immunity. (56)

In addition to getting plenty of sleep—around eight hours per night is a good goal—you should also work on optimizing your circadian rhythm. Circadian rhythm disruption, caused by factors such as blue light exposure before bed and abnormal sleep patterns, primes the body for viral infection. (57)

Reduce Stress

Mental and emotional stress depresses the immune system, making it harder to fight off colds and flu. Stress reduction practices should be a crucial part of your recovery process; in fact, meditation has been found to reduce the severity of cold and flu illness. (58) If you want to reduce your stress but don’t know where to begin, try a meditation app such as Headspace, Calm, or Waking Up, or practice some easy breathing exercises.

Allow Yourself to Rest

In our 24/7 on-the-go society, busyness is often valued over rest. However, if you want to give your body the opportunity to heal from a cold or flu, then rest is essential. Give yourself permission to curl up with a good book and some hot tea (such as the immune-boosting ginger tea I mentioned above) or take a nap. Getting some much-needed rest will actually make you more productive by reducing the duration of your illness.

Eat a Nutrient-Dense, Whole-Foods Diet

Eating a nutrient-dense, whole-foods diet is also crucial when recovering from a cold or the flu. Avoid sugar, refined grains, and industrial seed oils, which impair immune function, and instead focus on eating high-quality animal proteins, non-starchy vegetables, moderate amounts of starchy plants such as sweet potatoes, some vitamin C-rich fruit, and healthy fats.

Back to Top

Cold and flu season comes around every year, but that’s the only thing about it that’s inevitable. You don’t have to be miserable if you catch a bug, if you use one or more of the natural cold and flu remedies I’ve discussed here. They’ll do wonders for reducing your symptoms and the length of your illness—or even preventing it—so you can get back to feeling like yourself in no time.

Now, I’d like to hear from you. What are your favorite natural cold and flu remedies? Will you consider trying any of the remedies in this article? Let me know in the comments below.

The post The Top 20 Natural Remedies for Cold and Flu appeared first on Chris Kresser.

Be Nice and Share!
This post was originally published on this site

http://www.marksdailyapple.com/

Some people just don’t do milk.

There are many reasons why. Maybe you have a dairy intolerance. Maybe you don’t like the way cow’s milk tastes. Or maybe you think cow milk is unhealthy.

I won’t contest the reasons why. That’s another topic for another post, and I’ve already covered the most common anti-dairy arguments. If you want to read about my stance on the healthfulness (or lack thereof) of dairy, read what I’ve written about raw milk, cheese, yogurt, and dairy in general. If you want to learn how to identify dairy intolerance, read this.

But the fact is, lots of people either need or want a milk alternative. Water is great to drink, but it’s not the right smoothie substrate, and it can’t replace milk in recipes or coffee drinks. You need something vaguely white and thick enough to pass as milk.

Normally in a post like this, I’d cover all the different varieties and what sets each apart—their strengths and weaknesses, their nutrient profiles, their unhealthy ingredients. And I’ll certainly do that today, but first there’s good news and bad news.

The good news is that there are plenty of good choices available. If you want something to drink, use in smoothies, or add to coffee, there are many different plant-based milk that avoid overly offensive ingredients.

The bad news is that most non-dairy milks are usually very low in nutrients. The parent food to these plant-based milks—the almonds, the cashews, the hemp seeds, and so on—are extremely nutrient-dense in and of themselves. Just check out my posts on nuts and seeds to get the nutritional lay of the land. But almond milk isn’t almonds, cashew milk isn’t cashews, and hemp seed milk isn’t hemp seeds.

This isn’t surprising when you think about how nut milks are made: by blending the nuts with a bunch of water and straining out the solids to try to extract some of the nut-ness. It’s pretty inefficient. If you could press an almond to wring out the almond milk, then you’d have something interesting. But that’s not how it works. Most non-dairy milks are superficial mirages of the real thing.

To illustrate this, let’s look at the most popular non-dairy milks and compare the nutrients in the parent nut/seed/plant to the nutrients in the nut/seed/plant-milk (when applicable).

Nutrient Profiles Of Popular Non-Dairy Milks

Almond Milk

This is the go-to option for most strict paleo eaters starting out. It sounds like a great idea. Almonds are a nutritious nut, high in magnesium, copper, vitamin E, and manganese. They have a decent amount of protein, some nice prebiotic fiber. In your head, almond milk is fantastic. Unfortunately—and this goes for most of the other nut milks out there—the average jug of store-bought almond milk contains no more than a handful of almonds.

In an ounce of almonds:

  • 163 calories
  • 6 g carbs: 3.5 g fiber
  • 14 g fat: 8.8 g MUFA, 3.4 g linoleic acid (LA), 1.1 g SFA
  • 6 g protein
  • 50% vitamin E
  • 22% vitamin B2
  • 31% copper
  • 18% magnesium
  • 28% manganese

In a cup of almond milk:

  • 36 calories
  • 1.4 g carbs
  • 2.6 g fat: 1.7 g MUFA, 0.6 g linoleic acid
  • 1.4 g protein
  • 45% vitamin E (added)
  • 17% vitamin A (added)
  • 25% vitamin D2 (added)
  • 4% magnesium
  • 4% manganese
  • 39% calcium (added)
  • 8% copper

Not great carry over. No prebiotic almond fiber. Almost no protein, magnesium, manganese, or copper. The richest nutrients are all the ones they added after the fact.

Cashew Milk

Cashew milk is in the same boat: mostly water, not too much cashew.

In an ounce of cashews:

  • 156.8 calories
  • 8.6 g carbs: 0.9 g fiber
  • 12.4 g fat: 6.7 g MUFA, 2.2 g LA, 2.2 g SFA
  • 5.2 g protein
  • 10% vitamin B1 (thiamine)
  • 69% copper
  • 24% iron
  • 20% magnesium
  • 20% manganese
  • 15% zinc

In a cup of cashew milk:

  • 25 calories
  • 1.4 g carbs: 0.2 g fiber
  • 2 g fat: 1.1 g MUFA, 0.4 g linoleic acid
  • 0.8 g protein
  • 2% vitamin B1
  • 11% copper
  • 4% iron
  • 3% magnesium
  • 3% manganese
  • 2% zinc
  • 17% vitamin A (added)
  • 25% vitamin D2 (added)
  • 18% vitamin E (added)
  • 37% calcium (added)

Coconut Milk

Traditionally, you make coconut milk by pulverizing fresh coconut flesh, blending it with a little water, and passing it through a cheesecloth or fine strainer. This produces a very rich, very high-fat milk that runs about 550 calories per cup. This is the coconut milk used in cooking that comes in cans and cartons. A second pass with the coconut solids produces a thinner, less-rich coconut milk that runs about 150 calories per cup. This is often called “Lite Coconut Milk” and can be used to cook or to drink.

Besides the abundance of medium chain triglycerides and a lot of manganese, neither thick or thin coconut milk are nutrient-dense. A cup of rich, full-fat coconut milk gives decent amounts of magnesium, copper, zinc, selenium, and iron, but you have to realize that it takes 600 calories to get those nutrients. That’s not exactly nutrient-dense; the micronutrient-to-calorie ratio is skewed.

They do sell jugs of thin coconut milk as a milk replacement. Except for the fortifications they add (vitamin D, calcium, riboflavin, and the other usual suspects), these are

Flax Milk

In an ounce of flaxseed:

  • 151.4 calories
  • 8.2 g carbs: 7.7 g fiber
  • 12 g fat: 2.1 g MUFA, 6.5 g ALA (omega-3), 1.7 g LA, 1 g SFA
  • 5.2 g protein
  • 39% vitamin B1 (thiamine)
  • 38% copper
  • 20% iron
  • 26% magnesium
  • 31% manganese
  • 13% selenium
  • 11% zinc

In a cup of flax milk:

  • 25 calories
  • 1 g carbs
  • 2.5 g fat: 1.2 g ALA (omega-3)
  • 5% iron
  • 63% B12 (added)
  • 25% vitamin D2 (added)
  • 17% vitamin A (added)
  • 25% calcium (added)

The main standout is the omega-3 content. Flax milk has a little over a gram of alpha-linolenic acid (the plant form of omega-3) per cup.

Hemp Milk

I’m not talking about the oncoming wave of high-THC cannabis milks. This is hemp milk, produced by blending non-psychoactive hemp seeds with water and straining the solids out.

In an ounce:

  • 149.1 calories
  • 7.8 carbs: 7.8 g fiber (all fiber)
  • 10.1 g fat: 1.1 g MUFA, 2.2 g ALA, 4.8 g LA, 0.8 g SFA
  • 7 g protein
  • 24% vitamin A
  • 63% copper
  • 50% iron
  • 33% magnesium
  • 86% manganese
  • 13% selenium
  • 18% zinc

In a cup of hemp milk:

  • 70 calories
  • 2.2 g carbs, all fiber
  • 6 g fat, 1 g ALA (omega-3), 3 g omega-6
  • 2 g protein
  • 18% copper
  • 13% iron
  • 10% magnesium
  • 24% manganese
  • Plus all the usual fortifications (calcium, vitamin D, vitamin A, riboflavin, vitamin B12

That’s not too bad, actually. It picks up some decent mineral levels, and hemp fat is one of the only fats to contain stearidonic acid, an intermediate omega-3 fat in the conversion pathway from ALA to EPA that increases the EPA content of red blood cells in humans (a very good thing).

Macadamia Milk

There’s a product called Milkadamia. Great name, disappointing result.

In an ounce:

  • 203.5 calories
  • 3.9 g carbs: 2.4 g fiber
  • 21.5 g fat: 16.7 g MUFA, 0.4 g LA, 0.1 g alpha linolenic acid (ALA), 3.4 g SFA
  • 2.2 g protein
  • 28% vitamin B1 (thiamine)
  • 24% copper
  • 13% iron
  • 51% manganese

In a cup of mac nut milk:

  • 50 calories
  • 1 g carbs
  • 5 g fat
  • 1 g protein
  • 125% vitamin B12
  • 17% vitamin D
  • 25% vitamin A
  • 38% calcium

Despite having the best product name and the most potential for being a creamy milk substitute (has anyone tried adding mac nuts to a smoothie?—incredible!), the nutrient profile is low, and there’s not much going on.

Oat Milk

I’ve written about oats before. They have some interesting properties, some beneficial fiber, and a decent mineral profile. Adding oat beta-glucan fibers to fiber-free instant oatmeal reduces the postprandial glucose response, so at least in the context of refined starch, oat fiber can be helpful.

The most popular and widely-available oat milk is called Oatly. The website explains the process: mill raw oats with water, add enzymes to extract the starch, separate the beta-glucan from the bran, discard the bran, pasteurize it, bottle it. This retains the beta-glucans (2 grams of fiber per cup) and starch (16 grams carbs per cup). The only micronutrients they advertise are the ones they add, including calcium, potassium, vitamin A, riboflavin, vitamin D, and vitamin B12; there’s no indication that the normal oat-bound minerals like magnesium, manganese, and zinc make it into Oatly in significant amounts. To top things off, they add canola oil for texture and mouthfeel.

Rice Milk

Rice milk is made by blending water with cooked rice, brown rice syrup, and brown rice starch.

Like the others, its only real micronutrients comes from the ones they add to it. It’s higher in carbohydrates than any of the other milks I found.

Soy Milk

Believe it or not, of all the popular non-dairy milks out there, soy milk contains the most nutrients and is probably the closest to cow milk. It’s high in protein. It contains a nice balanced selection of minerals. A review comparing soy milk, coconut milk, almond milk, and rice milk to cow milk found that soy milk was the closest—mostly because it actually featured measurable nutrients.

In a cup of soy milk:

  • 74 calories
  • 3.6 g carbs; 2 g fiber
  • 4 g fat
  • 8 g protein
  • All the usual additions, like calcium, vitamin B12, vitamin D, riboflavin, and vitamin A
  • 10% magnesium
  • 15% manganese
  • 6% folate
  • 6% potassium
  • 19% copper
  • 10% selenium

It’s not ideal though. People who regularly drink soy milk tend to end up with micronutrient deficiencies. Kids who drink cow milk are less likely to have atopic eczema, while soy milk drinkers have no such protection (and may even have increased risk). The protein in soy milk can help people build muscle, but milk proteins work better and also provide other benefits to the immune system.

I’m not saying you shouldn’t use non-dairy milks. They are inoffensive and helpful for recipes. Just don’t expect any incredible health benefits from them.

3 Notable Brands With Extra Benefits

But there are a few specific non-dairy milk products that deserve a closer look, especially if you’re going to go this route.

Vita Coco Coconut Milk

Instead of blending coconut meat with water and filtering out the solids, Vita Coco mixes coconut cream into coconut water to produce a milk-like product. I haven’t tasted it myself, but the nutrient profile is pretty compelling.

  • Moderate levels of fat (5 grams per cup), primarily from saturated medium chain triglycerides.
  • Low carb (5 grams per cup). Naturally sweet from the coconut.
  • Decent mineral levels (RDIs: 45% calcium, 15% magnesium, 10% potassium, 10% zinc).

Some of the calcium, magnesium, and zinc is added, some is natural (coconut water can be a good source of all three). Still, it’s cool to see magnesium added because so many are deficient and supplementary magnesium is well-tolerated and effective.

Ripple

Back when I was toying with the idea of getting a significant amount of my protein from plant sources for a quick experiment (long story short: I didn’t do it, I like animals too much, and I found myself relying too heavily on processed powders), I got a bottle of something called Ripple. Ripple is pea-based milk, fortified with extra pea protein, algae-based DHA, calcium, iron, and vitamin D. It has as much protein per serving as milk (8 grams), using a type of protein that can promote muscle gain, and it tastes quite good. It uses high-oleic sunflower oil for fat, which is low in polyunsaturated fat. If I truly couldn’t have dairy and desperately wanted something to drink or make smoothies with, I’d probably do Ripple.

Tempt Hemp Milk

I’ve never tried this brand, or hemp milk in general. But just like the generic hemp milk analyzed above, Tempt Hemp Milk has a far better nutrient profile than most of the other nut or other non-dairy milks I ran across. If it tastes anything like hemp seed, which has a nutty, subtle flavor, I can imagine hemp milk having a pleasant taste.

Tips For Making Your Own

You’re all an enterprising bunch. Why not make your own non-dairy milk?

  1. You can make your own nut milk. There are thousands of recipes out there, but they generally seem to involve soaking nuts in water and a pinch of salt overnight, draining them, and blending the nuts with fresh water, straining out the solids, and sometimes adding a date or a dab of maple syrup for sweetening. The higher the nut:water ratio, the richer, more nutritious the milk.
  2. You can also make thicker, more nutrient-dense nut milk by blending nut butter and water until you reach the desired consistency. You aren’t discarding anything with this method.
  3. You can avoid nuts altogether. One scoop of MCT powder, one scoop of collagen peptides, whisked into water makes a decent approximation of milk. Use 3 tablespoons of water to make creamer for coffee. This isn’t a nutrient-powerhouse, but it provides medium chain triglycerides (which boost ketone production) and collagen.
  4. Or how about making a kind of nut broth? The usual audience for non-dairy milks is obsessed with consuming raw foods. They make a point to prevent their food from ever getting warmer than the hemp-clad crotch of a Trustafarian hitchhiking through Joshua Tree in the middle of summer. But consider that applying heated water to pulverized nuts will extract even more nutrients from the nut and deliver them into the water. Then you strain the solids and refrigerate the broth, producing “milk.” I bet that’d be quite tasty and more nutritious than a cold water nut wash.

The Bottom Line on Nut Milks…

Nothing on the market or that you cook up in your kitchen is going to rival the nutrient density of cow’s milk. From the protein to the healthy dairy fats to the dozens of micronutrients we know about and the dozens we have yet to catalogue, actual milk packs a real wallop that your basic almond, cashew, pecan, or flax milk simply can’t defeat. So, you’ll have to shift your view of “milk” as a whole food. Don’t give your kid four glasses of hemp milk and think you’re replacing cow dairy. Don’t wean your infant off the breast and fill a bottle with hazelnut milk instead; it’s not the same. Don’t eat a dog bowl-sized serving of cereal with some rice milk. The only nutritious part of cereal is the milk, and non-dairy milks do not qualify. Don’t rely on non-dairy milks for your nutrient intakes. Those are shoes they’ll never fill.

Instead, use non-dairy milks to make nutrient-dense smoothies. Use them in your coffee. Make protein shakes with them. In short, use these non-dairy plant-based milks to make it easier to eat more nutrient-dense foods.

Before you run out to buy cashew milk or pea milk or something similar, I will say this: I’m a fan of dairy. It’s a nutrient-dense source of bioavailable protein, healthy fat, calcium, vitamin K2, and other important and helpful compounds. If you can eat it without tolerance issues, you probably should. And if you can’t, you may be able to tolerate other animal milks, like goat’s milk. Many people who can’t do cow dairy can handle goat. It’s worth a try.

What about you? What’s your favorite non-dairy milk? Do you have any plant-based milks that you swear by?

collagen_bars_640x80

References:

Onuegbu AJ, Olisekodiaka JM, Irogue SE, et al. Consumption of Soymilk Reduces Lipid Peroxidation But May Lower Micronutrient Status in Apparently Healthy Individuals. J Med Food. 2018;21(5):506-510.

Hon KL, Tsang YC, Poon TC, et al. Dairy and nondairy beverage consumption for childhood atopic eczema: what health advice to give?. Clin Exp Dermatol. 2016;41(2):129-37.

Babault N, Païzis C, Deley G, et al. Pea proteins oral supplementation promotes muscle thickness gains during resistance training: a double-blind, randomized, Placebo-controlled clinical trial vs. Whey protein. J Int Soc Sports Nutr. 2015;12(1):3.

Wolever TMS, Jenkins AL, Prudence K, et al. Effect of adding oat bran to instant oatmeal on glycaemic response in humans – a study to establish the minimum effective dose of oat ?-glucan. Food Funct. 2018;9(3):1692-1700.

The post Ultimate Guide to Non-Dairy Milks appeared first on Mark’s Daily Apple.

Be Nice and Share!