Originally Posted At: https://breakingmuscle.com/feed/rss
Mitchell Hooper is the winner of the 2022 Giants Live World Tour Finals (GLWTF). During the competition that took place on Oct. 8, 2022, in Glasgow, Scotland, the Canadian strongman captured his first victory on the Giants Live circuit. He also made it two consecutive major strongman wins after recently taking first in the 2022 Arnold Strongman Classic UK.
The two athletes who joined Hooper on the podium were Aivars Šmaukstelis of Latvia (second place) and the United States’ Kevin Faires (third). According to Strongman Archives, with his runner-up finish at the 2022 GLWTF, Šmaukstelis has now stood on a podium in his last four official competitive appearances. Meanwhile, Faires can now boast his first top-three placing since the 2019 Giants Live North American Open.
Here’s an event-by-event breakdown of the 2022 Giants Live World Tour Finals.
Nicol Stones
During the Nicol Stones segment, the athletes had to walk the two unevenly weighted stones of 114 kilograms (251.3 pounds) and 139 kilograms (306.4 pounds) for a max distance. Current Nicol Stones World Record holder Kevin Faires took the event victory with a distance of 24.61 meters.
Kevin Faires — 24.61 meters
Mitchell Hooper — 24.14 meters
Andy Black — 24.08 meters
Paul Smith — 23.1 meters
Aivars Šmaukstelis — 20 meters
Louis Jack — 19.75 meters
Eddie Williams — 16.58 meters
Mark Felix — 16.37 meters
Pavlo Nakonechnyy — 15.91 meters
Rauno Heinla — 12.75 meters
Pavlo Kordiyaka — 9.4 meters
Pa O’Dwyer — 8.58 meters
Carry & Drag
During the Carry & Drag, the competitors had the task of carrying a 125-kilogram anchor and dragging a 350-kilogram over a 40-meter course. They had a time limit of one minute. Using the athleticism that’s helped him blitz professional strongman lately, Hooper captured his first event win of the contest with a time of 22.16 seconds.
Mitchell Hooper — 22.16 seconds
Pavlo Kordiyaka — 22.96 seconds
Kevin Faires — 23.41 seconds
Pa O’Dwyer — 25.35 seconds
Aivars Šmaukstelis — 26.45 seconds
Paul Smith — 27.30 seconds
Pavlo Nakonechnyy — 27.78 seconds
Rauno Heinla — 28.57 seconds
Louis Jack — 28.84 seconds
Eddie Williams — 30.65 seconds
Andy Black — 37.37 seconds
Mark Felix — 40.40 seconds
Axle Deadlift
The 2022 GLWTF’s Axle Deadlift was about pulling 350 kilograms (771.6 pounds) for a max amount of reps with a one-minute time limit. Pavlo Nakonechnyy came out on top when he successfully finished 11 reps. Nakonechnyy was the only athlete to finish with double-digit reps.
This contest’s iteration of the Dumbbell Press featured a 100-kilogram (220.5-pound) dumbbell. Whoever could clean and press said dumbbell as many times as possible within a minute would win. After a few solid results on earlier events, Šmaukstelis and Pavlo Kordiyaka tied for first in the event with seven reps.
Aivars Šmaukstelis — Seven reps (Tied for first)
Pavlo Kordiyaka — Seven reps (Tied for first)
Mitchell Hooper — Six reps
Pa O’Dwyer — Five reps (Tied for fourth)
Paul Smith — Five reps (Tied for fourth)
Pavlo Nakonechnyy — Four reps
Kevin Faires — Three reps
Rauno Heinla — Two reps (Tied for eighth)
Eddie Williams — Two reps (Tied for eighth)
Louis Jack — Two reps (Tied for eighth)
Mark Felix — No reps
Andy Black — No reps
Power Stairs
To close the contest, the athletes had to load five implements with weights ranging from 200 to 250 kilograms (440.9 to 551.1 pounds) up three respective stairs. Their final scores were determined by how many of the total 15 steps they climbed within a minute. While he didn’t win the overall competition, Šmaukstelis closed with another event victory (15 steps in 33.02 seconds).
For Hooper, his remarkable debut pro year continues with this victory at the 2022 GLWTF. In addition to his two straight victories and first Giants Live win, Hooper has now finished on the podium in five straight contests dating back to the 2022 Giants Live Strongman Classic in early July. The superstar kept his reaction short and sweet in a post on his Instagram.
“My first [Giants Live Strongman] win. Surreal. Let’s keep riding the wave.”
Originally Posted At: https://breakingmuscle.com/feed/rss
On Oct. 1, 2022, during the 2022 America’s Strongest Man (ASM) U105KG, strongman Nicolas Cambi set a Max Heavy Dumbbell World Record of 129.5 kilograms (285 pounds). Cambi’s record was part of an overall first-place performance for the athlete. It is the consecutive year he has won the contest. Cambi wore a lifting belt, knee sleeves, and an arm sleeve around his right pressing arm during the milestone.
According to Strongman Corporation, Cambi’s Heavy Dumbbell World Record surpasses the previous top figure by 75 pounds. Cole Booth held the past mark of 95.3 kilograms (210 pounds) at the 2018 TX Record Breakers.
To get in an ample position for his heavy dumbbell lift, Cambi performed what’s known as a belt clean, briefly resting the dumbbell on his lifting belt before driving it into overhead pressing position. The lifting technique appeared to allow him to generate more leg drive on the final press because it split the press into two segments. After finishing at lockout, Cambi would then hold his dumbbell overhead just long enough while waiting for the official green light — a down signal from the official.
Cambi’s unorthodox but legal strategy of cleaning the dumbbell from his belt drew the attention of fellow strongman Pa O’Dwyer. In the comments of the post of Cambi’s record lift, the Irish athlete asks Cambi to clarify that he did indeed perform a clean of his dumbbell from his belt. After receiving further confirmation from Cambi, O’Dwyer made a joking reference to The Dark Knight, writing, “Some people just want to watch the world burn, Master Wayne.”
Cambi’s second straight victory at the ASM U105 continues a successful start to his approximate six-year career. According to Strongman Archives, it’s the fourth victory of his career. To date, Cambi has only failed to make the podium on one occasion. In addition to this Heavy Dumbbell World Record, the athlete also possesses the Block Press (141.5 kilograms/311.9 pounds) and Log Lift (187 kilograms/412.3 pounds) U105KG World Record figures. He achieved both at the 2021 Clash at the Corral (CatC) contest.
Here’s an overview of notable results since Cambi began competing in strongman in March 2015:
Nicolas Cambi | Notable Strongman Results
2015 Arnold Amateur Strongman World ChampionshipsU105 — Fourth place
2017 World’s Strongest Man (WSM)U105 — Second place
At the time of this writing, Cambi hasn’t alluded to his next competition. Most of his recent social media posts were from or connected to the 2022 ASM U105 competition. With yet another World Record under his belt, Cambi could elect to bask in his achievement for a little while. That is, until it’s time to break another boundary.
Originally Posted At: https://breakingmuscle.com/feed/rss
A general perusal of Jaisyn Mike’s social media will say he’s quite confident in his abilities. The two-time International Powerlifting Federation (IPF) World Champion in the +120-kilogram division seems to make it a point to showcase unique feats of strength and power. The 44-year-old competitor’s latest training accomplishment is no different.
On Oct. 6, 2022, Mike uploaded a video to his Instagram profile where he completed a 192.8-kilogram (425-pound) bench press for 20 reps while wearing wrist wraps and a lifting belt. According to the post’s caption, the show of endurance is a personal record (PR) for Mike.
Per other posts on Mike’s Instagram, his bench press work and general training are related to preparation for the 2023 USA Powerlifting (USAPL) Raw Nationals. While he has competed in the Masters 1 (ages 40-49) category of late, Mike plans to feature in the Open portion and in the 140-kilogram weight class at that specific contest. It would be his first full powerlifting meet since the 2019 USAPL Raw Nationals in October of that year. Mike has participated In bench-only competitions in the time since. Per a press release from USAPL, the 2023 Nationals will take place on Sept. 14-17, 2023, in Memphis, TN.
Competition prep aside, this sort of bench press display is nothing new for Mike, who seems to have centered on that aspect of his strength of late. Recent marks from his routine are right in line with this new PR.
Just several days before he finished this 20-rep set, Mike successfully locked out a 230.4-kilogram (508-pound) bench press for 10 reps. Earlier in the same week, Mike pushed through a 190.5-kilogram (420-pound) bench press for an older 20-rep PR.
When not pushing himself on the bench press, Mike has excelled all the same in the gym. The powerlifter shared an early-October 2022 clip of himself completing a raw 365-kilogram (804.6-pound) deadlift for a one-rep PR. This was a rapid progression from a 354.7-kilogram (782-pound) deadlift that Mike logged in late-September 2022.
According to Open Powerlifting, here’s an overview of Mike’s all-time raw competition bests:
Aside from winning the 2023 Nationals, Mike’s other primary goal appears to be a desire to eclipse a 362.9-kilogram (800-pound) deadlift on a sanctioned lifting platform, especially after some of the recent 900-plus-pound pulls from other powerlifters.
Whether Mike can successfully make a run in the Open at next year’s Nationals remains to be seen. Nonetheless, his recent training progress would indicate he seems to be on the right progressive track.
Featured image: @mr.athletic_over_everything on Instagram
Originally Posted At: https://breakingmuscle.com/feed/rss
Bodyweight exercises are often shunned by “hardcore” gym-goers who only deem worthy exercises when you lift heaps of hard-cast iron. Yet they forget that bodyweight movements can be very beneficial, and even humbling. Some would argue that being able to lift a proverbial ton isn’t very worthy if you can’t lift yourself and master your own body weight.
When it comes to training your back, pull-ups aren’t your only option. The inverted row — sometimes jokingly called the Australian pull-up because your body is “down under” the bar — targets your back, shoulders, and biceps.
Credit: MDV Edwards / Shutterstock
The inverted row is highly effective because it provides benefits to beginners and experienced lifters alike, improving pulling strength, back muscle size, and whole-body stability and coordination. Here’s how to perform a perfect inverted row, along with everything you need to know about this powerful and overlooked exercise.
Call it an inverted row, a bodyweight row, an Australian pull-up, or even the light-hearted but derogatory “fat man pull-up.” Whatever term you use, the movement is the same. Take a look at the straightforward technique and then continue learning.
How to Do the Inverted Row
The inverted row is a relatively less challenging bodyweight back exercise compared to the classic pull-up because you’re lifting a lower percentage of your body weight. This makes it a perfect exercise for newcomers. Nevertheless, improper execution will lead to poor muscle recruitment and minimal benefits, so pay attention to good form.
Step 1 — Get Into Position
Credit: Breaking Muscle / YouTube
Lie on the ground in a rack or Smith machine and reach your arms toward the ceiling. Note the spot slightly above your fingertips, and set a barbell in the rack at that height. Return to a lying position with your chest under the bar, and take slightly wider than shoulder-width, palms-down grip.
Keep your legs straight and your heels on the ground. Maintain a stiff core and hips to keep your body in a straight line.
Form tip: Because the resistance comes from leveraging your bodyweight, you can easily scale the exercise to suit your strength level. The steeper your body angle, the easier the exercise will be. The more horizontal your body is, the more challenging it will be. However, your back should not be able to rest on the ground in the stretched position. Instead, if necessary, elevate your feet on a bench or step to increase the difficulty.
Step 2 — Pull Your Chest to the Bar
Credit: BarBend / YouTube
Flex your abs, squeeze your shoulder blades together, and pull yourself up until your torso touches the bar. It should make contact near your lower chest. Think about driving your chest “up” through the bar toward the ceiling.
Do not let your elbows flare out too much on your sides. Keep them relatively close to your body to improve the recruitment of your lats (back muscles). In the top position, don’t bend your legs or let your glutes hang down.
Form tip: If your chest cannot reach the bar, adjust the height and reposition to reduce the difficulty. Achieving a full range of motion is critical for building strength, stimulating muscle growth, and improving shoulder and upper back joint health.
Step 3 — Stay Tight As You Lower
Credit: Breaking Muscle / YouTube
Keep your entire body tense and keep your shoulder blades squeezed together as you slowly straighten your arms. When you’ve reached full lockout, your back and shoulders should still be slightly off the ground.
Pivot your body on your heels, don’t bend your legs during the exercise. Let your back, shoulder, and arm muscles do the work of lifting and lowering.
Form tip: Maintain a stiff posture and an engaged core for maximum benefits. Ensure total-body tension and do not relax during the eccentric (descent or lowering phase).
Inverted Row Mistakes to Avoid
Just because the inverted row is a bodyweight exercise doesn’t mean you get a free pass to butcher basic technique. Good form matters as much with bodyweight exercises as with free weight movements. Review these frequent mistakes to make sure you’re not doing them.
Losing Posture
The main muscles of the inverted row are the back and the arms, but the whole body is involved in the lift. If your glutes start dropping down and you lose tension and posture, the mechanics of the exercise will change and you will reap less benefits. Your body should form a straight line from your ankles to your shoulder joints.
There’s one acceptable exception to the “straight line” rule: To significantly improve your leverage and make the exercise easier, you can bend your legs and plant your feet flat on the floor. However, you should still keep a straight line from your knees to your shoulders while maintaining tension in glutes, core, and shoulder blades.
Avoid it: Push your heels into the ground to tense your legs and contract your glutes. Imagine having a string attaching your hip bones to the ceiling.
Rowing Too High
In the top position of each repetition, the bar should touch the lower part of your chest. If you’re positioned incorrectly and pull too high, with the bar hitting your upper chest or neck, you turn the exercise into a type of face pull variation.
Credit: inimma / Shutterstock
This is a mistake because it decreases activation of your bigger lat muscles and increases recruitment of your rear deltoids (shoulders) and upper back. A higher pulling position also causes your elbows to flare out to the sides, which can increase strain on your shoulder joint, especially if you lack shoulder mobility.
Avoid it: Prior to beginning your set, when setting up the bar position, be sure your lower chest or upper abs are lined up under the bar. This helps to put you in a good pulling position before the movement even begins.
Pulling with “Broken” Wrists
When any exercise becomes difficult, because of fatigue or excessive weight, the body will naturally try to recruit additional muscles to come to the rescue. This can happen with the inverted row if your arms are much stronger than your back, when your wrists bend during the movement.
Credit: Jasminko Ibrakovic / Shutterstock
Pulling with bent or “broken” wrists will shift more stress to your arms and can cause joint pain and discomfort. It also excessively fatigues your gripping strength which will limit the amount of back work you can achieve.
Avoid it: Keep a neutral wrist position at all times, from the stretched position to the top contraction. Think about pulling with your elbows instead of pulling with your hands. If you have wrist pain, use a neutral grip by placing a football bar (sometimes known as a Swiss bar) in the rack instead of a straight barbell or by switching from a barbell to suspension straps (like a TRX).
Benefits of the Inverted Row
The simplest exercises can sometimes be overlooked, but they are often the ones that can provide major benefits. The inverted row can provide several benefits in terms of strength, muscle mass, and core stability.
More Muscle
Just like the pull-up, the inverted row is a fantastic exercise for building muscle mass in the back, arms, and forearms using just your bodyweight. In fact, it can recruit more lat and upper back muscle than a traditional barbell row (1) The inverted row makes it easy to accumulate volume (repetitions and/or sets) to stimulate muscle growth in your target muscles. (2)
Pulling Strength
Bodyweight movements have a reputation of being less effective for building strength because you can’t move extremely heavy weights but, if you’re a beginning lifter, it can prove very efficient. (3) As a multi-joint exercise, the inverted row is indeed an ideal choice for building pulling strength. (4)
Credit: Donny Podrasky / Shutterstock
The inverted row demands whole-body coordination and power. Like many bodyweight movements, you can eventually add resistance, like a weighted vest, to provide basic progressive overload. This will challenge the back, biceps, and grip strength of any experienced lifter.
Less Lower Back Stress
Rowing exercises usually involve the lower back to maintain proper posture and provide stability, but this can often be a limiting factor, especially for lifters with pre-existing lower back problems.
The inverted row creates very little spinal load because your spine isn’t put under any significant strain. As such, if you’re having back pain, it is an ideal option for a rowing movement with nearly zero stress on your lower back. Moreover, it also engages your core, which has been linked to less lower back pain and a better core and spinal health. (5)(6)
Muscles Worked by the Inverted Row
A properly done inverted row can be one of the most efficient back exercises in your arsenal. It recruits multiple muscles in your back without straining the often overused lower back like many alternative movements. As a pulling exercise, the inverted row also recruits several support muscles.
Latissimus Dorsi
The lats are the biggest and strongest back muscles. They go from your hip bone and lower spine to your humerus (arm bone) and are heavily involved in moving your arm through a variety of motions. Because they cover so much of your torso, the lats also contribute to spinal stability and trunk movements. They are the main target of the inverted row.
Upper Back
This includes your trapezius, rhomboids and posterior deltoids — all involved in scapular (shoulder blade) motion and joint health. These muscles work similarly to move the shoulder blades in several ways, assist in pulling motions, and contribute to stabilizing the scapulae during pressing movements.
Biceps
Of course, we all know the biceps. On the front of the upper arm, it is the biggest arm muscle and goes from the radius (forearm bone) to the scapula. The biceps are recruited to perform the inverted row, but other relatively smaller muscles will help the biceps flex (bend) your arm.
The pronated (palm down) grip used during the inverted row actually puts an emphasis on the brachialis, the strongest arm flexor muscle. (7) It is actually located just under the biceps, and can help your biceps appear larger because a well-developed brachialis will “push” it higher.
Forearms
Your forearms will be trained by nearly every back exercise because your grip transfers force from the weight toward the target muscle. Several muscles work throughout your forearms, but the forearm flexors on the palm-side of your lower arm are responsible for your grip and will be taxed the most. The brachioradialis, the biggest muscle on the opposite side of your forearm, will also assist in flexing your upper arm.
Core
In order to maintain proper posture and be more efficient during this exercise, you’ll have to engage your whole core. All of your abs (rectus abdominis, obliques, transverse abdominis), your erector spinae (spinal muscles), and some hip muscles are recruited synergistically. Your abs are the anterior core muscles running on the front of your torso while the erectors are along your back (beginning at the lower back, they run up to your neck).
Your core muscles do not move through a range of motion during the inverted row, but are contracted isometrically to maintain a strong, stable, and safe body position.
Who Should Do the Inverted Row
The inverted row is versatile and demands bare minimum equipment —any bar or beam that can support your weight. Lifters with a variety of goals and abilities can incorporate this exercise into their routine.
Beginners
The inverted row is an ideal pulling exercise for beginners starting to master their own body’s resistance. The exercise can be scaled in an instant to your strength level by either raising the bar or bending your legs to make it easier, or placing your feet on a bench or adding a weighted vest on — or both — to make it harder.
As pull-ups are significantly harder for inexperienced lifters without a base of strength, the bodyweight row is a great first step to increase pulling strength, general fitness, and whole-body tension.
Physique Enthusiasts
Be it a bodybuilder or someone that just wants to pack on some size, many lifters overlook the inverted row as a muscle-building exercise. Despite being a bodyweight exercise, it can be more efficient than some other rowing exercises, especially for targeting your lats and strengthening your upper back. It also has the benefit of being low-stress on your lower back, so you won’t interfere with recovery from low-back intensive exercises like squats or deadlifts.
General Fitness Advocates
Whether you’re a CrossFit enthusiast, sports athlete, or a Regular Joe that wants to improve their functional fitness, the inverted row is a multi-function exercise for developing several physical qualities. You can program it to improve strength, muscle size, muscular endurance, whole-body stability and coordination. You can even build cardiorespiratory capacities by tossing it into a circuit workout to improve your fitness as a whole.
How to Program the Inverted Row
Bodyweight movements are very versatile in programing, and the range of repetitions can vary considerably depending on your goals and strength level. If you’re a newer lifter, focus on only performing high-quality repetitions and treat it exactly like any other resistance exercise — no cheating on your form to squeeze out extra reps. A more experienced lifter can add external load or use a high training volume to make the movement more challenging.
Unweighted, Low Repetition
When you are at the early phase of training and still developing fundamental strength, coordination, and body awareness, your goal is to improve your form and build a general base. You cannot do too many repetitions because you lack the strength to do it without your form breaking down. Three to five sets of four to six repetitions is a good range to stick with.
You can also use a “total reps goal” approach instead of specific sets and reps. Aim for a modest number, roughly 20 repetitions, and complete them in as many sets of quality repetitions as needed. It could take 15 sets or it could be four. Over time, aim to reach the target in fewer total sets.
Unweighted, High Repetition
If you’re a strong lifter, you can use bodyweight training for high repetitions to build muscle while sparing your joints from excessive loading stress. (8) Aim for two to three sets of at least 15 repetitions to failure while keeping a good form. This will provide a great pump and will challenge more your core and postural muscles because of the longer set duration.
Weighted, Medium Repetition
If you can add external resistance to the lift using a weighted vest, a backpack, or a pair of chains draped across your torso, you can treat this exercise like any other resistance training movement and hit it hard and (relatively) heavy. The traditional bodybuilding scheme of three to four sets of eight to 12 repetitions will be your best bet to promote hypertrophy and provide a challenging time under tension.
Inverted Row Variations
Once you’ve mastered the basic movement, you can very easily switch the focus of the exercise to accommodate your goals or individual needs. Here are some simple tweaks to provide variation to your inverted rows.
Supinated Inverted Row
Using a palms-up grip is a simple change if you want to experience more biceps growth, because the arm muscles will be in optimal alignment. As such, most lifters will also be stronger and will be able to bang out more repetitions or use more weight.
This is similar to using chin-ups in place of pull-ups. The adjusted hand position changes muscle recruitment and emphasizes the biceps and forearms over the muscles of the back.
Neutral Grip Inverted Row
The neutral grip, or hammer grip, can be a welcome relief for lifters with achy shoulders, elbows, or wrists. The stress on these joints is drastically reduced because brachialis and brachioradialis recruitment is increased. As an added bonus, building these muscles will help you build a set of classic Popeye arms.
To perform it, use a football bar (or Swiss bar) instead of a straight barbell. If your gym doesn’t have one, you can use a neutral-grip “V-bar” attachment from the pulldown station and set yourself up parallel to the barbell. Suspension straps, like a TRX or gymnastic rings, would also be effective.
Ring Row
Using any suspension straps like a TRX or a pair of gymnastic rings is the most versatile and joint-friendly row option. You can use whatever grip you want: palm-down, neutral, or palm-up. You can even add a natural twisting motion by rotating your hands during each repetition. Begin pulling with a palm-down grip and rotate to neutral or palm-up as you approach the top position.
The main benefit is that the ring’s instability will challenge your core and your shoulders. This variation is the hardest, but the required stabilization will greatly improve your core and shoulder health and stability, which transfers to overall athleticism and power in other upper body exercises.
Inverted Row Alternatives
Variety is the spice of life, and of muscle growth. (9) If you’re ready to switch things up or if you don’t have a spot to perform the inverted row, you’re covered with these effective alternatives.
Seal Row
The seal row is the free weight equivalent of the inverted row. Lie prone (face down) on an elevated flat bench and grab a pair of dumbbells or a barbell — there even are specially designed stations for this exercise with easy to grab weights. Pull the weights from the stretched position beneath the bench toward your chest, as if performing an upside down inverted row.
Because your body is fully supported, cheating with momentum is very difficult. It also nearly eliminates any strain on the lower back, like the inverted row. With this variation, there’s no need for total-body stabilization, so you can solely focus on using your pulling muscles and develop a great mind-muscle connection.
Pull-Up
They say the pull-up is the king of upper-body bodyweight exercises, and for good reason. It’s a tremendous back-builder. When you’re comfortable with inverted rows, get started with this vertical bodyweight exercise.
Like the inverted row, the pull-up will target more of your lats than your upper back. You can use the same grip variations and set/rep programming schemes as the inverted row.
Bent-Over Barbell Row
The standard barbell row might be an upper body pulling exercise in its purest form. Grab a barbell, bend forward and gather tension in your whole body, and start rowing heaps of iron.
This exercise will demand superior whole-body engagement, particularly your glutes and hamstrings to counterbalance the load. If you want to improve your pulling strength, back muscle size, and total body stability, get familiar with this classic movement.
FAQs
Are inverted rows and pull-ups the same thing?
No. Despite both being bodyweight pulling exercises, they are different. One is a vertical movement pattern while the other works horizontally. This means that muscle recruitment will be similar, but not exactly be the same. The inverted row will recruit more of your upper back, for instance.
Pull-ups are also harder, because your body is completely hanging in the air and you’re required to lift proportionally more of your body weight. The inverted row has your feet supported on the ground and angled, which means that you’re lifting a lower percentage of your body weight.
As a bodyweight movement, when should I do the inverted row?
There are no clear rules because it will depend on your specific goals and strength levels. If you want to develop your strength or technique, include them at the start of your workout. If you’re using them to build muscle mass, they can be performed later in session, after your muscles are fatigued from other exercises.
If you really want to speed up your strength and technique gains as a newer lifter, you can also use the grease the groove technique. Perform a single set of a few high-quality repetitions, several times throughout the day (for instance, you can do it at home under a sturdy table), waiting at least 30 minutes between each set. This training method will develop your strength, coordination, and skill so that you quickly become very good at the exercise.
Get Back to Bodyweight Training
The inverted row is a highly effective addition to any training program, whether you’re just getting started in the gym or if you’re well-experienced. While the pull-up has a much more widely known reputation as being “the” bodyweight back-training exercise, the inverted row deserves plenty of attention and can deliver plenty of results. It shouldn’t be treated as an introductory exercise that’s forgotten once you build some strength. It’s definitely time to get on the ground and start pulling.
References
Fenwick CM, Brown SH, McGill SM. Comparison of different rowing exercises: trunk muscle activation and lumbar spine motion, load, and stiffness. J Strength Cond Res. 2009 Mar;23(2):350-8. doi: 10.1519/JSC.0b013e3181942019. PMID: 19197209.
Brigatto FA, Lima LEM, Germano MD, Aoki MS, Braz TV, Lopes CR. High Resistance-Training Volume Enhances Muscle Thickness in Resistance-Trained Men. J Strength Cond Res. 2022 Jan 1;36(1):22-30. doi: 10.1519/JSC.0000000000003413. PMID: 31868813.
Lipecki, Krzysztof & Rutowicz, Bartosz. (2015). The Impact Of Ten Weeks Of Bodyweight Training On The Level Of Physical Fitness And Selected Parameters Of Body Composition In Women Aged 21-23 Years. Polish Journal of Sport and Tourism. 22. 10.1515/pjst-2015-0014.
Brandão, Lucas & Painelli, Vitor & Lasevicius, Thiago & Silva-Batista, Carla & Brendon, Helderson & Schoenfeld, Brad & Aihara, Andre & Cardoso, Fabiano & Peres, Bergson & Teixeira, Emerson. (2020). Varying the Order of Combinations of Single- and Multi-Joint Exercises Differentially Affects Resistance Training Adaptations. Journal of Strength and Conditioning Research. 34. 1. 10.1519/JSC.0000000000003550.
Joan Aguilera-Castells, Bernat Buscà, Azahara Fort-Vanmeerhaeghe, Alicia M. Montalvo & Javier Peña (2020) Muscle activation in suspension training: a systematic review, Sports Biomechanics, 19:1, 55-75, DOI: 10.1080/14763141.2018.1472293
Kumar T, Kumar S, Nezamuddin M, Sharma VP. Efficacy of core muscle strengthening exercise in chronic low back pain patients. J Back Musculoskelet Rehabil. 2015;28(4):699-707. doi: 10.3233/BMR-140572. PMID: 25467999.
Kleiber, T., Kunz, L., & Disselhorst-Klug, C. (2015). Muscular coordination of biceps brachii and brachioradialis in elbow flexion with respect to hand position. Frontiers in physiology, 6, 215. https://doi.org/10.3389/fphys.2015.00215
Schoenfeld BJ, Peterson MD, Ogborn D, Contreras B, Sonmez GT. Effects of Low- vs. High-Load Resistance Training on Muscle Strength and Hypertrophy in Well-Trained Men. J Strength Cond Res. 2015 Oct;29(10):2954-63. doi: 10.1519/JSC.0000000000000958. PMID: 25853914.
Baz-Valle E, Schoenfeld BJ, Torres-Unda J, Santos-Concejero J, Balsalobre-Fernández C. The effects of exercise variation in muscle thickness, maximal strength and motivation in resistance trained men. PLoS One. 2019 Dec 27;14(12):e0226989. doi: 10.1371/journal.pone.0226989. PMID: 31881066; PMCID: PMC6934277.
Hey folks, Board-Certified Health Coach Chloe Maleski is here to answer your questions about becoming a health or fitness coach. Considering a career change or side gig? Ready to take your Primal knowledge to the next level? We’re here to cheer you on! Have a question you’d like to ask our health coaches? Leave it below in the comments or over in the Mark’s Daily Apple Facebook group.
Patrick asked:
“Primal eating, combined with exercise, has changed my life. You could say it was my personal pandemic project—made possible due to working from home. I’m considering becoming a health coach myself but work in a totally different field (accounting). I have no experience with science, nutrition, fitness, etc., outside of reading blogs like this one. I have ZERO experience coaching. Any recommendations for getting started? Is the Primal Health Coach program suitable for newbies? How long does it take to complete? Do you cover the business side or just nutrition?
Hurray! So fantastic that you turned working from home into a life-changing, wellness-promoting project, Patrick! It really is true: Just a couple of years (or less) of consistent effort can change the state of our health and our life’s trajectory.
Fantastic as well that you’re eager to take what you’ve learned and achieved to the next level. The Primal Health Coach Certification is an excellent way to make that happen.
As a coach, I can attest that there’s a depth of knowledge that only comes from teaching and guiding others. Regardless of whether you make health coaching a new career, a side gig, or another project in self-learning and discovery, the training is transformative. Let’s take a look at your specific questions and cover the Primal Health Coach basics.
Is the Primal Health Coach Certification for newbies?
In short, yes! You do not need prior experience in coaching or prior knowledge of science or nutrition to enroll and succeed.
Many established healthcare professionals and others with similar backgrounds do complete the certification as a way to boost their knowledge, enhance their credentials, and better support their clients and patients.
That said, many others who join have little or no experience in the health and wellness space. Some are regulars here at Mark’s Daily Apple and simply want to take their Primal knowledge to the next level. Others, like you, are considering a career change that integrates what’s worked for them and how they earn a living.
Others don’t know much about Primal eating and living at all (at least not yet!) but are attracted to the growing field of health coaching and the possibility of launching a thriving business they can do from anywhere.
Not “just” nutrition
One thing that sets the Primal Health Coach Institute apart from similar programs is that we understand the importance of solid nutritional and lifestyle knowledge AND that those alone are not enough to succeed as a coach or business.
As you might expect, we cover Primal eating and living fundamentals, including the science behind why they work and how they can be tailored to fit clients with different needs and goals.
This includes nutrition, of course, but also the other 10 Primal Blueprint Rules. We dive deep into the what, how, and why—explaining the details while taking care to use clear language that you’ll be able to share with others. We also provide extensive resources, allowing you to take your learning even further if you choose.
Equally important, the PHCI provides more than a health education. We help you develop coaching skills and learn how to get a coaching business off the ground and keep it thriving. This well-rounded preparation is essential for standing out in the sea of coaches and helping your clients get real, sustained results.
Taking things one step further, we ensure our graduates can start making money as soon as they have their certification in hand by providing a wealth of resources, done-for-you templates, and even a ready-made coaching program. Rather than leaving you to “sink or swim,” we provide ongoing webinars, optional events, and masterclasses. We also have a tight-knit community of coaches who support one another on our mission to promote healthier, more vibrant living.
How long does it take to become a Primal Health Coach?
That’s up to you! The Primal Health Coaching Certification is an online program that you can complete at your own pace, making your way through the material anytime, anywhere.
Moving relatively quickly and completing one chapter a week, you could finish everything in 6 months. That said, there’s no rush, and the program is designed for flexible self-study. There is a lot of material to cover and digest, and the curriculum is robust—utilizing multimedia delivery modes and supporting diverse learning styles.
Even after completing all 23 chapters of multimedia materials and graduating, you retain lifetime access to the program and our Business Resource Center. Because we’re always adding new resources and content to stay up to date with the science, this is gold! It’s also a way for you to stay connected to PHCI faculty and thousands of students and grads.
What does the Primal Health Coach Certification Program offer?
I encourage you to head over to the Primal Health Coach Institute for full details on the certification, glowing testimonials, and next steps. Also check out the PHCI blog for insights into what coaching looks like and how to succeed in this expanding arena.
That said, here’s an overview of what you’ll receive.
The Primal Health Coach Certification Program offers the most in-depth and up-to-date ancestral health education in the world. We don’t just create health experts. We certify health coaches who are true catalysts for behavior change. And we make sure they have the business knowledge and marketing resources to go out in the world and change lives. The program includes:
Online course made up of 23 chapters of multimedia educational resources tailored for diverse learning styles, including videos, webinars, and supplemental eBooks
College-level fitness and nutrition education that covers the basics and way more
Business-building tasks and development projects to help you shape your business story, name, and niche, plus develop your product and set up a payment system (all before graduation!)
Practical experience developing your coaching skills, crafting your signature coaching program, establishing a 90-day marketing strategy, and writing your personal sales and enrollment script
Peer-to-peer training, coaching practice, and case studies
Training in language and liability issues to ensure that you stay within your legal scope of practice
Access to a private Primal Health Coach Facebook community, a valuable resource for community-based learning and building your professional network
Lifetime subscription to our Business Resource Center, an exclusive portal designed to help you launch your business and scale for maximum profit and impact
How to become a Primal Fitness Coach
I know you asked about our Primal Health Coach program, but that’s only one of the PHCI’s growing suite of offerings.
If Primal fitness is more your thing, you might consider the brand new Primal Fitness Coach Certification. This program can be completed on its own, or you could go all in and add it to your repertoire as a Primal Health Coach.
It offers the same high-level, well-rounded, multimedia educational experience but with a focus on preparing fitness coaches who are proficient in training clients to be fit for life. This functional fitness certification covers best practices for daily movement, strength-training and conditioning, HIIT exercises, sprinting, and more.
Take your Primal knowledge to the next level
Either of the above programs will prepare you to set up a thriving coaching business and help others transform their health and lives. And…even if coaching isn’t your calling, they are still an excellent way to deepen your knowledge and take your own wellness journey to the next level.
You’ll not only get a new layer of external accountability and positive peer pressure, but will be joining a likeminded community while learning to “be your own coach.” This alone makes the investment worth it.
Of course, working with a Primal Health Coach one-on-one is another excellent way to see results AND get a sense of whether becoming a coach is right for you. Visit myprimalcoach.com to learn more. I hope to see you on the inside!
Are you a Primal Health Coach Institute student or grad? Or thinking of becoming one? Let us know and drop other questions for me in the comments!
The 80/20 principle has been a centerpiece of the Primal Blueprint approach and philosophy since the beginning, but I still get comments and questions about it. In case you’re not familiar, the 80/20 principle suggests that in the context of a full and earnest commitment to making health-promoting choices, conforming with the 10 Primal Blueprint Laws 80% of the time will yield a solidly healthy result.
Many tell me how much they love the concept. It’s a feature that makes the Primal lifestyle possible for them. Others suggest that it leaves too much room for backsliding. Still others find it confusing—does it mean living 100% Primal only 80% of the time and partying it up that other 20%? Or does it mean living 80% Primal 100% of the time? (The answer is neither, as you’ll see.)
I love having these kinds of discussions within the community. Your perspectives help me to continue to grow and evolve my thinking even after all these years. So let me share my perspective on the 80/20 principle, and I encourage you to share your own thoughts in the comments as well. Just because I’m “the Primal guy” doesn’t mean I get to dictate how you interpret what it means to live Primally, nor how you embody these teachings in your own life. It’s obviously a general principle and, as such, it’s intended to mean different things to different people.
What Is the 80/20 Principle, And What Is It NOT?
In short, the 80/20 principle is a rule to make Primal doable in the context of the modern world. It’s a feature that makes the Primal Blueprint a fully achievable, enduring lifestyle that reconciles with the grind and disruptions of daily life.
Let me put it this way: the 80/20 principle is an acknowledgment that we’re adults who take full responsibility for every choice but occasionally find ourselves in circumstances that aren’t conducive to adhering fully to the Primal Laws. You should always have the intention to do your best, to aim for 100%. But you should not let your commitment to Primal living become a source of stress or anxiety, and you shouldn’t beat yourself up or throw in the towel when perfection isn’t possible.
You have agency and reasoning skills, so you should be able to make conscious compromises. Perhaps you’re on vacation and really want the experience of sampling the local cuisine. For you, it’s part of the adventure. You authentically choose within the 80/20 principle to make the most of your hard earned adventure. (Personally, this is my favorite manifestation of the principle.) Maybe it’s a special anniversary or family gathering. You don’t use the situation as an excuse to wildly abandon your commitment to health and longevity. You loosen the strings enough to find the best balance between short-term experience and long-term goals.
Sometimes the 80/20 principle is a matter of feasibility. Travel doesn’t always present the most ideal Primal options. A difficult period in your life (new baby, death or serious illness in the family) may temporarily disrupt your focus or ability to do all the good things you normally incorporate into your routine.
There are also the Primal ideals, especially when it comes to food. I know not everyone has ready access to or the budget for grass-fed beef, pastured butter, organic produce, or a wide diversity of produce year round. This is where that old saying comes in: “Don’t let perfect be the enemy of good.” The majority of the health benefits from Primal come from eliminating the grains, sugars, and nasty oils. Worrying about organic, local, and so on is the cherry on top. Likewise, if all you manage right now is walking and microworkouts, but you haven’t found a way to build sprints into your routine yet, you’re still miles ahead of the person who is still sedentary.
Sometimes you just have to do the best you can. It’s not a question of motivation or commitment but the influence of external conditions. Think of it as a cushion, not a cop-out, and focus on the big picture. Primal success is less about what you do at any one meal or single bout at the gym and more about what you do over the course of a given week or month.
And What Is It Not?
Most importantly, it isn’t permission to only shoot for 80% compliance or success. If you set out to make your Primal commitment 80%, guess what. It will likely fall well below that. If you set out to make your commitment 100%, you’ll probably settle in somewhere between 80 and 95%.
It doesn’t mean getting 20% of your calories from ice cream and the other 80% from meats and salads. The 80/20 principle isn’t about “cheating” 20% of the time.
It isn’t intended as a “get-out-of-Primal-free card” for flocking to grains, skimping on fat or protein, or ignoring a continuing sleep deficit.
It doesn’t mean you’re perfect during the week and then go on a bender on the weekend.
It doesn’t mean working out 10 months of the year and then taking two months off to veg on the couch.
It doesn’t mean picking your favorite 8 of the 10 Primal Blueprint laws and scrapping the other two.
And let me be clear: there’s nothing wrong with achieving 100%. If you find the Primal Laws easy to incorporate fully into your life, that’s cause for celebration, not concern. I would never suggest that you’re missing out on life because you don’t feel the need to indulge in conscious compromises. More power to you if you’re happy and fulfilled without them.
Is This the Same as the 80/20 Rule Diet?
Decidedly no, but I’ve gotten this question a fair amount, so let’s clear it up. When people talk about the 80/20 diet, they usually mean the eating strategy attributed to Australian nutritionist, chef, and personal trainer Teresa Cutter. In this approach, you are supposed to “be good” 80% of the time, but you are allowed to indulge the other 20% of the time within reason. No foods are off the table. It’s a “have your cake and eat it too” diet, and it’s very much NOT what the Primal 80/20 principle represents.
The Primal 80/20 principle isn’t a diet at all; it’s more of a mindset. It’s about giving yourself permission not to be perfect, not actually planning dietary excursions into your week. By the same token, the 80/20 principle isn’t carb cycling, alternate day fasting, or any other structured eating pattern. With those, the assumption is that you’re (mostly) sticking to Primal foods but eating at specific times or with certain macronutrient ratios.
And of course, the Primal Blueprint encompasses more than nutrition, so the Primal 80/20 principle does as well. All aspects of Primal living—movement, sleep, stress management, social connection, cognitive challenge—fall under the 80/20 umbrella. There are probably some aspects you’re closer to 100% on most of the time and others you struggle with. For me, the food part is easy, but I’ve historically struggled with the stress bit.
When Does the 80/20 Principle NOT Apply?
There are times when 100% compliance—or something close to it—is important. One example that comes to mind is when someone is using an elimination diet (autoimmune protocol, low-FODMAP, etc.) to explore chronic symptoms. Unless they are strict about eliminating and then systematically reintroducing potential trigger foods, the diet probably won’t be much use.
Another time when it makes sense to be stricter is during the transition to a keto diet. Ketosis is a notoriously fragile metabolic state. Eat a single high-carb meal or snack, and wham, you’re out. When you’re in the process of adapting to keto, it makes sense to be consistent for at least the first four to six weeks to facilitate the process. Even after that, there’s little wiggle room if staying in ketosis is important to you.
The Bottom Line
At its core, the 80/20 principle is a recognition that life isn’t totally predictable and that we’re not in Grok’s Kansas anymore. Denying that reality and trying to fit Primal principles perfectly into modern life can be like jamming a square peg into a round hole. The point of 80/20 is to release the pressure valve that comes with thinking that you are supposed to be perfect and that this Primal living thing should come easily all the time.
As the Primal Blueprint cements itself in your routine, it generally becomes easier (and more desirable) to live well above that 80%. That was my experience, and I can’t even count how many people have told me the same over the years. The Primal Blueprint comes naturally for me now because my entire lifestyle revolves around it and I’ve been doing it so long. It’s so much a part of my routine that I don’t often think about it except when I travel. It will become your normal as well, but the chance that you’ll always be the perfect Primal specimen are small. I’m not, and I’m fine with that.
I encourage everyone to focus on the process and the big picture, not simply the daily details. The Primal Blueprint is first and foremost about taking full responsibility for your life and health. No excuses, no guilt.
As always, thanks for reading, and keep the questions and comments coming!
Originally Posted At: https://breakingmuscle.com/feed/rss
It might be impossible to have familiarity with strongman as a sport and not know the exploits of the Stoltman brothers. Among their individual achievements, Tom Stoltman is the two-time defending World’s Strongest Man (WSM) champion (2021-2022), while his older brother Luke won the 2021 Europe’s Strongest Man (ESM). In a shift from their usual task of lifting hefty objects, the two brothers decided to train in a different kind of athleticism.
On Oct. 5, 2022, the Stoltmans uploaded a video to their joint YouTube channel where Tom and Luke take cues about how to swim from extreme adventurer and ultra-marathon swimmer Ross Edgley. Edgley is notably the first known person in history to swim around Great Britain’s length of 1,780 miles (2,864 kilometers). The trio decided to conduct the swimming lesson in an undisclosed portion of the North Sea somewhere in the United Kingdom.
Given that temperatures in the North Sea are a “little chilly” for swimming in early October — roughly 54 degrees Fahrenheit (12 degrees Celsius) — it might have been safe to assume the group would outfit themselves in heating gear.
Instead, the Stoltmans elect to jump into the water while wearing just swim trunks with swim goggles for their vision. Once they’re in the water, Edgley relays his personal process for swimming, especially when he’s in the middle of an ultra-marathon.
Edgley details something he calls the “catch-up stroke,” where one arm doesn’t make its own individual stroke through the water until it “catches up” with the other arm. The objective behind the technique seems to be about efficiency and saving energy while in the water, given the apparent shorter strokes.
For the Stoltmans, two elite strongmen who each weigh 350-plus pounds, this technique is a means of “slowing down” their strong arms to focus their power and channel it into a quality swim.
The group seemingly puts Edgley’s technique into successful practice as the camera pans over them swimming through a current in the North Sea. To close their day, the Stoltmans and Edgley spend some time relaxing in the sauna and a small cold pool.
After their short foray into autumn swimming lessons in the North Sea, the Stoltmans have a stocked strongman slate ahead of them.
The brothers will compete at the 2022 Giants Live World Tour Finals on Oct. 8, 2022, in Glasgow, Scotland. Luke is the contest’s defending champion, while Tom was last year’s runner-up. Both Stoltmans will then team up as members of Team United Kingdom at the 2022 Giants Live World’s Strongest Nation on Nov. 26, 2022, in Liverpool, England. Strongman legend and 2017 WSM champ Eddie Hall will be their team captain.
Even after swimming with an extreme adventurer, the grinding strongman mentality seemingly never stops for these two elite competitors.
Originally Posted At: https://breakingmuscle.com/feed/rss
Chris Bumstead has an argument for being one of the more accomplished and recognizable faces in modern bodybuilding. Yet, despite his successful run, he isn’t satisfied. The three-time reigning Classic Physique Olympia champ (2019-2021) is pushing hard to make it four consecutive championships this December.
On Oct. 5, 2022, over his YouTube channel, Bumstead shared a comprehensive look at his recent training. This time, he focused on his legs. After already diagramming how he trains aspects of his body like arms and shoulders earlier in the off-season — the new clip is another detailed look at how one of bodybuilding’s superstars is preparing for the Olympia stage again.
Here’s a complete rundown of Bumstead’s latest “killer leg day” before the 2022 Mr. Olympia commences on Dec. 16-18, 2022, in Las Vegas, NV.
Seated Leg Curl, Leg Extension, Hip Adduction
Bumstead treated the first part of his leg workout like a warm-up. He didn’t have a concrete number of repetitions or sets he wanted to reach. It was more about getting his lower body muscles prepared for the meat and potatoes of his training session. The leg curls and leg extension were for Bumstead’s hamstrings and quads, while a few sets on a hip adduction machine loosened up his adductor muscles along the inner midline of his thighs.
Mid-way through this warm-up series, Bumstead removed his shoes and trained in socks for the remainder of his workout. He has previously stated this leg day ritual helps him feel more stable during exercises and improves his mind-muscle connection.
Hack Squat
For his first big movement of the day, Bumstead started with some hack squats. The athlete did an initial set without any plates attached to the machine to get a sense of the movement, and slowly added weight as he progressed. Bumstead’s final working set featured him completing nine reps with nine 45-pound plates on each side, followed by a “back-off set” using seven plates for 12 repetitions.
During a between-set rest period, Bumstead was approached by recently retired, seven-time 212 Olympia winner Flex Lewis. The coincidental meeting likely occurred because the training location, Bev Francis Powerhouse Gym in Syosset, NY, is known as “the East Coast Mecca of Bodybuilding” and regularly hosts a who’s who of bodybuilders and sports stars.
Single-Leg Press
Bumstead shifted to the leg press machine, where he performed a few heavy sets of the movement unilaterally to give both of his legs equal attention. After his sets, he discussed the importance of listening to your body during a workout, especially when you’re having a high energy, high performance day.
“Sometimes you just have to ‘read the room,’” he said. “One day if you feel a lot stronger, if it feels too light, or feels too easy, don’t just do 10 reps to do 10 reps. Rack the weight. Put more weight on. ‘Buckle up for the ride.’ That’s the quote for this year.”
Leg Extension
To center on his quads, Bumstead returned to the leg extension machine as a main lift, not simply a warm-up. While he did a few more challenging sets, Bumstead makes sure not to load too much weight so as to keep any potential punishment on his knees at a minimum.
Instead, he achieved a deep stretch in the bottom position of each rep and worked through a long range of motion for maximum work.
To shift focus on his glutes and hamstrings, Bumstead performed a few sets of a Romanian deadlift with a loaded barbell. The bodybuilder had two plates per side for sets of 12 as he worked through this part of his routine. Bumstead noted that his glutes and hamstrings were still fatigued from the single-leg press, making this relatively light weight more than enough.
Sissy Squat
As he neared the end of his workout, Bumstead implemented some sissy squats into his routine. The movement, which asks the quads to lift the majority of a person’s body weight, can help strengthen connective tissues and muscles in the knees and legs. Bumstead appropriately powered through some sets of sissy squats as best as he could before finally moving off of quad work.
Seated Leg Curl
Bumstead had everything come full circle for this workout when he finished with seated leg curls to give his hamstrings attention. After he “beat up” his legs with textbook-perfect repetitions here, the bodybuilder called it a day.
Bumstead will have to overcome a few noteworthy peers to win his fourth consecutive Classic Physique Olympia title. There’s former two-time champ Breon Ansley (2017-2018), whose reign ended with Bumstead’s first title in 2019, and Terrence Ruffin, an athlete who usually finishes around the top of the Classic Physique Olympia. Late riser Neil Currey might be someone to watch as a dark horse, too.
However, if this glimpse at Bumstead’s commitment to building powerful legs says anything, his impressive run in the Classic Physique division may well continue.
Originally Posted At: https://breakingmuscle.com/feed/rss
The sport of powerlifting, on the whole, doesn’t seem to be short on young stars and up-and-comers at the moment. With a fresh performance under his belt, there might be another big name to throw into a growing competitive ring. On Oct. 2, 2022, during a victory at the Australian Powerlifting League (APL) Strength Quest II, 19-year-old powerlifter Theo Maddox broke two raw Teen 18-19 World Records in the 140-kilogram weight class. The contest took place at the GroundZeroW Gym in Arundel, Australia.
Maddox’s first record was a 390-kilogram (859.8-pound) deadlift that Maddox pulled from a sumo stance with a mixed grip while wearing a lifting belt. The pull surpasses Max Shethar’s previous figure of 350 kilograms (771.6 pounds) from the 2021 United States Powerlifting Association (USPA) Ragnarok Invite II. Maddox’s second feat was a 962.5-kilogram (2,117.5-pound) total, exceeding Jackson Powell’s past mark of 897 kilograms (1,977.5 pounds) from the 2022 United States Powerlifting Coalition Big Bend Classic.
Here’s an overview of Maddox’s complete performance at the 2022 APL Strength Quest II, where he also earned all-time raw competition bests on his squat and bench press:
Theo Maddox (140KG) | 2022 APL Strength Quest II Top Stats
Squat — 355 kilograms (781 pounds) | All-Time Competition Best
Deadlift — 390 kilograms (859.8 pounds) | Teen 18-19 World Record
Total — 962.5. kilograms (2,117.5 pounds) | Teen 18-19 World Record
With four competitions to his name according to Open Powerlifting, Maddox has yet to lose in his budding competitive career. Here’s a rundown of his complete career results:
Theo Maddox | Complete Career Results
2020 New Zealand Powerlifting Federation (NZPF) WBOP Regional Championships (Sub-Juniors/Raw) — First place
2020 NZPF Nationals (Sub-Juniors/Raw) — First place
2021 NZPF North Island Championships (Juniors/Raw) — First place
2022 APL Strength Quest II(Teen 18-19/Raw) — First place
Despite his most recent impressive result undoubtedly putting him on the powerlifting map, Maddox didn’t appear satisfied with a record-breaking output. As the 19-year-old athlete would explain in a post on his Instagram, he’s treating this stellar finish as a learning experience.
“Look, it wasn’t the day I wanted, but it was good to get on the platform again after so long off,” Maddox wrote. “I have a lot to learn and improve upon, and that’s honestly very exciting to have acquired all this new information. I am now in a very good position to build some of my foundations up and work on my weaknesses. A break will do me good, however. I need to take care of my mental [health] and plan a fair amount out. Talk less, do more. Talk is cheap, after all.”
Originally Posted At: https://breakingmuscle.com/feed/rss
There’s a reason Monday is often called “International bench day.” Training for a strong, muscular chest is awesome and it can be appreciated year-round. But the bench press isn’t the only way to get there. The humble push-up is often pushed aside in the quest for a strong and muscular chest because the latest flashy chest exercise featured on Instagram might look “way cooler.” But is it as effective as the push-up? Probably not.
Credit: Ground Picture / Shutterstock
When performed regularly, the simple push-up and its variations will help you build bigger pecs, triceps, and shoulders, improve your relative strength, and it can even transfer over to boosting your bench and overhead press numbers.
Here are 10 push-up variations to try if you’re ready to give bodyweight training a fair shake. You will never look at push-ups the same way again.
This challenging variation takes the standard bodyweight push-up up a notch by using a resistance band in a quite unusual way. By performing a push-up with your hands on the band instead of the floor, the highly unstable element fires up all of your shoulder and core stabilizer muscles.
The band gives you instant feedback when using anything less than perfect form. You’re forced to move at a slower speed to maintain control, and the increased time under tension does wonders for adding muscle.
When to Use it
When regular push-ups are easy and you’ve advanced to doing push-ups for seemingly endless reps, the chaos push-up will snap you out of this funk. The increased time under tension makes it great for adding muscle and it’s a great alternative exercise for dumbbell bench presses. The instability of the chaos push-up is excellent for additional rotator cuff strength if you’re coming back from a shoulder injury.
How to Do it
Loop a heavy-duty resistance band around safety pins on the squat rack, at roughly waist height. Light to moderate bands may not be able to support your body weight. The higher the band is placed and the higher your body angle, the easier the exercise will be.
Place your hands on the band in a shoulder-width grip and hold tight with stiff arms. Bring your legs behind you and allow the band to support your weight, while engaging your glutes and core. Bend your arms and slowly lower yourself into a push-up. Press yourself up, pause briefly at the top to reset and stabilize before repeating.
Decline Push-Up
The decline push-up is one of the most common variations of the classic push-up. It’s fantastic for adding muscle because it’s relatively low stress on the joints, requires minimal equipment to perform, and can be trained for very high reps which benefits size and strength.
This movement shifts the focus to the upper chest and anterior deltoid, similar to an incline bench press, for better overall muscle development of the chest and shoulders.
When to Use it
Your chest is a relatively large muscle with multiple sections, or heads, so it pays to train with your arms at a variety of angles relative to your torso. (1) Perform the decline push-up in any workout in place of your standard push-up, particularly if your workout lacks angled chest exercises or if your shoulders are bothering you from other pressing exercises.
How to Do it
Place your toes on a box, step, or flat bench and position your hands underneath your shoulders. Engage your core to keep your spine neutral, neither sagging nor excessively arched. Lower yourself into a push-up until your chest is just above the floor and your elbows are angled roughly 45-degrees from your sides. Pause briefly at the bottom and push back to the starting position. Reset your body position at lockout and repeat.
Incline Plyo Push-Up
The incline plyo push-up allows you to generate upper body power with less compressive stress on the joints than similar free weight movements.
The incline plyo push-up is an excellent regression (less challenging variation) from the clapping push-up because you press less of your body weight due to the inclined position. This can allow you to squeak a few more reps and apply more explosive force.
When to Use it
Use sets of six to 10 reps with this powerful variation as a “primer” at the start of a heavy bench press workout to recruit more muscle and ignite your CNS. (2) If you’re having difficulty with plyo push-ups from the floor, this is a good way to introduce explosive movements while building strength, speed, and power.
How to Do it
Place your hands on a stable platform like a secured bench or box, a set of steps, or a Smith machine bar. Keep your arms straight as you lean forward and position your feet back, keeping a straight line through your body. Bend your arms and lower yourself rapidly toward the bench before explosively pushing yourself up and allowing your hands to leave the bench.
As you land, slightly bend your elbows and “catch” yourself on the way down to better absorb the force. Descend smoothly into the next repetition.
Clapping Push-Up
The clapping push-up is performed with maximum force. On each repetition, your hands will leave the ground and you will quickly clap them together to display power, coordination, and control.
Power exercises like the clapping push-up train the fast-twitch muscle fibers of the body, which are capable of more growth than slow-twitch fibers. (3) This exercise is a progression of the incline plyo push-up and should only be performed when you’ve mastered the incline movement.
When to Use It
As the first exercise of the workout, before heavy lifting, perform sets of six to eight reps. This will build explosive strength and help to improve your performance with other pressing exercises following in the workout, such as the overhead press and bench press.
How to Do it
Lie on the floor in a good push-up position with your hands under your shoulders, your legs straight, and your spine neutral. Bend your arms and lower yourself into a push-up position with your elbows at a roughly 45-degree angle. Before your chest touches the floor, press explosively and let your hands leave the floor. Quickly clap your hands together and get them back to the floor to catch yourself. Reset your body before the next repetition or, if you’re advanced, immediately transition into the next rep.
Spiderman Push-Up
The Spiderman push-up is an advanced variation that requires your upper body and lower body to work together with coordination, strength, and stability.
This push-up variation will increase your chest’s time under tension at the peak of your push-up contraction, which will challenge your strength and improve the hypertrophy stimulus. It also tests and challenges your core stability and hip mobility, making it an excellent “bang for the buck” movement.
When to Use It
The Spiderman push-up is excellent to insert into a conditioning workout or fat loss circuit because it trains many muscles with one movement and improves your upper body, core, and hip flexor strength. Make sure to do equal reps on both legs.
How to Do it
Assume your regular push-up position on the ground with your hands slightly wider than shoulder-width apart. Lower your chest toward the ground while simultaneously pulling your right knee toward your right forearm. Don’t allow your torso to rotate excessively to accommodate your rising leg
Pause briefly in the bottom while your chest hovers near the ground before reversing the process and bringing your foot back to the starting position while pushing yourself back up. Repeat the next repetition with the left leg. Alternate legs with each repetition. To cue the overall movement, imagine you’re a web-slinging superhero climbing the outside of a building.
Slider Push-Up
For the slider push-up, you’re using a simple slider device to reach one arm forward as you perform a traditional bent-arm push-up with the opposite arm. This variation recruits more of the serratus anterior (outer chest muscle which controls the shoulder blades), while also increasing muscular tension on your chest and triceps.
If you have shoulder mobility issues, stay within a range of motion you can control by limiting how far you reach forward. The slider push-up challenges your shoulder stabilization and may improve shoulder health over time.
When to Use It
The slider push-up is a great exercise to eventually build up to a one-arm push-up because most of the work is done by one arm while the other is providing support. For maximum focus and strength, perform this exercise near the beginning of any workout, before fatiguing your chest and triceps with other exercises.
How to Do it
Kneel on the ground and put an exercise slider or furniture slider under each hand. Rotate your shoulders to put your wrists, elbows, and shoulders in a stacked position. Straighten your legs and stabilize your entire body in a front plank position. Engage your glutes and keep a tight core.
Lower into a push-up by bending one arm while keeping the opposite arm straight as it extends forward. After reaching the lowest comfortable position, pull the forward hand back while pressing the bent arm to lockout. Alternate sides with each repetition.
Suspension Strap Single-Arm Push-Up
This variation uses suspension straps, like gymnastic rings or TRX cables, to adjust your body angle which changes the intensity of the push-up. The straps also add an element of instability, which means you’re training core strength as well as upper body and lower body stabilizers.(4)
This exercise will help strengthen imbalances between sides and give you instant feedback if there is anything amiss with your pressing technique since it requires total focus and control.
When to Use It
Unilateral (single-arm) presses are great for strengthening imbalances between sides, since most people naturally have one slightly more developed or slightly stronger arm. If you find one arm lagging behind the other during the bench press or overhead press, this is an effective way to target each side on its own.
How to Do it
Loop the handles together and grip the strap over your shoulder with one hand. Adjust your intensity by moving your feet closer to the anchor point (harder) or further away (easier). Slowly lower yourself while keeping your shoulders square to the floor. Don’t rotate or shift to favor either side. While learning the movement, control the range of motion and don’t let your elbow go too far past your torso. Press back, reset, and repeat. Perform all reps on one side before switching.
Band-Resisted Push-Up
Bodyweight push-ups will never truly go out of style, and sometimes you just want to add resistance to this classic exercise. Putting weight plates on your back is okay, but it can get awkward to keep them in place as you move. This is where a looped resistance band comes in.
The band’s ascending resistance will make the exercise more difficult toward the top of the push-up, which maximizes your muscles’ peak contraction.
When to Use It
The band provides the majority of resistance in the upper end of the range of motion, which will help build triceps lockout strength and muscle gains for your chest and triceps. Do this when you want to add variety to your training, build some chest muscle, and put some pep back into your bench press without joint stress from a barbell.
How to Do it
Loop a resistance band around your upper back and put the ends of the band snugly under your hands. Place your hands underneath your shoulders and rise onto your toes in a front plank position. Keep a straight line through your core and squeeze your glutes. Slowly lower yourself down until your chest is nearly touching the floor. Think about driving your hands through the floor as you press back up and fight resistance to the starting position.
Archer Push-Up
This exercise has you performing a push-up with primarily one arm while the other arm provides support, similar to a slider push-up. The wide grip and long range of motion make this one of the more advanced push-up variations.
By alternating side to side, you allow each arm to do its own share of the work. This unique training angle also works the chest differently from most exercises, which can stimulate more muscle growth.
When to Use It
If your goal is to be able to do one-arm push-ups, archer push-ups can play a big role in getting you there. It can be used as a “gateway” movement to build the pressing strength and total-body stability needed to achieve a clean one-arm push-up.
How to Do it
Get on the ground with your toes planted and your hands set well-beyond shoulder-width. Your wrists and elbows may be more comfortable when your fingers point “out” toward the side walls instead of forward. Maintain a stiff body position through your core.
“Pull” your right chest down toward your right hand by bending your right elbow. Keep your left arm straight as your body approaches the ground. Press through your bent arm to return to the starting position and repeat to the opposite side. Alternate sides with each repetition, and perform an even amount of work on each side.
Yoga Push-Up
This unique exercise is one part push-up and one part “downward dog” yoga pose. It trains strength, mobility, and flexibility in your pressing muscles, core, upper back, lower back, hips, and lower body.
Your pecs and triceps get significant time under tension and a change of pressing angle similar to a decline push-up. The “downward dog”-like position helps to improve strength and mobility in the thoracic spine (upper back), hips, and hamstrings.
When to Use It
The yoga push-up is ideal when you’ve finally decided to perform some of the mobility work that often gets forgotten. It works well as a time-efficient warm-up before any workout, especially sessions that will involve chest pressing or shoulder training because it addresses the upper and lower back.
How to Do it
Start in a regular push-up position, on your toes and hands, with your body straight from head to heel. Descend into a standard push-up with your elbows roughly 45-degrees away from your torso. When your chest is slightly above the floor, press up while pushing your hips back at an upward angle. You should feel a stretch in your hamstrings as your torso and legs form an upside down “V” shape.
Keep your shoulders relaxed and pushed away from your ears. Reverse the entire movement to transition back into the starting push-up position and repeat for reps.
Muscles Worked by the Push-Up
Most push-up movements primarily work the chest, with support from the shoulders and triceps, while the abdominals and lower back work to keep a strong core.
Credit: Prostock-studio / Shutterstock
However, specific variations can emphasize the upper chest, focus more on core strength, or build shoulder and upper back mobility.
Pectorals
Your chest muscles are front and center with the push-up. Your pecs are largely responsible for arm adduction (bringing your arms closer to your centerline) which occurs when you push your body away from the floor.
Triceps
Once your elbows break 90-degrees as you press upwards, your triceps take over significantly to extend your elbows and lockout your arms. Performing any push-up with a relatively close-grip (your hands closer than shoulder-width) will also increase triceps activation. (5)
Anterior Deltoids
The shoulder muscle has three individual heads, each responsible for moving your arm in a different plane relative to your body. The anterior deltoid on the front of the shoulder works to “raise” your upper arm in front of your body. It assists your chest and triceps when pushing your body away from the ground.
Core
If your spine doesn’t stay neutral during the push-up, it all counts for naught because you’ll compromise joint health, safety, and efficiency. The anterior and posterior core — your abs and lower back — keep your torso rigid so your chest and triceps can apply maximum force. Single-arm movements like the slider push-up and single-leg movements like the Spiderman push-up require more core activation to counterbalance a reduced base of support.
Push-Up Form Tips
The most common technique flaw in the push-up is a loss of core stability. This results in an ugly-looking push-up which strains the lower back and increases the risk of injury. Your best bet is to engage your abs and glutes, and stop the movement if you find yourself losing spinal position.
Although there is nothing necessarily wrong with having your hands wider than shoulder-width apart when performing the basic push-up, be sure to keep your elbows angled near 45-degrees from your torso for most push-up movements. When your hands are placed wide, it’s more work on the shoulders (and shoulder joints) and less involvement from the chest and triceps.
Credit: lzf / Shutterstock
The cardinal sin of almost all push-ups is reaching your head down to meet the floor. This is high risk on your cervical spine and neck, and it short-changes the effective range of motion for your target muscles. You can prevent this error by tucking your chin to your chest, pulling your head back to make a “double-chin”, and staring directly at the floor.
Push Yourself with New Exercises
Too many lifters write off the push-up as being “an easy exercise.” They underestimate its value because of the general lack of load and apparent simplicity of the movement. But as any of these variations showcase, a few tweaks here and there will take the bodyweight push-up to the next level by adding extra movement, changing the angle of work, or throwing stability requirements to the mix. Tackle some of these exercises and the push-up will never seem so “easy” again.
References
Rodríguez-Ridao, D., Antequera-Vique, J. A., Martín-Fuentes, I., & Muyor, J. M. (2020). Effect of Five Bench Inclinations on the Electromyographic Activity of the Pectoralis Major, Anterior Deltoid, and Triceps Brachii during the Bench Press Exercise. International journal of environmental research and public health, 17(19), 7339. https://doi.org/10.3390/ijerph17197339
Sale D. G. (1988). Neural adaptation to resistance training. Medicine and science in sports and exercise, 20(5 Suppl), S135–S145. https://doi.org/10.1249/00005768-198810001-00009
D’Antona, G., Lanfranconi, F., Pellegrino, M. A., Brocca, L., Adami, R., Rossi, R., Moro, G., Miotti, D., Canepari, M., & Bottinelli, R. (2006). Skeletal muscle hypertrophy and structure and function of skeletal muscle fibres in male body builders. The Journal of physiology, 570(Pt 3), 611–627. https://doi.org/10.1113/jphysiol.2005.101642
Borreani, S., Calatayud, J., Colado, J. C., Moya-Nájera, D., Triplett, N. T., & Martin, F. (2015). Muscle activation during push-ups performed under stable and unstable conditions. Journal of exercise science and fitness, 13(2), 94–98. https://doi.org/10.1016/j.jesf.2015.07.002
Kim, Y. S., Kim, D. Y., & Ha, M. S. (2016). Effect of the push-up exercise at different palmar width on muscle activities. Journal of physical therapy science, 28(2), 446–449. https://doi.org/10.1589/jpts.28.446
For now classes are 6pm and 640pm at 2840 Wildwood st in the Boise Cloggers studio.
Book your class NOW!
click this ==>
Warrior Fit Testimonials
First, I want to say thank you for convincing me to do Tabata! I was struggling to lose weight and Finally I found something that helped! I really appreciate your coaching! - Craig T.
Ever since I was convinced to do Tabata I have seen huge results, I lost 6 pounds and gained energy in the first 3 weeks. I have been working out for 3 months before I decided to do Tabata and I struggled to lose weight.
At first I thought "How am I losing weight by bringing my heart rate up then cooling down then bringing it up again?" I don’t know how it works but it does!
Thank you!! - Theresa F.
The first day of Tabata, I wondered WHAT AM I DOING - I AM 56 !! Five weeks later I knew that it was what I needed. I learned that I could push myself well beyond my comfort zone and feel good later. I have a marked improvement in physical as well as emotional endurance. - Lyn C.
When I was first told about Tabata I was very excited from the word go, however that excitement stemmed from the fact that I had no clue what it meant. I missed the first week of class b/c I was traveling for work so when I came in during the 2nd week I had some making it up to do.
It was hard at first b/c my body wasn't used to working out at such a fast pace, but once I got into a rhythm I started to feel very good. These classes are no joke. If you stick with it you will leave there feeling stronger, healthier and overall better about yourself and what you've accomplished.
I would recommend these classes to anyone. Darrin is a great trainer and he'll keep you going with his energy.
- Jami L.
Warriors Fit Audio
Warrior Fit uses High Intensity Music to get ya Moooovin' So we can all "Get Our Sweat On"
The link below will give ya a freeee shot at Audible plus a couple audio books just to try it out and if you haven't used audio books on your commutes you are missing out. Get pumped up before you get to where you are going and exercise your mind. I use it Everyday. Go get yours now!

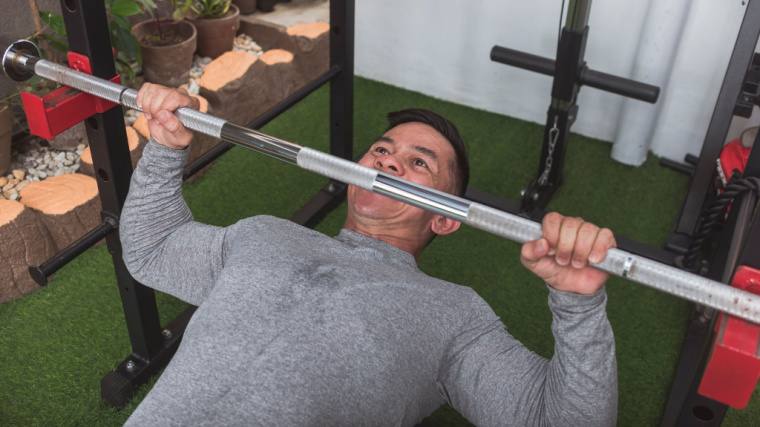
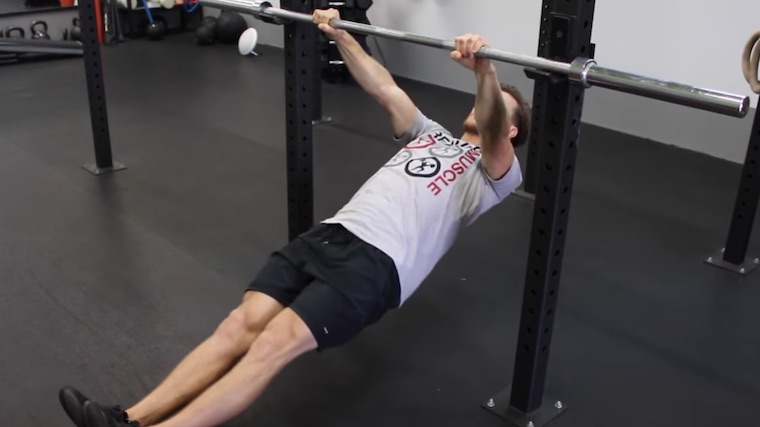
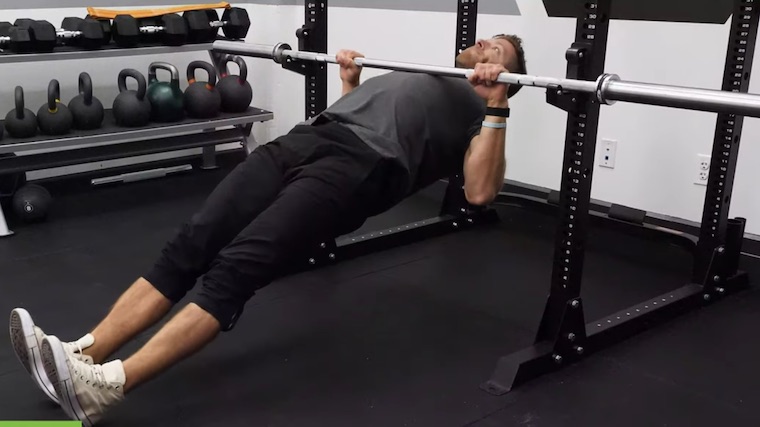
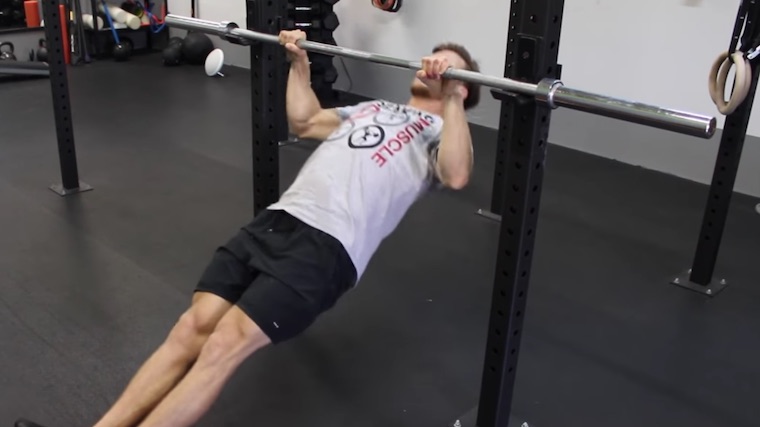
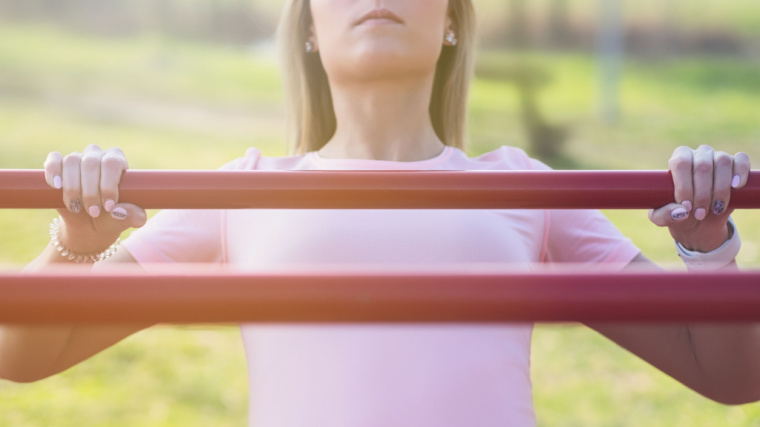
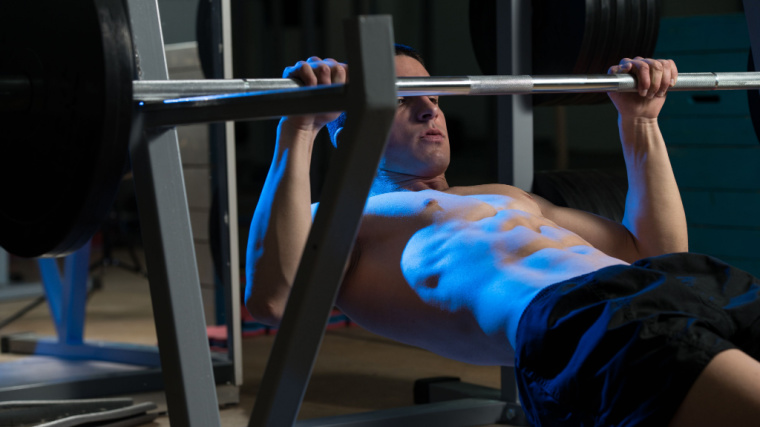
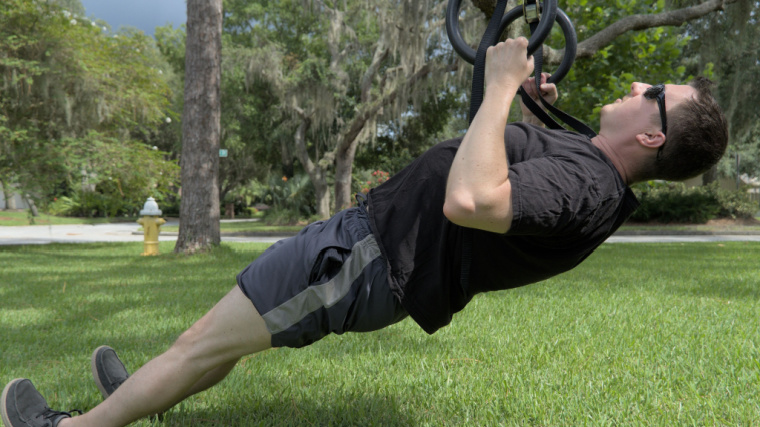
 Hurray! So fantastic that you turned working from home into a life-changing, wellness-promoting project, Patrick! It really is true: Just a couple of years (or less) of consistent effort can change the state of our health and our life’s trajectory.

 The 80/20 principle has been a centerpiece of the Primal Blueprint approach and philosophy since the beginning, but I still get comments and questions about it. In case you’re not familiar, the 80/20 principle suggests that in the context of a full and earnest commitment to making health-promoting choices, conforming with the

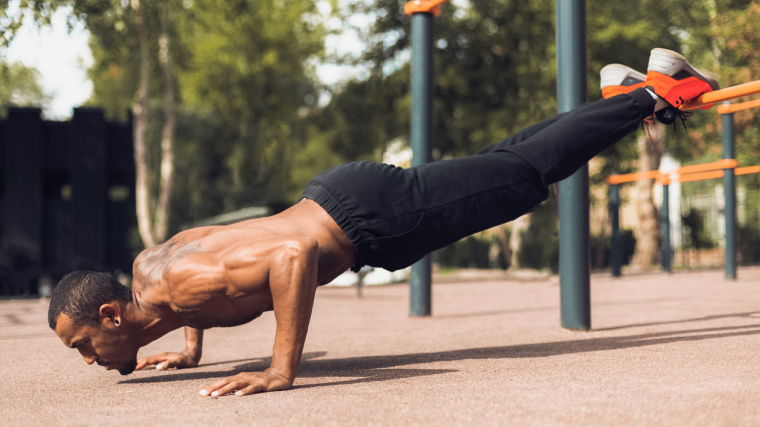

 For now classes are 6pm and 640pm at 2840 Wildwood st in the Boise Cloggers studio.
Book your class NOW!
click this ==>
For now classes are 6pm and 640pm at 2840 Wildwood st in the Boise Cloggers studio.
Book your class NOW!
click this ==>


