Originally Posted At: https://breakingmuscle.com/feed/rss
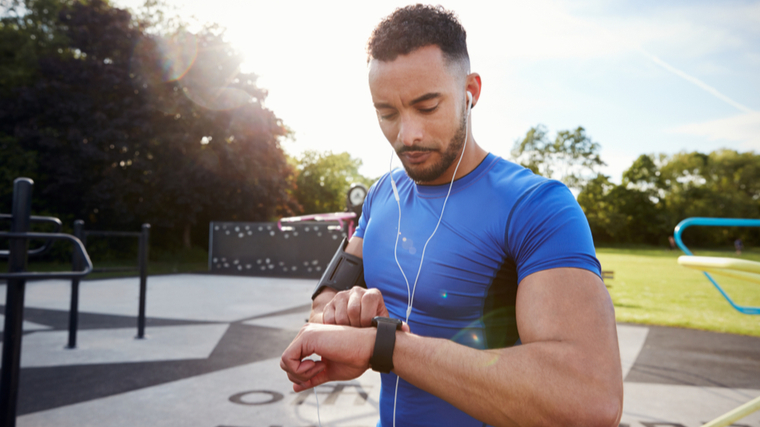
You get 24 hours every day. They’re yours to do whatever you want or, more accurately, whatever you need to get done. Once you start subtracting six or seven hours of sleep, eight or nine hours of work, commuting and traveling, time to eat, and, oh yeah, some face time (not FaceTime) with your family, it can be difficult to squeeze in the gym.
Credit: Monkey Business Images / Shutterstock
Sure, some people shuffle priorities to find two or more hours per day to train, but for the time-constrained lifter, finding just one hour can be too big a task. Fortunately, short workouts don’t have to mean coming up short on results. Here’s how to make the most from just 20 minutes of well-planned training.
Building strength and power doesn’t require a variety of exercises to hit target muscles from multiple angles. It just requires laser-like focus on some basic movements.
This straightforward approach makes this an ideal goal for brief workouts. Heavy weight, low volume training has been shown to deliver better strength gains than higher volume training. (1) Get in, get some heavy reps on a big lift, then get out to start resting and recovering.
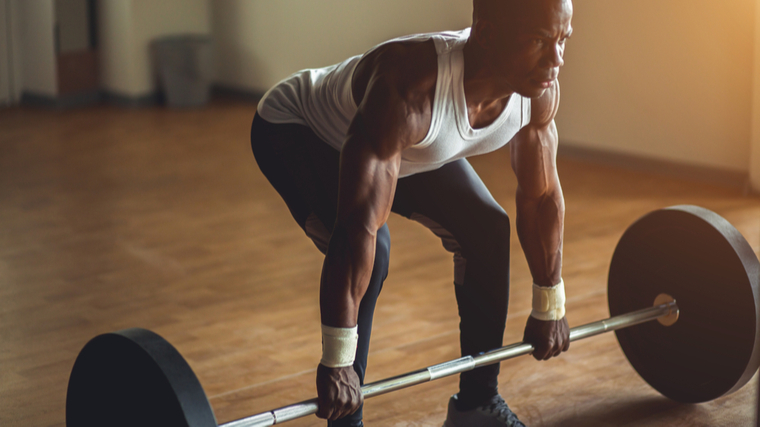
One-Lift Workout
This focused workout requires you to put all your strength-building eggs in one basket. Choose one multi-joint (compound) barbell exercise, like the deadlift or bench press, and work on it for the entire session. Even though there’s a time limit, take three full minutes of rest between each set.
Credit: UfaBizPhoto / Shutterstock
It’s going to feel like you’re spending more time resting than lifting during this workout because, well, you are. This type of long rest period has been shown to help optimize strength gains and recovery between sets. (2) This will help you make the most of the lifting you do perform. Use an extremely challenging weight without reaching muscular failure.
While this program delivers results, any extremely minimalist training plan is unsuitable for long-term programming because muscle discrepancies and imbalances may potentially develop from limited exercise options. Use this approach as needed, not as an extended long-term solution.
Deadlift
How to Do it: Set up in front of a barbell with your feet roughly shoulder-width apart and the bar nearly touching your shins. Keep a neutral spine as you grab the bar with a palms-down grip. Pull your shoulder-blades back and open your chest. Keep your arms locked straight as you drive through your heels to stand upright. Squeeze your glutes and abs as you reach the top position. Lower the bar quickly but under control. Pause to reset your grip before performing the next repetition.
Sets and Reps: 5 x 2
Rest time: Three minutes between sets.
20-Minute Workout for Muscle
Muscle-building workouts can certainly benefit from multiple exercises per body part and high volume training that requires an hour or two in the gym. However, that’s absolutely not the only way to stimulate growth.
You can keep the training volume low (and, therefore, keep the workouts brief) when you manipulate exercise intensity, reach muscular failure, and even tiptoe beyond failure. This allows you to trigger muscle gains comparable to a high volume approach. (3)
Classic High-Intensity Training
Take a page out of old school bodybuilding and apply some intensity-boosting techniques to reap maximum benefit from just one high-intensity set of an exercise. It’s essential that you warm-up sufficiently, but you only have one working set to get through and there will be some serious muscle burning, so watch the foul language when you’re in the gym.
Credit: Paul Aiken / Shutterstock
Here’s a sample plan for a chest, shoulders, and triceps workout. You can apply the same framework to any muscle group or training split — training one or two exercises per body part with one work set using intensity-boosting techniques.
Low Incline Dumbbell Press
How to Do it: Lie on an incline bench set at a relatively low angle. Keep a palms-down grip while pressing the dumbbells from shoulder-height to meet above your chest. On each rep, pause for three seconds in the stretched position. When muscular failure approaches after eight to 10 reps, remove the pause and perform reps until muscular failure.
Sets and Reps: 1 x 8-10, followed by as many reps as possible.
Rest time: 90 seconds before moving to the next exercise.
Pec-Deck Flye
How to Do it: Sit in a pec-deck machine and grab the handles at shoulder-height. Keep your elbows in line with your shoulders as you squeeze your hands to meet in the middle. Take four seconds to lower the weight on each rep. When muscular failure approaches after 10 to 12 reps, take one second to lower the weight and perform reps until muscular failure.
Sets and Reps: 1 x 10-12, followed by as many reps as possible.
Rest time: 90 seconds before moving to the next exercise.
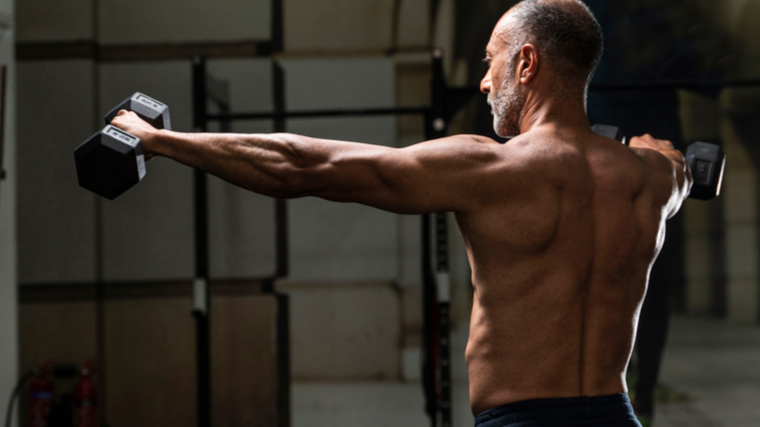
Lateral Raise
How to Do it: Stand upright with dumbbells in each hand at your side. Perform a standard lateral raise by lifting the weights to shoulder-level while keeping a slight bend in your elbows and your palms pointed down. Hold the top position of each rep for two seconds. After reaching muscular failure, immediately reduce the weight by roughly 50% and perform reps until you reach muscular failure again.
Sets and Reps: 1 x 10-12, followed by one drop set for as many reps as possible.
Rest time: 90 seconds before moving to the next exercise.
Triceps Pushdown
How to Do it: Setup at a high-pulley cable station with a rope handle or EZ-bar attached. Perform a standard triceps pushdown, keeping your elbows pinned to your sides while straightening your arms. After reaching muscular failure in 10-15 reps, immediately reduce the weight by roughly 50% and perform as many reps as possible. After reaching failure again, reduce the weight a second time and perform more reps. Repeat the process until you’ve reached the lightest weight on the stack.
Sets and Reps: 1 x 10-15, followed by multiple drop sets for as many reps as possible.
Rest time: No rest between drop sets.
20-Minute Workout for Fat Loss
Fat loss training doesn’t have to mean marathon-like slogs on the treadmill or lightweight high-rep weight lifting.
Banging out a fast, intense workout can help to burn calories, stimulate your metabolism, and preserve muscle to reveal the lean body you’re after.
Fat-Burning Barbell Complex
A “complex” is essentially a type of circuit training where multiple exercises are performed back-to-back-to-back with a single piece of exercise equipment and a single weight. For example, you might use a 75-pound barbell for five different exercises performed in sequence without changing the weight for each exercise.
Credit: Mix Tape / Shutterstock
Complexes are a very efficient way to perform multiple sets of multiple movements in minimum time. Always aim to perform each repetition quickly without sacrificing technique. Because of the fast-pace and overall intensity, don’t be surprised by the relatively light weight you’ll be using. The sets shouldn’t approach muscular failure, but your cardiovascular conditioning will quickly become the limiting factor and that light weight will feel heavy enough by the end of the session.
Deadlift
How to Do it: Set up in front of a barbell with your feet roughly shoulder-width apart and the bar nearly touching your shins. Keep a neutral spine as you grab the bar with a palms-down grip. Pull your shoulder-blades back and open your chest. Keep your arms locked straight as you drive through your heels to stand upright. Squeeze your glutes and abs as you reach the top position. Avoid bouncing the weight off the floor between reps.
Sets and Reps: 5 x 6
Rest time: No rest before moving to the next exercise.
Barbell Row
How to Do it: From the top position of a deadlift, push your glutes back and bend forward at the waist. Keep a palms-down grip on the bar as your arms extend down to stretch. Maintain a neutral spine while you row the bar into your lower abs.
Sets and Reps: 5 x 6
Rest time: No rest before moving to the next exercise.
Hang Clean
How to Do it: Stand upright with a palms-down grip on the bar, holding the bar in front of your hips. Push your glutes back while bending your knees slightly. Keep a neutral spine as you explode upwards with your legs to drive the bar towards the front of your shoulders. Allow your elbows to “flip” under the bar as you catch it in the top position. Drop the weight back to hip-height and perform the next rep.
Sets and Reps: 5 x 6
Rest time: No rest before moving to the next exercise.
Thruster
How to Do it: This is a hybrid front squat/shoulder press movement. Hold the bar across the fronts of your shoulders as you squat down as deep as possible, as if performing a front squat. As you rise into the standing position, perform a shoulder press to lockout the bar overhead. Lower the bar to your shoulders and descend into another deep front squat. On the last rep of each set, carefully lower the bar behind your neck to rest on your traps.
Sets and Reps: 5 x 6
Rest time: No rest before moving to the next exercise.
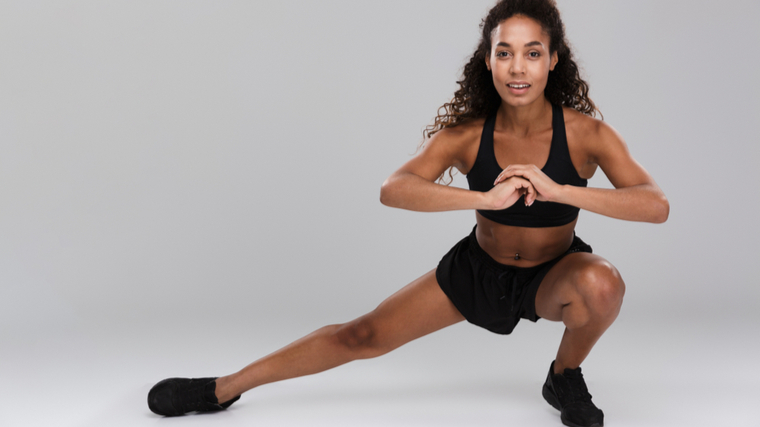
Reverse Lunge
How to Do it: Hold the bar across your traps and upper back. Step backwards with one leg and descend into a lunge position. Keep your shoulders back and your torso upright. Alternate legs each rep to perform a total of six repetitions.
Sets and Reps: 5 x 3 per leg.
Rest time: Rest 60 seconds before repeating the first exercise.
20-Minute Bodyweight Workout
When your schedule is tight, performing a bodyweight workout will always be an appealing and effective option.
Bodyweight training can be done anywhere and anytime, so the need to drive to and from a gym is completely eliminated and you don’t need to fight any crowds for equipment.
EMOM Bodyweight Workout
Get the most from limited training time with an EMOM workout — performing a set every minute on the minute instead of performing a set, resting a certain amount of time, and performing another set. This method lets you squeeze more training volume into a predetermined amount of time.
This specific bodyweight workout cranks up the intensity by also incorporating supersets to fit even more work into each time period. For the duration, you’ll perform two exercises back-to-back and rest for the remainder of a minute before repeating the exercises.
T-Push-Up
How to Do it: Begin in a push-up position with a straight line from your heels to your neck. Lower your body to the ground and straighten your arms. From the top position, shift your weight onto one hand and rotate at the shoulder. Your weight should be supported on one hand and one foot while you face sideways. Reach your free arm to the ceiling and don’t allow your hips to sink. Lower yourself under control and return to the push-up position. Perform another push-up and rotate onto the opposite hand.
Sets and Reps: 3 reps per side, 12 minutes total.
Rest time: No rest before moving to the next exercise.
Reverse Lunge
How to Do it: Pull your shoulders back and keep your torso upright. Step backwards with one leg and descend into a lunge position. Perform all reps with one leg before switching sides.
Sets and Reps: 3 reps per leg, 12 minutes total.
Rest time: Rest until the next minute begins and then repeat the previous exercise (Note: this is not the same as resting one minute).
V-Up
How to Do it: Lie flat on the ground with your legs straight and your hands by your sides. Keep your legs straight while raising both feet towards the ceiling and reaching both hands towards your feet. Lower your hands and legs under control. Don’t bounce your heels off the ground between reps.
Sets and Reps: 10 reps, five minutes total.
Rest time: No rest before moving to the next exercise.
Squat
How to Do it: Stand with your feet more than shoulder-width apart. Keep your upper body upright as you descend into a deep squat. On the last rep of each set, hold the bottom position for five seconds.
Sets and Reps: 5 reps, five minutes total.
Rest time: Rest until the next minute begins and then repeat the previous exercise.
Never Skip the Warm-Up
Just because you don’t have much time to train is no excuse to skimp on a thorough warm-up. Warm-ups are an effective way to reduce the risk of injuries and improve performance. (4)(5)
Credit: Dean Drobot / Shutterstock
If you think it’s hard to find time to get to the gym, keep skipping your warm-up and then try finding time to get to physical therapy. Or just be sure to implement a general warm-up followed by some exercise-specific movements for your training day. That’s a much better idea.
Quick and Complete Warm-up
Squat: Stand with your feet more than shoulder-width apart. Keep your upper body upright as you descend into a squat. Adjust your depth based on your mobility and comfort. Aim to squat progressively deeper as the warm-up continues. Perform 10 reps before moving to the next exercise.
Band Pull-Apart: Take a resistance band with a palms-down grip and hold the band at arms-length in front of you. Pull both hands back until the band touches your chest. Hold the contraction for two seconds. Return to the starting position under control. Perform 10 reps before moving to the next exercise.
Side Lunge to High Knee: Stand with your feet together. Take a wide step to the side with one leg to the side and keep it straight as you bend the other leg. Stand upright and bring the far leg in to your center, raising the knee to waist-height before returning your feet together. Perform three reps with one leg, followed by three reps with the other leg, before moving to the next exercise.
Push-Up Plus: Perform a basic push-up, supporting your body weight on your hands and toes. Don’t allow your hips to sag down or arch high up. With your arms locked out in the top position of each rep, continue driving your hands into the ground while spreading your shoulder blades apart. Perform five repetitions before repeating the first exercise. Perform two to four total sets of the entire circuit.
Time Enough at Last
Whether it’s busy season at the office or you just can’t find the energy to grind through a long training session, you don’t have to compromise results just because you’re grabbing a quick workout. If you can maintain focus for the duration of your average sitcom (minus commercials), you can not only stay on track, but you can keep the results rolling in.
References
Mangine, G. T., Hoffman, J. R., Gonzalez, A. M., Townsend, J. R., Wells, A. J., Jajtner, A. R., Beyer, K. S., Boone, C. H., Miramonti, A. A., Wang, R., LaMonica, M. B., Fukuda, D. H., Ratamess, N. A., & Stout, J. R. (2015). The effect of training volume and intensity on improvements in muscular strength and size in resistance-trained men. Physiological reports, 3(8), e12472. https://doi.org/10.14814/phy2.12472
de Salles, B. F., Simão, R., Miranda, F., Novaes, J., Lemos, A., & Willardson, J. M. (2009). Rest interval between sets in strength training. Sports medicine (Auckland, N.Z.), 39(9), 765–777. https://doi.org/10.2165/11315230-000000000-00000
Wernbom, M., Augustsson, J., & Thomeé, R. (2007). The influence of frequency, intensity, volume and mode of strength training on whole muscle cross-sectional area in humans. Sports medicine (Auckland, N.Z.), 37(3), 225–264. https://doi.org/10.2165/00007256-200737030-00004
Woods, K., Bishop, P., & Jones, E. (2007). Warm-up and stretching in the prevention of muscular injury. Sports medicine (Auckland, N.Z.), 37(12), 1089–1099. https://doi.org/10.2165/00007256-200737120-00006
Fradkin, A. J., Zazryn, T. R., & Smoliga, J. M. (2010). Effects of warming-up on physical performance: a systematic review with meta-analysis. Journal of strength and conditioning research, 24(1), 140–148. https://doi.org/10.1519/JSC.0b013e3181c643a0
Originally Posted At: https://breakingmuscle.com/feed/rss
On July 2, 2022, weightlifter Mattie Rogers stole the show during the 2022 USA Weightlifting (USAW) National Championships Week in Las Vegas, NV. Rogers showed off her strength and broke three Senior American Records in the snatch, clean & jerk, and total while competing in the 76-kilogram division.
The last time Rogers competed on a sanctioned lifting platform was during the 2022 USAW North American Open Series 1 in March 2022. She took home first place in the 81-kilogram weight class. With three records and some gold medals in the 76-kilogram division at the 2022 USAW National Championships, Rogers has shown off her continued versatility.
Here are her top stats from this contest:
Mattie Rogers (76KG) | 2022 USAW National Championships Top Stats
Snatch — 112 kilograms (246.9 pounds) | Senior American Record
Clean & Jerk — 140 kilograms (308.6 pounds) | Senior American Record
Total — 252 kilograms (555.5 pounds) | Senior American Record
Rogers’ snatch figure topped Kate Vibert’s former American Record from the 2020 Tokyo Olympics by one kilogram. She extended the current clean & jerk by two kilograms, surpassing Jenny Arthur’s mark from 2018. Finally, Rogers’ top total exceeded Vibert’s former best American Record total of 249 kilograms (548.9 pounds), which Vibert also set at the 2020 Tokyo Olympics.
Notably, Rogers actually left subsequent attempts at extending her snatch and clean & jerk records on the table. The American athlete notched her American Record snatch on her second attempt, then waved off the rest. Meanwhile, on the clean & jerk, Rogers made an opening lift of 140 kilograms for the American Record, then declined further opportunities.
Here is the podium for the 76-kilogram division at the 2022 USAW National Championships:
Women’s 76KG Podium | 2022 USAW National Championships
1. Mattie Rogers
Snatch — 112 kilograms (246.9 pounds) | Senior American Record
Clean & Jerk — 140 kilograms (308.6 pounds) | Senior American Record
Total — 252 kilograms (555.5 pounds) | Senior American Record
In an Instagram post on her performance, Rogers reflected on her dominant performance and what to possibly expect moving forward.
“Only took three of the six attempts to stick with our training plan with a quick hop over to the training hall after to finish up the day with a nice personal record triple,” Rogers wrote. “Got to compete in the class my body is most comfy in and set all-new American records for the snatch, CJ, and total. Happy with this checkpoint!”
Another 2020 Tokyo Olympian, Rogers has made steady progress since that fateful competition. In each of her last two contests — the 2022 USAW North American Open Series 1 and 2022 USAW National Championships — the American athlete has now improved upon her previous best-ever total of 246 kilograms from Tokyo.
For Rogers to do that while competing in lower weight classes than her time in Tokyo might say a lot about her prospects as qualifications for the 2024 Paris Olympics start to ramp up. Notably, Rogers competed in the 87-kilogram division in Tokyo. Based on her Instagram caption, it appears that 76 kilograms is where the athlete feels most comfortable as a competitor. Her best finish in this division is a bronze medal from the 2021 International Weightlifting Federation (IWF) World Championships.
Unfortunately, while it is still a category in American contests, the International Olympic Committee (IOC) is dissolving the 76-kilogram division for Paris 2024. That means Rogers will have to either bulk up and compete at 81 kilograms or +81 kilograms, or she may feature at 71 kilograms. In that case, she might square off against Vibert and even rising star Olivia Reeves for a spot on the Team USA roster in an intriguing battle.
Depending on the division she chooses to qualify for, Rogers could have a very different journey to Paris. As that competition starts to get closer and closer in the side mirror, she’ll undoubtedly push herself even more in training and other contests.
Originally Posted At: https://breakingmuscle.com/feed/rss
Your lower body carries the most potential for power and strength than any other body part because half of your entire body is working during the majority of exercises.
This makes leg day an essential part of building a well-rounded physique. Leg day can even set the tone for the entire training week. Break from convention and skip “international chest day,” and you’ll realize that a good squat workout on Monday can fire you up to take on anything.
Whether you want a punishing leg workout that will leave your muscles sore for days or you’re looking for something that can add more strength and coordination to your daily activities, these 20 exercises will guide you down the right path.
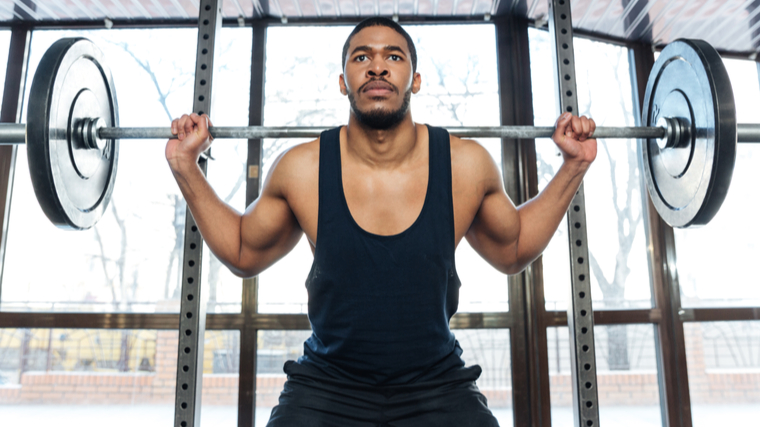
The Back Squat often gets labeled as the king of lower body exercises — and that’s fair. It not only challenges every muscle in the lower body, but also places responsibility on muscles across the upper body to help stabilize the load and help protect the spine. This ends up making it one the most useful full-body exercises in your exercise selection arsenal.
In addition, the back squat reinforces a basic movement pattern we engage in daily. The ability to squat has been associated with improved quality of life and increased mobility in older adults, giving it yet another reason to be at the top of our list. (1)
How to Do the Back Squat
Place a barbell into a squat rack around shoulder-height. Position yourself with the barbell across your upper back. Keep your body and the barbell connected by contracting your upper back muscles and squeezing the bar in your hands. Inhale to brace your core before lifting the weight from the rack.
Take a few small steps backward and get your feet into position roughly hip-width apart or a little wider based on your comfort and mobility. With your core braced, squat down until your upper legs are parallel to the floor. Drive yourself back up toward the starting position by pushing your feet down into the floor.
Benefits of the Back Squat
The back squat challenges the whole body, emphasizing the lower body — most notably the quads, glutes, and adductors.
Muscles throughout the core are engaged and the muscles responsible for posture are strengthened.
The squat movement positively impacts muscle coordination and functional strength, benefiting gymgoers of all ages and with all goals.
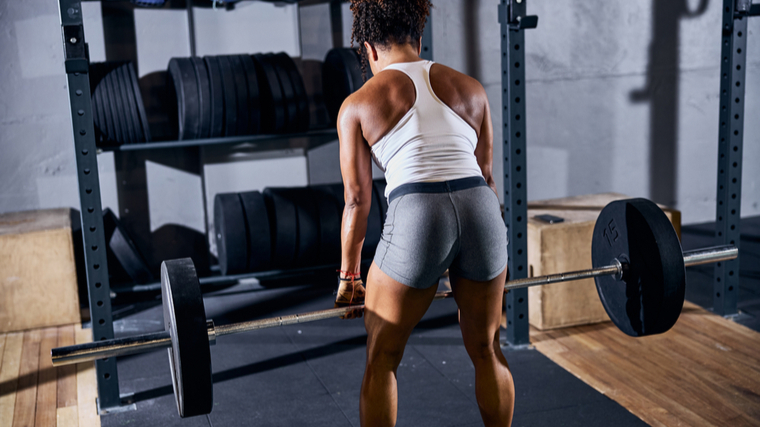
Conventional Deadlift
The conventional deadlift gets a lot of attention for its back training benefits, but let’s not forget that it’s a lower-body driven exercise with many benefits for building the legs. It’s also a popular test of strength, requiring force production from your feet through your legs and glutes, across your core and upper back, and into your grip.
The proper technique for a deadlift is straightforward, but it can take a lot of practice to get right. So take your time, practice, and progress your loads responsibly. Because of the significant strength potential of the glutes and hamstrings, the deadlift is often the first barbell exercise that allows lifters to move some serious weights once they’ve mastered proper form.
How to Do the Conventional Deadlift
Stand in front of a loaded barbell with your feet shoulder-width apart, with the bar aligned just over the knots of your shoelaces. Drive your hips back and allow your knees to bend slightly as you grip the barbell outside of shoulder-width with a palms-down grip.
Keep your back and torso rigid and arms straight. Push your feet into the floor as you simultaneously pull your chest and shoulders upwards to lift the bar.
Benefits of the Conventional Deadlift
The conventional deadlift helps build muscle and strength across the upper and lower body — most notably your glutes, hamstrings, spinal erectors, and grip.
Your strength in this movement, alongside your technique, will improve substantially when performed consistently.
Because it coordinates the upper and lower body and transfers power from your feet to your grip, it’s an excellent movement for building total-body strength.
Sumo Deadlift
The sumo deadlift is often viewed as the red-headed stepchild of the strength world. There is ongoing debate among the fitness community that it is “cheating” compared to the conventional deadlift because sumo deadlifts travel through a shorter range of motion.
Regardless of hair color or social popularity, the sumo deadlift is an effective exercise for building muscle and strength across your upper and lower body. It shares many of the same benefits and qualities that make its conventional counterpart so beloved.
Choosing to perform the sumo variation over the traditional variation often comes down to preference, limb length, and mobility. The sumo variation also challenges the lower body muscles differently than the conventional stance due to your widened foot position, with more challenge on the quadriceps and adductors relative to the hamstrings.
How to Do the Sumo Deadlift
Stand with a loaded barbell over the knots of your shoelaces. Set your feet outside shoulder-width apart with your toes pointed slightly outward. Drive your hips back and allow your knees to bend as you grip the barbell inside of your legs, somewhere around shoulder-width, with a palms-down grip.
Keep your back and torso rigid and your arms straight. Push your feet into the floor as you simultaneously pull your chest and shoulders upwards to lift the bar.
Benefits of the Sumo Deadlift
The sumo deadlift allows a more upright torso, reducing lower back strain.
This deadlift variation emphasizes the quads and adductors.
The sumo deadlift can be a more efficient deadlift variation for taller lifters and lifters with longer than average legs.
Heels-Elevated Trap Bar Deadlift
Deadlifting with a trap bar, sometimes referred to as a hex bar or diamond bar, is a go-to for many lifters looking to build their lower body strength while minimizing the load on their spine and lower back. The trap bar keeps your arms in a neutral position, as opposed to being in front of your body. This neutral-position increases shoulder and upper back stability and allows your torso to remain more upright, which reduces lower back recruitment.
Because the trap bar’s unique design keeps your hands by your sides, the weight is near your body’s center which allows for a more comfortable and upright torso position. The added benefit from elevating your heels allows you to achieve more knee flexion, which increases the emphasis on the quads.
How to Do the Heels-Elevated Trap Bar Deadlift
Place an inclined wedge or two small weight plates on the ground inside a loaded trap bar. Stand on the wedge (or plates) with your heels up and the balls of your feet on the ground. Keep both feet facing forward, parallel to the handles.
Drive your hips back and allow your knees to bend as you securely grip the handles. Keep your back and torso rigid and arms straight. Push down into the floor with your feet while pulling your chest and shoulders upwards to lift the weight.
Benefits of the Heels-Elevated Trap Bar Deadlift
The trap bar deadlift allows you to keep the weight centered while allowing a more comfortable, upright torso position.
The trap bar demands less from the lower back than other deadlift variations, which is great if you’re working around an injury or physical limitation at the gym.
The heel elevation allows your knee to travel further forward during the exercise, emphasizing muscular tension on the quads.
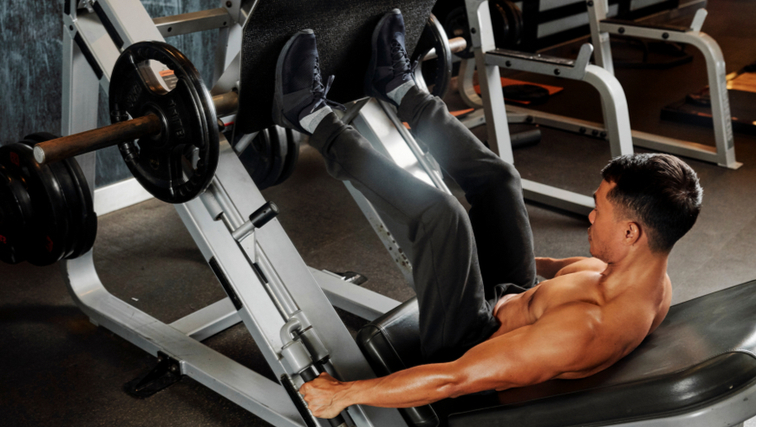
Leg Press
The leg press is a machine-based movement that mimics exercises like the back squat or hack squat. Because you don’t have to support heavy weights with your upper body, you can often load this exercise up with more weight than you would most other leg exercises. This lower body focus makes the leg press a go-to exercise for building bigger and stronger legs.
Due to the ease and efficiency of loading and unloading the weight plates, this exercise is one of the best for safely performing more advanced techniques such as rest-pause sets or drop sets.
How to Do the Leg Press
Sit in the leg press seat and place your feet toward the middle of the platform, about shoulder-width apart. Perform a few reps without weight to ensure your feet are in an appropriate position.
Press the sled out of the resting position, move the safety bars, and slowly lower the sled towards your chest until your thigh-and-knee angle reaches roughly 90-degrees. Press the sled up by driving your entire foot into the platform. A good rule of thumb for strength and safety is that if your lower back or hips lift off the seat, you’ve lowered the weight too far.
Benefits of the Leg Press
The leg press allows you to perform the squat movement pattern without the load bearing down on your spine.
This machine can be used with more weight than you would be able to perform on most other leg exercises.
The support of the machine lets you safely and effectively perform more advanced training techniques like rest-pause sets or drop sets.
Hack Squat
The hack squat is a modern-day interpretation of a movement performed by strength pioneer George Hackenschmidt in the early-1900s. This exercise is a close relative to the back squat and leg press, and delivers the same leg-building benefits while providing training variety.
The hack squat machine supplies a level of external support and stability, which reduces lower back strain while allowing you to work to higher levels of muscular fatigue.
How to Do the Hack Squat
Position yourself in the machine with your feet on the platform around shoulder-width apart or slightly outside, closely mimicking your back squat stance. Keep your hips and torso flush against the back pad with your shoulders snug into the shoulder pads. Maintain a neutral head position, resting on the pad if one is available.
It may help to do a few reps with no weight to ensure you are comfortable throughout the entire range of motion. Lower your body until the bottoms of your thighs reach parallel to the floor or slightly below. From this bottom position, focus on keeping your feet flat as you drive into the platform and return to the starting position.
Benefits of the Hack Squat
This exercise allows you to mimic the movement pattern of a back squat with reduced lower back strain.
The machine’s overall stability, predetermined movement pattern, and external support help you work deeper into muscular fatigue with relatively lower risk of injury when compared to its free-weight counterparts.
Bulgarian Split Squat
The split squat is one of the best single-leg exercises for building muscular size and strength. In addition, the unilateral nature of the movement challenges coordination and stability across the body.
Most importantly to the goal of building muscle, this exercise creates a high level of fatigue in the target muscle Even without added weight, the Bulgarian split squat can be challenging enough to stimulate growth.
How to Do the Bulgarian Split Squat
Hold a dumbbell in each hand while standing roughly two feet in front of a bench or box. Place one foot back on the bench with your laces down. Once you’re balanced, pull your shoulders back and engage your core.
Drive your back knee down toward the ground while your front knee bends to 90-degrees. From the bottom, press your front foot down into the ground as you stand back up into the starting position.
Benefits of the Bulgarian Split Squat
The single-leg setup challenges you to balance throughout the range of motion, positively contributing to gains in muscle, strength, and coordination.
The split squat can be adjusted to emphasize specific muscles. Leaning slightly forward during the rep emphasizes the hamstrings and glutes. Placing your front foot closer to the bench prioritizes the quadriceps muscles.
Romanian Deadlift
The Romanian Deadlift, often nicknamed the RDL, primarily builds muscle and strength in the hamstrings and glutes. It also challenges muscles in the upper and lower back, which both contribute to strength in big lifts such as the squat and deadlift.
It may not have the clout of other members of the deadlift family, but when it comes to targeting the back of the legs, the RDL is one of the most effective exercises in the gym.
How to Do the Romanian Deadlift
Stand in front of a loaded barbell with your feet shoulder-width apart. Grip the bar just outside the knees with both palms down. Perform a conventional deadlift to get the bar in the top position and hold.
Lower the bar by pushing your hips back while allowing your legs to bend very slightly. The bar should reach near the middle of your shins. Raise the weight by driving your hips forward and returning upright to the starting position.
Benefits of the Romanian Deadlift
The Romanian deadlift emphasizes the hamstrings and glutes.
The exercise has carryover benefits to other big lifts, such as the squat and deadlift, because it also works powerful postural muscles throughout the back.
The Romanian deadlift allows you to use more weight than many other hamstring exercises, making it extremely effective for building size and strength.
Nordic Hamstring Curl
The Nordic hamstring curl is a bodyweight movement that builds strength and resilience in the hamstrings. It has also been shown to reduce the risk of hamstring injuries. (2)
One unique aspect of this exercise is that it prioritizes the eccentric (lowering) portion of the rep, while the majority of exercises are focused on the concentric (lifting) portion. Some lifters consider this an advanced exercise, but it can be performed by all fitness levels due to several simple variations and regressions which can adjust the difficulty to an appropriate level.
How to Do the Nordic Hamstring Curl
Kneel on the floor with both feet anchored beneath something sturdy, most commonly a heavily loaded barbell. You can also ask a partner to hold your ankles. With a straight torso, extend your arms in front of you and slowly lower your hands towards the floor. The lower you get, the more challenging the movement will be as your hamstring muscles are loaded with more of your body weight.
Catch yourself with your hands and push your body back up to the starting position while curling your hamstrings. As you get more advanced, work to lower your chest to the floor and raise yourself up without using your hands.
Benefits of the Nordic Hamstring Curl
The Nordic hamstring curl can be performed anywhere you can securely anchor your feet.
The Nordic hamstring curl builds leg strength and has been linked to healthier and less injury-prone hamstrings.
Kettlebell Swing
The kettlebell swing is an explosive movement that focuses on power development. Although a simple-looking exercise, it packs a functional one-two punch when it comes to mastering the hip hinge motion and developing explosive power through the hamstrings and glutes.
While a dumbbell can also be used to perform swings, the kettlebell’s larger mass and offset center of gravity make the movement more natural and more comfortable.
How to Do the Kettlebell Swing
Place the kettlebell 12 to 18-inches in front of you. Stand with your feet around hip-width apart or wider, with your feet facing forward. Grab the kettlebell’s handle with both hands, palms down, while maintaining a neutral spine.
Begin the movement by “sweeping” the kettlebell back between your legs into a loaded position before forcefully driving the kettlebell forward by extending the hips forward with your hamstrings and glutes.
Keep your arms relaxed while your hips do all the work to bring the weight in front of you. To initiate the next rep, allow the kettlebell to fall naturally back into the loaded position slightly behind your legs. Work to get into an explosive rhythm and repeat the motion.
Benefits of the Kettlebell Swing
This exercise will help develop explosive power through your hips, hamstring, and glutes.
The swing’s repeated rhythmic-based movement will help train your hinge pattern, which carries over to deadlift strength.
The kettlebell swing only requires access to a kettlebell and enough space to swing it, making it ideal for home workouts.
Walking Lunge
The walking lunge is an alternating-leg, free-weight exercise that shares the same benefits as the stationary split squat with the added benefit of requiring intermuscular coordination and control as you move through space.
This exercise will help develop leg size, strength, and total-body coordination. When performed for very high reps or long distances, it can even be used for conditioning or fat loss.
How to Do the Walking Lunge
Assume a standing position with a dumbbell at your sides in each hand. Take a step forward roughly 18 to 24-inches and plant your entire foot firmly on the ground. Lower yourself in a controlled lunge while allowing your front knee to track forward, aiming between the first and second toe, while your back knee drops straight down to the ground.
Do not rush the eccentric (lowering) portion of the rep. Allow yourself to descend under control while maintaining engagement in your core and an upright torso. To finish, drive through the floor with your front foot and return to starting upright position. Smoothly transition to step forward with the opposite leg and repeat the process. Continue alternating legs with each repetition.
Benefits of the Walking Lunge
This exercise does an excellent job loading the quads, glutes, and adductors through a long range of motion.
The walking lunge builds total-body stability while improving intermuscular coordination due to maintaining an upright upper body while actively alternating legs throughout the exercise.
Reverse Lunge
This lunge variation is a more controlled movement than the forward or walking lunge, because there’s no forward momentum challenging your balance.
The relative stability of this lunge makes it great for beginners and advanced trainees alike who want to add weight to their lunge movements while focusing on the muscle’s action rather than balance or coordination.
How to Do the Reverse Lunge
Stand with your feet side by side and keep your hands at your hips. Take a large step back with one leg. When the ball of the back foot is on the ground, descend until your back knee is barely an inch above the floor.
Ideally, as your back knee reaches the bottom, your front leg should be bent at a 90-degree angle. Keep your chest up and shoulders back. Drive through your front foot and stand back up to the feet-together starting position.
Benefits of the Reverse Lunge
The reverse lunge is easier to stabilize than the other lunge-based variations, making it easier for beginners to learn and progress.
The added stability of this variation allows more advanced lifters to add load without awkwardly trying to manage the weight while moving forward (like in a walking lunge).
Barbell Hip Thrust
The barbell hip thrust has become a cult classic among glute-focused fitness enthusiasts over the past few years, and for a good reason.
The hip thrust is an exercise that focuses on the glutes more directly without much involvement from secondary muscle groups like the hamstrings or quadriceps.
How to Do the Barbell Hip Thrust
Sit on the ground perpendicular to a flat bench with your upper back (just under the shoulder blades) against the bench and your legs extended. Roll a loaded barbell above your legs so it can rest in your hip crease before bending your legs and placing your feet flat on the floor. You may want to place a padded cushion or folded towel between your hips and the barbell to lessen any discomfort on your hip bones.
Press through your feet and use your glutes to drive your hips up until your body is aligned straight from your knees to your chin. Use your hands to keep the barbell in position. Hold the top position for a second and then lower your hips toward the floor.
Benefits of the Barbell Hip Thrust
This exercise places significant tension on the glutes while minimally working other muscles in the lower body, allowing you to accumulate more muscle-building training volume directly on the glutes.
This exercise aids in developing hip extension strength, helping you improve other movements that rely on hip extension such as back squats and deadlift variations.
Leg Extension
The leg extension is a machine-based exercise that gymgoers tend to either love or hate. Some say it’s harmful on the knee joint, while others shout its muscle-building benefits from the rooftops. If set up and performed properly, the leg extension is safe and effective for building muscle in the quadriceps.
This exercise has little to no learning curve, meaning lifters of all skill levels can perform it effectively without much practice. As a bonus, the leg extension targets the rectus femoris muscle in its shortened position. This is a quadriceps muscle that crosses the hip joint and plays a vital role in helping stabilize the pelvis in other lower body exercises.
How to Do the Leg Extension
Adjust the back pad to align your knees with the axis of rotation (signified by a dot or marker on some machines) and adjust the ankle pad so it rests just above your shoes.
Start the movement by straightening your leg to move the ankle pad, then accelerate into the rep until you reach the end range of knee extension. Ensure your toes point straight ahead, not angled in or out.
Benefits of the Leg Extension
You can target the quads with almost no involvement from other lower body muscles, making it a highly effective exercise to emphasize the quadriceps.
It targets the rectus femoris, a quadriceps muscle that crosses the hip joint and plays a vital role in helping stabilize the pelvis.
Seated Leg Curl
The seated leg curl is an excellent single-joint movement that primarily challenges the hamstring muscles with some assistance from the calves.
Due to the design of the machine, the lifter is put into a stable position, allowing the focus to be on curling the weight. The added stability makes it a great exercise for newbies in the gym and allows any lifter to safely use more weight for lower reps.
How to Do the Seated Leg Curl
Adjust the back pad so your knees align with the axis of rotation (signified by a dot or marker on some machines) and adjust the thigh pad to fit snugly just above your knees. The ankle pad should be just above your shoes.
Keep your toes pointed straight ahead and pulled slightly upwards. Flex your knees to curl the pad until it’s under the seat, then control the weight as you return to the starting position.
Benefits of the Seated Leg Curl
This exercise is great for lifters looking to place a challenge specifically on their hamstrings.
Increased external stability supplied by the machine allows the lifter to take sets deeper into fatigue while maintaining proper form.
The seated position allows the lifter to train the hamstrings in a more stretched position (hip flexion and knee extension).
Lying Leg Curl
The lying leg curl is another go-to single-joint exercise that can emphasize the hamstrings. It not only does a great job of focusing on the hamstrings, but it also challenges the calf through the beginning of the range of the movement, helping you cover more ground if you’re short on time in the gym.
With less stability supplied by the machine itself, due to your body position during the exercise, the lying leg curl requires the lifter to do more of the heavy lifting to keep the body stable throughout the exercise.
How to Do the Lying Leg Curl
Adjust the leg pad on the machine so your knees align with the axis of rotation (often signified by a dot or marker) and adjust the ankle pad to touch at your ankles. Engage your hamstrings and lift the leg pad by curling your feet towards your glutes. Ensure your toes point straight ahead. Focus on controlling the weight as you return to the fully stretched position.
Benefits of the Lying Leg Curl
All leg curls allow you to focus more training volume on your hamstrings for increased size.
The lying position allows the hamstrings to be challenged in their fully contracted position (hip extension and knee flexion).
Standing Calf Raise
The standing calf raise is a relatively easy-to-perform exercise that challenges the calf muscles. Variations of this movement can be done using a dedicated calf raise machine, a Smith machine, a barbell in a rack, or dumbbells, making it a practical exercise for any lifter regardless of where they train.
Stronger calf muscles help bring stability to the ankle and knee, which can translate into athletic performance as well as strength in compound exercises such as the back squat or deadlift. (3)
How to Do the Standing Calf Raise
Adjust the height of the shoulder pad to fit your structure, so you can enter in a quarter-squat position. Brace your core and raise the weight by standing tall.
Begin with your legs in a “soft lockout,” or slightly bent in the knees, with only the balls of your feet on the foot platform. Drive your body up while pushing your ankles forward. Squeeze your calves up to the top of the movement and lower to stretch as far as your ankles allow.
Benefits of the Standing Calf Raise
This exercise is relatively easy to set up and perform, making it practical for beginners.
The calf raise adds size and strength to the lower leg while creating stability around the knee and ankle. (4)
Seated Calf Raise
This calf raise variation has the lifter perform the exercise with the knees bent, focusing more on the soleus (one of the two heads of the calf muscle) through a complete range of motion. You can perform this movement in a machine or with dumbbells resting on your knees in a seated position.
The bent-leg position of the exercise de-emphasizes the gastrocnemius head of the calf muscle, which is more heavily involved in straight-leg raises, and more significantly activates the soleus.
How to Do the Seated Calf Raise
Load up the machine with your chosen weight, then sit with your knees bent and the balls of your feet on the platform. Secure the leg pad over your thighs.
Lift the weight and drive your ankles forward, squeezing your calves to the top of the movement. Lower the weight under control into a deep stretch.
Benefits of the Seated Calf Raise
The seated calf raise allows lifters to train the calves with no involvement of the upper body, making it ideal for lifters dealing with shoulder or back issues.
It trains the soleus through a complete range of motion while minimizing involvement from the gastrocnemius.
Tibialis Anterior Raise
A less known muscle of the lower leg, the tibialis anterior acts as an antagonist to the calf muscles and helps pivot the ankle and point the foot upwards. In addition, the tibialis anterior raise can add strength to the front of the lower leg, adding stability to your knee and helping to improve your gait cycle (the way your feet move while walking).
This exercise is beneficial for physique-focused lifters, running enthusiasts, and even aging adults who want to maintain their ability to walk and balance later in life.
How to Do the Tibialis Anterior Raise
Stand with your back and shoulders against a wall. Walk your feet roughly six to 12-inches in front of your body. From this position, raise your toes toward your face and hold for a beat. Lower your feet flat on the ground and repeat.
The farther you walk your feet out in front of you, the more challenging it will become. Start close to the wall and increase the distance as you improve.
Benefits of the Tibialis Anterior Raise
Tibialis raises adds strength and conditioning to under-focused muscles of the shin, potentially helping to avoid shin splints.
The movement increases stability around your knees and ankles.
This helps to improve your gait cycle, which is especially important for aging adults.
Air Bike
Air bikes, like the Assault Bike or Airdyne, are cardio machines many gymgoers dread to see in their training program because they’re always used for high-intensity workouts. Although they’re mainly used for cardiovascular benefits, air bikes also help build size to your legs, especially the quadriceps.
This movement is a sure-fire way to light up your quadriceps, increase aerobic capacity, and push your lactate threshold (your body’s ability to handle accumulating metabolic waste and fatigue).
How to Do the Air Bike
Adjust the seat height to best fit your structure and sit down with both feet on the pedals with both hands grasping the handles. When the seat is at the proper height, there should be a slight bend in your knee at the bottom of each revolution.
Pedal and propel your arms back and forth in sync with your leg drive. Focus on pushing powerfully with your legs, not pulling with your arms.
Benefits of the Air Bike
Because the resistance is only determined by how hard you pedal, it can be performed for all ages and skill levels.
The air bike is a low-impact method for building leg size and improving cardiovascular health.
The Leg Muscles
The primary muscle groups in the legs include the quadriceps, hamstrings, adductors, glutes, calves, and tibialis anterior.
Credit: Dragon Images / Shutterstock
Understanding their anatomy will help increase your body awareness, mind-muscle connection, and improve the overall effectiveness of your lifting and program design.
Quadriceps
The quadriceps, also known as the quads, are located on the front of the thigh and are made up of four separate muscles: the rectus femoris, vastus lateralis, vastus medialis, and vastus intermedius. They help extend and stabilize the knee, while also playing an essential role in hip stability because the muscles attach near the hip joint. (5)
Hamstrings
The hamstrings are located on the back of the thigh and are made up of three separate divisions, the semitendinosus, semimembranosus, and biceps femoris. This muscle plays a role in hip extension (keeping your lower body directly under your upper body), knee flexion (bending the knee), and knee stability because the muscles cross over the knee joint. (6)
Adductors
The adductors are made up of several muscles spanning down the inside of the thigh. These muscles help adduct the leg (moving the thigh toward the body’s centerline) and help support the pelvis during many lower body movements. The adductor magnus, sometimes referred to as another hamstring muscle due to its location and function, also helps extend the hip. (7)
Glutes
The glutes are a popular group of muscles including the gluteus maximus, medius, and minimus. These muscles help the hips extend, externally and internally rotate, and abduct (moving the thigh away from the body). (8) Strong glutes are often considered the foundation for a powerful lower body.
Calves
The calf muscles are made of two heads, the gastrocnemius and soleus. Both heads of the muscle work to flex the ankle to point the foot downwards. The soleus attaches beneath the knee, while the gastrocnemius crosses above it. This is allows the soleus to be emphasized during bent-leg exercises. The calf muscles also assist the hamstrings in knee flexion movements like the leg curl and play an essential role in stabilizing the knee. (9)(10)
Tibialis Anterior
The tibialis anterior is located on the front of the lower leg (shin). The primary function of this muscle is to point the foot upwards. The tibialis and calf muscles are comparable to the biceps and triceps because they’re positioned directly opposite one another and they perform similar movements depending on where the resistance is applied. Building up strength in this muscle can help create a more efficient gait cycle during walking or running. (11)
How Often Should You Train the Legs
To maximize leg growth, train your legs at least one to two times per week, depending on how many total days per week you will be in the gym. Due to the different muscle groups in the lower body, it’s essential to train the legs with a handful of exercises spanning many different rep ranges.
Credit: Shift Drive / Shutterstock
Each workout may include a different amount of training volume depending on your training split. Anywhere from 10 to 12 total sets per week is a great starting point for beginners. Advanced lifters can exceed 14 to 18 sets per week, especially if their goal is to emphasize a specific body part. Increased calf training, for example, is one popular approach.
Choose one to three exercises for each muscle group to achieve this total volume and divide the sets evenly across your training week. It’s a good idea to focus on training each primary joint function — knee flexion, knee extension, hip hinge, and squat — to ensure balanced development across the entire lower body.
How to Progress Your Leg Training
Since the legs are trained with a wide variety of exercises, it’s possible to steadily add weight to some exercises every week. For example, you can add more weight more quickly with two-legged, multi-joint (compound) exercises like the leg press or deadlift than with single-joint (isolation) exercises like the leg extension or with single-leg exercises like lunges.
Credit: YAKOBCHUK VIACHESLAV / Shutterstock
If you find any exercises require more time to improve your technique, be sure to perform those movements towards the beginning of your workouts to avoid training them when fatigued. If you’re new to lifting, improving your technique in an exercise can lead to gains in strength and muscle size without necessarily adding reps or weight. Keep in mind whenever adding a new exercise into your routine, it will take your body a few weeks to get used to the new challenge and nail down the technique.
How to Warm-Up Your Legs
Effective ways to warm-up for any muscle group is with the exercises you are performing in that day’s training session. For example, if you’re performing back squats or deadlifts, warm-up by performing reps with light weight and raise the intensity (load lifted) as you proceed toward your working sets.
This ensures that the appropriate muscles and joints are being primed, reducing the risk of injury and improving your overall training performance.
If you need additional time to warm-up, include exercises that work the muscles surrounding the joints you’ll be working in that session. For a leg workout, that would include the ankle, knee, hip joints, and the lower back.
Building Up Your Legs
Designing an effective leg workout can be fairly straightforward. Choose one to three exercises for each region of the lower body and progress those exercises over time with varying rep ranges. This detailed list gives you plenty of options to choose from, and will keep your legs growing for years to come. Stop skipping leg day and get to work.
References
Brito, L. B., Ricardo, D. R., Araújo, D. S., Ramos, P. S., Myers, J., & Araújo, C. G. (2014). Ability to sit and rise from the floor as a predictor of all-cause mortality. European journal of preventive cardiology, 21(7), 892–898. https://doi.org/10.1177/2047487312471759
van Dyk, N., Behan, F. P., & Whiteley, R. (2019). Including the Nordic hamstring exercise in injury prevention programmes halves the rate of hamstring injuries: a systematic review and meta-analysis of 8459 athletes. British journal of sports medicine, 53(21), 1362–1370. https://doi.org/10.1136/bjsports-2018-100045
Möck, S., Hartmann, R., Wirth, K., Rosenkranz, G., & Mickel, C. (2018). Correlation of dynamic strength in the standing calf raise with sprinting performance in consecutive sections up to 30 meters. Research in sports medicine (Print), 26(4), 474–481. https://doi.org/10.1080/15438627.2018.1492397
Mokhtarzadeh, H., Yeow, C. H., Hong Goh, J. C., Oetomo, D., Malekipour, F., & Lee, P. V. (2013). Contributions of the soleus and gastrocnemius muscles to the anterior cruciate ligament loading during single-leg landing. Journal of biomechanics, 46(11), 1913–1920. https://doi.org/10.1016/j.jbiomech.2013.04.010
Bordoni B, Varacallo M. Anatomy, Bony Pelvis and Lower Limb, Thigh Quadriceps Muscle. [Updated 2021 Feb 7]. StatPearls Publishing; 2021.
Rodgers CD, Raja A. Anatomy, Bony Pelvis and Lower Limb, Hamstring Muscle. [Updated 2020 Aug 13]. In: StatPearls [Internet]. StatPearls Publishing; 2021.
Jeno SH, Schindler GS. Anatomy, Bony Pelvis and Lower Limb, Thigh Adductor Magnus Muscles. [Updated 2020 Aug 10]. In: StatPearls [Internet]. StatPearls Publishing; 2021.
Elzanie A, Borger J. Anatomy, Bony Pelvis and Lower Limb, Gluteus Maximus Muscle. [Updated 2022 Mar 28]. In: StatPearls [Internet].
Binstead JT, Munjal A, Varacallo M. Anatomy, Bony Pelvis and Lower Limb, Calf. [Updated 2020 Aug 22]. StatPearls Publishing; 2021.
Alshami, A. M., & Alhassany, H. A. (2020). Girth, strength, and flexibility of the calf muscle in patients with knee osteoarthritis: A case-control study. Journal of Taibah University Medical Sciences, 15(3), 197–202. https://doi.org/10.1016/j.jtumed.2020.04.002
Juneja P, Hubbard JB. Anatomy, Bony Pelvis and Lower Limb, Tibialis Anterior Muscles. [Updated 2021 Aug 13]. In: StatPearls [Internet].
Originally Posted At: https://breakingmuscle.com/feed/rss
Professional strongmen often have a lift or event where they particularly excel. For Cheick “Iron Biby” Sanou, his area of strength is pressing anything overhead as he’s both the Axle Press and Log Lift World Record holder. The athlete from Burkina Faso recently once again showed why he has a warranted reputation for overhead prowess.
On June 30, 2022, Sanou shared footage of himself completing a 115-kilogram (253.5-pound) circus dumbbell press for four reps. It’s unclear when the presses occurred, but Sanou wore a lifting belt and lifting straps while finishing the exercise. According to the caption of the strongman’s Instagram post, he doesn’t consider himself a “dumbbell press specialist.” With that context in mind, Sanou’s training feat could be even more impressive.
Iron Biby became the Axle Press World Record owner with a press of 217 kilograms (478.4 pounds) at the 2021 Strongman Classic. He then became the owner of the Log Lift World Record, thanks to a lift of 229 kilograms (504.8 pounds) from the 2021 Giants Live World Tour Finals. That achievement surpassed four-time World’s Strongest Man (WSM) Champion Žydrūnas Savickas by one kilogram.
Whereas other strongman athletes generally compete in each event at competitions, Sanou often chooses to forgo events non-overhead. It appears that commitment has paid off to this point. He has two World Records in two separate overhead events to show for his dedication.
Sanou’s Jam-Packed Calendar
Much of Iron Biby’s current training undoubtedly centers around the two upcoming contests in his 2022 competitive season.
First, the strongman is one of 12 athletes who will compete at the 2022 Giants Live Strongman Classic on July 9 in London, England. A few months later, he will partake in the 2022 Giants Live World Tour Finals on October 8, 2022, in Glasgow, Scotland. Between both contests, some other noteworthy featured athletes include two-time reigning WSM Champion (2021-2022) Tom Stoltman, former WSM Champion (2020) Oleksii Novikov, Trey Mitchell, and Mark Felix.
Thriving in any overhead events at both Giants Live competitions might not be Sanou’s only goal. In a relative stray from his norm, he pulled a 400-kilogram (881.9-pound) raw deadlift double during a training session in late June 2022. For context, Giants Live strongman contests deadlift for reps events usually have a rough weight of 360 kilograms (795 pounds). That Sanou can pull 400 kilograms could portend great things for his near future.
At the time of this writing, the Giants Live organization has not announced the events for the 2022 World Tour Finals. On the other hand, an Axle Deadlift is a part of the schedule for the 2022 Strongman Classic. Sanou could elect to try his hand at the event and show off his strength range on an international stage.
The 2022 Giants Live Strongman Classic will take place on July 9, 2022, in London, England. Not long after, the 2022 Giants Live World Tour Finals will occur on October 8, 2022, in Glasgow, Scotland.
For now classes are 6pm and 640pm at 2840 Wildwood st in the Boise Cloggers studio.
Book your class NOW!
click this ==>
Warrior Fit Testimonials
First, I want to say thank you for convincing me to do Tabata! I was struggling to lose weight and Finally I found something that helped! I really appreciate your coaching! - Craig T.
Ever since I was convinced to do Tabata I have seen huge results, I lost 6 pounds and gained energy in the first 3 weeks. I have been working out for 3 months before I decided to do Tabata and I struggled to lose weight.
At first I thought "How am I losing weight by bringing my heart rate up then cooling down then bringing it up again?" I don’t know how it works but it does!
Thank you!! - Theresa F.
The first day of Tabata, I wondered WHAT AM I DOING - I AM 56 !! Five weeks later I knew that it was what I needed. I learned that I could push myself well beyond my comfort zone and feel good later. I have a marked improvement in physical as well as emotional endurance. - Lyn C.
When I was first told about Tabata I was very excited from the word go, however that excitement stemmed from the fact that I had no clue what it meant. I missed the first week of class b/c I was traveling for work so when I came in during the 2nd week I had some making it up to do.
It was hard at first b/c my body wasn't used to working out at such a fast pace, but once I got into a rhythm I started to feel very good. These classes are no joke. If you stick with it you will leave there feeling stronger, healthier and overall better about yourself and what you've accomplished.
I would recommend these classes to anyone. Darrin is a great trainer and he'll keep you going with his energy.
- Jami L.
Warriors Fit Audio
Warrior Fit uses High Intensity Music to get ya Moooovin' So we can all "Get Our Sweat On"
The link below will give ya a freeee shot at Audible plus a couple audio books just to try it out and if you haven't used audio books on your commutes you are missing out. Get pumped up before you get to where you are going and exercise your mind. I use it Everyday. Go get yours now!

 (@ironbiby)

 For now classes are 6pm and 640pm at 2840 Wildwood st in the Boise Cloggers studio.
Book your class NOW!
click this ==>
For now classes are 6pm and 640pm at 2840 Wildwood st in the Boise Cloggers studio.
Book your class NOW!
click this ==>


