
Originally Posted At: https://breakingmuscle.com/feed/rss


http://www.marksdailyapple.com/
 Whether you’re a big breakfast person or not, everyone enjoys something warm and comforting in the morning, right?
From Primal pancakes to frittatas, we’ve got 10 delicious ideas for those who crave the savory or the sweet—as well as some filling coffees for those who prefer to keep the routine simple and the fare light in the a.m.
Enjoy any of these great dishes and drinks anytime of the day….


Have a favorite Primal or keto breakfast or questions about what to eat in the a.m.? Share your ideas and inquiries below.

The post 10 Hot Autumn Breakfasts To Warm Your Morning appeared first on Mark’s Daily Apple.
http://www.thealternativedaily.com/
Sometimes it can be hard to know if what you read on the internet is actually true. Since the internet is a public platform, anyone can publish anything that rings with a grain of truth, and suddenly it’s accepted as a proven fact. In this world of expensive snake oils, miracle weight-loss drugs, and all […]
http://www.marksdailyapple.com/
 For hundreds of thousands of years, humans had an unbroken tradition of evening firesides. It’s where we told stories, recounted the happenings of the day, sang, danced, and just sat in comfortable silence staring into the flames. It’s also where we graduated from desperate scavengers scooping half-eaten marrow and gnawing bone scraps for gristly morsels into legitimate cooks.
Now that line is broken. Now we sit around the television. We sit under the perma-glow of the LED, gazing into our phones. If we even cook, we do it under perfectly controlled settings. Which is fine, but it’s missing something: the wildness of fire.
Cooking over a campfire is more art than science. It’s feel. It’s intuition. It’s love. Every flame is unique, every piece of wood or charcoal providing a different amount of heat. No two steaks or slices of bacon are identical cooked over flame or charcoal, yet each is perfect in its own way. It always works out.
First of all, you don’t need to actually go camping to do campfire cooking. It certainly helps, and I highly recommend camping as often as you can, but you can cook over fire almost anywhere, anytime.
Here’s what to do….
If you have Netflix, watch it. It’s from the first season. This trailer gives you a taste of what to expect.
Mallmann is an Argentine chef who cooks exclusively using wood fire. He’s a bit of a romantic, always wearing colorful cloaks and elaborate hats and quoting poetry and things like that, but somehow it works with him. He’ll have you wanting to start flirting with the “edge of uncertainty” that is campfire cooking.
Buy one if you like. I haven’t come across any great cooking commercial fire pits, but I’m sure they’re out there.
You can get some old steel drums and either cut the tops off, or lay them on their side and cut from top to bottom to create a “trough” style pit. Make sure to clean the inside and (this is important) only use unlined drums—you don’t want any toxic material coating the interior. Give it a good hot fire or two to burn off any unwanted residues.
You can find a metal fabricator nearby who’ll build whatever you want. Bring a sketch (or detailed description) of your desired fire pit and he or she will build exactly what you envision.
Horizontal smokers work, too, if the trough section is big enough for a fire.
A basic Weber-style charcoal grill can also work well, handling either wood fires or charcoal.
Or, for the most Primal experience, you could build one on the ground. Make a ring of stones, shape it into whatever arrangement you’d feel best cooking on, and get cooking. Have a source of water nearby (hose, huge bucket) so you can douse the thing if it gets out of hand.
There’s something extremely romantic about cooking in black iron over fire. It feels Primal, elemental, and ancient. Plus, cast iron can handle the worst fire you can throw at it and turn it into something beautiful and delicious.
Get a grill, like this one: Raichlen’s Tuscan grill—a 14 inch by 14 inch square cast iron grill with screw on legs, so you can place it directly in the fire and either cook right on the grill or use it as a stand for your pan or griddle. I’ve used this thing to cook meat right in the sand as the sun drops. Nothing like it.
Get some pans: I like a 12 inch cast iron pan and a 15 inch cast iron pan—good sizes but still maneuverable (albeit heavy). If you’re feeding more people or need to cook 4-5 steaks at once, think about getting a really huge piece like this 20-incher or maybe the 17 incher from Lodge. You can often find better deals (and unique pieces) at garage sales, antique sales, or off of Craigslist.
Get a griddle: A big flat rectangular slab of iron is also pretty great, if you prefer that shape to the round pan. Your mileage may vary. Or get both!
For cooking, I like the log cabin setup. You need a big fire pit to do this, and it consumes a lot of wood, but it really creates a hot flame and, if you plan on cooking over it (see the next section), great embers in a short amount of time. Start with two large pieces across from each other. Stack two more across the top on the other sides, forming a square. Continue until you’ve got a 1-2 foot structure. Then, place a small tipi inside the “cabin” and light it. Place small kindling-size pieces across the top of the “cabin” to increase the fuel.
Here’s a nice video of one.
Oak is probably the best to cook over. Almond and madrone are also great. Neutral taste, powerful heat.
Don’t cook over wood like redwood or bay or eucalyptus. Anything with strong resin or sap will flavor your food, and not in a good way. Although some Caribbean jerk recipes use bay for flavor, a little bit goes a long way.
Straight up charcoal is another option. It’s not as romantic or thrilling as building a fire and seeing it cook down into embers, but it does the trick.
You’re ready to go. Your fire is blazing. Embers are developing. What’s next?
The quintessential campfire meal is grilled steak. Or seared—read on. Some salt, some pepper, some fat, some fire, and some iron. It’s easy. It’s delicious. And it’s highly satisfying.
What kind of steaks?
They all work. I’d reserve the pricy stuff like NY strips, ribeyes, and porterhouses for a later date, for when you’re more skilled around the campfire, and stick with cheaper (but no less delicious) cuts in the beginning.
Cook this with salt and pepper on your cast iron pan, which should be screaming hot before you add the steaks. Flip once, press the center, and when it feels right, it’s done. Don’t use a thermometer. Go by feel. Trust your instincts. If they’re wrong, they will hone themselves and the next one will be better. You don’t want to be the person who’s fussing and fretting with fancy thermometers over the campfire, do you?
You can grill over the grates, but I really think a pan works better here. Any marinated steak, however, seems to work better over a grill.
And these all apply, of course, to other types of animal flesh: lamb leg steaks or chops, pork chops or loin, venison (preferably backstrap from an animal just killed).
I hereby declare that the category of “stews” includes chili, curry, pot roasts, and anything else you cook in a big old pot with liquid that’s hearty, rich, and thick and isn’t soup.
This is the best chili to make over a campfire.
This is a great lamb curry.
I love this German pot roast over the fire. Since the liquid will evaporate quicker than in the oven, you’ll need to keep some bone broth on hand to keep adding to the pot as it disappears. It actually ends up better and richer than the oven version due to the added gelatin.
I once came up with a stew using camp leftovers that I’ll probably never be able to recreate, but this was the gist:
The beauty of this one was that we kept adding ingredients throughout the cook as we discovered them and went “hey, this might be good!” Yours might not turn out the same, but it will be great. Probably works well with any hunk of meat, as long as it has bone and connective tissue—think oxtails, shanks, legs, feet.
The problem with making dishes like this in the kitchen is that it’s terribly boring standing there for hours monitoring its progress. The beauty of making dishes like this over the campfire is that it’s not. You’ve got friends pitching in, taking turns with the spoon. You have a beverage. You’re laughing, chatting, talking. You can always just gaze at the trees. It’s a communal event. If you can, extend the cook time of all these dishes. Really let the fire and smoke soak into the stew.
Veggies are to be cooked as the meat is resting, preferably using the same pan in the same fat. A few ideas:
Vegetable “Risotto”: Chop peppers (both hot and sweet and mild), slice onions, some green tomatoes, some leeks and shallots (basically all the alliums you can find), carrots, cherry tomatoes. Throw in a few whole garlic cloves (or a few dozen). Cook in the meat drippings and as it cooks down, add little scoops of hot bone broth. That’s the “risotto” part—continually adding hot broth to reduce down into syrup. Consider a splash or two of lemon juice at the end, if it needs acidity.
Crispy Asparagus: Chop asparagus up into four pieces, each about two inches long. In either avocado oil or the meat drippings, sauté the asparagus pieces until browned and crispy. Finish with sea salt and lemon juice.
Grilled Zucchini: Slice big vertical slices about a finger width thick. Brush with avocado oil and plenty of salt and pepper. Grill over a grate until you get char marks. Flip, repeat, eat. Zucchini is surprisingly low carb and very high in potassium.
I tend to let loose with the sweet stuff a bit more when camping, reason being I’ve been incredibly active, my circadian rhythm is on point from lack of artificial lighting, and sweet stuff just tastes better when it’s a rarity. And even this “sweet stuff” isn’t all that sweet compared to what most people are eating daily.
Whipped cream: Keep metal bowl on ice, pour in cream, maybe add a splash of bourbon or rum, add a little sweetener (real sugar, monkfruit powder, honey, etc.—less is more), and whisk. Pass the bowl around the group for everyone to whisk, since your forearms are probably tired from hauling around cast iron.
Grilled Fruit:
Primal Chocolate Cake: This never fails to please. Cook a Japanese sweet potato by wrapping in foil and burying it in the coals and ashes, making sure to poke a hole down the middle with a chopstick first to provide an avenue for heat down the middle. When it’s ready, cut in half, stick some 85% dark chocolate pieces into the flesh, sprinkle with salt, and mash. Eat.
Dates Stuffed With Salted Macadamia Nuts: No explanation needed. One or two nuts per date half. Incorporate bacon if you like.
“Pumpkin Pie”: Take the winter squash of your choice (I like honey nut, a better, smaller, sweeter butternut) and bury it in the coals and ashes an hour before you need it. Once it’s done, halve it, deseed it, add a raw egg yolk to each half, sprinkle some ginger/cinnamon/nutmeg, add salt, and mash it up. Top with whipped cream.
The trick with campfire cooking is to make it sort of elaborate but not surgical. Rustic but not “empty can of beans into pot.” It’s a fine balance. It’s riding that edge of uncertainty. You can’t quite define it; you just know it when you taste it.
Take care, everyone, and get out of the city and go camping. Or crowd around the fire in your backyard. Or, heck, go to a park with BBQ grills and make a day of it. It’s not too late. Fall camping is my favorite. It’s the perfect time.
What about you? What do you like to cook over the fire?
Thanks for reading. Be well. And let me know how your campfire goes.

The post Campfire Cooking: A Primal Guide appeared first on Mark’s Daily Apple.
http://chriskresser.com/
Is SIBO the result of bacterial overgrowth, or decreased bacterial diversity? In this episode of Revolution Health Radio, I talk with Dr. Purna Kashyap—an expert in the microbiome and G.I. issues—about his recent study on SIBO and the implications it has for treatment.
The post RHR: Have We Been Wrong about SIBO? with Dr. Purna Kashyap appeared first on Chris Kresser.
Originally posted at: http://www.nerdfitness.com/

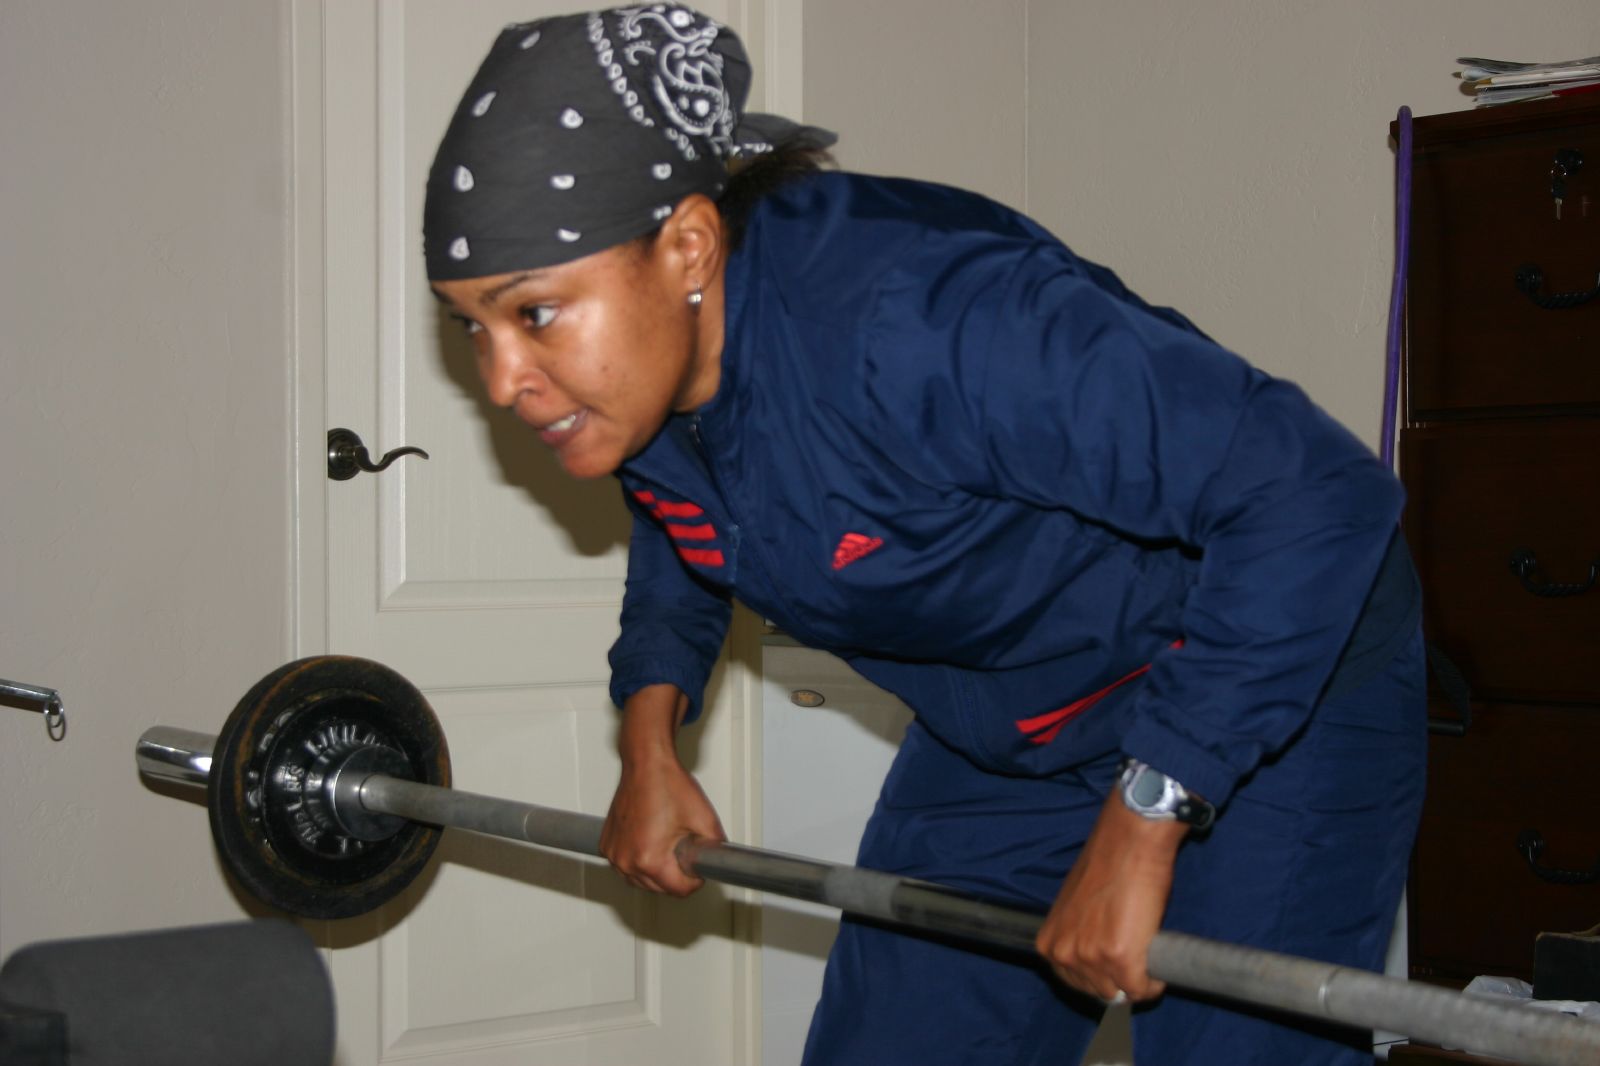
If you want to learn how to perform the bent-over row, you’ve come to the right place!
We help many of our coaching clients jumpstart their strength training practice, including how to perform rows safely and effectively.
Today we’ll show you exactly how our clients get started with bent-over rows.
Here’s what we’ll cover in today’s guide:
A quick note: we have compiled ALL of our strength training content into a comprehensive guide that will remove all the confusion and answer all the questions you have about weight training!
Grab our guide, Strength Training 101: Everything You Need to Know, when you sign up in the box below!
Download our comprehensive guide STRENGTH TRAINING 101!

Bent-over rows are a great way to train your “pull” muscles:
If you’ve been doing bench presses regularly, start doing an equal amount of work with your pull muscles to stay in balance and away from injury.
Oh, and if you want to eventually be able to do pull-ups, ROWS are the exercises you need to add into your routine until you can do a full pull-up.
Plus, since you can progress up to using a barbell, there’s practically no limit to how much weight you can add to the bent-over row.
This is key for “progressive overload,” meaning you lift more weight than you did last time. Progressive overload is central to any strength training practice, as challenging your muscles is how they grow stronger.
However, we won’t just hand you a barbell and wish you luck. That would be cruel.
Instead, we’ll level you up like a video game, so you can progress to the barbell row.

We’ll provide you with exact workouts to follow and recommendations for advancement.
Our first stop will be…
We’re going to start with one-arm bent-over dumbbell rows, the most basic of back exercises.
The bench will offer some added support here too.
Row Workout Level 1: One-Arm Dumbbell Row
Here’s a video tutorial showing you exactly how to perform the one-arm dumbbell row on a bench:
What weight should you start with initially?
Whatever allows you to get to at least 5 reps a set.
This will allow you to get stronger and stronger.
Make sure you give yourself at least 48 hours until you do the Level 1 Dumbbell Rows again, so you can include rows for your workouts on:
As soon as you can do 3 sets of 8 reps (each arm), it’s time to move up to a heavier dumbbell.
Once you can lift a 15-pound (5kg) dumbbell or heavier, consider moving up to the next level.
Want help designing your own workout routine? I’ve got two options for you.
The first is to head over to “Build Your Own Workout Routine” and get your hands dirty. Our guide will walk you through building a full-body exercise program in 10 simple steps.
The second is to have a Nerd Fitness Coach do all the heavy lifting for you (not really, you still have to lift stuff), by having them build you a tailor-made workout routine:
It’s now time to do a proper bent-over row!
We’ll use dumbbells to start, as the barbell itself may be too heavy.
Here’s how to perform the Bent-Over Dumbbell Row:
Boom!
Here’s a video tutorial showing you exactly how to perform the row:
Aim to do 3 sets of 8 reps for your dumbbell rows.
Again, a Monday-Wednesday-Friday training schedule will give you time to recover between movements.
You’ll need to be able to do bent-over dumbbell rows with at least 20 pound (10kg) weights before advancing onto the next section, as the barbell itself weighs 45 pounds (20kg).
My dear Rebel, it’s time to perform the bent-over row with a barbell!
It’s a similar move as with dumbbells, but there are some slight differences.
The Bent-Over Barbell Row is performed as follows:
There you have it! You are now rowing with barbells!
Want a video tutorial showing you the movement, step-by-step? You got it, but only because you asked nice:
To ensure you have the setup correct, record a clip of yourself and match it here against our videos and gifs. If they look close then you’re doing great!
If you want to have a trained professional review your form, our coaches can do just that in our spiffy app!

There’s nothing inherently dangerous about performing the bent-over row.
However, as with just about any exercise, if you have bad form you might open yourself up to injury.
That’s why it’s critical you get the movement down before you start adding all sorts of extra weight.
Record yourself with some light dumbells or just the bar. How does it look? Make sure it semi-resembles our vids and gifs here before you start lifting more weight.

Here are three common faults when performing the bent-over row:
If you’re still concerned about the possibility of hurting yourself while doing the bent-over row, consider training with the inverted bodyweight row. It’s personally my favorite row because of the lower chance of injury.
The only question left to answer is when to do your rows.
For that, it’s time to build a full-body workout.
We generally recommend our coaching clients complete a full-body strength training workout 2-3 times per week.
Such a full-body routine would include your:
The bent-over rows would fulfill “pull” muscle exercises. So would pull-ups or bodyweight rows.
If you went with our Monday-Wednesday-Friday schedule mentioned earlier, you could do:
All you’ll need are some lower body, push, and core exercises and you’ll have a full-body program. Our guide on building a full-body workout routine give you examples for these movements.
Want a little more help getting going? You seem like a nice person, so I’ll share with you our top suggestions for next steps:
1) If you want step-by-step guidance, a custom weight training program that levels up as you get stronger, and a coach to keep you accountable, check out our killer 1-on-1 coaching program:
2) Good at following instructions? Check out our self-paced online course, the Nerd Fitness Academy.
The Academy has 20+ workouts for both bodyweight or weight training, a benchmark test to determine your starting workout, HD demonstrations of every movement, boss battles, meal plans, a questing system, and a supportive community.
3) Join the Rebellion! We need good people like you in our community, the Nerd Fitness Rebellion.
Sign up in the box below to enlist and get our guide, Strength Training 101: Everything You Need to Know. It’ll help you start incorporating rows into your training.
Download our comprehensive guide STRENGTH TRAINING 101!
Alright, enough from me. Now it’s your turn:
Do you train with bent-over rows?
Dumbbells or barbells?
Do you stick with inverted bodyweight rows?
Let us know in the comments!
-Steve
PS: Make sure you read the rest of the articles in our Strength Training 101 series:
###
Photo source: Barbell Rows.
GIF source: Final Fantasy.
http://www.thealternativedaily.com/
Coconut oil is one of nature’s greatest miracles, with millions of people across the globe experiencing the real power of this tropical treasure. If you’ve been a fan of coconut oil since it gained popularity in the early 2010s (or even longer), you’re probably tired of hearing about all of the different ways to use […]
http://www.marksdailyapple.com/
It’s Monday, everyone! And that means another Primal Blueprint Real Life Story from a Mark’s Daily Apple reader. If you have your own success story and would like to share it with me and the Mark’s Daily Apple community please contact me here. I’ll continue to publish these each Monday as long as they keep coming in. Thank you for reading!

Yup, success stories are back! And I’m looking for more. Follow-ups, mid-progress reflections—every story at every stage has the potential to inspire folks out there who are getting started or contemplating a new beginning. Contact me here to share your story—long or not so long. You never know who you’ll impact by doing it. Enjoy, everyone!
They say if you love something you should let it go and if it comes back, it loves you too. Well, apparently excess weight really loves me because every time I let it go, it always seemed to come back! Relationships are complicated. Good ones leave you feeling refreshed and energized, while bad ones leave you feeling broken down, depressed, and anxious. Relationships with food aren’t much different.
In my twenties, I was living on my own and partying. Perhaps a little too hard, because over the course of a few years, I gained and lost over 100 pounds—often in 25-30 pound increments. I’d gain the weight, get frustrated, then attempt to lose it through increased exercise and severe calorie restriction.
This would last for a few months until I hit my goals, but it was simply unsustainable. It further pushed the narrative that in order to lose weight I would need to eat a steady diet of plain chicken breasts, salads, and low-fat yogurt while torching calories on the trails. I knew I didn’t want to do that forever.
By 2016, I was married with two young children. Between kids and our careers (I worked as a residential house painter), life got pretty stressful, and what I ate didn’t help. My breakfasts consisted of a bacon, egg, and cheese bagel and mozzarella sticks. And lunch was typically fast food or from a gas station. I would carry around jelly beans in my pocket and loved craft beer. Everyone else was overweight, so why not me too?
It wasn’t until later that year that I started to change my relationship with food.
 I caught wind of the keto diet and suddenly realized that all of the modern day convenience foods I was eating were derailing my health goals. Within a few months of following a keto diet, I effortlessly lost nearly 40 pounds. (You can read more about my keto journey in this MDA post.) I learned everything I could by reading books and listening to podcasts. I even started a Facebook group where our members have collectively lost more than 4,000 pounds to date!
About that time, I began to notice ads about coaching certifications. One of them happened to be for the Primal Health Coach Institute. In the spring of 2017, after being confronted by someone close to me about my lack of “proper nutrition education,” I immediately enrolled in the program and starting my journey to becoming a Primal Health Coach, graduating in the fall.
Clients have been banging my door down to be taught how to achieve effortless weight management. Just kidding! Getting my coaching career off the ground was slower than I expected. I was still working as a residential house painter and had no marketing experience. I thought that if people knew I was a health coach, they’d simply ask to be coached!
Then I had another roadblock. My wife was diagnosed with an Acoustic Neuroma brain tumor, and it was growing rapidly. We spent months focusing on her care and in the spring of 2018, a surgery was scheduled to have it removed. Even after the surgery, I spent much of my time and effort ensuring that she would make a full recovery, which thankfully, she did.
Despite not having the capacity to build a thriving health coaching business during this time, my yearning to have one never ceased. I continued to learn and stay active in the Primal Health Coach community and devoured podcasts and books about primal health.
In the beginning of 2019, I launched a podcast called “The Joe Health Show” featuring stories of people who have used a keto or primal way of eating to lose weight and manage chronic health issues. I also feature fellow Primal Health Coaches who’ve had their own health transformations and now help others dealing with similar struggles.
I focus my efforts on networking with other coaches and giving them a platform to share their story. My thought is that while I may not be the right coach for everyone, I can help spread the word about different health coaches, so people find the one that’s right for them.
In addition to my podcast, I’ve recently started my new “Bee Fit” Personal Health Coaching program and launched a 21-day online program called “Completely 21” that teaches the basics of healthy living decisions, from food and sleep to other lifestyle habits.
I’ve helped countless people overcome chronic health issues, reverse disease, decrease inflammation, lose weight, become more mobile, get off medications, and become more metabolically efficient runners. You can’t put a monetary value on that! Even if I never make another penny from my Primal Health Coach Institute certification, it was money well spent.
– Jonathan Geiman

Have a story to share? Email me here. Thanks, everybody, and have a great week.

The post I Changed My Relationship With Food appeared first on Mark’s Daily Apple.
http://www.marksdailyapple.com/
 These days you can find a wide array of grain-free pastas with genuinely delicious flavor and texture. If you like the taste of pasta but want to limit the pasta carbs, add meat and veggies so less pasta goes further in the dish. Chicken thighs are a great choice to this end. Experiment with adding in veggies like spinach, baby broccoli, mushrooms or bell peppers, and create a variety of versions to your own taste.
For the sauce, use a full-fat coconut milk for the richest flavor, or use traditional full-fat dairy milk or your favorite milk substitute along with our new Primal Kitchen® No-Dairy Vodka Sauce.
Servings: 4
Prep Time: 5 minutes
Cook Time: 30 minutes
Ingredients:

Instructions:

Heat one tablespoon of oil in a pan over medium heat. Sprinkle the boneless chicken thighs with salt and pepper, and add them to the pan once it is hot. Sear for 2 minutes on each side, then cover the pan and reduce the heat to medium-low. Once the chicken reaches an internal temperature of at least 165 degrees Fahrenheit, remove the thighs from the pan and allow them to rest for 5-10 minutes before slicing or cutting into chunks.
In the same pan (or another, whatever you prefer) add the remaining oil and heat it over medium heat. Once hot, add the chopped onion. Stir with a wooden spoon for 3-4 minutes, or until the onion is browned and soft. Add in the grated garlic and heat until the garlic is fragrant. Add in the Vodka Sauce and coconut milk and reduce the heat to medium low. Stir for 1-2 minutes, or until the sauce has thickened and come together.
Prepare the Chickapea pasta according to the directions on the box, but boil the pasta to be slightly undercooked. Drain the pasta, reserving about ¼ cup of pasta liquid. Pour the drained pasta into the pan with the vodka sauce and stir over medium-low heat until the pasta reaches your desired doneness. Add in the chicken and stir. Add the reserved pasta water 1 tablespoon at a time until the sauce reaches the thickness of your liking. Top the pasta with a pinch of red pepper flakes, a sprinkle of salt and pepper and the shredded basil. Enjoy!

Nutrition Information per serving (1/4 of recipe):


The post Penne Alla Vodka appeared first on Mark’s Daily Apple.
http://www.thealternativedaily.com/
It is no big secret that sleep plays an essential role in our health. Without sufficient sleep, our bodies begin to break down. Getting less than seven or eight hours of sleep each night, especially over time, has been linked to some severe health issues. The good news is, there is one easy way to […]
 For now classes are 6pm and 640pm at 2840 Wildwood st in the Boise Cloggers studio.
Book your class NOW!
click this ==>
For now classes are 6pm and 640pm at 2840 Wildwood st in the Boise Cloggers studio.
Book your class NOW!
click this ==>


