
Originally posted at: http://www.nerdfitness.com/

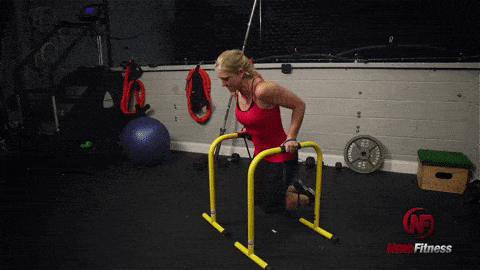
Today you learn one of the most underrated exercises of all time: the dip.
It’s something we remind our coaching clients not to overlook, and I’m excited to share the exercise with you today.
Here’s what we’ll cover so you can learn the bodyweight dip:
- What is the dip exercise? What muscles does the dip train?
- How to do a dip (Video tutorial)
- What if I can’t perform a dip? (Progression plan)
- Tips and tricks for performing the dip exercise.
- Variations on the dip (Advanced dip moves)
- When should you do dips in your workout? (Getting started)
A quick note: we have compiled ALL of our strength training content into a comprehensive guide that will remove all the confusion and answer all the questions you have about weight training! Grab our guide, Strength Training 101: Everything You Need to Know, when you sign up in the box below!
What Is the Dip Exercise? What Muscles Does the Dip Train?

The dip is a compound, bodyweight exercise.
You grab two parallel bars, hoist yourself up, and then lower your entire body by bending your elbows.

When you hear “compound exercise,” it’s referring to multi-joint movements that work several muscles or muscle groups at the same time.
The dip exercise trains your:
- Chest
- Shoulders
- Tricep
- Back
- Abs
You may be thinking, “abs?”
Yep! You need to stabilize your body as you raise and lower yourself.
Which is one of the reasons bodyweight dips are so great!
Some would even argue that dips are the best chest exercise out there, even better than the bench press.

There’s some logic to it.
- When you think about it, the bench itself offers a lot of support during the bench press. So do your legs.
- With the dip exercise, your upper body is supporting your entire body. Thus a fuller workout.
Instead of isolating your chest for 5 exercises, your shoulders for 5 exercises, and triceps for 5 exercises, just do dips!
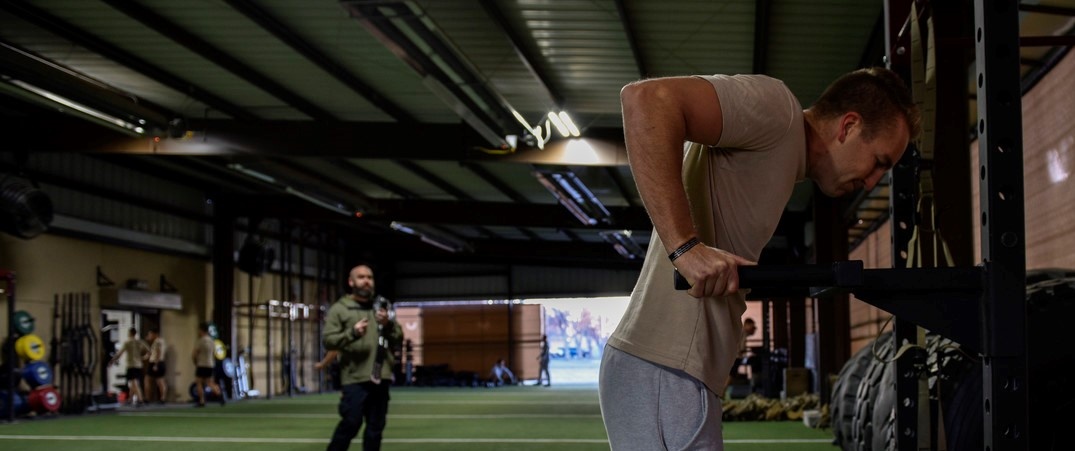
How to Do a Proper Dip Exercise
First of all, make sure you can do a dip.
Don’t hop up there and then lower yourself unless you’re fairly confident you can get through at least one of these things. We can’t have you tearing any muscles or falling on somebody, because that would suck.
Head to our progression plan if you can’t do a full dip yet.
Here’s how to do a proper dip exercise:
- Grab the parallel bars (or rings), and hoist yourself up. At this point look straight ahead, and contract your stomach muscles (just like when you do squats and deadlifts). If you’re keeping your abs tight for all of these exercises, you’ll never have to do a crunch again and you’ll still have washboard abs.
- Bend your knees if you like (so your feet are behind you), for stability purposes, but keep your head up and look straight ahead.
- Keeping your elbows at your side, lower yourself until your triceps are parallel to the floor. A lot of folks will recommend you go past parallel, but I think this puts too much strain on your shoulders at a weird angle and can cause injury/discomfort. I only go down to parallel and haven’t had any issues, so I’d recommend the same.
- Once you hit parallel, explode back up until JUST before you’re able to lock your elbows. By not locking your elbows, you keep the tension in your muscles and don’t jack up your joints. w00t.
- Now do another one. And then another!
Those are dips.
Keep your elbows as tight as possible, engage your abs, and hold your body in balance as you go up and down.
Are you doing it right?
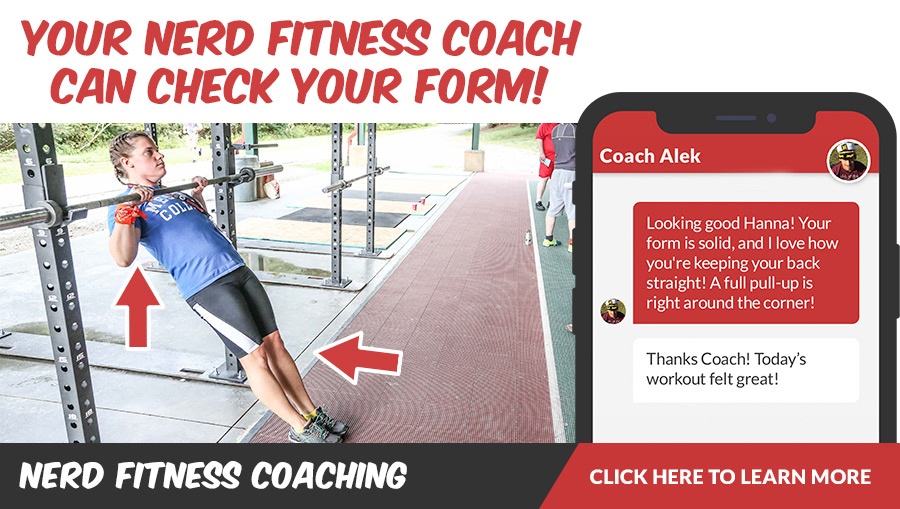
Check your form by recording a video of yourself and matching it against the videos and gifs here. If it looks close then you’re doing great!
Want to have an expert review your form? Our coaches can do just that in our spiffy app!
What If I Can’t Perform a Dip? (Progression Plan)

If you don’t quite have the strength to do a full bodyweight dip, follow our progression plan below.
You’ll be doing the complete dip movement before you know it!
Level 1 Dip Progression: Knee Push-Ups
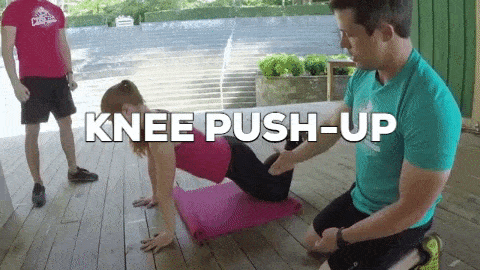
If you’re just starting to develop your push muscles, our first stop will be knee push-ups. We’ll build your strength up so you can start doing…
Level 2 Dip Progression: Push-Ups
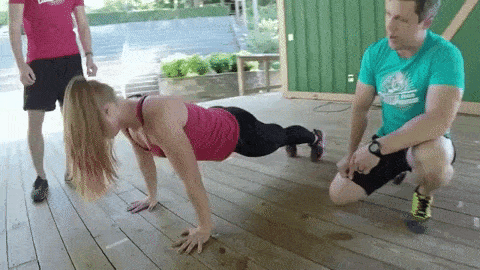
Can you do a push-up with proper form yet? If not, that’s our stop.
Push-ups will help you develop chest muscles for doing proper dips. Only after you can do 20 proper push-ups should you consider trying to do a dip.
Level 3 Dip Progression: Assisted Dips
It’s now time to do some dips! With a little bit of assistance…
We’ll use a resistance band to help support your weight while you grow stronger. You can progress with weaker and weaker resistance bands until you feel comfortable trying a proper bodyweight dip.
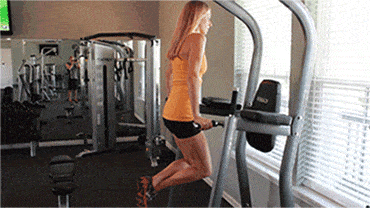
How about using an assisted dip machine?
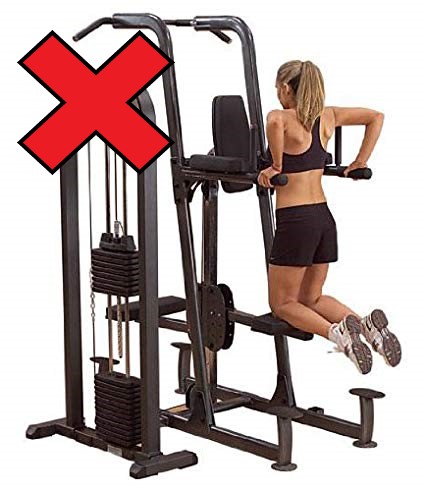
We’re not huge fans of machines here at Nerd Fitness.
Here’s why: an assisted dip machine stabilizes your body during the movement, which means your own muscles don’t need to do any of that stabilization work! We’d rather you stick with resistance bands than mess with this contraption, as it still makes your muscles work together throughout the movement.
Sure, if you don’t have bands and can ONLY do dips with the machine pictured above, it’s not the end of the world! Just make sure you are also doing other movements as well that DO recruit those stabilizer muscles (push-ups, presses, and so on).
If you find yourself getting stuck on “assisted dips,” you’re not alone. Lots of folks find it difficult to move beyond the support of the band.
We work hand-in-hand with people like you to master bodyweight training in our Online Coaching Program. If you don’t know how to add dips into your workouts, or you just want somebody to give you the exact workout to follow every day, we got you!
Tips and Tricks for Performing the Dip Exercise
Here are some extra tips on getting better at dips:
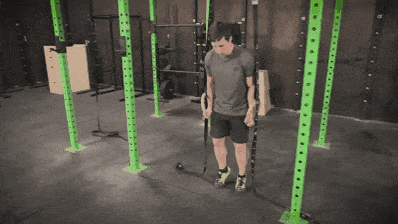
#1) Don’t swing – this goes for practically every exercise. If you start swinging your body as you go up and down, you take the emphasis off the muscles you’re actually trying to work.
Save swinging for the playground:

#2) Don’t flare out your elbows if you can avoid it – the more “out” your elbows are, the more emphasis on your chest. Elbows tight = emphasis on shoulders and triceps.
Nicholas Elorreaga does a good job showing the difference here:
#3) Don’t do half reps – again, this could be another universal rule. Challenge your muscles by bringing your triceps parallel to the ground, then make sure you extend arms to almost “elbows locked” at the top:

#4) Don’t go too fast – you want to be slow and in control during your dip. When you go too quickly, proper form is often sacrificed. Make sure you train safely by going slowly…this isn’t a race!
#5) Don’t settle for cheap substitutes – don’t use dip machines or other isolation tricep machines:

These don’t recruit any of your stabilizer muscles, put your body at weird angles, and don’t give you full results. Stick with bodyweight dips!
Variations on the Dip (Advanced Dip Moves)
Once you can do 3 sets of 15 dips no problem, you have a few options to ramp up the difficulty:
#1) Add weight to your bodyweight dips by:
- Picking up a dumbbell between your feet (challenging)
- Wearing a weighted backpack (awkward)
- Wearing a belt with weights hanging off it (what I do)
#2) Go Slower: keep your abs tight, and lower yourself ridiculously slow.
Your body will have to recruit every muscle in your chest, shoulders, and triceps (including all stabilizer muscles) to keep your body under control.
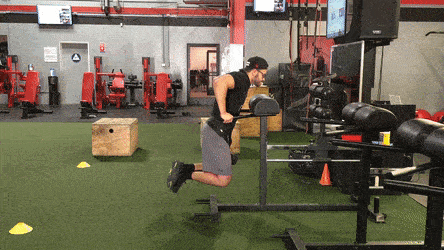
#3) Try Ring Dips:
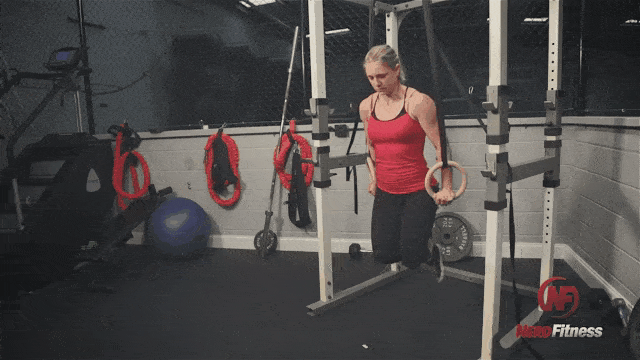
Lower yourself down until your chest touches the rings (yes, that low!) and then push up until you are in a straight arm support position.
If you’ve never played with gymnastic rings before, the instability of the rings will provide a greater challenge than your standard dip station.
You can also lower the height of your rings to utilize some support from your feet:
Raise the rings higher and higher as you grow stronger and stronger.
Make sure you check out our “Guide to Training with Gymnastic Rings” if you’d like to learn more.
When Should You Do Dips in Your Workout? (Getting Started)

Now that you know how to do dips, let’s discuss when to do them.
Unless you’ve been strength training for years and know what you’re doing, we recommend that you pick a full-body routine that you can do 2-3 times a week.
So let’s build a full-body workout right now!
You want a workout routine that has at least one exercise for:
- Quads (front of your legs).
- Butt and hamstrings (back of your legs).
- Chest, shoulders, and triceps: (“push” muscles).
- Back, biceps, and grip ( “pull” muscles).
- Core (abdominals and lower back).
Dips would make a great addition to your “push” muscles (chest, shoulders, triceps).
So a sample workout routine that includes dips could look like:
- Barbell squats: 5 sets of 5 reps.
- Barbell Deadlifts: 3 sets of 3 reps.
- Dips: 3 sets of 15 reps.
- Pull-ups (or chin-ups): 3 sets of 8 reps.
- Planks: 3 sets, 1 minute hold each.
That’s all!
Do your full-body workout and then go play some Nintendo.

Need some help getting started?
I have three great options to help you with your dip and strength training journey:
#1) If you want step-by-step guidance, a custom strength training program that levels up as you get stronger, and a coach to keep you accountable, check out our killer 1-on-1 coaching program:
2) Good at following instructions? Check out our self-paced online course, the Nerd Fitness Academy.
The Academy has 20+ workouts for both bodyweight or weight training, a benchmark test to determine your starting workout, HD demonstrations of every movement, boss battles, meal plans, a questing system, and supportive community.
3) Join the Rebellion! We need good people like you in our community, the Nerd Fitness Rebellion.
Sign up in the box below to enlist and get our guide, Strength Training 101: Everything You Need to Know. It’ll help you start incorporating dips into your training:
That should get you going on mastering the bodyweight dip.
Alright, your turn?
Do you head to the gym to crush dips?
Are you currently progressing through assisted dips?
Any tips or tricks we missed?
Let us know in the comments!
For the Rebellion,
-Steve
PS: Want to learn more? Read the rest of our Strength Training 101 series:
- Strength Training 101: Beginner Strength Workouts
- 6 Gym Workouts for Beginners
- How to Find a Good Personal Trainer
- Strength Training 101: Inverted Rows
- Strength Training 101: How to Squat
- Strength Training 101: The Press
- Strength Training 101: The Deadlift
###
Photo source: Fitness time, Lost, Assisted Dip Machine, Blue benny, Maltz Challenge, The Harbor Divers of Stone Town.
GIF source: Weighted dips, Bodyweight Dip.
Filed under: Fitness
 For now classes are 6pm and 640pm at 2840 Wildwood st in the Boise Cloggers studio.
Book your class NOW!
click this ==>
For now classes are 6pm and 640pm at 2840 Wildwood st in the Boise Cloggers studio.
Book your class NOW!
click this ==>


