
Originally Posted At: https://breakingmuscle.com/feed/rss

In this episode, I’m delighted to be joined by Jamie Lewis to discuss the history of strength training.
http://www.marksdailyapple.com/
 More and more people are questioning whether alcohol deserves a place in their lives. The popular media has dubbed this growing contingent of alcohol skeptics “sober-curious.” These folks aren’t so much worried that they have a serious drinking problem, though that might be a nagging thought in the back of their minds. Rather, they suspect that the negatives outweigh the positives, even if they only drink “moderately” (however they define it).
Sober-curious folks are ready to dabble in sobriety, yet the choice to stop drinking is a complicated one. Cutting out alcohol isn’t as simple as switching to mineral water and going on your merry way. For many, it means giving up a stress or anxiety release, a comfortable habit, and a way to unwind at the end of a long day.
Then there are the obvious social considerations. Drinking is woven into every aspect of social life, from celebrations to mourning, brunches with friends, first dates, work functions—you name it, alcohol is there. Drinking is so normalized that not drinking unsettles and perplexes other people more than drinking to excess.
The sober-curious crowd, which includes a growing contingent of young people, is ready to disrupt the system as they increasingly realize that a sober lifestyle has more to offer. Alcohol perhaps isn’t the cool best friend it’s supposed to be. It’s more like the sloppy, unhelpful roommate who needs a boot.
Disclaimer: This post isn’t aimed at people who believe themselves to be, or who have been diagnosed as, addicted to alcohol. It’s for people who are curious about exploring sobriety as an alternative to a life that includes alcohol consumption. If you need help, call your doctor or the SAMHSA National Helpline at 1-800-662-HELP (4357).
Let’s be clear: You don’t have to think you have a problem to realize that your life might be better with less—or no—alcohol.
An entire industry is growing up around the idea of sobriety. The market for boutique alcohol-free beverages is booming. You can find sober happy hours in any major city. The sheer number of books, blogs, long-form essays, Instagram accounts, and podcasts dedicated to getting sober is a testament to this sea change.
Overwhelmingly, the people telling their sobriety tales publicly were once on the precipice, their drinking behavior threatening to destroy everything, before they quit. These narratives are important, and you might see yourself in their stories. However, they don’t represent the entire sober-curious movement. Plenty of people don’t have tales of woe beyond the occasional hangover and retrospectively embarrassing karaoke session. Nevertheless, they think they’d be better off without alcohol. They’re usually not writing books about their path to sobriety, but their stories—and yours, if this is you—are equally valid.
Society tends to treat drinking as a binary: you’re a drinker or a non-drinker, period. In reality, there are shades of gray in the middle. One of your many adult responsibilities is to decide where you belong along the imbibing spectrum. You might want to drink less often or not at all.
In either case, breaking up with alcohol means tackling the very practical side of changing the behavior, as well as the much deeper—and usually much harder—work of filling the void that getting sober leaves behind. There’s no magic pill here. Some people will have an easier time than others, irrespective of how much they drink.
Below are some strategies to try, but this is not an all-encompassing list. Some might help, and others not at all. To be successful, you’ll likely need a variety of different tools and tricks at your disposal.
Drinking is a habitual behavior. At least, it is for anyone who thinks about quitting. You don’t quit things that aren’t ingrained; you simply don’t do them.
Habitual behaviors follow a predictable pattern:
Breaking habitual patterns comes down to interrupting that process. With something like alcohol consumption, it’s probably best to break the chain in as many places as possible.
One way to reduce the drive to drink is to avoid getting triggered in the first place. When it comes to drinking, that’s usually easier said than done.
Cues can be things (seeing your favorite crystal highball glass in the cupboard), people (your happy hour buddy), time of day (getting off work), places (sitting on your porch swing), or even emotions. Getting rid of the alcohol and barware in your house is a great first step. However, if feeling stressed is your main trigger, tossing the booze almost certainly won’t be enough. It’s not like you can snap your fingers and live a stress-free life. You can start to develop different tools for coping with stress without drinking, possibly with a therapist’s help.
For many people, their cues include friends or coworkers, or their favorite restaurants and bars. Ultimately, you may have to cut ties with certain people, switch jobs, or find new hobbies on your path to sobriety. You don’t necessarily have to start there, though, depending on your situation. There are other ways to engineer your environment:
If you’re comfortable doing so, tell people that you are doing a sobriety experiment.
People seem to accept sobriety more when you give it a cute name like “Dry July” or “Sober October.” Ask your friends not to invite you out for drinks or recount their drunken exploits to you for the time being. If you’ve been in the Primal community for a while, your friends are probably used to your “weird” self-experiments, like giving up grains, so they might not bat an eye.
Find or create sober spaces.
Thanks to the growing sober-curious movement, it’s easier than ever to find alcohol-free social options like sober dance parties, sober dating events, and even bars that specialize in fancy non-alcoholic concoctions. You shouldn’t have any trouble finding these types of events in any large-ish city.
If none exist in your area, you always have the option of starting social meet-ups yourself to get to know other sober-curious folks. Invite your friends to join you. Plan sober game nights or picnics. Go kombucha tasting instead of wine tasting. Do a couch-to-5k together. Lean on each other for social support.
The impulse to drink is usually accompanied by beliefs about how much better you’ll feel, or how much more fun you’ll be having, once you take that drink. A major focus of most addiction recovery programs is changing the thoughts you have around alcohol.
You’re thinking about quitting for a reason. See if you can start focusing on the negatives more than the positives. Come up with a mantra or affirmation that reminds you why you don’t want to drink:
Of course, you’ll probably need more than just a mantra, but it could be one piece of the puzzle.
When a craving hits, employ the same techniques you use to deal with sugar cravings: distract yourself, ride it out, or replace the alcohol with something you feel better about consuming. One technique that some addiction specialists use is a mindfulness-based tool called urge surfing. Fighting cravings makes them stronger, whereas tuning in to them and “riding the wave” allows them to pass more peacefully. Here is an example of an urge surfing meditation to try.
Try these delicious, refreshing summer mocktails recipes!
Nobody drinks because they want to raise their blood alcohol level. They drink because of the other stuff alcohol delivers: numbing, social connection, disinhibition, maybe even self-punishment. Ultimately, there’s nothing that alcohol offers that we can’t get by healthier means. Alcohol just happens to be readily available, fast-acting, and socially sanctioned.
An essential piece of the sobriety puzzle is learning to meet those needs in other ways. This requires self-awareness first—an honest exploration of why you’re drinking—and then effective tools to fill those voids without the downsides of drinking.
Your trajectory is going to be highly individual. Some #soberAF social media influencers will try to convince you that sobriety looks like walks on the beach, meditation, yoga retreats, and other “self-care.” Sure, bubble baths and meditation might help. I’d never tell you not to meditate. But, if your drinking behavior stems from unresolved childhood trauma, no amount of chanting om is going to deliver everything you need. You might very well need a competent therapist and a support group to arrive at your destination.
If quitting alcohol is your goal, and it feels important or urgent, then do what you need to do. Sure, in an ideal world, you’d replace drinking with a health-promoting, life-affirming habit instead. You’d go from drinking to transcendental meditation or training for an Ironman or learning another language or whatever. However, if in reality, you go from drinking every night to bingeing Netflix for a couple months until you have made a clean break from alcohol, so be it. You can work on becoming bilingual later.
I learned this simple but incredibly powerful statement from Melissa Urban, founder of Whole30. She discovered that when you tell people, “I don’t drink,” or “I’m not drinking,” they challenge you and want to know why. Adding the tiny qualifier “right now” mostly eliminates the pushback. Maybe it’s because, as a society, we have become accustomed to sobriety experiments like Dry January. Or perhaps it makes people less uncomfortable to process the idea of “right now” as opposed to “forever.”
It’s also a poignant reminder to yourself that you don’t have to commit to never drinking again. You don’t even have to worry about the party you’ll be attending this weekend or the wedding next month. All you have to do is keep making the choice right now, in this moment, not to drink.
Hundreds of roads lead to sobriety. Seek out sobriety and recovery stories from people like you, but also realize that there’s only one YOU. You have the freedom and the responsibility to find the path that is right for you. Your path won’t look exactly like anyone else’s, and that’s fine.
Some people will be able to do it on their own with no major hiccups. Others will need more structured support. You’re surely familiar with Alcoholics Anonymous (AA), but there are many, many other options out there that might suit you better. Don’t give up if the first one you try isn’t a good fit.
Many people believe that 100 percent abstinence is the only way to go. Others feel just as strongly that it doesn’t have to be all or nothing for everyone.
Instead of total abstinence, some folks opt for “mindful drinking,” which is exactly what it sounds like: making conscious, controlled choices about how much to drink and when. Mindful drinking approaches encourage you to drink more intentionally (and presumably, more moderately) without going completely dry.
In her book, We Are the Luckiest: The Surprising Magic of a Sober Life, Laura McKowen reminds us, “One of the definitions of sobriety is to be clearheaded. In that way, sobriety is about freeing yourself from any behavior, relationship, or way of thinking that enslaves you and keeps you from being present to life.” Ultimately, only you can decide what you need to do to be present or free, with or without alcohol.
As a final note, don’t be the person who challenges someone else’s sobriety. Just don’t.
When someone tells you they aren’t drinking, the only acceptable responses are, “OK!” and, “Can I get you some mineral water?” It’s never “Why?” or “Are you pregnant?” or “C’mon, one won’t hurt.” Don’t even consider, “Are you going to make me feel guilty for drinking?” Never be the reason that someone else feels pressured to take a drink they don’t want.
If you’ve tried your own sober experiment, share below what worked for you. What resources did you use? How did you navigate social situations where others were drinking? What did you learn?

The post Sober-curious: Experimenting with Ditching Alcohol and Going Dry appeared first on Mark’s Daily Apple.
http://www.marksdailyapple.com/
 I hope you enjoyed part one of this presentation. I’d like to you pay particular attention to the four prerequisites in your diet and fitness program that must be in place before you can properly benefit from explosive sprinting and jumping workouts. They were detailed at the end of part one, and to briefly recap they are:
Increasing all forms of general everyday movement is a broad and non-specific recommendation, which makes it more difficult to integrate into daily life. It’s time to focus on a life-changing centerpiece to meet this objective: A morning flexibility, mobility, core & leg strengthening routine. I do this every single day immediately upon awakening. What started as a pretty simple and non-strenuous 12-minute session has progressed gracefully over the past four years into a quite challenging session that takes a minimum of 35 minutes every day to complete – by choice. You don’t have to make a big production out of it if you don’t want to.
My integration of the morning routine into a habit has been a life-changing experience for many reasons. It provides discipline, focus, and structure to start my day, and I have a sense of pride that I have a streak going past four years and counting. This regimen elevates the fitness platform from which I launch all formal workouts, and especially helps with injury prevention.
The following is a simple template for a highly effective sprint workout.
I always take a 10-minute bicycle ride or jog to the running track. Usually I’m off into the warmup right after my elaborate morning routine, so I don’t need the additional stretching. Otherwise, consider doing some dynamic stretching after you complete your cardio warmup. You want to get your heart rate and respiration elevated, be breaking a light sweat, and central nervous system focused on delivering upcoming hard efforts.
Review the basic and advanced running technique drill videos for ideas. Even though running is a simple sport, developing correct technique is critical. This video will help you avoid common mistakes and dial in the most efficient technique for sprinting and all slower speeds. I’ve been really enjoying a focus on skipping drills. Many sprint coaches contend skipping is the single best way to refine good technique because you can isolate certain aspects of the running stride that are hard to focus on when running full speed. And also because the basic skipping movement and all variations are inherently explosive—just like good sprinting.
This video details 10 Ways To Skip. I typically circle a 400-meter running track two times and do all ten skipping styles shown. Work efforts are usually around 20 seconds (never longer).
Since I’m fully warmed up when I start skipping, these two laps have quite a high degree of difficulty. I’ll do a skip drill for about 20 seconds, jog for about 20 seconds, and then another skip drill. I’m breathing hard and my heart rate is elevated as I finish a sequence. I’ll end my two laps with the difficult hamstring kick outs as seen here on the advanced technique drills video. They have to feel good in order to proceed to real sprinting or hard jumping. On occasion when I feel too sluggish with the skipping drills, I’ll just head home with an aerobic cooldown and wait for a better day. This is an extremely important admonition. Sprinting or jumping when the muscles or central nervous system are fatigued is a recipe for big trouble in the form of injury or an ineffective workout with extended recovery time at the very least.
Preparatory efforts where you accelerate up to nearly full speed and then immediately slow back down. Your accelerations last 4-5 seconds before you slow down. This is just revving the engine for the formal sprints ahead. Focus on precise and explosive sprinting techniques. If you notice any tightness or imperfections in your technique, this is a good final checkpoint to consider skipping the main sprints.
I’ll do four to eight 80 meters sprints with at least one-minute rest between efforts. My 80- meter efforts take me 11-12 seconds, so I’ll rest at least five times longer than the sprint, or around 1:00.
This honors what Dr. Craig Marker calls “luxurious” rest intervals in the HIRT protocol. During the recovery period, you want your respiration to return to near normal and your nervous system to return to what sports scientist Dr. Tudor Bompa calls an, “optimally excited and uninhibited” state—you are psyched to take on the next sprint! This is a big difference from toeing the line with your tongue hanging out, hoping you can “survive” three more. I had to learn to ditch my endurance athlete mindset at the chain-line fence I hopped to access the track, and instead treat my body and my psyche with the delicate sensitivity shown when training thoroughbred racehorses.
Surprising as it may seem, you never need to do anything more than eight times 80 meters for a template sprint (running) workout. Those new to running sprints can start out with four times 80 meters and progress up to eight. The only reason to run longer sprints is if you have competitive goals, where you encounter high risk for minimal extra payoff (more shortly.) Trying to sprint for longer than 20 seconds invites cellular breakdown, increased recovery time, and appetite spikes in the aftermath. If you keep your sprints between 10-20 seconds, you are burning ATP and creatine phosphate for fuel instead of blasting through your glycogen stores.
Taking insufficient recovery time between sprints is another way to trash yourself and compromise the intended benefits of the workout. This is a mistake I made for 13 years with my sprint workouts because I inappropriately projected my endurance athlete mentality into my sprint training. Mind you, I could perform my sprints on short recovery intervals just fine because of my strong endurance background. I recall an all-comers meet a decade ago where I achieved something not even Usain Bolt could ever dream of. I ran a 100-meter race and was disappointed with my performance. So I jogged back to the starting line and lined up in the blocks to participate in the next heat. After perhaps a minute of rest, I improved my time by 1/10th of a second, and was only 3.5 seconds off the world record! (For those uninitiated to track & field stats, this is a joke that happens to be true.)
When one is pumped up and ready for a peak performance session, the potential drawbacks are not perceivable in the moment. The problem when you perform explosive efforts with short recovery is that you experience that aforementioned cellular breakdown and increased recovery time in the hours and days afterward. For so long, I associated sprint workouts with waking up the next day feeling beat up, calves sore to the touch, and needed to crash out for a big nap in the afternoon. After all, this was a centerpiece workout with huge fitness benefits that you only do once every 7-10 days, right? Alas, there is a cutoff point where a workout becomes too difficult for maximum benefit, and toning things down can be a much better strategy. With a correctly designed sprint workout, I can perform significantly more of them over the course of a year, not have to waste precious resources repairing sore muscles, and not challenge my general health and hormone function with high-stress workouts.
If you’re performing low- or no-impact sprints on a stationary bike, cardio machines, rowing, or running uphill or upstairs, you can sprint for longer and do a few more reps than you can with running sprints. The lower degree of difficulty of the activity, the more the body can handle. For example, Olympic sprinters spend perhaps 1-2 hours a day on the track, with just minutes of explosive effort in total. By contrast, Olympic swimmers spend 4-5 hours a day in the pool, including numerous high-intensity sets and sprints. With low impact activities, you can sprint for up to 20 seconds, but keep the range between four and eight and keep the rest “luxurious,” at least one minute. Maximum benefits accrue with high impact running (bone density, fat reduction signaling), so strive to progress to running sprints if at all possible. Whether running or doing low-impact, you always want to set your sights on going faster rather than adding more sprints or taking less recovery than what’s recommended here.
So you’re not a jumper you say?! Even if you don’t dream of Olympic bronze like me, I strongly encourage you to consider adding jumping to your training regimen. Leaving the earth to briefly experience the theory of gravity viscerally is one of the quintessential human movements, yet even many highly devoted fitness enthusiasts never get air time of any kind. The reason sprinting on flat ground and jumping are the best fat loss workouts is because the penalty for carrying extra non-functional weight is so severe (unlike non-weight bearing sports like swimming or downhill skiing, or moving at lower levels of intensity). This is why you never see a fat sprinter or high jumper!
Sprinting and jumping send strong genetic signals to shed excess body fat so you might find yourself more adapted for ensuing sessions. Even with workouts lasting less than 30 minutes in total, and cumulative explosive efforts totaling only a few minutes (e.g., 8 x 12-second sprints, plus a dozen difficult technique drills lasting 10 seconds each totals 3.6 minutes), the metabolic benefits are experienced for days afterward.
This is a concept known as excess post-exercise oxygen consumption (EPOC)1 – your metabolic rate increases in response to the extreme energy expenditure during the workout. What’s happening with EPOC is that your body is working hard on cellular repair, hormone rebalancing, building new and stronger muscles and mitochondria, replenishing fuel sources like ATP and glycogen, replenishing depleted neurons in the central nervous system, and so on. Countless studies have validated that a little goes a long way such that a properly conducted explosive sprint or jumping workout or a resistance training session, can deliver a greater return on investment than lower intensity workouts2 lasting five times longer.
All manner of jumping can also improve bone density, balance, and resilience against all kinds of athletic or everyday physical injuries. Dr. Michael Roizen, co-author with Dr. Oz of the popular You: The Owner’s Manual health book series and leader of the Cleveland Clinic Wellness Institute, says you can preserve bone mass in the spine and lower extremities by simply jumping up and down 20 times, every morning and every night. The attributes of bone density and better balance, general mobility and athleticism also represent some of the most important longevity attributes, because it’s the number-one cause of injury and death.3 in American’s over age 65 is falling. A simple falling incident with a frail senior can spell doom because the recovery time restricts activity and leads to further atrophy. This increases the risk of accidents from even the most mundane of daily activities. Many falling victims never get back up after breaking a fragile femur bone and being bedridden for so long that there’s not enough strength to get back up even with the initial break healed.
When I go through my sequence of jumping drills, I’m honoring the principles of sprinting where my work efforts last between 10 and 20 seconds with plenty of rest between sets. A single set of jumping drills isn’t as tough as a sprint of the same duration, so I’m resting maybe 20-30 seconds between work efforts instead of 60.
Usually I’ll do ~14 sets, which means most but not all of the advanced suggestions here. If you are a novice, focus on the basic drills and limit the duration of your sets to 10 seconds. You can try to work in some advanced drills over time and extend the duration of your work efforts up to 20 seconds, but never over. As with technique drills and sprints, end the set if you notice technique or explosiveness falter.
Here is a template for a fun and effective jumping workout:
There are a lot of options here but please don’t get overwhelmed. 2004 Olympic high jump champion Stefan Holm, who holds the world record for jumping a differential of 2’0” over his height (5”10” with high jump personal best of 7’10”), suggests getting really good at a handful of your favorite drills and perfecting them. He’s pretty good at Holm Hurdles (they are 5’0’ high!). If you haven’t left the ground in a while, you can start with the basic drills and just do a few of them each time you work out. Baby steps count for a lot when you head in the direction of sprinting and jumping, so get started right away and strive to make steady progress over time. Good luck!!

References
The post Sprinting, Jumping, Losing Body Fat, (And Cultivating Gratitude), Part Two appeared first on Mark’s Daily Apple.
Originally Posted At: https://breakingmuscle.com/feed/rss

As a coach, I have seen so many variations of bar muscle up progressions. Many I have seen are extremely dangerous and involve bands, boxes, and a lack of proper skill and strength foundations.
This article is going to explain the proper foundational movements to get your first bar muscle up – and how to get that first bar muscle up without injuring yourself in the process.
;
http://www.thealternativedaily.com/
Your nose is probably not the first body part that you think of when you hear the words “self-care;” however, looking after this vital organ is essential to overall health and wellbeing. Did you know that your nose contains your breath? Along with your mouth, your nose is the pathway of air entering and exiting […]
http://www.marksdailyapple.com/
 Is there a comfort food more perfect than a stack of pancakes? We leveled up your basic grain-free pancake recipe with coffee and hazelnuts for roasty, nutty perfection on a plate. Serve them with a touch of maple syrup or maple-flavored monk fruit syrup if you want to keep your carbs on the low side. Top your coffee infused hazelnut pancakes with some of the toasty chopped hazelnuts for an added crunch, not to mention a photo worthy of the ‘gram.
Here’s how to make them.


Place hazelnuts (we used roasted hazelnuts) in a high speed blender and blend until a fine flour forms. Don’t blend too long or you’ll get the beginnings of hazelnut butter. Measure out ¾ cup of the hazelnut flour and move to the next step.
In a bowl, whisk together the coffee, coconut oil, milk and vanilla extract until the coconut oil is melted and the mixture is combined.

Add the ground hazelnuts, ground flaxseed, tapioca starch, coconut flour, baking powder and ground coffee and whisk together. Add the monkfruit sweetener to taste (we used about 4 drops, but sweeten to fit your tastes).

Whisk in the eggs and mix until the batter is smooth.
Heat a pan over medium heat on your stovetop. You can use a small skillet or regular 9” one. Once hot, add a small amount of coconut oil (about 1-2 teaspoons or so) and swirl it around the pan. Quickly scoop the batter out into 1, 2 or 3 pancakes on the pan, depending on the size of your pan. Allow them to cook until the edges of the pancakes are bubbling and slightly set, then carefully flip them. Allow them to cook on the other side until the pancakes are fairly firm. Remove the pancakes from the pan with a spatula.
Add a little more coconut oil to the pan and repeat until you’ve used up all of the pancake batter. Enjoy as is or top with a little bit of syrup and chopped hazelnuts.


Tips:


Grain-free pancakes infused with coffee and hazelnuts for a roasty, nutty spin on this classic comfort food.
1/4 cup strong coffee
2 tbsp. soft coconut oil
2 tbsp. Milk of choice
1/2 tsp. Vanilla extract
3/4 cup ground hazelnuts (roasted)
2 tbsp. ground flaxseed
2 tbsp. tapioca starch
2 tbsp. coconut flour
1 tsp. baking powder
1/4–1/2 tsp. ground coffee
4 drops monk fruit extract sweetener
3 room temperature large eggs
Coconut oil for the pan
Place hazelnuts (we used roasted hazelnuts) in a high speed blender and blend until a fine flour forms. Don’t blend too long or you’ll get the beginnings of hazelnut butter. Measure out ¾ cup of the hazelnut flour and move to the next step.
In a bowl, whisk together the coffee, coconut oil, milk and vanilla extract until the coconut oil is melted and the mixture is combined.
Add the ground hazelnuts, ground flaxseed, tapioca starch, coconut flour, baking powder and ground coffee and whisk together. Add the monkfruit sweetener to taste (we used about 4 drops, but sweeten to fit your tastes).
Whisk in the eggs and mix until the batter is smooth.
Heat a pan over medium heat on your stovetop. You can use a small skillet or regular 9” one. Once hot, add a small amount of coconut oil (about 1-2 teaspoons or so) and swirl it around the pan. Quickly scoop the batter out into 1, 2 or 3 pancakes on the pan, depending on the size of your pan. Allow them to cook until the edges of the pancakes are bubbling and slightly set, then carefully flip them. Allow them to cook on the other side until the pancakes are fairly firm. Remove the pancakes from the pan with a spatula.
Add a little more coconut oil to the pan and repeat until you’ve used up all of the pancake batter. Enjoy as is or top with a little bit of syrup and chopped hazelnuts.
For a stronger coffee flavor, use more ground coffee, or espresso powder.
We like using roasted hazelnuts for this recipe, but regular raw hazelnuts should work as well.
Keywords: gluten free pancakes, gluten free hazelnut pancakes, hazelnut pancakes, paleo pancakes
The post Gluten-free Coffee Infused Hazelnut Pancakes Recipe: Paleo, Primal, and Perfect appeared first on Mark’s Daily Apple.
Originally Posted At: https://breakingmuscle.com/feed/rss

The age-old desire to build a strong, well-proportioned physique is still alive and well. Yes, the average gym-goer no longer yearns to build a monstrous, freaky, eye-popping body complete with gnarly veins, huge, stumpy legs and the inability to fit into a dress shirt.
But everybody in the gym still wants to build an appreciable amount of muscle and strength. And they want to actually see the results of their hard work without it being hidden under a layer of unwanted body fat.
http://www.marksdailyapple.com/
 I’d argue that mindfulness is one of the biggest health trends of our time. It promises less stress, more inner peace, and a solid dose of self-awareness. It’s also a multi-billion-dollar industry, from apps that dole out guided meditations to full-on retreats in tropical locales.
But before you download the paid version of Headspace or investigate roundtrip fares to Bali, ask yourself this important question: Am I ready to stop operating on autopilot, repeating the same less-than-healthy patterns over and over again?
I’ll let you ponder one that for a minute.
Mindfulness is a 2,500-year-old practice. It’s the ability to be fully present, where you’re totally tuned into what’s happening, what you’re doing, and why you’re doing it — in the moment and without judgement.
A lot of my health coaching clients are convinced they’re being mindful when it comes to their eating habits, yet somehow, manage to polish off a bottle of wine or wheel of cheese without realizing it. Now, I’m all for hedonistic behaviour, but if your choices leave you full of regret, shame, and guilt, it’s probably worthwhile to pursue a different strategy.
Mindfulness isn’t for the faint of heart. It also isn’t great for perfectionists (if you’re determined to “get it right”), those with limited patience, or anyone looking for a temporary fix. Or if you don’t believe change is possible.
Contrary to most things in our instant gratification world, you probably won’t get results right away. Which is why mindfulness isn’t a great fit for everyone. In fact, one study showed that it can actually make stress worse, although it’s not clear if the outcome was related to the participants’ mindset, their mode of mindfulness, or a combo of both.1
Another struggle that comes up with a mindfulness practice is that it can be uncomfortable to take a good hard look in the mirror. When you embark on a mindfulness journey — and stick with it — you will reprogram your thoughts and actions. Assuming you want to, you’ll begin to recognize your self-sabotaging behaviours and establish different habits. Heck, you might even start to like yourself more.
In this study, researchers from the University of Utah recruited 1089 undergrads, ranging in age from 18 to 53, to complete questionnaires about different traits:2
Researchers found that the more mindful students also reported experiencing more well-being. Diving deeper, they also discovered that certain aspects of mindfulness were more impactful than others, specifically, students who were non-judgmental about their thoughts and feelings had a clearer and stronger sense of self. One researcher adding, “If we don’t expect to beat ourselves up for our flaws, we may be more willing to take a clear look in the mirror.”
Obviously, there are benefits to embracing mindfulness, from having more self-compassion to changing your relationship with food. But is it right for you? It might be, if you fall into one of these categories:
If beating yourself up, or feeling guilt, shame, or other useless emotions hasn’t worked for you in the past, perhaps you’re open to trying something different. Perhaps you’d be keen on doing something that didn’t require forcing, white-knuckling, or falling off a wagon.
It’s one thing to decide to be more mindful, but it’s something entirely different to know how to do it. And that’s the secret sauce the separates the folks who start to move the needle on their thought patterns (and health goals) from those who struggle to get started.
Most people think being mindful means they’ve got to commit to an hour-long daily meditation practice with ornate pillows, dimmed lights, and chanting voices. Setting unrealistic expectations will only make you feel worse. Instead, start with something that feels easy that you can do anytime and anywhere.
Try this: Your brain craves periods of stillness, so step away from your phone, TV, computer, and yes, family members, and sit quietly, taking a much-needed pause from the constant flood of info coming at you. For 30 seconds, do nothing except for being still and breathing. Can’t sit still the whole 30 seconds? Totally normal. Do the best you can, and, this is key, don’t judge yourself for what you can or can’t currently do.
Is it shallow and fast or deep and calm? Your breathing affects your mind, so if you’re someone who’s constantly overthinking, worrying, anticipating, or stressing, I’d recommend reviewing your breathing patterns. This study from the Journal of Neurophysiology shows how deliberate breathing activates different parts of the brain associated with emotion, attention, and awareness.3
Try this: Consciously inhale and exhale to a set rhythm. I personally love “triangular breathing,” a variation of box breathing, where I inhale for six seconds, hold for two seconds, and exhale for eight seconds. It doesn’t have to be that complex either, just slow down your breathing, making your exhales longer than your inhales. Not only can this make you feel calmer and more focused, it has the power to regulate your nervous system and allow you to be still in the present moment, aka mindfulness.
Consciously or not, you’re constantly judging yourself and others. Dozens of times per day, you’re evaluating your decisions, appearance, and self-worth, replaying scenarios and conversations, and trying to mentally strongarm outcomes that are out of your control. It gets exhausting. On a subconscious level, judgements are how you protect yourself, and you know how much your brain likes to keep you safe. You don’t have to be thrilled with every thought or emotion, but it’s worth your while to a create safe place for them to live — even for 30 seconds.
Try this: This is the time to notice, not to fixate and freak out. It’s an opportunity to sit with uncomfortable emotions and give yourself room to feel them in the moment. So, practice observing your thoughts without reacting to them. The more you practice embracing all the parts of you (the good and the painful), the easier mindfulness will become.
Thanks to the pandemic, we got fairly used to staying indoors, working too much, perfecting our sourdough and banana bread recipes, and completely neglecting the great outdoors. But there’s something so freaking magical about the great outdoors. The grass, the trees, the dirt, and of course, the fresh air. Being surrounded by nature has some pretty powerful benefits too, including reducing muscle tension and blood pressure, decreasing cortisol, and boosting endorphins.4
Try this: Take a walk in the woods, move your yoga practice to the backyard, or just stand in the grass barefoot and notice the sights, sounds, and smells. Connecting with nature allows you to slow down and be more present, which is what mindfulness is all about. Can’t get outside? Evidence suggests even just looking at photos of natural landscapes can have similar benefits.5
Wouldn’t it be nice to feel less stressed and less critical, rather than racing through each day overwhelmed, overworked, and believing you’ll be happy if you could just get to the other side of your challenge du jour? Listen, mindfulness isn’t for everyone. But if you’re ready to flip the script on your current mindset (and I think you are), use these tips to get started:
What do you think? Does mindfulness work for you?

The post Why Mindfulness Isn’t for Everyone appeared first on Mark’s Daily Apple.
Originally posted at: http://www.nerdfitness.com/

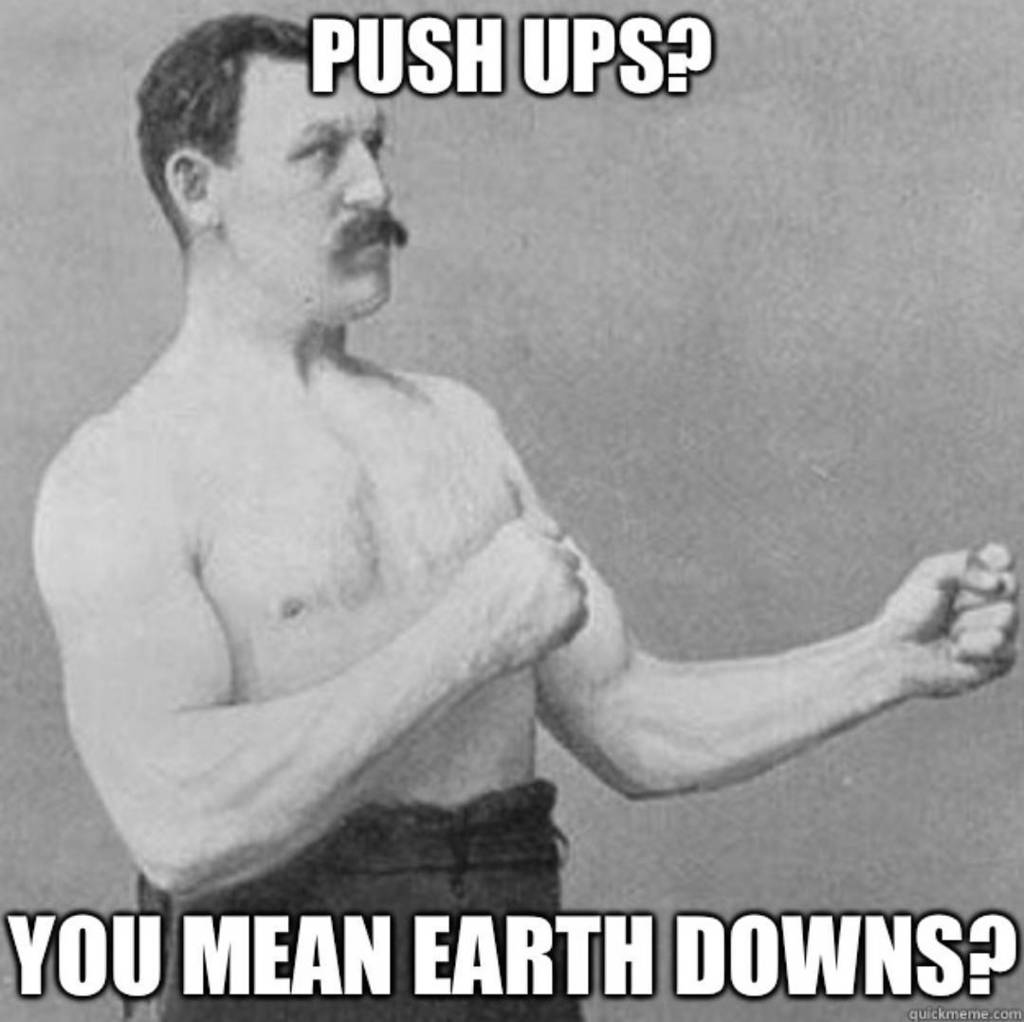
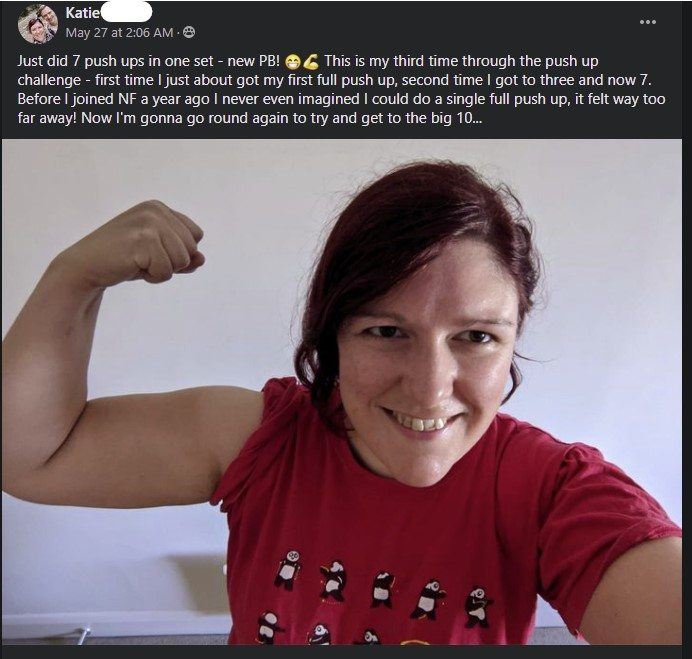
Today I’m going to help you achieve your first push-up!
Yep, I know that sounds super confident. But it’s because I have a push-up progression plan that’s helped loads of clients in our Online Coaching Program crush their first push-up.
Here’s what we’ll cover:
Follow our guide and you’ll be doing “Earth Downs” in no time:
Let’s get started.
As I discuss in the video above, the most important part of your push-up progression plan: consistency.
Yeah, I know, there’s nothing too earth-shattering there.
But no matter what your current strength level is, the best way to work towards a push-up is to train your push muscles consistently. No matter where you’re starting today.
This is how our friend Mason went from wall push-ups to regular push-ups, then all the way to diamond push-ups.
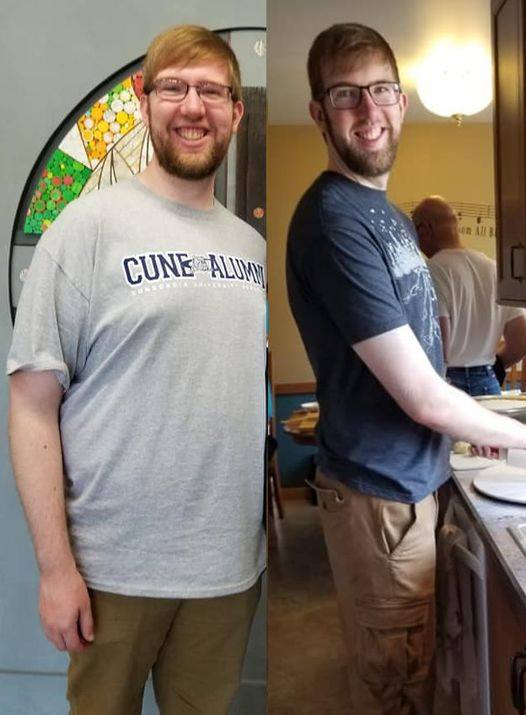
Oh, and he lost like 70 pounds along the way too!
I’ll discuss push-up variations you should start with in the next section. Plus, we’ll wrap up today’s guide by discussing just how often you should train your push muscles.
Just remember, if you want your first push-up (and you should, cause push-ups are awesome), then you’ll need to be consistent with our push-up progression plan.
Cool?
Cool.
Our first stop on the Push-up Progression Plan: finding a push-up variation for you to become comfortable with. Something you can do about 8-10 reps with, for about 3-4 sets.
To start, you’ll probably train with an elevated push-up variation:
These will be easier than a regular push-up, since the higher the elevation, the less of your body’s weight you’ll be lifting during the movement.
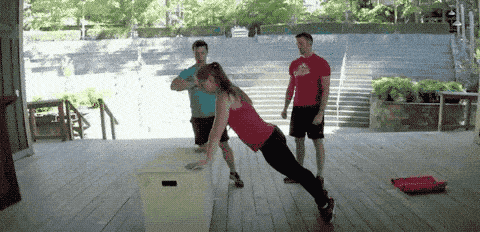
Conversely, if you were to elevate your feet, you’d actually be lifting more than a regular push-up:
Here’s a rough breakdown of the percentage of your bodyweight lifted for different elevations of push-ups:[1]
The strategy behind our push-up progression plan is to slowly move you down to the ground, lifting more and more of your own weight as you go.
Think of it like gaining XP in a video game, so one day you’ll be able to tackle the final boss: the floor.

It might help to pretend there’s a witch below it.
Alright, let’s show you exactly how to do some of these push-up variations.

The push-up variations below can be thought of as benchmarks.
If you can’t complete 8-10 reps or hold for 60 seconds, nbd.
We’ll have you train at the level below and you’ll move up before you know it.
Here are 7 variations for our Push-up Progression Plan:
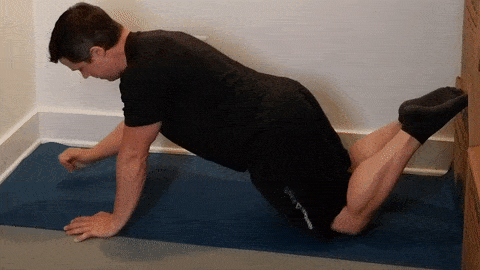
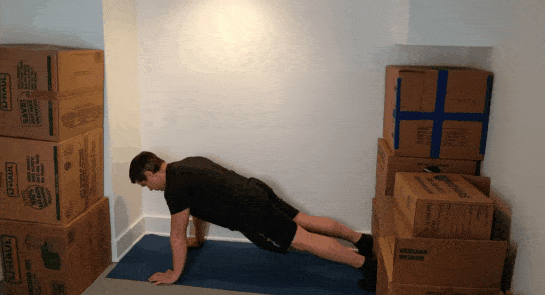
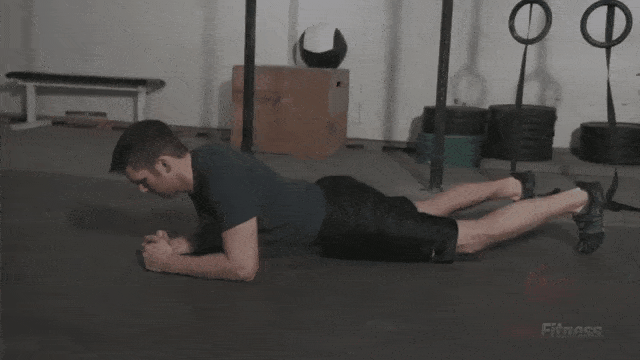
Hold yourself up on your forearms and knees, with the body in a straight line from shoulders to knees.
Lie on the floor with your forearms flat, making sure that your elbows are aligned directly under your shoulders.
Engage your core and raise your body off the floor in a straight line from head to feet, keeping your forearms planted. Try not to let your hips rise or drop.
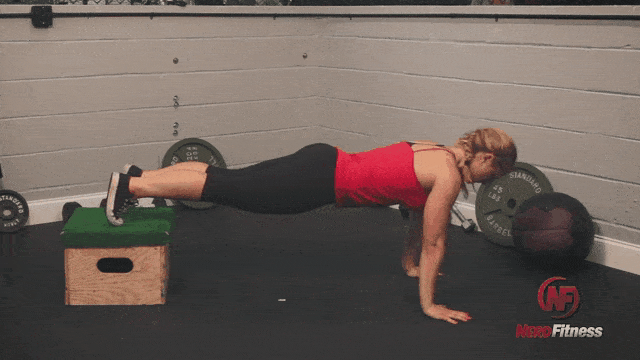
Hold yourself up at the top of a push-up position, with the body in a straight line from shoulders to feet.
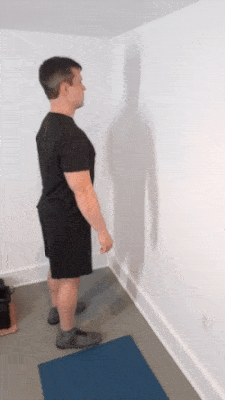
Place your hands on a wall about chest weight (roughly 4′, 48″, or 122 cm). Bend your arms and get as close to the wall before pushing back up.

Place your hands on a surface about waist high (roughly 3′, 36″, or 92 cm). Bend your arms and touch your chest to the surface before pushing back up.
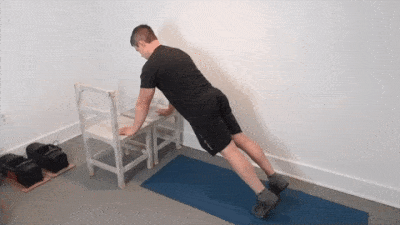
Place your hands on a surface about knee high (roughly 1.5′, 18″, or 46 cm). Bend your arms and touch your chest to the surface before pushing back up.
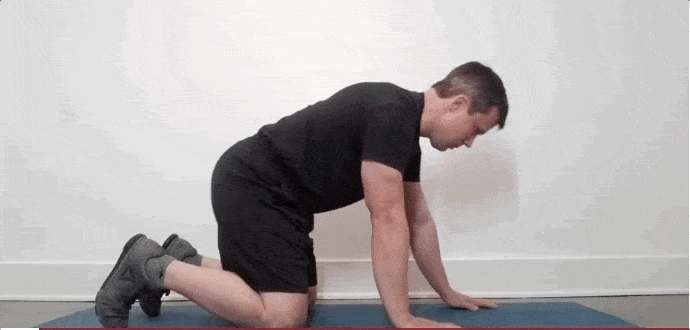
Hold yourself up on your hands and knees, with the body in a straight line from shoulders to knees. Lower down to the ground before pushing back up.
You made it to a push-up!
Are you doing them correctly?
Our next section will dive into the correct form, since this is a guide on getting your first proper push-up (I wouldn’t hold out on you).
But first, you may be asking yourself a question: when do I progress up to the next level?
For that, I’d recommend downloading our new app (it’s free to try out).
Nerd Fitness Journey will guide you through a workout routine specifically designed to help you get your first push-up, with benchmarks and signals on when to move up.
Plus, you get to earn actual XP so you level up your very own superhero!
You can give it a free test drive right here:


The video above walks you through the correct way to do a proper push-up, and also includes a few well-placed jokes from yours truly.
Here’s how to complete one perfect push-up:
Here are 4 common mistakes I see with push-ups:
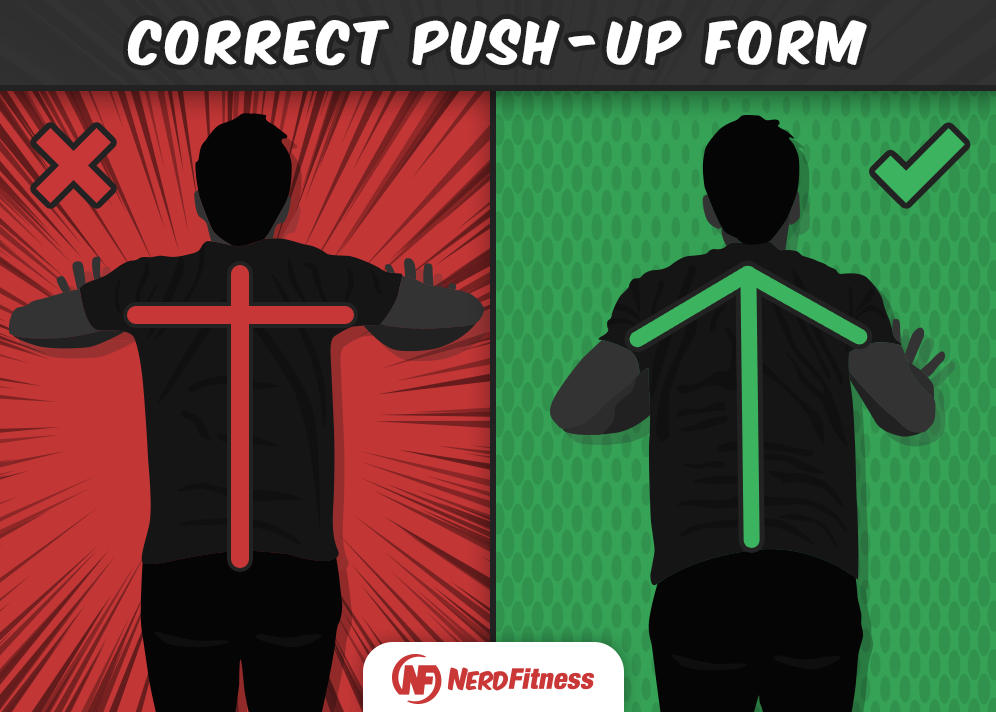
#1) Make sure you keep your elbows in. Often, beginners will flare out their elbows when doing a push-up.
A good way to think of this, is you want your body to appear more like an ARROW from the top, not a T.
This infographic on the proper push-up form shows you want I mean:
#2) Keep your head in line with your body. We don’t want your head shifting forward, which could put unnecessary stress on your neck and prevent a full range of motion.
#3) Keep your hips in line with your body (no sagging). We want you in one straight line as you push your body up and down:
#4) Attempt to do a full range of motion with your push-up (as long as it’s pain-free). Shoot to come all the way down, so your chest is touching the ground or the object you’re doing push-ups against.
If you want more help here, we have a full guide on how to do proper push-ups, (including advanced variations to try).

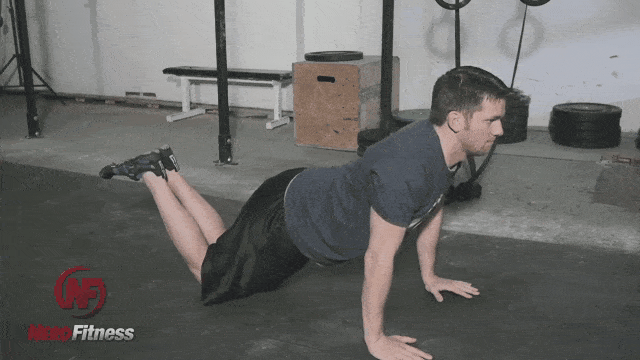
There are two exercises that will go a long way towards achieving your first push-up:
First, let’s talk about push-up negatives.
“Negative” in exercise terminology generally means only doing half of a traditional rep, normally lowering the movement.

To do a Push-up Negative:
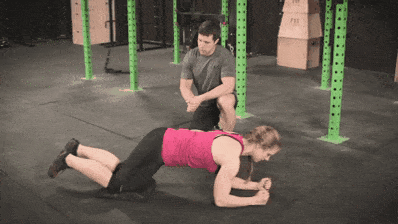
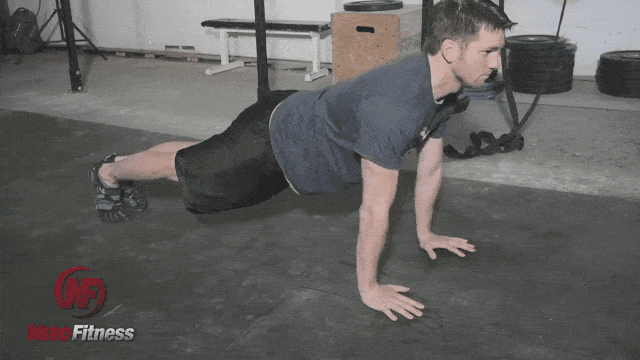
Next, let’s talk about Front Planks or Holding at the Top of a Push-up.
This is important for a few reasons:
If you follow the Push-up Challenge in NF Journey, you’ll notice that pretty much every workout ends with a type of one of these holds, since core strength is so critical for push-ups.
Oh, and if you want to just try Nerd Fitness Journey to see what I mean, you can do so right here:


Remember earlier when I said the name of the game with push-up progression is consistency?
To show you what I mean, it’s time to build a workout for conquering push-ups.
I’d recommend three workouts a week for a Push-up Progression Plan, with a rest day between.
Could be Monday-Wednesday-Friday or Tuesday-Thursday-Sunday.
As long as there’s a day off between workouts, it’s fine.

Oh, and if you can only do two workouts a week, that’s okay too. Just do the best you can (even once a week).
The “Get Your First Push-up” Workout is:
Let’s dive into each of these a bit more.
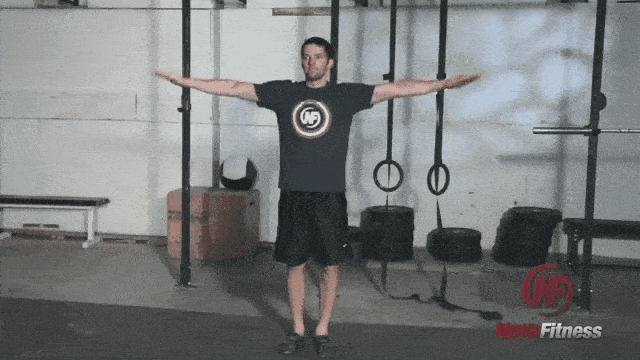
Arm circles for push-ups will look like this:
Wrist stretches for push-ups will look like so:

You can always do a more formal warm-up routine, but just make sure you include some variation of these two moves.
Earlier, we went through 7 variations that will help you get your first push-up.
After your warm-up, you should train with one of them.
For our Push-up Progression Plan, I want you to alternate between two variations:
For example:
After you train with your push-up variation, I want you to attempt 2-3 reps of a negative push-up.
If these are too tough, simply do an easier variation, like knee push-up negatives:
Any of the 7 variations we discussed earlier can be done as a “negative.”
These negatives will be important, as they’ll go a long way towards building strength for a regular push-up.
We’re going to end our “Get Your First Push-up” Workout with a hold:
Choose whichever variation you like, but attempt to hold the position for a full minute, with as few sets as possible.
If you need to break up the 60-second hold, you could:
Just aim to go longer and longer as you go.
These holds will help strengthen your core, which will be critical for doing push-ups with proper form.
Oh, and if you want someone to modify this workout for you (let’s say you also want to do some HIIT for fat loss) our 1-on-1 Online Coaching Program can do just that.
Plus, your coach can review your movements through our app so you’ll know your training correctly and safely.

That should give you everything you need to get started with the push-up progression plan.
Remember, your “Get Your First Push-up” Workout is:
Do this three times a week, with a day of rest between workouts, and you’ll be good to go.

As you continue on the Push-up Progression Plan, remember to keep pushing harder. We want you slowly but surely increasing the challenge of the workout (known in the biz as “progressive overload.”)
This could be:
Oh, and if you need any help along the way, I gotcha boo.
Here’s how to continue your journey with Nerd Fitness.
#1) Our Online Coaching Program: perfect for someone who wants an expert (like me!) to design the right path for conquering push-ups. We’re all different, so why not have a coach guide you through a program that’s custom-made for you?
You can schedule a free call with our team so we can get to know you and see if our coaching program would be a good fit. Just click on the image below for more details:
#2) If you want an exact blueprint for crushing push-ups, check out NF Journey. Our fun habit-building app helps you exercise more frequently, eat healthier, and level up your life (literally).
Plus, our 6-week Push-up Challenge has helped quite a few Rebels achieve their first push-up!
Try your free trial right here:
#3) Join the Rebellion! We need good people like you in our community, the Nerd Fitness Rebellion. You’ll meet individuals from all different walks of life, all of whom are trying to level up their lives.
Sign up in the box below to enlist and get our “Strength Training 101: Everything You Need to Know” guide, which will teach you exactly how to grow strong enough to rock push-ups:
Download our comprehensive guide STRENGTH TRAINING 101!
Alright, I want to hear from you now:
Can you do a proper push-up?
If not, what level are you on?
Are we missing any helpful suggestions for a beginner?
Let me know in the comments!
-Jim
PS: Check out the rest of our guides on doing push-ups:
###
Photo source: Gecko push-up; Figure push-up; 102, 103, 104…; doll push-up, push-up sunset;
The post The Push-up Progression Plan (Get Your First Push-up!) first appeared on Nerd Fitness.
 For now classes are 6pm and 640pm at 2840 Wildwood st in the Boise Cloggers studio.
Book your class NOW!
click this ==>
For now classes are 6pm and 640pm at 2840 Wildwood st in the Boise Cloggers studio.
Book your class NOW!
click this ==>


